
If you have been searching for a foolproof marble cake recipe, this is the one you need to bookmark right now. Marble cake is the ultimate compromise for anyone who can never choose between chocolate and vanilla, and this version delivers the best of both worlds in every single slice. The swirling ribbons of rich chocolate batter winding through a buttery vanilla base are not just gorgeous to look at; they create a cake that is wonderfully moist, tender, and packed with flavor.
What makes this recipe special is the technique. Instead of making two completely separate batters, you start with one master vanilla batter and simply set aside a portion to mix with melted semisweet chocolate and cocoa powder. This creates a deeper, more pronounced chocolate swirl than cocoa powder alone, and it keeps the texture beautifully consistent from crumb to crumb.
This cake works for birthday parties, weekend baking, afternoon tea, or any time you want something that looks impressive without requiring professional skills. Once you master the swirling technique, it becomes one of those recipes you come back to again and again.
You might also enjoy: Checkerboard Cake Recipe
Why You’ll Love This Marble Cake Recipe
This is the kind of cake that earns compliments every single time you bring it to the table.
It is genuinely beginner-friendly. The swirling technique sounds intimidating, but all you need is a butter knife and a light hand.
Both the chocolate and vanilla flavors are equally strong and satisfying. Neither one overpowers the other, which is the hallmark of a truly balanced marble cake.
The crumb is incredibly tender thanks to buttermilk, which adds moisture and a subtle tang that keeps the cake from tasting flat.
Using a combination of butter and oil is the key to getting that bakery-style texture. Butter provides rich flavor, and oil keeps the cake from drying out as it sits.
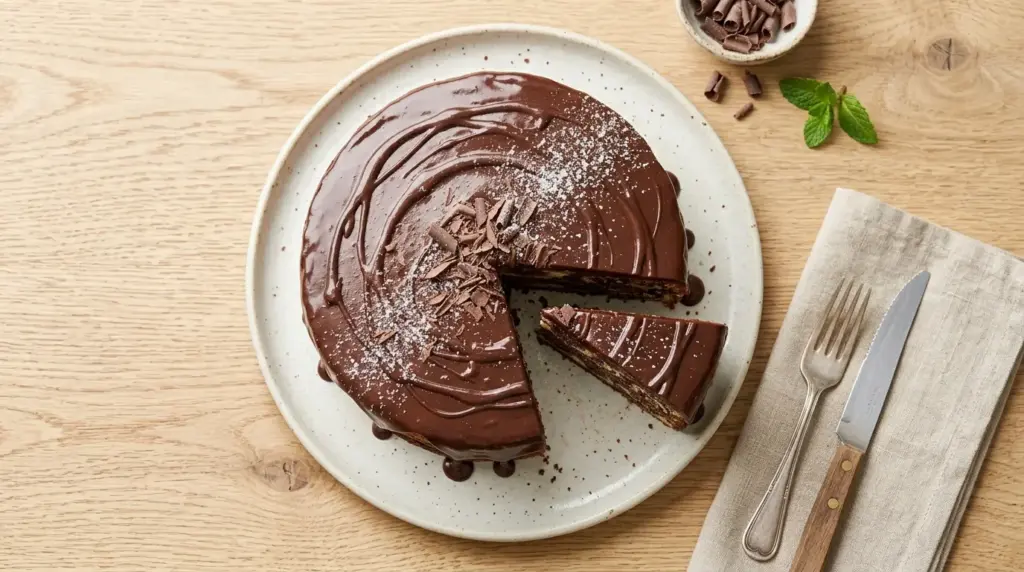
The chocolate ganache drizzle on top is simple to make but adds a polished, bakery-worthy finish.
Here is a quick summary of why this recipe stands out:
- One base batter for both flavors, which means less mess and fewer dishes
- Uses melted semisweet chocolate for a deep, distinct chocolate swirl (not just cocoa powder)
- Buttermilk in the batter guarantees a moist, tender crumb
- Works beautifully as two round cake layers or a single Bundt/loaf cake
- Topped with a glossy chocolate ganache that elevates the whole presentation
- Freezer-friendly and keeps well for days
Read Also: Pound Cake Recipe
Ingredients
This marble cake uses straightforward pantry staples, with a couple of key ingredients that make a big difference in texture and flavor. Make sure your butter, eggs, and buttermilk are all at room temperature before you start; cold ingredients do not blend smoothly and can result in a lumpy, dense batter.
For the Cake:
- 2 1/2 cups (315g) all-purpose flour, spooned and leveled
- 1 tablespoon baking powder
- 1/2 teaspoon fine salt
- 3/4 cup (170g) unsalted butter, softened to room temperature
- 1/4 cup (60ml) neutral vegetable oil
- 1 1/2 cups (300g) granulated sugar
- 4 large eggs, room temperature
- 2 teaspoons pure vanilla extract
- 1 cup (240ml) buttermilk, room temperature
- 4 oz (115g) semisweet chocolate, finely chopped and melted
- 3 tablespoons unsweetened cocoa powder
- 2 tablespoons whole milk
For the Chocolate Ganache:
- 6 oz (170g) semisweet chocolate chips
- 1/2 cup (120ml) heavy whipping cream
For a lighter topping alternative, try pairing the finished cake with a generous swirl of Chocolate Buttercream Frosting.
Kitchen Equipment Needed
Having the right equipment on hand makes the process smoother and helps ensure an even bake. You do not need anything fancy; these are tools most home bakers already own.
- Two 8-inch or 9-inch round cake pans (or one 9×5-inch loaf pan)
- Stand mixer or hand electric mixer
- Large mixing bowl and medium mixing bowl
- Small microwave-safe bowl (for melting chocolate)
- Rubber spatula
- Whisk
- Butter knife or thin skewer (for swirling)
- Wire cooling rack
- Kitchen scale (highly recommended for accuracy)
- Parchment paper
- Sifter or fine mesh sieve
Read Also: Sour Cream Coffee Cake Recipe
Recommended Products for This Recipe
These are products I genuinely recommend based on quality and performance. Each one addresses a common pain point when baking a marble cake from scratch.
1. OXO Good Grips Digital Kitchen Scale
Measuring flour by volume is one of the most common causes of a dense, dry cake. A reliable kitchen scale removes all the guesswork and ensures you use exactly the right amount of every ingredient, which is especially important when you are working with a delicate crumb like this one.
2. Ghirardelli Semisweet Chocolate Baking Bar
The quality of your chocolate directly impacts how distinct and flavorful your chocolate swirl tastes. A high-quality semisweet chocolate bar like this one melts silkily, incorporates smoothly into the batter, and produces a noticeably richer, deeper chocolate flavor than lower-quality chips.
3. USA Pan Aluminized Steel Round Cake Pans
These pans heat evenly and have a non-stick coating that makes removing a delicate cake a stress-free process. Their reinforced rims prevent warping, and the light aluminized steel promotes even browning without over-darkening the edges.
4. Wilton Offset Spatula Set
Spreading ganache evenly across the top of a marble cake is much easier with an offset spatula. The angled blade gives you control and keeps your hand out of the way, making it ideal for smoothing both frosting and ganache cleanly.
Another great complement to this cake is a silky Vanilla Buttercream Frosting if you prefer a lighter, creamier topping option.
Step-by-Step Instructions
Step 1: Prep Your Pans and Preheat the Oven
- Preheat your oven to 350°F (175°C) and position a rack in the center of the oven.
- Lightly butter the inside of two 8-inch or 9-inch round cake pans.
- Cut two circles of parchment paper to fit the bottom of each pan, press them in, and butter the parchment as well.
- Dust the sides of each pan with a light coating of flour and tap out any excess. Set pans aside.
Step 2: Whisk the Dry Ingredients
- In a medium bowl, add the all-purpose flour, baking powder, and fine salt.
- Whisk thoroughly until everything is well combined and there are no clumps.
- Set the bowl aside. Having this mixture pre-combined means you will not overmix the batter when you add it to the wet ingredients.
Step 3: Prepare the Chocolate Mixture
- Place the finely chopped semisweet chocolate in a small microwave-safe bowl.
- Microwave in 20-second intervals, stirring between each interval, until the chocolate is completely smooth and melted. This usually takes about 60 to 90 seconds total.
- Once melted, add the cocoa powder and whole milk to the bowl and stir vigorously until fully combined and smooth.
- Set the chocolate mixture aside to cool slightly while you make the main batter.
Step 4: Cream the Butter, Oil, and Sugar
- In the bowl of a stand mixer fitted with the paddle attachment (or in a large bowl with a hand mixer), combine the softened butter, vegetable oil, and granulated sugar.
- Beat on medium speed for 4 to 5 minutes, stopping to scrape down the sides of the bowl once or twice, until the mixture is very light, pale, and fluffy.
- Do not rush this step. Properly creamed butter and sugar trap tiny air bubbles that give the cake its lift and light texture.
Step 5: Add the Eggs and Vanilla
- With the mixer running on low, add the eggs one at a time, letting each egg fully incorporate before adding the next.
- After all four eggs are in, add the vanilla extract and mix for another 30 seconds on medium speed.
- Scrape down the sides and bottom of the bowl well. The mixture should look smooth, glossy, and slightly increased in volume.
Step 6: Alternate the Dry Ingredients and Buttermilk
- Reduce the mixer speed to low.
- Add one third of the flour mixture to the butter mixture and mix until just barely combined.
- Pour in half of the buttermilk and mix gently until incorporated.
- Add another third of the flour mixture, mix briefly, then add the remaining buttermilk.
- Finish with the last third of the flour mixture and mix only until you can no longer see streaks of dry flour.
- Remove the bowl from the mixer and use a rubber spatula to give the batter a few gentle folds by hand to ensure everything is evenly combined. Do not overmix; overmixing develops gluten and can make the cake tough.
Step 7: Make the Chocolate Batter
- Scoop approximately one third of the vanilla batter (about 2 cups or 480ml) into the bowl with your cooled chocolate and cocoa mixture.
- Fold gently but thoroughly with a rubber spatula until no vanilla streaks remain and the chocolate batter is smooth and uniform.
Step 8: Layer and Swirl the Batters
- Using a large spoon or ice cream scoop, alternate dropping large spoonfuls of vanilla batter and chocolate batter into each prepared cake pan.
- Once all the batter is divided between the pans, take a butter knife or thin skewer and insert it about halfway down into the batter.
- Use a gentle figure-eight or looping swirl motion across the top of each pan three or four times to marble the two batters together.
- Do not over-swirl. Two to four passes is all you need; too much swirling blends the batters together and loses the distinct marble pattern.
Step 9: Bake the Cakes
- Place both pans in the preheated oven on the center rack.
- Bake for 28 to 35 minutes, or until a toothpick or cake tester inserted in the center comes out clean or with just a few moist crumbs.
- If your oven runs hot, start checking at the 26-minute mark.
- Avoid opening the oven door during the first 25 minutes of baking, as this can cause the cake to sink in the center.
Step 10: Cool the Cakes
- Remove the pans from the oven and let the cakes cool in their pans on a wire rack for 15 minutes.
- After 15 minutes, run a thin knife or offset spatula around the edge of each cake to loosen it.
- Invert each cake onto the wire rack, peel away the parchment paper, then flip the cakes right-side up again.
- Allow the cakes to cool completely, at least 1 to 2 hours, before adding the ganache. Pouring ganache over a warm cake will cause it to melt and run off.
Step 11: Make the Chocolate Ganache
- Place the semisweet chocolate chips in a medium heat-proof bowl.
- Heat the heavy cream in a small saucepan over medium heat until it just begins to simmer around the edges. Do not let it boil.
- Pour the hot cream over the chocolate chips and let it sit undisturbed for 2 minutes.
- Whisk gently from the center outward until the ganache is silky, smooth, and glossy.
- Let the ganache cool for 5 to 10 minutes until it thickens slightly. It should be pourable but not so liquid that it runs off the cake immediately.
Step 12: Assemble and Finish
- Place one cooled cake layer on your serving plate or cake stand.
- Pour or spread a thin layer of ganache over the top of the first layer.
- Carefully place the second cake layer on top.
- Pour the remaining ganache over the top of the cake, using an offset spatula to guide it toward the edges and let it drip naturally down the sides.
- Let the ganache set for at least 20 minutes before slicing and serving.
For a more traditional frosted presentation, you can also frost this cake all around with a layer of Cream Cheese Frosting.
Tips for Success
Getting a marble cake just right comes down to a few key details. These tips address the most common pitfalls and help ensure your cake turns out perfectly every time.
- Use room temperature ingredients. Cold butter will not cream properly, cold eggs can cause the batter to curdle, and cold buttermilk can cause the fat to seize. Set everything out at least an hour before you start.
- Do not overmix the batter after adding the flour. Overmixing activates the gluten in the flour and results in a rubbery, dense cake. Mix only until the flour streaks disappear.
- Swirl gently and sparingly. Two to four passes with a knife gives you a beautiful marble; more than that and you end up with a muddy brownish batter.
- Use a kitchen scale to measure your flour. The most common cause of a dry, dense marble cake is too much flour, which happens when you scoop directly from the bag. If measuring by cup, use the spoon-and-level method.
- Check for doneness early. Ovens vary significantly. Start checking at the 26-minute mark by inserting a toothpick into the thickest part of the cake.
- Cool completely before ganaching. A warm cake will melt the ganache too quickly and it will not set properly.
You might also love: Angel Food Cake Recipe
Serving Suggestions
Marble cake is versatile enough to serve at casual afternoon gatherings or elegant celebrations alike. Here are some of the best ways to enjoy it.
The simplest and most classic presentation is to slice the cake and serve it as-is with the chocolate ganache drizzled on top. A scoop of Vanilla Bean Ice Cream on the side turns it into a proper dessert.
Marble cake is also wonderful served alongside:
- A warm cup of coffee or espresso, where the bitter notes beautifully complement the sweet cake
- A dollop of lightly sweetened whipped cream on each slice
- Fresh berries like raspberries or strawberries for a pop of brightness and acidity
- A drizzle of Caramel Sauce for a salted caramel marble cake twist
- Pastry Cream served alongside individual slices for a more elegant plated dessert
Variations to Try
Once you have the classic recipe down, this is a cake that takes well to all kinds of creative twists. Here are some of the best variations worth experimenting with.
The base recipe can be adapted in several fun directions:
- Loaf pan marble cake: Pour the batter into a greased and lined 9×5-inch loaf pan and bake at 325°F (165°C) for 55 to 70 minutes. Tent with foil after the first 45 minutes to prevent over-browning on top.
- Bundt marble cake: Grease and flour a standard 12-cup Bundt pan generously. Bake at 350°F (175°C) for 45 to 55 minutes. Finish with a ganache drizzle that flows beautifully down the ridges.
- Cream cheese swirl: Add 4 oz (115g) of softened cream cheese beaten with 2 tablespoons of sugar as a third swirl element for a slightly tangy, cheesecake-style layer.
- Espresso marble: Stir 1 tablespoon of instant espresso powder into the chocolate mixture to amplify the chocolate flavor and add a subtle coffee note.
- Orange vanilla marble: Add 1 teaspoon of fresh orange zest and a splash of orange extract to the vanilla batter for a citrus-forward variation that pairs beautifully with the chocolate.
- Peanut butter chocolate: Swirl 1/4 cup of smooth peanut butter warmed slightly into the chocolate batter before layering into the pan.
Read Also: Funfetti Cake Recipe
Storage and Reheating
Marble cake stores exceptionally well, making it a great option for baking ahead of time. Proper storage keeps it moist and fresh for several days.
Follow these storage guidelines:
- Room temperature: Store the un-ganached cake, wrapped tightly in plastic wrap or stored in an airtight container, at room temperature for up to 3 days.
- Once ganached: Keep the assembled cake covered loosely (use a cake dome or invert a large bowl over it) at room temperature for up to 2 days, or refrigerate for up to 5 days.
- Refrigerator: Refrigerated marble cake can taste a little dry and firm straight from the fridge. Let slices sit at room temperature for 20 to 30 minutes before serving for the best texture.
- Freezer: Wrap individual slices in two layers of plastic wrap, then place in a zip-lock freezer bag. Freeze for up to 2 months. Thaw overnight in the refrigerator or at room temperature for 1 to 2 hours.
- Reheating: If you prefer a slightly warm slice, microwave an individual piece for 10 to 15 seconds. Do not overheat or the crumb will dry out.
Another reader favorite to make ahead and freeze is this Classic Yellow Cake Recipe.
Nutritional Facts
Per serving (based on 12 servings, including ganache). Values are approximate.
| Nutrient | Amount Per Serving |
|---|---|
| Calories | 490 kcal |
| Total Fat | 26g |
| Saturated Fat | 15g |
| Cholesterol | 110mg |
| Sodium | 210mg |
| Total Carbohydrates | 59g |
| Dietary Fiber | 2g |
| Total Sugars | 38g |
| Protein | 7g |
Nutritional values are estimates only and will vary based on specific ingredients used, pan size, and serving size.
Read Also: Lemon Chiffon Cake Recipe
Health Benefits of Key Ingredients
While marble cake is absolutely an indulgent treat, some of its core ingredients do bring meaningful nutritional value to the table.
Enjoy these benefits from the key ingredients:
- Eggs are one of the most nutritionally complete foods available. They provide complete protein, essential B vitamins including choline for brain health, and fat-soluble vitamins A, D, E, and K.
- Dark and semisweet chocolate contain flavonoids, which are plant-based antioxidants that have been linked to improved heart health, reduced inflammation, and better blood flow. The higher the cacao percentage, the more pronounced these benefits.
- Buttermilk is lower in fat than regular milk and provides calcium, potassium, and beneficial probiotics that support digestive health. Its natural acidity also helps tenderize the gluten in the flour, contributing to the cake’s soft crumb.
- Cocoa powder is rich in magnesium, iron, and antioxidants. When used unsweetened, it is a surprisingly mineral-rich addition to baked goods.
- Butter provides fat-soluble vitamins including vitamins A, D, E, and K2, and its rich fat content contributes to the feeling of satiety and the cake’s luxurious mouthfeel.
- All-purpose flour contributes B vitamins and iron to the overall nutritional profile of each serving.
You might also enjoy the health profile of a lighter baked treat like this Lemon Cake Recipe.
Frequently Asked Questions
1. Can I use cake flour instead of all-purpose flour?
Yes, you can substitute cake flour in a 1:1 ratio by weight, or use 1 cup plus 2 tablespoons of cake flour for every 1 cup of all-purpose flour called for in the recipe.
Cake flour has a lower protein content, which produces an even more delicate, tender crumb. The cake will be slightly lighter and softer in texture, which many bakers prefer.
2. What if I do not have buttermilk on hand?
You can make a simple buttermilk substitute at home in just a few minutes.
Pour 1 tablespoon of white vinegar or fresh lemon juice into a measuring cup, then fill it up to the 1-cup line with whole milk. Stir briefly and let it sit for 5 minutes until it thickens and curdles slightly. Use exactly as you would buttermilk in this recipe.
3. Why did my marble pattern disappear and look blended?
This almost always happens from over-swirling the batter.
It only takes two to four gentle passes with a butter knife to create a beautiful marble effect. Any more than that, and the batters start blending together into a uniform brownish color. Less is genuinely more when it comes to swirling.
4. Can I make this as a single layer sheet cake instead?
Absolutely. Pour the batter into a greased and parchment-lined 9×13-inch baking pan.
Bake at 350°F (175°C) for approximately 30 to 35 minutes, or until a toothpick inserted in the center comes out clean. The ganache drizzle works beautifully over a sheet cake as well.
5. Can I frost this cake instead of using ganache?
Yes, and this cake pairs wonderfully with several different frostings.
Chocolate Buttercream Frosting is the most popular choice, but Vanilla Buttercream Frosting and cream cheese frosting also work beautifully. Frost the cake once it has cooled completely to room temperature.
Read Also: White Cake Recipe
Final Thoughts
A great marble cake is one of those recipes that never goes out of style. It is familiar and nostalgic, yet impressive enough to bring to any celebration.
This recipe gives you all the tools you need to get it right on the very first try, from the one-batter technique to the gentle swirling method.
The best part is how adaptable it is. You can dress it up with ganache and fresh berries for a dinner party, or keep it simple and serve it plain with coffee on a weekend morning.
Give this marble cake recipe a try and see just how easy it is to create something truly beautiful and delicious from scratch.
If you make it, leave a comment below letting me know how it turned out! Tag your creation on social media so others can see it too.
Recommended:
- Red Velvet Cake Recipe
- Best Carrot Cake Recipe
- Moist Chocolate Cake Recipe
- Tres Leches Cake Recipe
- Strawberry Cake Recipe
- Easy Chocolate Cake Recipe
- Best Chocolate Chip Cookies Recipe
- Carrot Cake with Cream Cheese Frosting Recipe
- Hot Fudge Cake Recipe
- Eggnog Cake Recipe


