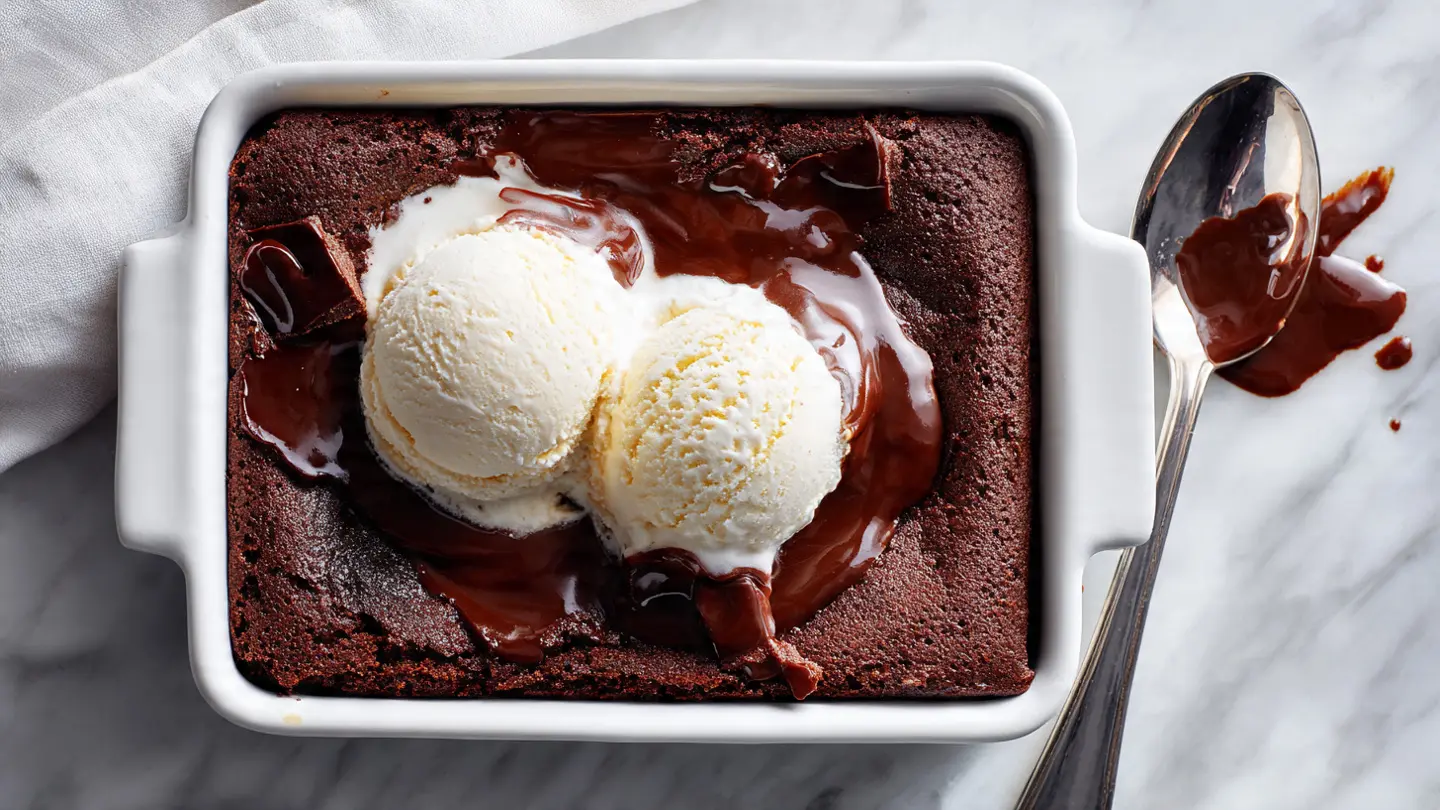
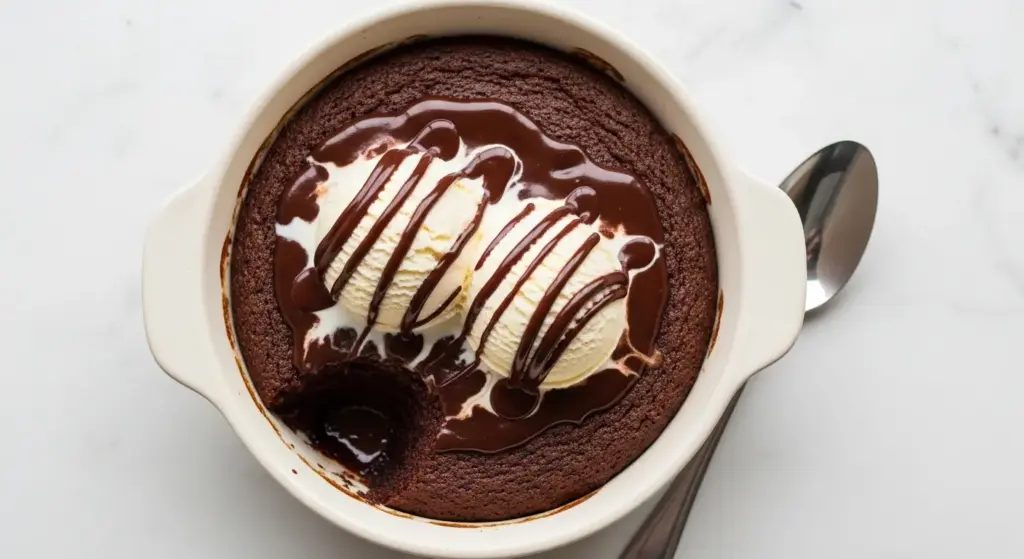
Few desserts deliver that kind of pure, undeniable chocolate magic quite like a hot fudge cake recipe made entirely from scratch. You mix a simple batter, sprinkle on a cocoa-sugar topping, pour hot water over the whole thing, and the oven does something almost impossibly good — it transforms those humble layers into a tender chocolate cake sitting on top of a pool of warm, gooey, thick hot fudge sauce.
This is one of those old-fashioned, vintage recipes that has been showing up on family tables for decades, and for very good reason. It never fails to impress, and it comes together in about 15 minutes of hands-on time with ingredients you almost certainly already have in your pantry.
The science behind it is surprisingly simple: the hot water sinks through the dry cocoa-sugar layer and forms a lava-like sauce at the bottom of the pan while the batter rises and bakes into a soft, brownie-like cake on top. When you scoop it out, that rich chocolate sauce flows up and over everything.
Serve it warm with a big scoop of vanilla ice cream, and you have a dessert that tastes like it took hours to make but actually required almost no effort at all.
You might also enjoy: Hot Fudge Sundae
Why You’ll Love This Hot Fudge Cake Recipe
This recipe is the kind you bookmark, print out, and keep on permanent rotation.
It uses one bowl and one baking dish, and you do not need a mixer, a double boiler, or any fancy equipment. The cleanup is just as easy as the preparation.
The self-saucing mechanism is genuinely magical, and it works every single time. Unlike traditional layer cakes, there is no frosting to make, no cooling time required, and no decorating involved.
It is perfect for potlucks, weeknight desserts, last-minute entertaining, and those moments when a serious chocolate craving hits without warning.
The texture hits every note at once: you get a slightly chewy, almost brownie-like top layer and a warm, flowing chocolate sauce underneath. It is richness and comfort in a single bite.
The hot water technique also keeps the cake itself incredibly moist, so even leftovers reheated the next day taste wonderful.
Here is why you will keep coming back to this recipe:
- Uses simple, everyday pantry ingredients
- No mixer required — just a bowl and a whisk
- Ready to serve in under 50 minutes from start to finish
- Virtually foolproof, even for beginner bakers
- The built-in hot fudge sauce means no extra steps
- Tastes incredible with vanilla ice cream, whipped cream, or both
- Feeds 8 people from one 8×8 inch baking dish
This pairs beautifully with a scoop alongside brownie pudding if you are putting together a full chocolate dessert spread.
Ingredients
The ingredient list is short, and every single item serves a purpose. The two-stage sugar system — granulated for the batter, brown sugar for the topping — is what gives this cake its deeply flavored, caramel-tinged fudge sauce.
Here is everything you need:
For the Cake Batter:
- 1 cup (125g) all-purpose flour
- ¾ cup (150g) granulated white sugar
- 3 tablespoons (18g) unsweetened cocoa powder, divided (2 tablespoons for batter, 1 tablespoon for topping — see topping below)
- 2 teaspoons baking powder
- ¼ teaspoon salt
- ½ cup (120ml) whole milk (or 2% milk)
- 2 tablespoons neutral oil (canola or vegetable oil)
- 1 teaspoon pure vanilla extract
For the Fudge Topping:
- ¾ cup (165g) packed brown sugar
- 3 tablespoons (18g) unsweetened cocoa powder (this combines with the brown sugar to make the hot fudge layer)
For Pouring Over the Top:
- 1¾ cups (415ml) very hot water (just off the boil — do not use cold water)
For Serving:
- Vanilla ice cream or freshly whipped cream
Read Also: Hot Fudge Sauce Recipe
Kitchen Equipment Needed
You do not need anything specialized to make this cake, which is part of what makes it such a reliable everyday recipe. A few basic baking staples are all it takes.
Here is what you will need:
- 8×8 inch square baking dish (ceramic or glass works best for even heat distribution)
- Large mixing bowl
- Medium mixing bowl (for the fudge topping mixture)
- Whisk
- Rubber spatula or wooden spoon
- Measuring cups and spoons
- Oven mitts
- Ice cream scoop (for serving)
Read Also: Mug Cake Recipe
Recommended Products for This Recipe
These are products recommended based on quality and performance, and each one genuinely makes a difference when making this recipe.
1. High-Quality Unsweetened Cocoa Powder
The cocoa powder you choose is the single most important flavor decision in this recipe — it is in both the batter and the fudge topping, so it has to be good. A Dutch-processed or high-fat natural cocoa will give you a noticeably deeper, richer chocolate flavor compared to basic grocery store options.
2. Ceramic Square Baking Dish
A ceramic baking dish distributes heat more gently and evenly than metal, which helps the self-saucing process work correctly and prevents the bottom from scorching before the top is set. It also goes straight from the oven to the table beautifully.
3. Pure Vanilla Extract
Pure vanilla extract (not imitation) adds a subtle floral depth that rounds out all the chocolate flavor in this cake. Since this recipe uses just one teaspoon, a good bottle lasts a long time and the flavor difference is very noticeable.
4. Ice Cream Scoop
Serving this warm cake with a perfectly rounded scoop of vanilla ice cream takes the whole experience to another level. A sturdy, spring-loaded ice cream scoop makes the presentation effortless every time.
Another crowd-pleasing chocolate dessert to have on your radar: Easy Pecan Pie Dump Cake
Step-by-Step Instructions
Follow these steps carefully the first time, and you will understand exactly what this cake is doing at every stage. It truly is as simple as it looks.
Step 1: Preheat the Oven and Prepare the Baking Dish
- Set your oven to 350°F (175°C) and allow it to fully preheat before you begin mixing. A properly preheated oven is essential for this recipe because the self-saucing process depends on consistent heat from the moment the dish goes in.
- Lightly grease your 8×8 inch (20x20cm) baking dish with butter, cooking spray, or a neutral oil. Make sure you coat all four sides and the bottom evenly so the cake releases cleanly when you scoop it out for serving.
- Set the greased baking dish aside while you prepare the batter.
Step 2: Mix the Dry Ingredients for the Batter
- In a large mixing bowl, add 1 cup (125g) all-purpose flour, ¾ cup (150g) granulated white sugar, 2 tablespoons of unsweetened cocoa powder, 2 teaspoons of baking powder, and ¼ teaspoon of salt.
- Whisk all of the dry ingredients together until they are fully combined and there are no visible streaks of cocoa or flour. This step ensures the leavening (baking powder) is evenly distributed throughout the batter so the cake rises uniformly.
- Make a small well in the center of the dry ingredients — this will help you incorporate the wet ingredients more easily in the next step.
Step 3: Add the Wet Ingredients to the Batter
- To the well in your dry ingredients, add ½ cup (120ml) milk, 2 tablespoons of neutral oil, and 1 teaspoon of pure vanilla extract.
- Stir everything together using a whisk or a rubber spatula until a smooth, thick batter forms. Do not overmix — stir just until no dry pockets of flour remain.
- The batter will be quite thick, similar to a brownie batter. This is exactly right; do not be tempted to thin it out.
Step 4: Spread the Batter Into the Baking Dish
- Pour the batter into your greased 8×8 inch baking dish.
- Use a rubber spatula to spread the batter into an even layer, making sure it reaches all four corners of the dish. The layer will be fairly thin — that is normal.
- Do not press the batter down firmly; just spread it gently and evenly.
Step 5: Make the Fudge Topping Mixture
- In a separate medium bowl, combine ¾ cup (165g) of packed brown sugar and 3 tablespoons of unsweetened cocoa powder.
- Whisk them together until fully blended and no lumps of brown sugar remain. The brown sugar provides deep molasses-flavored sweetness, while the cocoa powder gives the sauce its rich chocolate character.
- Sprinkle this brown sugar and cocoa mixture evenly over the top of the unbaked batter in the dish. Try to distribute it as evenly as possible from edge to edge, as this is the layer that will transform into the hot fudge sauce.
Step 6: Pour the Hot Water Over the Top
- Heat 1¾ cups (415ml) of water until it is very hot — just below a boil or freshly boiled is ideal. The water must be hot (not warm, not cold) for the self-saucing reaction to work correctly.
- Slowly and gently pour the hot water directly over the brown sugar and cocoa layer in the baking dish. Do not stir. Do not mix. Pour slowly, moving your hand around the pan so the water distributes evenly rather than all pouring into one spot.
- The dish will look like a hot mess at this point — water sitting on top of a dark sugary layer with batter underneath. This is exactly what it should look like. Trust the process.
Step 7: Bake the Cake
- Carefully transfer the baking dish to your preheated 350°F (175°C) oven. Move slowly to avoid sloshing the liquid around.
- Bake for 32 to 37 minutes. You will know the cake is done when the top looks set and matte (not shiny or wet) and the cake has pulled slightly away from the edges of the pan.
- Do not test this cake with a toothpick in the center — the sauce underneath will make it come out wet regardless of whether the cake is done. Instead, watch the surface: it should look like a baked chocolate cake, not like wet batter.
Step 8: Rest the Cake Before Serving
- Remove the cake from the oven and allow it to rest on a wire rack or heat-safe surface for 10 to 15 minutes before serving. This rest time is important — it allows the hot fudge sauce to thicken slightly and set up so it pools beautifully when you scoop the cake.
- Do not skip this resting step. A cake served too quickly will have a very thin, watery sauce. After resting, the sauce will be rich, thick, and properly fudgy.
Step 9: Scoop and Serve
- Use a large spoon to scoop portions of the cake into individual serving bowls, making sure to get a good scoop from the bottom of the pan so each serving gets both cake and fudge sauce.
- Top immediately with a generous scoop of vanilla ice cream. The contrast between warm, gooey cake and cold, creamy ice cream is the whole point of this dessert.
- Serve right away while the sauce is still warm and flowing.
Read Also: Chocolate Pudding Recipe
Tips for Success
A few small details make the difference between a good hot fudge cake and a truly exceptional one. Keep these in mind before you start.
Here are the most important tips:
- Use very hot water. This is non-negotiable. Cold or warm water will not activate the self-saucing process correctly. Freshly boiled or near-boiling water is what causes the brown sugar and cocoa topping to dissolve and sink to form the sauce.
- Do not stir after pouring the water. It is tempting, but stirring ruins the layering effect that creates the separate cake and sauce layers. Pour slowly, then leave it alone.
- Pour the water gently. Move your hand around the pan as you pour so the water does not blast a hole through the cocoa-sugar layer or displace the batter underneath. A slow, steady pour is key.
- Use packed brown sugar. Loosely measured brown sugar will not give you enough sweetness or molasses depth in the sauce. Pack it firmly into the measuring cup.
- Choose good cocoa powder. Since there is no butter or cream in the fudge sauce, the cocoa powder is doing all the flavor heavy lifting. A good Dutch-processed or high-fat cocoa makes a significant difference.
- Let it rest. Those 10 to 15 minutes of resting time after baking are not optional. The sauce needs that time to thicken to the right consistency.
- Do not double the recipe in one pan. If you need a larger batch, make two separate pans. Doubling in one large pan disrupts the self-saucing ratio and can result in an underdone or overly liquidy result.
This technique also works wonderfully in pudding cake made with cake mix if you ever want a shortcut version.
Serving Suggestions
Hot fudge cake is an intensely rich chocolate dessert, so it pairs best with simple, cool, or creamy accompaniments that complement rather than compete with all that deep chocolate flavor.
Here are the best ways to serve this cake:
- Classic vanilla ice cream is the gold standard pairing — the cold, creamy ice cream melts slightly over the warm cake and sauce, creating its own extra layer of richness
- Fresh whipped cream adds lightness without overpowering the chocolate — a generous dollop on top is always welcome
- A drizzle of extra hot fudge sauce over the top for chocolate lovers who want maximum indulgence
- Chopped toasted pecans or walnuts add a crunchy textural contrast to the soft, saucy cake
- A few fresh raspberries or strawberries on the side cut through the richness beautifully
- Mint chocolate chip ice cream instead of vanilla adds a refreshing, cooling note
- A dusting of powdered sugar just before serving for a simple but elegant presentation
- Serve in individual ramekins for an easy, elegant dinner party dessert
Read Also: Moist Chocolate Cake Recipe
Variations to Try
The classic version of this recipe is hard to beat, but it is also very easy to customize with a few simple swaps.
Here are some variations worth exploring:
- Peanut butter swirl: Drop spoonfuls of creamy peanut butter over the batter before adding the cocoa-sugar topping, then swirl lightly with a toothpick for a chocolate-peanut butter combination.
- Mocha version: Replace the hot water with very strong brewed coffee or hot espresso. Coffee intensifies chocolate flavor dramatically and gives the sauce a subtle grown-up bitterness.
- Salted caramel twist: After the fudge sauce layer is sprinkled, drizzle a few tablespoons of caramel sauce over the top before pouring the hot water.
- Mexican chocolate version: Add ½ teaspoon of ground cinnamon and a small pinch of cayenne pepper to the dry ingredients for a warm, spiced chocolate flavor.
- Slow cooker version: Pour the prepared batter and toppings into a greased slow cooker insert, cover, and cook on HIGH for 2 to 3 hours. Check at 2 hours — it is done when the top is set. Great for entertaining.
- Espresso-dark chocolate version: Use Dutch-processed cocoa powder in both the batter and the topping, and add 1 teaspoon of instant espresso powder to the batter for a deeper, more complex flavor.
- Mini individual servings: Divide the batter and toppings into 6 oven-safe ramekins (reduce baking time to about 20 to 22 minutes). Each guest gets their own individual self-saucing chocolate cake.
For another cozy, old-fashioned chocolate dessert, check out the Sticky Toffee Pudding Recipe.
Storage and Reheating
This cake is at its absolute best warm and fresh from the oven, but it does store well and reheats beautifully.
Here is how to store and reheat it:
- Refrigerator: Allow the cake to cool completely to room temperature, then cover the baking dish tightly with plastic wrap or transfer individual portions to airtight containers. Refrigerate for up to 4 days.
- Freezer: This cake can be frozen, though the texture of the sauce may change slightly upon thawing. Freeze individual portions in airtight containers for up to 2 months. Thaw overnight in the refrigerator before reheating.
- Microwave reheating (best method): Scoop a portion into a microwave-safe bowl and heat on HIGH in 30-second intervals, stirring gently between each, until the cake is warmed through and the sauce is flowing again. Usually takes about 1 to 1.5 minutes total.
- Oven reheating: Cover the dish loosely with foil and reheat at 300°F (150°C) for about 15 minutes or until warmed through. This works well if you are reheating a larger portion.
- Important tip: Do not reheat on the stovetop — the sauce on the bottom will scorch before the cake is warm.
Another great make-ahead dessert: Easy Chocolate Cake Recipe
Nutritional Facts
The following is an approximate nutritional breakdown per serving, based on 8 servings from one 8×8 inch pan. This does not include vanilla ice cream or whipped cream toppings.
| Nutrient | Per Serving |
|---|---|
| Calories | ~270 kcal |
| Total Fat | 4g |
| Saturated Fat | 1g |
| Cholesterol | 2mg |
| Sodium | 170mg |
| Total Carbohydrates | 57g |
| Dietary Fiber | 2g |
| Sugars | 41g |
| Protein | 3g |
Nutritional values are estimates and may vary based on specific ingredients used.
Read Also: Fudge Brownie Recipe
Health Benefits of Key Ingredients
This is an indulgent dessert, and there is nothing wrong with enjoying it fully. That said, a few of its core ingredients do bring some genuine nutritional value to the table.
Here are the notable health benefits in this recipe:
- Cocoa powder is rich in flavonoids, a group of antioxidants linked to improved heart health, better circulation, and reduced inflammation. Unsweetened cocoa powder specifically is one of the most antioxidant-dense foods you can add to a recipe.
- Dark cocoa and magnesium: Cocoa is one of the best dietary sources of magnesium, a mineral that supports muscle function, nerve health, and quality sleep. Most people do not get enough magnesium from their diet, so even a small amount from cocoa is a meaningful contribution.
- Whole milk contributes calcium, phosphorus, and vitamin D (if fortified), all of which support bone strength and density. Using whole milk also adds healthy fats that aid the absorption of fat-soluble vitamins.
- Vanilla extract contains small amounts of vanillin, a compound with mild antioxidant and anti-inflammatory properties. Pure vanilla extract also has a natural calming aromatic quality.
For a dessert with a lighter chocolate option, you might enjoy Chocolate Souffle.
Frequently Asked Questions
1. Why does this cake make its own hot fudge sauce?
The self-saucing magic comes down to density and heat. When you pour hot water over the cocoa-sugar topping, the water mixes with those dry ingredients and creates a liquid mixture that is denser than the cake batter beneath it. As the cake bakes, the batter rises thanks to the baking powder, while the cocoa-sugar-water mixture sinks to the bottom of the pan. As it heats, the mixture thickens into a rich, fudgy sauce. It is basic food science, but it feels like magic every single time.
2. Can I make this recipe in a 9×13 inch pan?
You can scale up the recipe for a 9×13 inch (23x33cm) pan, but do not simply double it and expect the same result. The self-saucing ratio is precise, so it is better to use 1.5x the recipe for a 9×13 pan and increase the baking time by about 5 to 8 minutes. Keep a close eye on the surface of the cake to judge doneness.
3. My cake came out very liquidy. What went wrong?
The most common cause is not allowing the cake to rest long enough after baking. Those 10 to 15 minutes of resting time are essential for the sauce to thicken to the proper fudgy consistency. A second possibility is that the water you used was not hot enough. Cold or lukewarm water does not trigger the self-saucing process correctly, resulting in a thin, watery sauce rather than a thick, fudgy one.
4. Can I use a box of cake mix instead of making the batter from scratch?
Yes — a box of devil’s food or chocolate fudge cake mix (prepared according to package directions) can be used in place of the from-scratch batter. Pour the prepared box mix batter into the greased dish, then continue with the brown sugar and cocoa topping and the hot water step as written. The result is slightly different in texture but still very delicious and even easier.
5. Is this the same thing as a lava cake or chocolate cobbler?
They are similar in spirit but technically different. A molten lava cake is individually portioned, made with a richer ganache-based batter, and the liquid center is formed by intentional underbaking. A chocolate cobbler is made with butter and typically has a crispier, more crumbly top. Hot fudge cake is closest to a self-saucing pudding cake: it has a soft, set cake layer on top and a pooling, pourable sauce on the bottom, all formed naturally during baking in a single pan.
Read Also: Dirt Pudding Recipe
Final Thoughts
This hot fudge cake recipe is one of those rare desserts that somehow manages to be both impossibly easy and genuinely impressive at the same time.
It asks very little of you — a single bowl, a handful of pantry ingredients, and about 15 minutes of active time — and it delivers something that tastes like you spent hours in the kitchen.
The warm, gooey fudge sauce that forms all on its own during baking is the kind of thing that makes people stop mid-bite and ask for the recipe. It is deeply chocolatey, lightly sweet, and perfectly saucy in a way that no poured-on frosting can match.
Give it a try this week, and do not forget to serve it warm with a generous scoop of vanilla ice cream for the full experience. Leave a comment below to let us know how it turned out, and share this recipe with the chocolate lovers in your life!
Recommended:
- Hot Fudge Sundae
- The Original Fantasy Fudge Recipe
- Checkerboard Cake Recipe
- Vanilla Pudding Recipe
- Best Chocolate Chip Cookies Recipe
- Easy Chocolate Cake Recipe
- Chocolate Pie Recipe
- Banana Pudding Recipe
- Caramel Sauce Recipe
- Boston Cream Pie Recipe