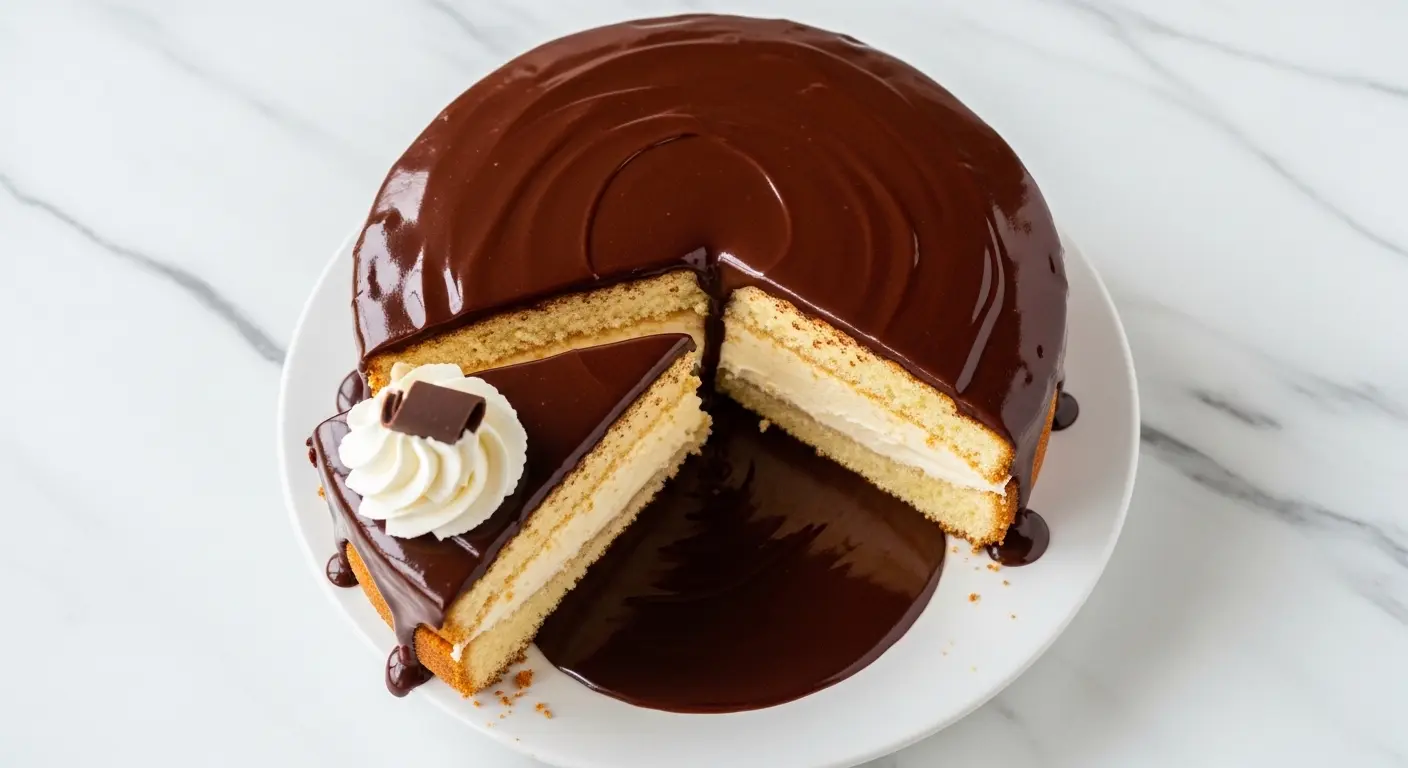
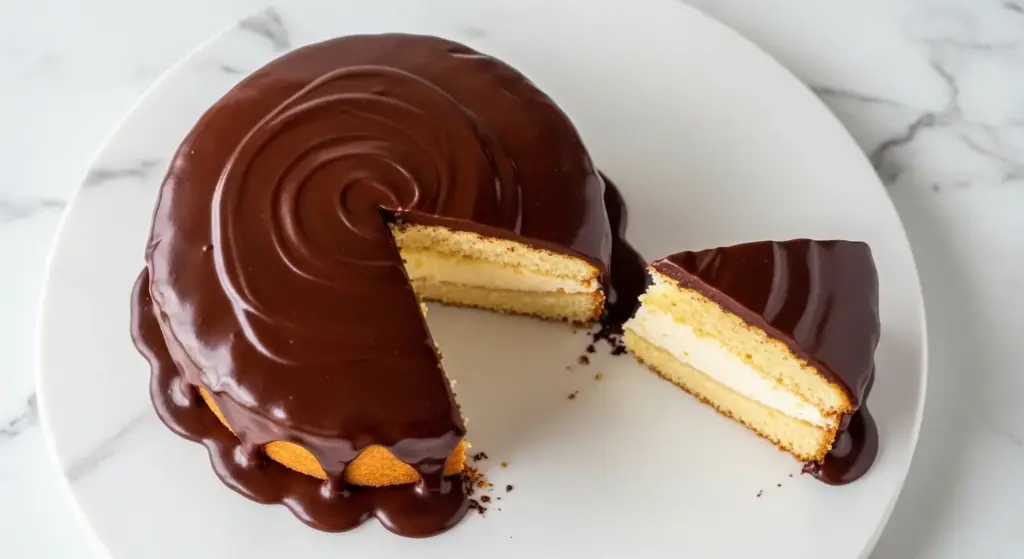
If you’ve ever bitten into a Boston cream donut and thought, “I need this in cake form,” then this boston cream pie recipe is exactly what you’ve been waiting for. Despite its name, Boston cream pie is actually a cake — two layers of tender, buttery sponge cake sandwiched together with a luscious vanilla pastry cream filling and finished with a glossy chocolate ganache on top.
It’s one of those desserts that looks absolutely stunning and tastes even better than it looks.
The history is as rich as the cake itself. Boston cream pie was first created by Armenian-French chef Mossburg Sanzian in 1856 at the grand opening of Boston’s Parker House Hotel, now known as the Omni Parker House. Back then, cakes and pies were often baked in the same pans, which is why this iconic layered cake carries the “pie” name to this day. It was even declared the official Massachusetts State Dessert in December 1996 — and honestly, it deserves the title.
This recipe walks you through all three components: a hot milk sponge cake, a silky vanilla pastry cream, and a dark chocolate ganache glaze. Each part is straightforward, and when they come together, the result is nothing short of showstopping.
This pairs beautifully as an impressive centerpiece alongside other classic American desserts like the Best Carrot Cake.
Why You’ll Love This Boston Cream Pie Recipe
This dessert checks every box — it’s visually impressive, deeply satisfying, and built on simple, familiar flavors that almost everyone loves.
Here’s why it’s a keeper:
- Three complementary textures. The soft, airy sponge cake, the thick and creamy pastry cream, and the smooth chocolate ganache create a layered experience in every single bite.
- It tastes even better the next day. After refrigerating overnight, the pastry cream softens the cake layers slightly and everything melds together in the most delicious way.
- It’s genuinely make-ahead friendly. You can prepare the pastry cream two days ahead and the cake layers the day before, making day-of assembly easy and stress-free.
- The hot milk method is foolproof. Unlike traditional sponge cakes that require whipping and folding egg whites, the hot milk sponge comes together quickly and reliably — no anxiety required.
- It serves a crowd. A standard 9-inch Boston cream pie serves 10 to 12 people, making it a perfect centerpiece for birthdays, holidays, and dinner parties.
- Every element can be made from scratch. There are no specialty ingredients here, just pantry staples and good technique.
Read Also: Classic Pumpkin Pie Recipe
Ingredients
This recipe is built around three components. Take a moment to read through all three before you start, and make sure your eggs and butter are at room temperature before baking day.
For the Hot Milk Sponge Cake:
- 1 1/2 cups (190g) all-purpose flour
- 1 1/2 teaspoons baking powder
- 1/4 teaspoon salt
- 3 large eggs, at room temperature
- 1 1/2 cups (300g) granulated sugar
- 1 teaspoon vanilla extract
- 3/4 cup (180ml) whole milk
- 6 tablespoons (85g) unsalted butter, cut into pieces
For the Vanilla Pastry Cream:
- 2 cups (480ml) whole milk
- 1/2 cup (100g) granulated sugar, divided
- 4 large egg yolks
- 3 tablespoons (24g) cornstarch
- 1/4 teaspoon salt
- 2 tablespoons (28g) unsalted butter
- 1 1/2 teaspoons vanilla extract
For the Chocolate Ganache:
- 4 oz (115g) bittersweet or dark chocolate, finely chopped (60-70% cacao)
- 1/2 cup (120ml) heavy cream
- 1 tablespoon light corn syrup (for shine and smoothness)
- Pinch of salt
Another favorite: Classic Pecan Pie Recipe
Kitchen Equipment Needed
Having the right tools makes the process significantly smoother, especially for the pastry cream which requires attentive whisking.
Here’s what you’ll need:
- Two 9-inch round cake pans
- Parchment paper rounds
- Stand mixer or electric hand mixer
- Medium saucepan (for pastry cream and ganache)
- Whisk
- Fine mesh strainer (for straining the pastry cream)
- Offset spatula (for spreading ganache)
- Large mixing bowls
- Instant-read thermometer (optional but helpful)
- Plastic wrap
- Cake stand or flat serving plate
Read Also: Easy Creme Brulee Recipe
Recommended Products for This Recipe
These are products that genuinely make a difference in quality and ease when making Boston cream pie. The recommendations below are based on performance and value.
1. Nordic Ware Natural Aluminum 9-Inch Round Cake Pans
Heavy-gauge aluminum pans heat evenly without warping, which is critical for getting flat, level cake layers. Uneven baking means uneven layers, and this affects both the look and the way your pastry cream sits inside the cake. A quality pan is one of the best long-term investments a baker can make.
2. High-Quality Dark Baking Chocolate (60-70% Cacao)
The ganache is only as good as the chocolate you use. A high-cacao dark chocolate creates a ganache with depth and a slight bitterness that perfectly balances the sweet pastry cream. Cheap chocolate chips can be oily and may not melt smoothly, giving you a grainy or dull glaze.
3. OXO Good Grips Balloon Whisk
The pastry cream requires constant, thorough whisking to prevent lumps and scorching. A wide, flexible balloon whisk gets into the corners of the saucepan where lumps like to hide, giving you a silky smooth custard every time.
4. Wilton Angled Icing Spatula
An offset spatula lets you spread ganache smoothly and precisely from the center outward, controlling those beautiful drips down the sides. It also helps you level the pastry cream filling without tearing the cake layers.
5. Fine Mesh Strainer
Straining the finished pastry cream catches any cooked egg bits or lumps, giving you a perfectly silky filling. It’s a small step that makes a big difference in the texture of the final dessert.
You might also enjoy: Easy Tiramisu Recipe
Step-by-Step Instructions
This recipe has three phases: pastry cream, cake, and assembly. Start with the pastry cream since it needs time to chill. Plan to start it at least 3 to 4 hours ahead, or ideally the night before.
1. Make the Pastry Cream
- Pour 2 cups (480ml) of whole milk into a medium saucepan. Add half of the sugar (1/4 cup / 50g) to the milk and stir briefly.
- Place the saucepan over medium heat and bring the mixture to just barely a simmer, stirring occasionally. Watch it carefully so it doesn’t boil over.
- While the milk heats, add the egg yolks and remaining 1/4 cup (50g) of granulated sugar to a medium bowl. Whisk them together briskly until the mixture turns pale yellow and slightly thickened, about 1 to 2 minutes.
- Add the 3 tablespoons of cornstarch and 1/4 teaspoon of salt to the egg yolk mixture. Whisk until completely combined and no dry lumps remain. The mixture will be thick.
- Once the milk is just simmering, remove it from the heat. Slowly pour about 1/4 cup (60ml) of the hot milk into the egg yolk mixture while whisking constantly. This step is called tempering — it raises the temperature of the eggs gradually so they don’t scramble when exposed to the full heat.
- Slowly whisk in the remaining hot milk in a thin, steady stream. This should take about 30 to 45 seconds.
- Pour the entire mixture back into the saucepan through a fine mesh strainer to catch any bits.
- Return the saucepan to medium heat. Whisk constantly and cook until the mixture thickens and large bubbles begin bursting at the surface, about 3 to 5 minutes. Don’t stop whisking, especially as it starts to thicken.
- Once it reaches a pudding-like consistency and bubbles are visibly bursting, reduce the heat to low and continue whisking for another 1 minute. This final cooking time removes any raw cornstarch flavor.
- Remove the saucepan from heat. Add the 2 tablespoons of unsalted butter and 1 1/2 teaspoons of vanilla extract. Whisk until the butter melts completely and the pastry cream is smooth and glossy.
- Pour the pastry cream through a fine mesh strainer into a clean bowl. Use a spatula to press it through, then scrape the underside of the strainer into the bowl.
- Press a sheet of plastic wrap directly onto the surface of the pastry cream so that the plastic is touching the cream. This prevents a skin from forming.
- Refrigerate for at least 3 to 4 hours, or overnight. The pastry cream needs to be completely cold and firm before you use it.
2. Prepare the Cake Pans and Preheat the Oven
- Arrange a rack in the center of your oven and preheat it to 325°F (165°C). This lower temperature ensures the cake bakes evenly and stays moist.
- Lightly butter the sides and bottoms of two 9-inch (23cm) round cake pans.
- Cut two circles of parchment paper to fit the bottoms of the pans and press them in. The parchment ensures the cake layers release cleanly and don’t stick.
- Dust the sides of each pan lightly with all-purpose flour. Tilt the pan to coat, then tap out any excess flour over the sink.
3. Make the Hot Milk Sponge Cake Batter
- In a medium bowl, whisk together 1 1/2 cups (190g) of all-purpose flour, 1 1/2 teaspoons of baking powder, and 1/4 teaspoon of salt. Set aside.
- Place 3 large eggs (at room temperature) in the bowl of a stand mixer fitted with the whisk attachment, or use a large bowl with an electric hand mixer. Room-temperature eggs whip up much more volume than cold eggs, which is key to a light, airy sponge.
- Beat the eggs on medium-high speed for about 1 minute until they are foamy. Add 1 1/2 cups (300g) of granulated sugar in a slow, steady stream while continuing to beat.
- Increase the speed to high and beat for 4 to 5 minutes until the mixture is very pale, thick, and has at least doubled in volume. When you lift the beater, the batter should fall back in thick ribbons. This step builds the structure of your sponge.
- Add 1 teaspoon of vanilla extract and beat briefly to combine.
- Meanwhile, in a small saucepan, combine 3/4 cup (180ml) of whole milk and 6 tablespoons (85g) of unsalted butter cut into pieces. Heat over medium heat until the butter is melted and the milk is hot but not boiling. Alternatively, microwave in a heatproof measuring cup in 30-second bursts until hot.
- With the mixer on low speed, add the dry flour mixture to the egg mixture in three additions, mixing just until combined after each addition. Do not overmix.
- Slowly pour the hot milk and butter mixture down the side of the bowl with the mixer running on low. Mix just until everything is smooth and incorporated. The batter will be thin — this is normal for a hot milk sponge.
4. Bake the Cake Layers
- Divide the batter evenly between the two prepared cake pans. You can use a kitchen scale for precision (approximately 400-420g per pan).
- Gently tap each pan on the counter a couple of times to release any air bubbles.
- Place both pans on the center oven rack and bake for 22 to 27 minutes. The cakes are done when a toothpick inserted in the center comes out clean, the tops spring back lightly when pressed, and the edges are just pulling away from the sides of the pan.
- Remove the pans from the oven and let the cakes cool in the pans on a wire rack for 15 minutes.
- After 15 minutes, run a thin knife or offset spatula around the edges of each cake, then invert onto the wire rack. Carefully peel off the parchment paper and allow the cakes to cool completely — at least 1 hour. Do not rush this step. A warm cake will melt the pastry cream.
5. Make the Chocolate Ganache
- Finely chop 4 oz (115g) of bittersweet or dark chocolate and place it in a heatproof medium bowl.
- In a small saucepan, heat 1/2 cup (120ml) of heavy cream over medium heat until it just begins to simmer. Small bubbles should appear around the edges. Do not let it boil.
- Immediately pour the hot cream over the chopped chocolate. Add 1 tablespoon of light corn syrup and a pinch of salt. Let the mixture sit, undisturbed, for 2 minutes.
- After 2 minutes, gently whisk from the center outward in small circles, gradually incorporating the cream and chocolate together until completely smooth and glossy. If any chocolate pieces remain, let the bowl sit over a pan of warm water for 1 minute, then whisk again.
- Allow the ganache to cool at room temperature for 10 to 15 minutes, or until it is slightly thickened but still pourable. It should coat the back of a spoon but still flow easily.
6. Assemble the Boston Cream Pie
- Place one completely cooled cake layer, flat side up, on your serving plate or cake stand.
- Give the chilled pastry cream a quick stir to loosen it slightly. It should be thick and spreadable.
- Spoon all of the pastry cream onto the center of the bottom cake layer. Use an offset spatula to spread it evenly to within about 1/2 inch (1.25cm) of the edge. The cream should be in a thick, even layer.
- Carefully place the second cake layer on top, flat side down, pressing very gently so it adheres evenly.
- Pour the slightly cooled ganache into the center of the top cake layer. Use an offset spatula to slowly nudge it toward the edges, allowing it to cascade decoratively over the sides. Work from the center outward so the drips are even and controlled.
- Let the cake sit at room temperature for 30 minutes to allow the ganache to set slightly before slicing. Alternatively, refrigerate until ready to serve.
Read Also: Classic Vanilla Cake Recipe
Tips for Success
Mastering the three components is about patience, temperature, and timing. These tips will save you from the most common pitfalls.
Keep these in mind throughout the process:
- Don’t rush the pastry cream chill time. A warm or under-set pastry cream will slide right out when you cut into the cake. Give it a full 3 to 4 hours minimum, or overnight for best results.
- Use room-temperature eggs for the cake. Cold eggs don’t whip up as much volume, which leads to a denser sponge. Set them out an hour before you start.
- Strain the pastry cream every time. Even if it looks smooth, passing it through a fine mesh strainer before chilling removes any cooked egg pieces that could affect the texture.
- Let the ganache cool before pouring. If the ganache is too hot, it will be too thin and run right off the cake. If it’s too cool, it won’t flow. Aim for 85 to 90°F (29 to 32°C) for the ideal pourable consistency.
- Cool the cake layers completely. Even a slightly warm cake can melt the pastry cream or cause the layers to slide. Patience is essential here.
- Don’t overmix the batter. Once you add the flour and hot milk to the whipped eggs, mix only until just combined. Overmixing develops gluten and makes the cake tough and dense.
- Use whole milk for both the cake and pastry cream. The fat content in whole milk contributes to the rich, creamy texture that makes this recipe so good. Low-fat milk will give you a thinner, less flavorful result.
The same careful, patient approach to custard works beautifully in a Classic Tiramisu as well.
Serving Suggestions
Boston cream pie is best served slightly chilled, which keeps the pastry cream firm and lets the ganache hold its shape beautifully.
Here are some ways to enjoy it:
- For a classic presentation, slice the cake with a long, sharp knife dipped in warm water and wiped clean between each cut. This gives you clean, neat slices that show off all three layers.
- With a hot beverage, a slice of Boston cream pie pairs perfectly with a cup of coffee or espresso. The bitterness of the coffee cuts through the sweetness of the pastry cream.
- As a birthday cake, this recipe is a naturally impressive birthday showstopper. Add candles and it becomes an instant centerpiece.
- As a dinner party dessert, make it the day before and refrigerate overnight. The flavors deepen and the cake is even better the next day.
- With whipped cream on the side, a small dollop of lightly sweetened whipped cream alongside each slice adds another layer of lightness.
- As individual servings, this same recipe works beautifully as Boston cream cupcakes — simply fill cupcakes with pastry cream and dip the tops in ganache.
Also try these elegant desserts for entertaining: Easy Creme Brulee
Variations to Try
Once you’ve mastered the classic version, there are plenty of ways to riff on the concept while keeping those signature flavors.
Here are some fun twists to explore:
- Boston Cream Cupcakes. Bake the same batter in cupcake tins (about 24 cupcakes) and bake at 350°F (175°C) for 15 to 20 minutes. Core out the center of each cooled cupcake, fill with pastry cream, replace the top, and spoon ganache over each one.
- Coffee-flavored pastry cream. Add 1 tablespoon of instant espresso powder to the warm milk when making the pastry cream. The coffee flavor pairs beautifully with both the vanilla cake and dark chocolate ganache.
- Banana Boston cream pie. Layer thin slices of ripe banana over the pastry cream before placing the second cake layer on top. This adds freshness and a natural sweetness.
- White chocolate ganache. Swap the dark chocolate for 6 oz (170g) of good-quality white chocolate. Use a 2:1 ratio of chocolate to cream, since white chocolate behaves differently and creates a thicker ganache.
- Coconut cream filling. Replace half the whole milk in the pastry cream with full-fat coconut milk and add 1/2 teaspoon of coconut extract for a tropical twist.
- Mini Boston cream pies. Use a 6-inch cake pan recipe scaled down and make individual two-layer mini cakes for elegant, single-serving presentations.
Another classic dessert worth exploring is the Classic Pineapple Upside Down Cake.
Storage and Reheating
Boston cream pie must be refrigerated because of the egg-and-milk-based pastry cream filling. It is highly perishable and should not be left at room temperature for more than 1 to 2 hours.
Here’s how to store and serve leftovers:
- Refrigerator: Cover the cake loosely with plastic wrap or place it in an airtight cake carrier. It will keep well in the refrigerator for up to 3 days. The cake actually improves after the first night as the layers meld together.
- Freezing the assembled cake: Freezing the assembled Boston cream pie is not recommended, as the pastry cream tends to weep and become watery once thawed. The texture suffers significantly.
- Freezing individual components: The cake layers can be wrapped tightly in plastic wrap and then foil and frozen for up to 2 months. The pastry cream does not freeze well due to the cornstarch, which can become grainy and separate on thawing.
- Serving from the fridge: Remove the cake from the refrigerator about 20 to 30 minutes before serving so the pastry cream softens slightly. The ganache will also be at its best at a slightly above-refrigerator temperature.
- Reheating: This dessert is not reheated. Serve it chilled or at slightly cool room temperature for best flavor and texture.
Read Also: Easy Chocolate Cake Recipe
Nutritional Facts
The following nutritional information is an estimate based on a standard Boston cream pie recipe serving 12 people.
| Nutrient | Per Serving (1/12 of cake) |
|---|---|
| Calories | approximately 420 kcal |
| Total Fat | 19g |
| Saturated Fat | 11g |
| Cholesterol | 145mg |
| Sodium | 135mg |
| Total Carbohydrates | 57g |
| Dietary Fiber | 1g |
| Sugars | 40g |
| Protein | 7g |
Please note: These values are estimates and may vary based on specific brands and exact measurements used.
The same buttery, egg-enriched base technique is also used in the Moist Chocolate Cake Recipe.
Health Benefits of Key Ingredients
While Boston cream pie is an indulgent dessert, several of its key ingredients do offer genuine nutritional contributions worth noting.
Here are some highlights:
- Eggs are one of the most nutrient-dense foods available. The egg yolks in the pastry cream are rich in fat-soluble vitamins including vitamin A, vitamin D, and vitamin K2, as well as choline, which supports brain and liver function.
- Whole milk provides calcium, vitamin D, and vitamin B12, supporting bone health and nervous system function. Full-fat dairy also contains conjugated linoleic acid (CLA), which has been studied for its role in metabolism.
- Dark chocolate (60-70% cacao) used in the ganache contains antioxidants including flavonoids, which have been linked to cardiovascular health. It also provides iron, magnesium, and manganese.
- Butter contains fat-soluble vitamins including vitamin A, E, and K2, as well as short-chain fatty acids which support gut health when consumed as part of a balanced diet.
- Vanilla extract is not just a flavoring agent — pure vanilla contains small amounts of antioxidants and has been studied for its potential anti-inflammatory properties.
- Cornstarch, while primarily used as a thickener, is naturally gluten-free, making it suitable for pastry cream preparations even in modified gluten-free versions of this dessert.
This recipe uses vanilla pudding level custard as a foundation, which is one of the most classic and versatile dessert building blocks.
Frequently Asked Questions
1. Why is it called a “pie” if it’s clearly a cake?
The name is a holdover from the mid-1800s when cakes and pies were regularly baked in the same pans. When Chef Mossburg Sanzian created the dessert at Boston’s Parker House Hotel in 1856, the distinction between cake pans and pie pans wasn’t always clear. The “pie” name stuck, and Boston cream pie has carried it ever since. In 1996, it was officially named the state dessert of Massachusetts, pie name and all.
2. Can I use a boxed yellow cake mix instead of making the cake from scratch?
Yes, you can use a boxed yellow cake mix if you’re short on time. Mix and bake it according to the package directions in two 9-inch pans. The scratch hot milk sponge has a better texture and flavor, but a quality boxed mix will still give you an excellent result with the homemade pastry cream and ganache.
3. How do I know when the pastry cream is thick enough?
The pastry cream is ready when you can see visible bubbles bursting at the surface and the mixture coats the back of a spoon thickly. Drag your finger across the spoon — if the line holds without the cream running back in, it’s done. It will continue to firm up as it cools and chills in the refrigerator.
4. Can I make Boston cream pie ahead of time?
Absolutely, and it’s actually encouraged. The pastry cream can be made up to 2 days in advance and stored covered in the refrigerator. The cake layers can be made the day before and wrapped at room temperature. On the day of serving, assemble the cake and pour the ganache. Once assembled, the cake can sit refrigerated for up to 1 day before serving.
5. My ganache turned out grainy or greasy. What went wrong?
A grainy or broken ganache is usually caused by one of two things: the cream was too hot (boiling rather than simmering), or the ganache was stirred too aggressively. To fix a broken ganache, warm it gently over a double boiler or in the microwave in 10-second bursts, then whisk in 1 to 2 teaspoons of warm whole milk or cream, one teaspoon at a time, until it comes back together. Using finely chopped quality chocolate also prevents graininess significantly.
Read Also: Classic Cheesecake Recipe
Final Thoughts
Making a Boston cream pie from scratch is truly one of the most rewarding experiences in home baking. When you set that glossy chocolate-glazed cake on the table and cut into it to reveal those three gorgeous layers — golden sponge, ivory pastry cream, and deep chocolate ganache — it just never gets old.
The recipe takes time and a little patience, but every component is manageable, even for newer bakers. Once you make it, you’ll understand exactly why this cake has been a beloved classic for more than 150 years.
Give this Boston cream pie recipe a try for your next birthday, dinner party, or just because you deserve something truly special this weekend. If you make it, leave a comment below and let us know how it turned out — and feel free to share a photo. We’d love to see your beautiful creation!
Recommended:
- Banana Cream Pie Recipe
- Chocolate Pudding Recipe
- Easy No Bake Cheesecake Recipe
- Checkerboard Cake Recipe
- Fruit Tart Recipe
- Lemon Meringue Pie Recipe
- Tres Leches Cake Recipe
- Sticky Toffee Pudding Recipe
- Chocolate Souffle Recipe
- Cannoli Poke Cake Recipe


