Forget the box mix. This vanilla pudding recipe is everything you want in a homemade dessert: silky smooth, deeply flavored, and surprisingly simple to pull off on the stovetop in under 20 minutes.
The secret to a truly great pudding lies in two things: whole milk for richness, and egg yolks for that custardy depth you just can’t get from a powder packet. The cornstarch keeps things stable and lump-free, while a splash of pure vanilla extract at the end ensures the flavor is bold, warm, and unmistakably classic.
This is the kind of recipe that feels nostalgic the moment it hits your spoon.
Whether you’re serving it chilled in individual cups with a cloud of whipped cream, or using it as the base for banana pudding, cream pies, or trifles, this recipe delivers every single time.
You might also enjoy this luscious Banana Pudding if you love classic pudding desserts!
Why You’ll Love This Vanilla Pudding Recipe
This vanilla pudding recipe checks all the boxes for a go-to homemade dessert.
It uses pantry staples you almost certainly already have, and the whole process from start to finish takes less than 25 minutes (plus chilling time).
Unlike store-bought pudding cups or boxed mixes, this version is made without any artificial flavors, preservatives, or dyes.
The combination of egg yolks and cornstarch gives you a pudding that sets up beautifully, thick enough to hold its shape but still spoonable and velvety.
It is incredibly versatile, working just as well as a standalone dessert as it does layered in trifles, poured into pie shells, or spooned over fresh fruit.
Here is why this recipe stands out:
- Rich, custardy flavor from real egg yolks
- Perfectly smooth and silky texture with no lumps
- Ready in about 20 minutes on the stovetop
- Naturally gluten-free with simple, clean ingredients
- Endlessly customizable with mix-ins and toppings
- Makes a beautiful base for many other desserts
For an equally indulgent no-bake treat, check out this No Bake Cheesecake.
Ingredients
Making vanilla pudding from scratch requires just a handful of everyday ingredients. The key is using whole milk (not reduced-fat or skim), as the fat content is what creates that signature creamy, full-bodied texture. Cornstarch is the backbone of this recipe, thickening the pudding smoothly without making it gluey, while the egg yolks add richness and a gentle golden color.
- 2 cups (480ml) whole milk
- 1/3 cup (65g) granulated sugar
- 3 tablespoons (24g) cornstarch
- 1/4 teaspoon fine sea salt
- 3 large egg yolks
- 2 tablespoons (28g) unsalted butter, cut into small pieces and cold
- 2 teaspoons pure vanilla extract
- Optional: 1 vanilla bean, split and scraped (for a more intense vanilla flavor and those beautiful flecks)
Read Also: Chocolate Pudding Recipe
Kitchen Equipment Needed
You don’t need any special equipment to make this pudding, just a few reliable kitchen staples. A medium heavy-bottomed saucepan is ideal because it distributes heat evenly and prevents scorching, which is especially important when working with dairy and eggs. A fine-mesh strainer is worth using if you want an absolutely silky, lump-free result.
- Medium heavy-bottomed saucepan (2-3 quart capacity)
- Whisk
- Medium mixing bowl
- Fine-mesh strainer
- Measuring cups and spoons
- Heatproof spatula or wooden spoon
- Individual serving dishes or a large bowl
- Plastic wrap (to prevent a skin from forming)
- Instant-read thermometer (optional but helpful for beginners)
Another favorite: Rice Pudding Recipe
Recommended Products for This Recipe
These are products chosen based on quality and performance that will genuinely help you make the best vanilla pudding possible.
1. Nielsen-Massey Pure Vanilla Extract
High-quality vanilla extract makes a massive difference in this recipe since vanilla is the star of the show. Nielsen-Massey is a trusted brand among professional bakers and home cooks alike, known for its rich, complex, and deeply aromatic flavor. Using it here will elevate your pudding from good to genuinely unforgettable.
2. OXO Good Grips Fine Mesh Strainer
Straining your pudding before it chills ensures a perfectly smooth, silky result with zero lumps. The OXO Good Grips Fine Mesh Strainer has a sturdy, wide-rimmed design that makes it easy to hold over a bowl while you pour hot pudding through. It’s a small tool that makes a real difference in the final texture.
3. All-Clad Stainless Steel Saucepan
A heavy-bottomed saucepan is essential for making pudding without scorching the milk or curdling the eggs. The All-Clad Stainless Steel Saucepan distributes heat evenly and gives you complete control over the cooking process. It is a kitchen investment you’ll use for soups, sauces, and countless other recipes for years to come.
4. Le Creuset Stoneware Serving Bowls
Serving your pudding in beautiful individual stoneware bowls makes the presentation feel special and restaurant-worthy. Le Creuset’s stoneware is chip-resistant, dishwasher-safe, and freezer-to-oven safe, making these bowls practical as well as beautiful. They retain the chill of the pudding well, which is a lovely bonus for serving.
Read Also: Dirt Pudding Recipe
Step-by-Step Instructions
Step 1: Whisk Together the Dry Ingredients and Egg Yolks
- Measure 3 tablespoons (24g) of cornstarch and 1/3 cup (65g) of granulated sugar directly into your medium heavy-bottomed saucepan.
- Add 1/4 teaspoon of fine sea salt and stir with a whisk to combine the dry ingredients evenly.
- Add 3 large egg yolks to the saucepan with the dry ingredients.
- Whisk everything together vigorously until the mixture is smooth, pale yellow, and no dry streaks remain. This takes about 60 seconds of active whisking.
- Make sure to scrape the sides and bottom edges of the pan with the whisk to incorporate everything fully. This step helps prevent lumps from forming later.
Step 2: Add the Milk and Begin Heating
- Pour all 2 cups (480ml) of whole milk into the saucepan with the egg yolk mixture.
- If you are using a vanilla bean, split it lengthwise, scrape out the seeds, and add both the seeds and the pod to the milk mixture now.
- Whisk the milk into the egg and cornstarch mixture until completely smooth and uniform. Take your time here, about 1-2 minutes, to make sure everything is fully blended with no lumps.
- Place the saucepan over medium heat. Do not walk away at this point.
- Begin stirring constantly with a heatproof silicone spatula or whisk, making sure to scrape the bottom and sides of the pan as you stir.
Step 3: Cook the Pudding Until It Thickens
- Continue to cook the mixture over medium heat, stirring constantly, for approximately 8-12 minutes. The exact time will depend on your stove.
- You will notice the mixture beginning to steam gently after about 5 minutes. This is normal and expected.
- Keep stirring continuously. Do not stop stirring at any point, as the mixture can scorch on the bottom or cause the eggs to curdle if left unattended.
- After 8-10 minutes, the mixture will begin to thicken noticeably. You may see the first bubbles beginning to form at the edges of the pan.
- Once the pudding reaches a full, gentle boil (you will see steady bubbling across the surface), cook for exactly 1 more minute while stirring. This ensures the cornstarch is fully cooked and the pudding will set properly.
- To test for doneness without a thermometer: dip a spoon into the pudding and run your finger across the back. If the line stays clean and the pudding coats the spoon thickly, it is ready.
- If using an instant-read thermometer, the pudding is done when it reaches 165-175°F (74-80°C).
Step 4: Remove from Heat and Finish the Pudding
- Remove the saucepan from the heat immediately once the pudding has thickened and cooked through.
- If you used a vanilla bean pod, remove and discard it now using tongs or a fork.
- Add 2 tablespoons (28g) of cold unsalted butter (cut into small pieces) to the hot pudding.
- Add 2 teaspoons of pure vanilla extract to the pudding.
- Whisk everything together vigorously for about 30-60 seconds until the butter is completely melted and incorporated. The butter adds a final layer of richness and a beautiful glossy sheen.
Step 5: Strain the Pudding (Optional but Recommended)
- Set a fine-mesh strainer over a large heatproof bowl or pitcher.
- Pour the hot pudding through the strainer, using your heatproof spatula to press it through if needed.
- This step removes any small lumps or cooked egg bits, resulting in an ultra-silky, smooth pudding.
- If you are happy with the texture and notice no lumps, you may skip this step.
Step 6: Transfer and Cover the Pudding
- Pour or ladle the pudding into individual serving dishes or a single large bowl, depending on your preference.
- Immediately press a sheet of plastic wrap directly onto the surface of the pudding, making sure the plastic touches every part of the top. This prevents a skin from forming as the pudding cools.
- Allow the pudding to cool at room temperature for about 20-30 minutes before transferring to the refrigerator.
Step 7: Chill and Serve
- Refrigerate the pudding for at least 3 hours, or until fully chilled and set. Overnight chilling is also perfectly fine and produces a very well-set pudding.
- When ready to serve, remove the plastic wrap gently. If the pudding has thickened significantly in the fridge, give it a gentle stir or whisk to loosen it slightly.
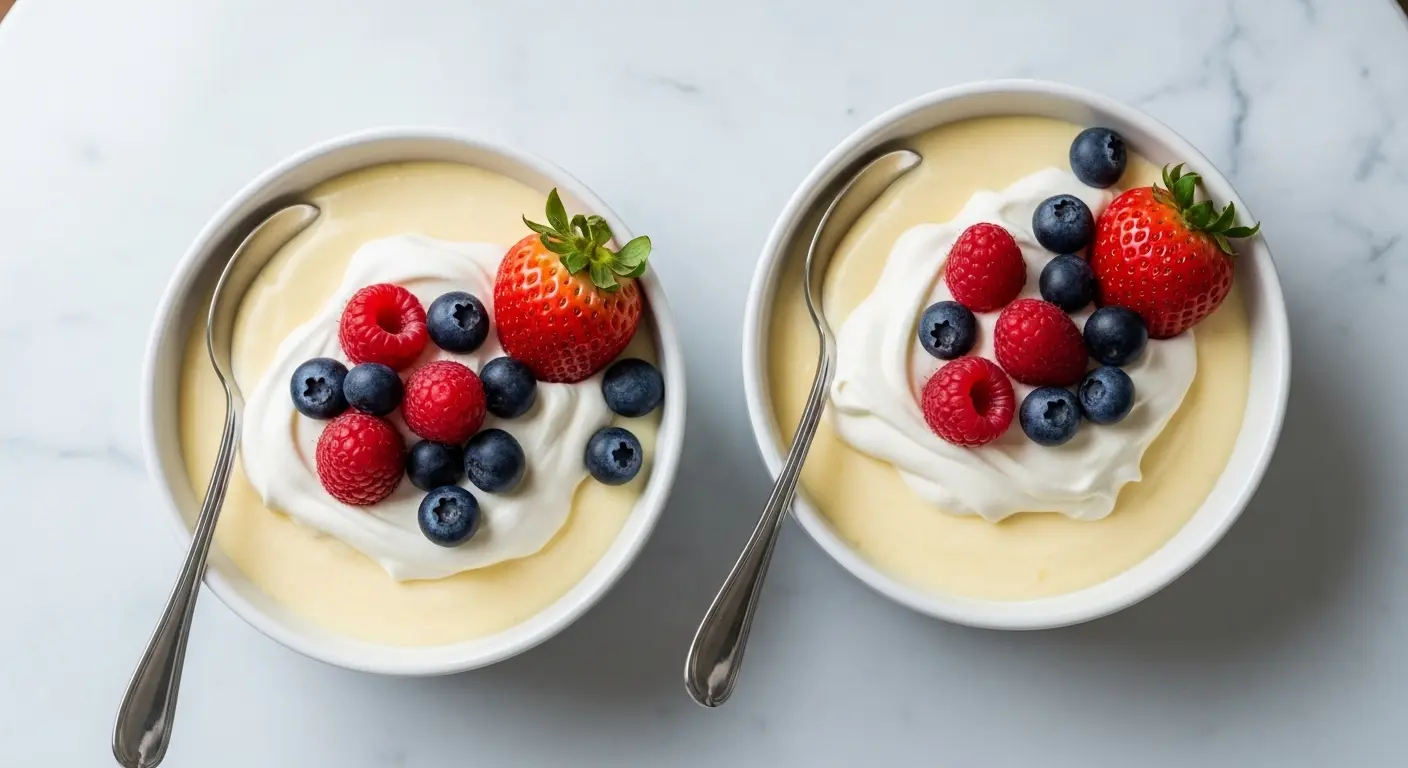
- Add your desired toppings, such as whipped cream, fresh berries, crumbled vanilla wafers, or a drizzle of caramel sauce, and serve immediately.
This technique works wonderfully as the filling in a Banana Cream Pie as well.
Tips for Success
Getting pudding right comes down to a few key techniques. The most important one is to never stop stirring once the pudding is on the heat. Consistent stirring keeps the eggs from scrambling and prevents the cornstarch from clumping into sticky lumps at the bottom of the pan. Another critical tip is to use cold butter at the very end, as it melts gradually into the hot pudding and creates a smoother, more velvety finish.
- Use whole milk only. Reduced-fat milk produces a thinner, less flavorful pudding that may not set as firmly.
- Whisk the dry ingredients and eggs together before adding liquid. This ensures the cornstarch is evenly distributed and prevents lumps from the start.
- Stir constantly. Never leave the pudding unattended on the heat, especially once it begins to thicken.
- Cook for the full extra minute after boiling. This activates the cornstarch completely and ensures the pudding sets properly once chilled.
- Use cold butter. Adding cold (not room temperature) butter at the end helps emulsify the fat smoothly into the pudding.
- Press plastic wrap directly on the surface. This is the only reliable way to prevent a rubbery skin from forming as it cools.
- Chill for at least 3 hours. The pudding continues to thicken as it cools, so don’t rush this step.
- Strain for a flawless result. Even if you think your pudding looks smooth, a quick strain through a fine-mesh sieve guarantees a perfectly silky texture.
You might also enjoy: Chia Seed Pudding Recipe
Serving Suggestions
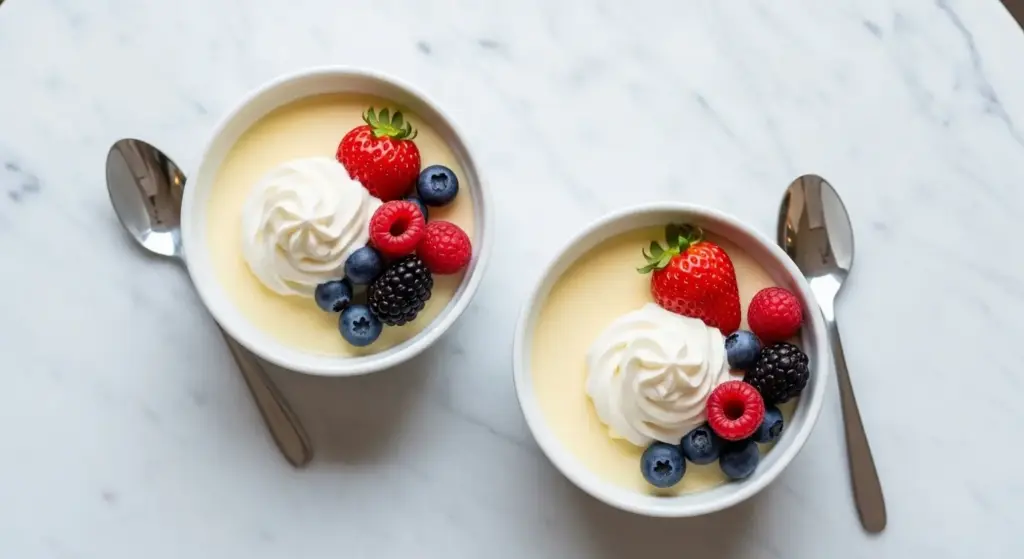
Homemade vanilla pudding is one of those desserts that shines on its own and equally as a supporting player in other dishes. Served chilled in a simple bowl with a spoonful of softly whipped cream, it is a completely satisfying dessert that feels nostalgic and comforting. The mild, warm vanilla flavor makes it an ideal canvas for whatever toppings or accompaniments you love.
Here are some of the best ways to serve this vanilla pudding:
- Top with fresh berries like strawberries, raspberries, or blueberries for a bright, fruity contrast
- Serve alongside Banana Cream Pie for a dessert spread that pudding lovers will adore
- Layer with crumbled vanilla wafers and sliced bananas for a quick, easy banana pudding-style parfait
- Spoon into a pre-baked tart shell and top with fresh fruit for an elegant Fruit Tart
- Drizzle with homemade Caramel Sauce and a sprinkle of fleur de sel for a sophisticated twist
- Use as a filling for layered trifles with pound cake, whipped cream, and fresh fruit
- Top with toasted coconut flakes and a pineapple chunk for a tropical-inspired serving
For an extra special dessert table, pair it alongside slices of Classic Vanilla Cake.
Variations to Try
The classic vanilla version is timeless, but this base recipe is incredibly easy to customize. Once you master the basic technique, you can adapt the flavors endlessly by swapping extracts, adding mix-ins, or adjusting the richness with different dairy options. The cooking process stays the same regardless of the variation you choose.
- Chocolate Vanilla Pudding: Whisk 3 tablespoons of good-quality unsweetened cocoa powder into the dry ingredients for a Chocolate Pudding hybrid with warm vanilla undertones.
- Coconut Vanilla Pudding: Replace 1 cup of whole milk with full-fat canned coconut milk for a tropical, coconut-scented pudding. Finish with toasted coconut flakes on top.
- Almond Vanilla Pudding: Add 1/2 teaspoon of pure almond extract along with the vanilla at the end for a nutty, fragrant variation that pairs beautifully with cherries.
- Butterscotch-Style Pudding: Swap out the granulated sugar for an equal amount of packed dark brown sugar to create a deeper, more caramel-like flavor profile.
- Dairy-Free Pudding: Use full-fat oat milk or unsweetened cashew milk in place of whole milk. The pudding will still thicken properly with the cornstarch, though the texture will be slightly lighter.
- Vanilla Bean Pudding: Use a full vanilla bean (seeds and pod) in addition to or instead of vanilla extract for a more intense, floral vanilla flavor with beautiful specks throughout.
Read Also: Bread Pudding Recipe
Storage and Reheating
Vanilla pudding stores very well in the refrigerator and actually improves with a little time, as the flavors meld and the texture firms up beautifully. The most important thing is to keep it covered so it doesn’t absorb odors from other foods in the fridge. If you have stored it in one large bowl, give it a gentle stir before serving to redistribute any liquid that may have settled on top.
- Refrigerator: Store the pudding in an airtight container or covered bowl for up to 4-5 days. Press plastic wrap directly on the surface if storing in an open bowl.
- Freezing: Vanilla pudding can be frozen for up to 2 months in a freezer-safe airtight container. The texture may become slightly grainy after thawing, so whisk it well after defrosting.
- Thawing: Thaw frozen pudding overnight in the refrigerator, then whisk vigorously or blend briefly to restore a smoother texture before serving.
- Reheating: If you prefer warm pudding, reheat it gently in a small saucepan over low heat, stirring constantly, until warmed through. Do not boil reheated pudding, as it can thin out or become gluey.
- Note: Once topped with whipped cream or other garnishes, the pudding is best consumed within 1-2 days.
Another favorite: Sticky Toffee Pudding Recipe
Nutritional Facts
The following nutritional information is estimated per serving, based on the recipe divided into 4 servings. Values are approximate and may vary based on the specific brands and quantities of ingredients used.
| Nutrient | Per Serving |
|---|---|
| Calories | approximately 235 kcal |
| Total Fat | 10g |
| Saturated Fat | 5.5g |
| Cholesterol | 170mg |
| Sodium | 145mg |
| Total Carbohydrates | 30g |
| Sugars | 24g |
| Protein | 6g |
| Calcium | 190mg |
| Iron | 0.4mg |
Note: Nutritional values do not include optional toppings like whipped cream, cookies, or sauces. Adding toppings will increase calorie and sugar content accordingly.
You might also enjoy: Corn Pudding Recipe
Health Benefits of Key Ingredients
While vanilla pudding is certainly a dessert meant for enjoyment, several of its key ingredients do offer some genuine nutritional value. Whole milk is one of the most nutrient-dense dairy products available, and egg yolks are among the most nutritious foods you can consume.
Here is a look at the notable benefits of the ingredients in this recipe:
- Whole milk is a significant source of calcium, phosphorus, and vitamin D, all of which are essential for bone health and muscle function. It also provides high-quality protein and healthy fats that support sustained energy.
- Egg yolks are rich in fat-soluble vitamins A, D, E, and K, as well as choline, a nutrient important for brain health and liver function. They also contain lutein and zeaxanthin, antioxidants that support eye health.
- Vanilla extract contains small amounts of antioxidants and has been used in traditional medicine for its mild calming and mood-lifting properties. Real vanilla also contains trace minerals like magnesium and potassium.
- Cornstarch acts as a clean, gluten-free thickener, making this pudding suitable for those with gluten sensitivities.
- Butter provides fat-soluble vitamins and conjugated linoleic acid (CLA), a naturally occurring fatty acid with anti-inflammatory properties when sourced from grass-fed dairy.
This easy Crème Brûlée is another classic custard-style dessert you’ll love exploring.
Frequently Asked Questions
1. Why did my vanilla pudding not thicken?
The most common reason pudding fails to thicken is that it was not cooked long enough.
The pudding needs to reach a full, steady boil and then cook for one additional minute to fully activate the cornstarch. If you stop cooking as soon as you see the first bubbles, the starch has not had enough time to do its job, and the pudding will remain soupy even after chilling.
2. Can I use skim milk or 2% milk instead of whole milk?
Technically yes, but the results will be noticeably different.
Whole milk’s fat content is what creates the pudding’s rich, creamy texture. Using skim or 2% milk will produce a thinner, less satisfying pudding that may not set as firmly in the refrigerator.
3. How do I prevent lumps in my vanilla pudding?
The key is to whisk the cornstarch and egg yolks together with the sugar and salt before adding any liquid.
This coats the starch granules in fat and prevents them from clumping when the milk is added. Constant stirring throughout the cooking process and passing the finished pudding through a fine-mesh strainer are the most reliable ways to guarantee a lump-free result.
4. Can I make this vanilla pudding recipe ahead of time?
Absolutely, and it actually tastes better after a full overnight chill.
Make the pudding the day before, press plastic wrap directly on the surface, and refrigerate it. The next day, simply remove the wrap, give it a gentle stir, and add your toppings just before serving.
5. What can I use this vanilla pudding for besides eating it plain?
This pudding is an incredibly versatile base for many other desserts.
Use it as the filling for cream pies, layer it with cake and fruit in a trifle, use it to make a classic banana pudding, spread it between cake layers, or spoon it into pre-baked tart shells for a quick and elegant fruit tart. It also works beautifully as a filling for eclairs and cream puffs.
Read Also: Brownie Pudding Recipe
Final Thoughts
Once you make vanilla pudding from scratch, you will understand immediately why it cannot be compared to the boxed version.
The texture is silkier, the flavor is deeper, and the satisfaction of making it with your own hands is something a powder packet simply cannot replicate.
This recipe is forgiving, fast, and endlessly rewarding.
If you give it a try, leave a comment below and let me know how it turned out! Did you serve it plain, use it in another recipe, or add your own creative twist?
Sharing your experience helps others discover how easy and delicious homemade vanilla pudding can be.
Recommended:
- Banana Pudding Recipe
- Figgy Pudding Recipe
- Malva Pudding Recipe
- Pudding Cake Recipe with Cake Mix
- Best Cheesecake Recipe
- Easy Tiramisu Recipe
- Classic Tiramisu Recipe
- Strawberry Cheesecake Recipe
- Strawberry Sauce Recipe
- Caramel Sauce Recipe


