If you’ve ever wanted to serve a dessert that gets everyone laughing before they even take a bite, this dirt pudding recipe is exactly what you need. Made with layers of creamy chocolate pudding, velvety cream cheese filling, and crushed Oreo cookies that look just like garden soil, it’s one of those treats that’s equal parts delicious and delightfully ridiculous.
The best part? You don’t need to turn on your oven once. This is a completely no-bake dessert that comes together in about 20 minutes of active prep time.
Originally popularized in the 1980s and 1990s, dirt pudding has been a staple at birthday parties, summer cookouts, potlucks, and school events for decades. It’s usually served with gummy worms poking out of the top to complete the “dirt” illusion.
What makes this version really shine is the combination of instant chocolate pudding, softened cream cheese, powdered sugar, butter, and whipped topping. The cream cheese brings richness and body to the filling, the powdered sugar balances the tanginess, and the butter adds a subtle depth of flavor that takes the whole dessert up a notch.
Kids go absolutely wild for it. Adults pretend to be too mature for it, then quietly scoop themselves a second helping.
This pairs beautifully with other crowd-pleasing no-bake treats like the Banana Pudding Recipe if you’re planning a party dessert spread.
Why You’ll Love This Dirt Pudding Recipe
This dessert has earned its legendary status for good reason.
It’s genuinely one of the easiest things you’ll ever make. No baking, no tempering chocolate, no complicated techniques.
You can prep it entirely the night before, which is a huge advantage when you’re hosting a party or gathering.
The flavor combination of chocolatey Oreos, creamy pudding, and tangy cream cheese is absolutely irresistible. It hits every note you could want in a dessert.
Kids can get involved in almost every step, making it a wonderful activity-and-treat combo. Crushing the Oreos is especially fun for little hands.
It’s easy to scale up for a crowd. Just double or triple the recipe and use a large trifle bowl or serving dish.
Here’s a quick breakdown of why this recipe works so well:
- No oven required so it’s perfect year-round, especially in warmer months
- Make-ahead friendly and actually tastes better after chilling overnight
- Endlessly customizable with seasonal toppings, different Oreo flavors, or themed decorations
- Kid-friendly prep with simple steps even young children can help with
- Universally loved by both kids and adults at every kind of gathering
- Affordable ingredients that are easy to find at any grocery store
- Visually dramatic and fun without requiring any artistic skill
Another favorite: Chocolate Pudding Recipe
Ingredients
This recipe uses simple, pantry-friendly ingredients that layer together beautifully to create the signature creamy-and-crunchy dirt effect.
The instant chocolate pudding is the base of the filling and gives it that rich, deep chocolate flavor. Using two packages ensures the mixture has enough body to hold up when layered. Instant pudding (not cook-and-serve) is critical here; cook-and-serve won’t set properly in this application.
Here’s everything you’ll need:
- 2 packages (3.9 oz / 110g each) instant chocolate pudding mix
- 3 cups (720ml) cold whole milk
- 8 oz (225g) full-fat cream cheese, softened to room temperature
- 4 tablespoons (55g) unsalted butter, softened to room temperature
- 1 cup (120g) powdered sugar (confectioners’ sugar), sifted
- 16 oz (450g) frozen whipped topping (such as Cool Whip), thawed
- 1 package (14.3 oz / 405g) Oreo cookies (regular, not Double Stuf)
- Gummy worms for topping (optional but highly recommended)
Read Also: Vanilla Pudding Recipe
Kitchen Equipment Needed
You won’t need any special equipment for this recipe, just the basics that most home kitchens already have on hand.
A hand mixer or stand mixer is important for beating the cream cheese and butter together smoothly. Trying to do this by hand can leave lumps in the filling, which affects both the texture and appearance of the final dessert.
- Hand mixer or stand mixer
- Food processor or large zip-top bag for crushing Oreos
- Rolling pin (if not using a food processor)
- 2 large mixing bowls
- Medium mixing bowl
- Rubber spatula or large spoon for folding
- Whisk
- Trifle bowl or individual serving cups/buckets
- Measuring cups and spoons
- Plastic wrap or lid for chilling
Read Also: No Bake Cheesecake Recipe
Recommended Products for This Recipe
These are products I personally recommend based on quality and performance. Using the right tools and ingredients can make a noticeable difference in your final result.
1. OXO Good Grips 11-Cup Food Processor
A good food processor makes crushing Oreos into perfectly even crumbs a total breeze. The OXO Good Grips model handles this job effortlessly, giving you that fine, sand-like consistency that really sells the “dirt” look. It’s a versatile kitchen tool you’ll reach for again and again.
2. KitchenAid Hand Mixer
Getting the cream cheese and butter perfectly smooth is much easier with a quality hand mixer. The KitchenAid model gives you enough power to whip through cream cheese without overworking the batter. Lumpy filling is one of the most common issues with this recipe, and a reliable mixer eliminates that problem entirely.
3. Libbey Selene Glass Trifle Bowl
Serving dirt pudding in a clear trifle bowl shows off all those gorgeous layers and makes for a stunning presentation at any party. The Libbey Selene bowl is the perfect size for this recipe and is dishwasher safe for easy cleanup. It’s a beautiful serving piece that works for dozens of other desserts, too.
4. Wilton Disposable Treat Cups with Lids
If you’re making individual dirt pudding cups for a party or event, these disposable cups with lids are ideal. They make portion control easy, are completely spill-proof during transport, and look adorable with gummy worms peeking out the top. They’re perfect for kids’ parties, bake sales, or school events.
5. Black Forest Gummy Worms
Not all gummy worms are created equal. The Black Forest brand uses real fruit juice and has a satisfying chewy texture that holds up beautifully in and on top of the pudding without becoming sticky or dissolving. They’re bright, colorful, and instantly recognizable as the star decoration of any dirt pudding.
You might also enjoy: Muddy Buddy Recipe
Step-by-Step Instructions
Follow these steps carefully and you’ll have a perfect dirt pudding every time. Read through all the steps once before starting so you know what’s coming next.
Step 1: Crush the Oreo Cookies
- Place all of the Oreo cookies (including the cream filling) into a food processor fitted with the standard blade.
- Pulse the cookies in short bursts of 2 to 3 seconds each until they break down into fine, sand-like crumbs.
- If you don’t have a food processor, place the Oreos in a large zip-top bag, seal it tightly, and use a rolling pin to crush them by rolling back and forth firmly. Bash the cookies until they are broken into fine crumbs with just a few slightly larger pieces for texture.
- Divide the crushed Oreos roughly in half. Set one half aside for layering and keep the other half for the topping. This prevents the layers from becoming uneven.
- Set all of the crumbs aside in a bowl or on a plate while you prepare the filling.
Step 2: Prepare the Chocolate Pudding
- Pour 3 cups (720ml) of cold whole milk into a large mixing bowl.
- Add both packages of instant chocolate pudding mix directly into the milk.
- Whisk vigorously for about 2 minutes straight, making sure to scrape the bottom and sides of the bowl, until the mixture is smooth and beginning to thicken.
- Set the pudding aside and allow it to rest for 5 minutes so it can continue to firm up. It should have a soft, thick consistency similar to loose mousse before you move on.
- Do not refrigerate the pudding at this stage; you’ll be folding other ingredients in shortly.
Step 3: Beat the Cream Cheese and Butter
- Make sure your cream cheese and butter are both fully softened to room temperature. Cold cream cheese will create lumps that are very difficult to smooth out later.
- Place the softened cream cheese and softened butter together in a separate large mixing bowl.
- Using a hand mixer or stand mixer fitted with the paddle attachment, beat the cream cheese and butter together on medium speed for about 2 to 3 minutes, until the mixture is completely smooth, light, and fluffy with no visible lumps.
- Stop to scrape down the sides and bottom of the bowl with a rubber spatula midway through to ensure everything is evenly combined.
Step 4: Add the Powdered Sugar
- Sift 1 cup (120g) of powdered sugar directly over the cream cheese and butter mixture. Sifting prevents any clumps from forming.
- Beat the mixture on low speed first to prevent a cloud of powdered sugar from flying up, then increase to medium speed and beat for another 1 to 2 minutes until the sugar is fully incorporated.
- The mixture should be smooth, silky, and noticeably sweeter. Taste it and set it aside.
Step 5: Combine the Cream Cheese Mixture with the Pudding
- Add the cream cheese and butter mixture to the bowl containing the prepared chocolate pudding.
- Using a rubber spatula, fold the two mixtures together gently using large sweeping motions from the bottom of the bowl upward. Try to keep the folding motion smooth and avoid stirring aggressively, which can make the pudding watery.
- Continue folding until the two components are fully combined and no white streaks of cream cheese mixture remain visible.
- The resulting mixture should be thick, glossy, and a rich chocolate brown color.
Step 6: Fold in the Whipped Topping
- Make sure your thawed whipped topping is at a soft but still cold consistency. It should not be melted or warm.
- Spoon the entire container of whipped topping on top of the pudding mixture.
- Using the same gentle folding technique as before, fold the whipped topping into the pudding mixture with large, sweeping motions.
- Fold just until the mixture is uniform in color and texture with no remaining white streaks. Overmixing at this stage will deflate the airy whipped topping and make the filling denser than desired.
- The final filling should be light, creamy, and mousse-like with a beautiful chocolate color.
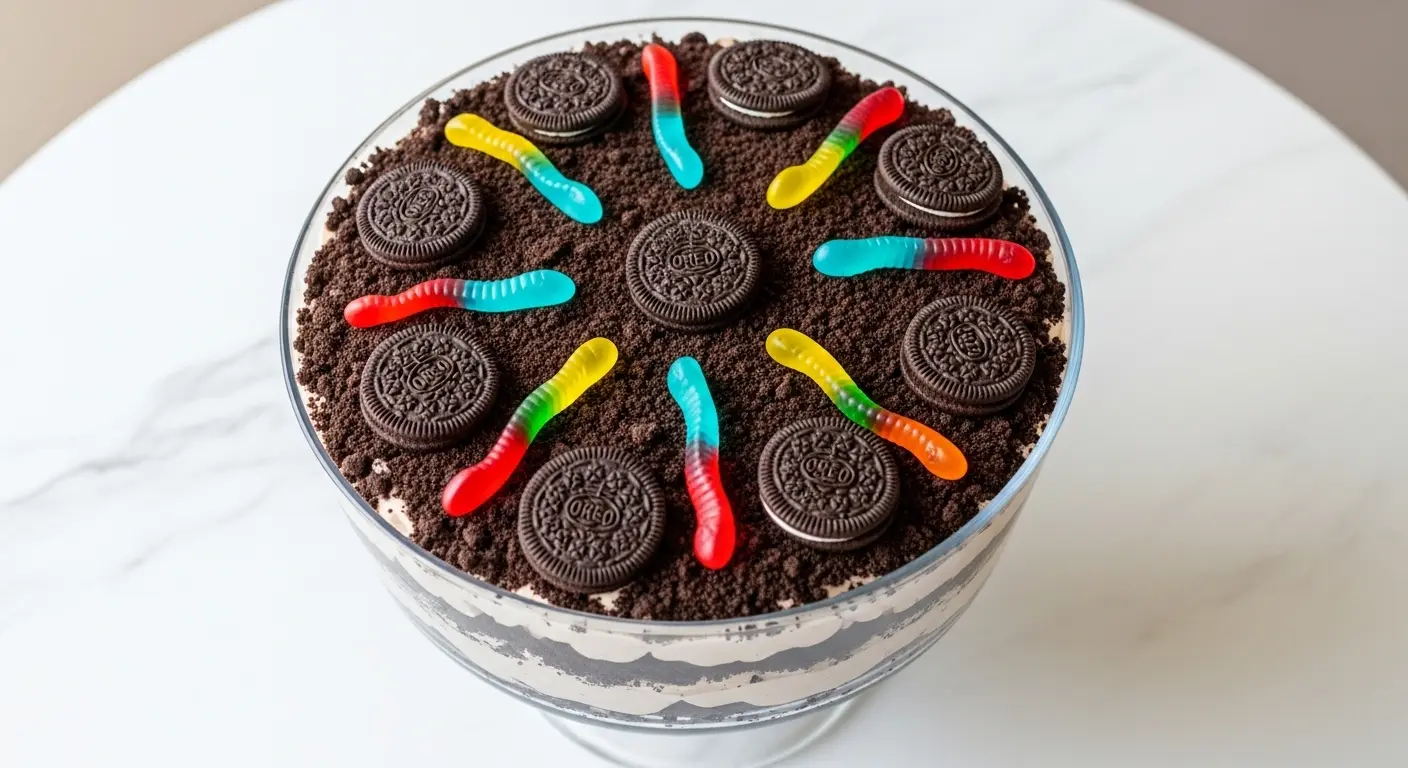
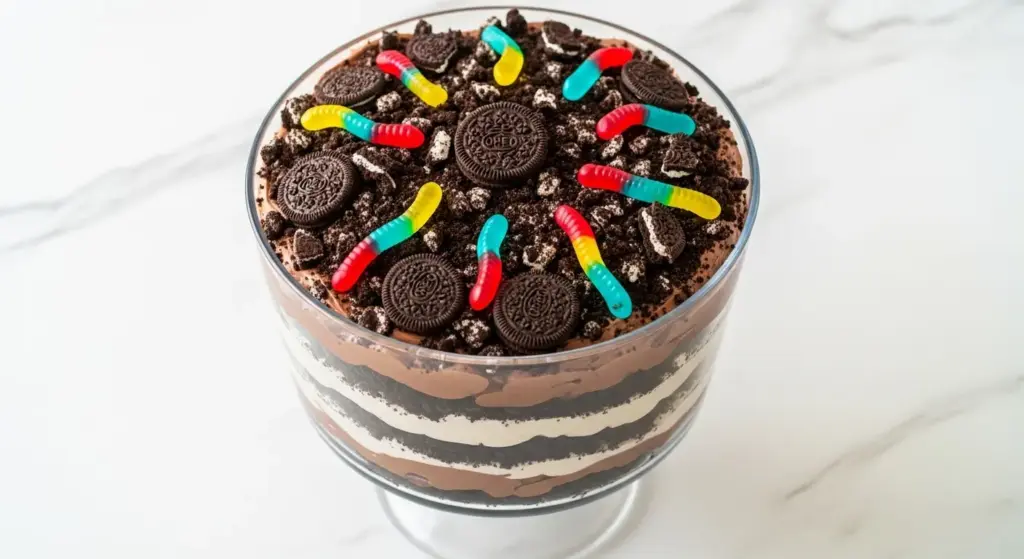
Step 7: Assemble the Dirt Pudding Layers
- Choose your serving vessel: a large trifle bowl (about 3-quart capacity), individual dessert cups, or even small buckets or flower pots for a fun themed presentation.
- Sprinkle a generous layer of crushed Oreo crumbs across the bottom of your serving vessel, about one-third of the total crumbs. Press them down very lightly so they form a stable base layer.
- Spoon roughly half of the chocolate pudding filling over the Oreo crumb base. Use a rubber spatula or large spoon to spread it out evenly from edge to edge.
- Add another layer of crushed Oreo crumbs on top of the pudding filling, using about half of the remaining crumbs.
- Add the second half of the pudding filling over the crumb layer, spreading it evenly to the edges.
- Top the entire dessert with the remaining crushed Oreo crumbs to complete the “dirt” look. Make sure the top is completely covered so no pudding filling is visible from the top.
Step 8: Add Gummy Worms and Chill
- Press several gummy worms partially into the top layer of Oreo crumbs so they appear to be crawling in and out of the “dirt.” This is the classic finishing touch that makes the dessert instantly recognizable and fun.
- Cover the trifle bowl or individual cups tightly with plastic wrap or a lid.
- Refrigerate for a minimum of 4 hours before serving. Overnight chilling (8 to 12 hours) is strongly recommended, as the Oreo crumbs absorb some moisture from the pudding and become wonderfully soft and cohesive.
- Serve cold directly from the refrigerator.
Read Also: Brownie Pudding Recipe
Tips for Success
A few simple strategies make all the difference between a good dirt pudding and a truly great one.
The most important tip is to use full-fat cream cheese and let it come completely to room temperature before mixing. Cold cream cheese doesn’t blend properly and creates small lumps throughout the filling that you simply cannot smooth out after the fact.
Here are more tips to ensure success:
- Use cold milk for the pudding: Cold milk helps instant pudding set faster and firmer, giving the filling better structure.
- Don’t overmix after adding whipped topping: Fold gently to preserve the airy texture. Overmixing makes the filling dense and flat.
- Reserve some Oreo crumbs: Keep the top layer of crumbs separate and add them fresh right before serving if you want a crunchier topping texture.
- Chill overnight if possible: This gives the Oreos time to soften into a perfect, cake-like texture and allows all the flavors to meld together.
- Use a food processor for the most even crumbs: Uneven crumbs are fine for texture, but very large chunks can make layering messy.
- Work with thawed Cool Whip: Frozen whipped topping won’t fold in properly and can leave icy chunks in the filling.
- Taste the filling before assembling: Adjust sweetness with a little extra powdered sugar if desired before you start layering.
Another favorite: Sticky Toffee Pudding Recipe
Serving Suggestions
Dirt pudding is incredibly fun to serve, and presentation really elevates the experience.
For the most classic presentation, serve it in a large trifle bowl so guests can see all the gorgeous layers before it gets scooped. Individual clear cups or mason jars are another beautiful option that makes portion control easy and allows each person to see their own perfect layers.
Here are some great ways to serve and enjoy this dessert:
- Serve in mini terracotta flower pots with gummy worms and plastic flowers for a showstopper centerpiece at a garden party or spring gathering
- Use small plastic sand pails and tiny shovels for a beach or summer party theme
- Pair with Classic Deviled Eggs at a backyard cookout for a complete party spread
- Serve alongside a Fruit Salad for a refreshing contrast to the rich, chocolatey pudding
- Portion into lidded cups the night before a school event or bake sale for easy transport
- Top individual servings with a single gummy worm and a sprinkle of extra crushed Oreos right before presenting to guests
Read Also: Chocolate Chip Bread Recipe
Variations to Try
The classic recipe is wonderful exactly as written, but there are so many fun ways to put your own spin on it.
These variations use the same basic method and structure while swapping out a few ingredients to create completely different flavor profiles or visual effects.
- Golden Oreo Beach Dirt: Replace regular Oreos with Golden Oreos for pale “sand” colored crumbs. Pair with blue Jello on the bottom layer for a beachy ocean and sand effect. Perfect for summer parties.
- Vanilla Cream Version: Swap the instant chocolate pudding for instant vanilla pudding. The filling becomes pale and creamy, which contrasts beautifully with the dark Oreo crumbs.
- Peanut Butter Dirt Pudding: Stir 2 to 3 tablespoons of creamy peanut butter into the cream cheese mixture before combining with the pudding. Use peanut butter Oreos instead of regular for a double peanut butter effect.
- Halloween Graveyard Cake: Add chocolate wafer cookies shaped like tombstones or use Milano cookies standing upright in the dirt surface. Swap gummy worms for Halloween-themed gummy skulls or spider rings.
- Mint Chocolate Chip Dirt: Use mint-flavored Oreos and add a small amount of peppermint extract to the cream cheese mixture. Top with green-tinted sugar for a festive St. Patrick’s Day or holiday version.
- No Cream Cheese Version: Omit the cream cheese and butter. Simply fold the whipped topping into the prepared pudding for a lighter, airier filling that still tastes great.
- Brownie Base Dirt Pudding: Press a thin layer of crumbled brownies into the bottom of the serving dish before adding your Oreo and pudding layers for a “mud” effect.
You might also enjoy: Rice Pudding Recipe
Storage and Reheating
Dirt pudding is a cold dessert that requires refrigeration at all times. It should never be left at room temperature for more than 2 hours.
Proper storage keeps both the texture and flavor at their best and ensures the Oreo layers don’t become unpleasantly mushy before you’re ready to serve.
- Refrigerator: Cover tightly with plastic wrap or a lid and store in the refrigerator for up to 3 days. The Oreo crumbs will continue to soften over time, so day two is often the peak of texture and flavor.
- Do not freeze: Freezing causes the filling to become watery and the texture changes significantly when thawed. The Oreo crumbs turn soggy and the cream cheese layer can separate. This dessert is not suitable for freezing.
- Individual cups: If stored in individual cups with lids, they’re easy to grab and go straight from the fridge without any additional prep.
- Topping tip: If you want a crunchier Oreo top layer on day two or three, simply sprinkle fresh crushed Oreos over the top right before serving rather than relying on the crumbs already in the dish.
- Reheating: Dirt pudding is served cold and should never be reheated.
Read Also: Chia Seed Pudding Recipe
Nutritional Facts
The following values are approximate and based on the full recipe divided into 12 servings when made as written with all ingredients included. Individual values will vary based on specific brands and exact portion sizes.
| Nutrient | Per Serving (approx.) |
|---|---|
| Calories | 430 kcal |
| Total Fat | 22g |
| Saturated Fat | 11g |
| Cholesterol | 40mg |
| Sodium | 510mg |
| Total Carbohydrates | 56g |
| Dietary Fiber | 1.5g |
| Total Sugars | 38g |
| Protein | 6g |
| Calcium | 130mg |
| Iron | 3mg |
Please note that these figures are estimates only and should not be used as medical nutritional advice. Values will vary depending on specific product brands, exact measurements, and serving sizes.
Another favorite: Corn Pudding Recipe
Health Benefits of Key Ingredients
While dirt pudding is absolutely a treat and not a health food, a few of the key ingredients do bring some nutritional value worth noting.
It’s always nice to know there’s a little goodness tucked in alongside all that chocolatey indulgence.
Here’s a look at some of the nutritional highlights from the key ingredients:
- Milk: Provides calcium and vitamin D, both essential for bone health. Whole milk also delivers a good amount of protein per serving and natural B vitamins.
- Cream cheese: Contains a small amount of vitamin A, which supports eye health and immune function. It also adds a dose of protein and healthy fats to the filling.
- Cocoa in the pudding: Cocoa contains flavonoids, which are plant-based compounds associated with heart health. The chocolate pudding mix provides a small amount of these beneficial compounds.
- Butter: A source of fat-soluble vitamins including vitamins A, D, E, and K. Butter adds richness and depth of flavor while contributing to the absorption of fat-soluble nutrients.
- Gummy worms: These are candy and offer no meaningful nutritional benefit, but they are a joy to eat and make this dessert an unforgettable experience.
Read Also: Banana Pudding Recipe
Frequently Asked Questions
1. Can I make dirt pudding ahead of time?
Yes, and it’s actually encouraged. Dirt pudding is best when made at least 4 hours in advance and ideally the night before.
The chill time allows the flavors to meld together and gives the Oreo crumbs time to soften slightly, creating a more cohesive and delicious texture throughout.
2. Can I use homemade whipped cream instead of Cool Whip?
You can, but there are a few things to keep in mind. Homemade whipped cream is less stable than Cool Whip and may begin to deflate or weep after a few hours in the refrigerator.
If you prefer to use homemade whipped cream, stabilize it by adding 1 teaspoon of unflavored gelatin dissolved in a small amount of water, or by whipping it with a tablespoon of powdered sugar to help it hold its shape longer.
3. Why is my dirt pudding too runny?
A runny filling is usually caused by one of two things. Either the instant pudding was not whisked long enough to thicken before being combined with the other ingredients, or the whipped topping was over-mixed and deflated.
Make sure to whisk the pudding and milk vigorously for a full 2 minutes and let it rest for 5 minutes before folding in the other components. Fold the whipped topping in gently with a rubber spatula rather than stirring.
4. Can I use cook-and-serve pudding instead of instant pudding?
No, cook-and-serve pudding will not work properly in this recipe. Cook-and-serve pudding needs to be heated and then cooled to set, and once it’s combined cold with the cream cheese and whipped topping, it won’t have the right firm, creamy consistency.
Stick with instant pudding mix for best results. Look for boxes that specifically say “instant” on the label.
5. How far in advance can I make dirt pudding?
You can make it up to 24 hours in advance for the best results. If stored properly in the refrigerator, it will remain delicious and safe to eat for up to 3 days total.
Beyond day 3, the Oreo crumbs tend to get too soft and the texture of the filling can change. For the absolute best experience, make it the night before and serve it the next day.
Another favorite: Malva Pudding Recipe
Final Thoughts
This dirt pudding recipe is proof that the best desserts don’t always require the most effort. It’s one of those rare treats that looks impressive, tastes incredible, and brings genuine joy to everyone who sees it before they even take the first bite.
Once you make it once, it will become your go-to for every birthday, cookout, school event, and holiday gathering on the calendar. Pull it out for Easter brunch with spring flower decorations, serve it at a Halloween party with tombstone cookies, or bring it to a backyard barbecue in little sand pail cups.
Give this recipe a try and let us know how it turned out in the comments below. We’d love to hear how you served it and what fun variations you tried!
Recommended:
- Figgy Pudding Recipe
- Bread Pudding Recipe
- Pudding Cake Recipe with Cake Mix
- No Bake Cookie Recipe
- Best Cheesecake Recipe
- Hot Fudge Sundae
- Cake Pop Recipe
- Monster Cookie Ice Cream Recipe
- Checkerboard Cake Recipe
- Cannoli Poke Cake Recipe


