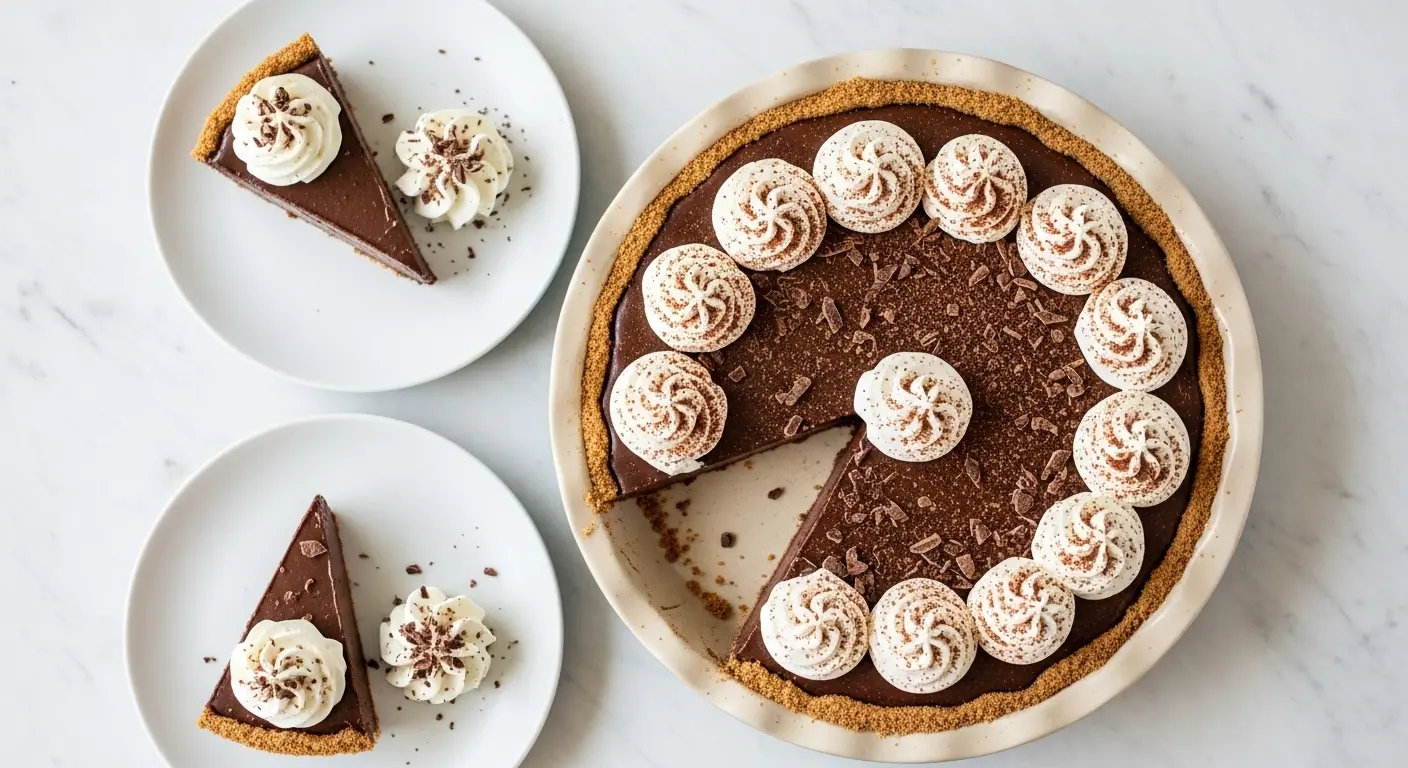
A truly great chocolate pie recipe is one of those desserts that never goes out of style. Rich, creamy, and deeply satisfying, this classic chocolate pie has been gracing family tables and holiday spreads for generations — and for good reason.
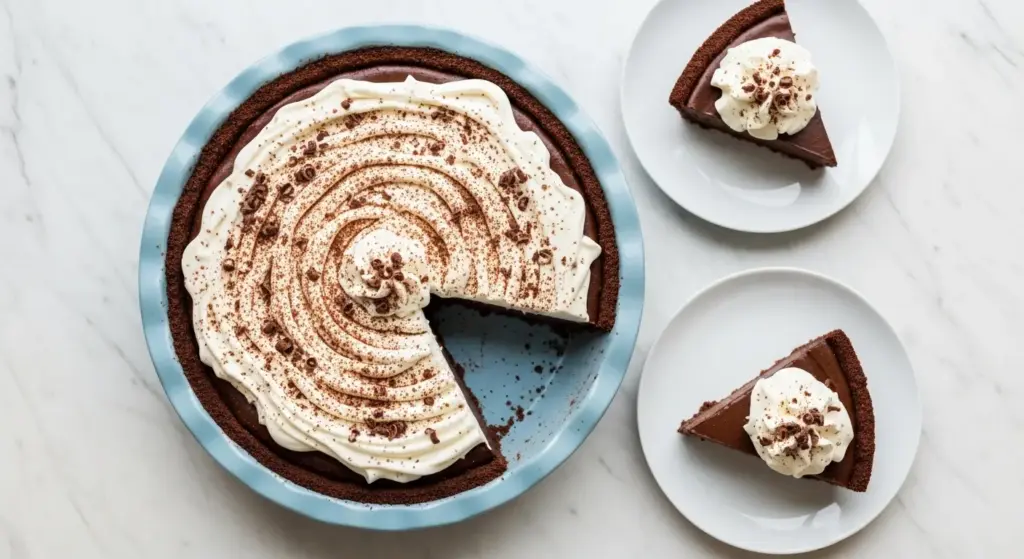
This recipe follows the beloved old-fashioned method: a silky chocolate custard filling made right on the stovetop, poured into a perfectly baked pie crust, and finished with a cloud of freshly whipped cream on top.
What makes this particular version so irresistible is the combination of unsweetened cocoa powder and a touch of real butter, which gives the filling a deep, complex chocolate flavor that boxed pudding mix simply can’t replicate.
It’s not overly complicated, but the result looks and tastes absolutely impressive. The filling sets to a smooth, pudding-like texture that slices beautifully every single time.
If you’ve been searching for a from-scratch chocolate pie recipe you can count on for Thanksgiving, Christmas, or just a Tuesday night treat — this is the one.
For a quick and reliable base, you might also love our Easy Pie Crust Recipe to pair with this filling.
Why You’ll Love This Chocolate Pie Recipe
This chocolate pie is the kind of dessert that gets passed down through families — simple ingredients, timeless technique, and a flavor that makes people close their eyes when they take that first bite.
One of the best things about it is how approachable it is. Even if you’ve never made a custard-style pie before, the stovetop method is forgiving and beginner-friendly.
The filling uses pantry staples you likely already have on hand, which means there’s no special trip to the grocery store needed.
It’s also incredibly versatile. You can dress it up with chocolate shavings and a swirl of whipped cream for an elegant dinner party dessert, or keep it casual for a weeknight family dinner.
The flavor is deeply chocolatey but not overwhelmingly rich, making it the kind of pie that people go back for seconds on.
- Made with real cocoa powder and butter for a bold, authentic chocolate flavor
- Smooth, creamy custard filling that sets up perfectly with no gelatin required
- Works with any 9-inch pie crust — baked pastry, graham cracker, or Oreo crumb crust
- Can be made a day ahead, which makes holiday prep so much easier
- Feeds 8 people with ease and looks stunning on any dessert table
Another reader favorite to add to your dessert lineup: Chocolate Pudding — it uses a nearly identical filling technique and is just as satisfying.
Ingredients
This classic chocolate pie filling is built on just a few key ingredients, and each one plays a very specific role. Using whole milk instead of skim or 2% is important here — the higher fat content gives the filling that luxuriously creamy texture you’re after. Similarly, unsalted butter lets you control the saltiness, and a full teaspoon of pure vanilla extract rounds out all the chocolate notes beautifully.
- 1 pre-baked 9-inch pie crust (homemade or store-bought)
- 1 cup (200g) granulated sugar
- 3 tablespoons (24g) cornstarch
- ½ cup (45g) unsweetened cocoa powder
- ¼ teaspoon (1.5g) salt
- 3 cups (720ml) whole milk
- 3 large egg yolks, lightly beaten
- 2 tablespoons (28g) unsalted butter
- 1½ teaspoons (7.5ml) pure vanilla extract
- 1½ cups (360ml) heavy whipping cream (for topping)
- 2 tablespoons (16g) powdered sugar (for whipped cream)
- ½ teaspoon (2.5ml) vanilla extract (for whipped cream)
- Chocolate shavings or cocoa powder for garnish (optional)
Read Also: Flaky Pie Crust Recipe
Kitchen Equipment Needed
Having the right tools on hand makes this recipe significantly easier to pull off, especially when you’re whisking a hot custard over the stove. A heavy-bottomed saucepan distributes heat evenly, which is essential for preventing the custard from scorching or developing lumps. A digital instant-read thermometer is optional but incredibly helpful if you’re new to custard-making.
- 9-inch pie dish
- Heavy-bottomed saucepan (medium to large size)
- Whisk
- Mixing bowls (at least two)
- Measuring cups and spoons
- Wooden spoon or silicone spatula
- Electric hand mixer or stand mixer (for whipping cream)
- Plastic wrap
- Offset spatula or the back of a spoon (for spreading whipped cream)
- Wire cooling rack
Read Also: Easy Pecan Pie Recipe
Recommended Products for This Recipe
These are products that genuinely make a difference when preparing this chocolate pie — selected based on quality, performance, and how much they streamline the process.
1. Valrhona Unsweetened Cocoa Powder
The quality of your cocoa powder directly determines the depth and complexity of your pie’s chocolate flavor. Valrhona’s Dutch-processed cocoa is rich, smooth, and slightly less bitter than standard grocery store brands, giving you a more nuanced, gourmet-tasting filling. It’s the kind of upgrade that instantly elevates a simple recipe.
2. OXO Good Grips Pie Pan
A sturdy, good-quality pie pan with slanted sides makes it so much easier to slice and serve clean portions without the filling dragging. The non-stick surface helps the crust release cleanly, and the clear glass allows you to check the bottom of your crust during blind baking. An investment you’ll use dozens of times over.
3. Pie Weights for Blind Baking
If you’re making a homemade pie crust, blind baking with pie weights is non-negotiable for a crisp, flat base. Ceramic or stainless steel pie weights distribute heat more evenly than dried beans, resulting in a properly baked, non-soggy crust that can stand up to the creamy filling without going soft.
4. Heavy-Bottomed Saucepan
A high-quality, heavy-bottomed saucepan is essential for making custard without scorching. Thinner pans tend to create hot spots that cause the filling to stick, burn, or develop an unpleasant eggy smell. A well-made saucepan gives you even, controlled heat from edge to edge.
5. Offset Spatula
An offset spatula makes spreading and swirling the whipped cream on top of the pie so much easier and cleaner. It gives you the gentle control you need to get that beautiful, café-style swooped finish on your whipped cream without pressing down and compressing the filling underneath.
You might also enjoy: Boston Cream Pie
Step-by-Step Instructions
Step 1: Prepare or Gather Your Pie Crust
- If using a homemade pie crust, prepare your dough, roll it out to about 12 inches (30cm) in diameter, and lay it into your 9-inch (23cm) pie dish.
- Press the dough gently into the bottom and up the sides without stretching it (stretched dough shrinks during baking).
- Crimp or fold the edges decoratively, then refrigerate the crust for at least 15 minutes to firm up the fat. This step helps prevent shrinkage.
- Preheat your oven to 400°F (205°C).
- Line the chilled crust with parchment paper and fill it completely with pie weights, dried beans, or uncooked rice.
- Bake on a rimmed baking sheet for 20 minutes, then carefully remove the parchment and weights.
- Return the crust to the oven and bake for an additional 10–15 minutes, until the bottom looks dry and the edges are a light golden color.
- Transfer to a wire rack and let the crust cool completely before adding the filling. A hot crust will cause the filling to set unevenly.
- If using a store-bought or pre-baked crust, simply set it aside and proceed to making the filling.
Step 2: Combine the Dry Ingredients
- In your heavy-bottomed saucepan (off the heat), whisk together the granulated sugar, cornstarch, cocoa powder, and salt until fully combined and no lumps remain.
- Take your time with this step — breaking up any lumps in the cocoa powder and cornstarch now will save you from a lumpy filling later.
- The cornstarch is the primary thickening agent in this recipe. When combined with the liquid and egg yolks and heated, it creates a smooth, stable custard that sets up beautifully in the fridge.
Step 3: Add the Milk and Egg Yolks
- In a separate small bowl, lightly beat the 3 egg yolks with a fork until broken up and slightly combined.
- Gradually pour about 1 cup (240ml) of the whole milk into the dry ingredients in the saucepan, whisking constantly as you pour to create a smooth, lump-free paste.
- Once the paste is smooth, slowly whisk in the remaining milk until fully incorporated.
- Add the lightly beaten egg yolks to the saucepan and whisk everything together until well combined.
- The egg yolks contribute richness and help the filling thicken to a silky, custardy consistency. Using whole milk (not reduced-fat) is key here — it provides the fat needed for a creamy texture.
Step 4: Cook the Chocolate Filling
- Place the saucepan over medium heat. Do not walk away — the filling needs constant attention from this point forward.
- Begin whisking continuously as the mixture warms up. Steady, constant whisking prevents lumps from forming and ensures even heat distribution throughout the filling.
- After about 8–12 minutes, the mixture will begin to thicken and you’ll notice it start to bubble around the edges. Keep whisking!
- Once the filling comes to a gentle boil and you see large, slow bubbles breaking through the center, let it boil for exactly 1 minute while still whisking continuously. This cooks out the raw starch taste from the cornstarch and locks in the thickened texture.
- Remove the saucepan from the heat immediately after that 1 minute mark.
Step 5: Add the Butter and Vanilla
- As soon as the saucepan is off the heat, add the 2 tablespoons of unsalted butter and 1½ teaspoons of pure vanilla extract.
- Stir with your whisk or a silicone spatula until the butter is completely melted and the filling is smooth, glossy, and uniform in color.
- The butter adds a subtle richness and sheen to the filling, while the vanilla ties all the flavors together. Adding these off the heat preserves the vanilla’s delicate aroma.
- Taste the filling (carefully — it’s hot!) and adjust for sweetness if desired.
Step 6: Pour the Filling into the Crust
- Pour the hot chocolate filling directly into your fully cooled, pre-baked pie crust.
- Use a spatula or the back of a spoon to spread it into an even layer, making sure it reaches the edges.
- Immediately press a piece of plastic wrap directly onto the surface of the filling. Make sure it’s touching the filling — this prevents a skin from forming on top as it cools. If you plan to cover the pie fully with whipped cream, you can skip this step.
- Let the pie cool on the counter at room temperature for about 30 minutes, then transfer it to the refrigerator.
- Chill for a minimum of 3–4 hours, though overnight is ideal. The filling needs this time to firm up and set completely. Do not rush this step or your slices will not hold their shape.
Step 7: Make the Whipped Cream Topping
- Just before serving, pour the cold heavy whipping cream into a clean mixing bowl. The bowl and beaters should be cold — pop them in the freezer for 5 minutes beforehand for best results.
- Begin beating on medium speed with an electric hand mixer or stand mixer until the cream starts to thicken and form soft, billowy mounds.
- Add the powdered sugar and ½ teaspoon of vanilla extract, then increase speed to medium-high.
- Continue beating until stiff peaks form — when you lift the beaters, the cream should hold a peak that stands straight up without drooping.
- Do not over-beat or the cream will become grainy and start to turn buttery. Once stiff peaks form, stop immediately.
Step 8: Top and Serve the Pie
- Remove the plastic wrap from the surface of the pie.
- Spoon the whipped cream over the top of the pie and use an offset spatula or the back of a spoon to spread it evenly or create decorative swirls.
- Garnish with chocolate shavings, a dusting of cocoa powder, or a drizzle of chocolate sauce if desired.
- Slice with a sharp knife, wiping the blade clean between each cut for neat, restaurant-quality portions.
- Serve immediately and enjoy!
For an equally decadent chocolate dessert experience, the Moist Chocolate Cake Recipe is another crowd-pleasing classic worth trying.
Tips for Success
Getting a perfect custard-style pie comes down to a few technique-driven details that make a big difference in the final texture and flavor. The most important one: never stop whisking once the filling hits the heat. A few seconds of neglect can cause the egg yolks to scramble or the cornstarch to clump at the bottom of the pan.
- Whisk constantly: This cannot be emphasized enough. Once the mixture goes on the heat, your hand does not stop moving. Use a good balloon whisk that covers the full base of the saucepan.
- Let the filling boil for exactly 1 minute: Many people pull the filling off the heat the moment they see bubbles, but the full 1-minute boil is necessary to activate the cornstarch thickening and cook out any raw starchy flavor.
- Cool the crust completely before filling: Pouring hot filling into a hot crust creates steam inside the pie, leading to a soggy bottom and an unevenly set filling.
- Chill overnight for the cleanest slices: Three to four hours gives a workable result, but overnight chilling allows the filling to firm up fully so your slices hold their shape beautifully.
- Use cold heavy cream for whipping: Warm cream will not whip properly. Cold cream and cold equipment make all the difference in achieving stiff, stable peaks.
- Press plastic wrap directly on the filling surface: This is the trick to preventing that rubbery skin from forming as the filling cools and chills in the fridge.
- Add egg yolks slowly: Combine a small amount of the warm milk mixture into the beaten yolks before adding them back to the pot. This gradual tempering prevents the yolks from cooking into scrambled eggs.
You might also enjoy: Classic Apple Pie
Serving Suggestions
This chocolate pie is a showstopper dessert that pairs beautifully with a range of complementary flavors and textures. A dollop of freshly whipped cream is the classic choice, but there are so many ways to make each serving feel special.
For a truly indulgent experience, serve each slice with a small scoop of vanilla ice cream on the side — the contrast of cold ice cream against the cool, silky chocolate filling is absolutely wonderful.
- A generous drizzle of Hot Fudge Sauce over the whipped cream for extra chocolate intensity
- Fresh raspberries, strawberries, or sliced bananas alongside each slice to cut through the richness with a touch of brightness
- A scoop of good vanilla or coffee ice cream on the side for a classic, indulgent pairing
- A dusting of powdered sugar or espresso powder over the whipped cream for an elegant, café-style presentation
- Crushed Oreo cookies scattered over the top for a little crunch and a cookies-and-cream twist
- A light drizzle of Caramel Sauce for a chocolate-caramel combination that is deeply satisfying
Variations to Try
The classic chocolate custard filling is incredibly versatile, and there are so many delicious ways to customize this pie while keeping the core technique the same. Whether you want a different crust, a richer chocolate flavor, or a show-stopping topping, the variations below are all worth exploring.
- Graham cracker crust: Swap the baked pastry crust for a graham cracker crumb crust for a texture that’s a little more casual and snackable. Press the crumbs into the pan and chill — no baking needed.
- Oreo cookie crust: Blend Oreo cookies into fine crumbs, mix with melted butter, and press into the pan for a cookies-and-cream twist that pairs beautifully with the filling.
- Meringue topping: Use the leftover egg whites to make a classic meringue topping instead of whipped cream. Beat whites with sugar until glossy and stiff, spread over the filling, and brown briefly under a broiler or with a kitchen torch.
- Bittersweet chocolate addition: For a more intense, adult-tasting pie, stir 2 oz (55g) of finely chopped bittersweet chocolate into the hot filling along with the butter.
- Mint chocolate: Add ½ teaspoon of peppermint extract along with the vanilla for a refreshing mint-chocolate flavor profile.
- Peanut butter swirl: Drop spoonfuls of creamy peanut butter over the filling before it fully sets and swirl gently with a toothpick for a peanut butter-chocolate combination.
For another amazing pie filling worth mastering, the Peanut Butter Pie Recipe is a no-bake classic that uses a similar creamy approach.
Storage and Reheating
This chocolate pie keeps well in the refrigerator and actually improves slightly overnight as the flavors meld and the filling firms up even more. Store the pie tightly covered so it doesn’t absorb any fridge odors — chocolate custard can pick up surrounding smells quite easily.
- Refrigerator: Cover the pie loosely with plastic wrap or store it under a pie dome. It will keep well for up to 3–4 days.
- Do not freeze the finished pie: Freezing causes the custard to break down when thawed, resulting in a watery, grainy texture. The filling does not freeze well.
- Freeze unbaked crusts: If you want to get ahead, freeze your prepared pie crust (unbaked) for up to 3 months. Bake it directly from frozen, adding a few extra minutes.
- Make the filling ahead: You can cook the filling up to 1 day ahead and store it (covered with plastic wrap pressed to the surface) in the fridge. Pour it into the crust up to 24 hours before serving.
- Whipped cream: For best results, make the whipped cream fresh just before serving. If you must add it ahead of time, a stabilized whipped cream made with a small amount of cornstarch or cream of tartar will hold up better in the fridge.
- Reheating: This pie is best served chilled — it’s not a pie you would typically reheat. If it feels too cold straight from the fridge, let it sit at room temperature for 10–15 minutes before slicing.
Read Also: Banana Cream Pie Recipe
Nutritional Facts
The following nutrition information is approximate and based on one slice of pie (1/8 of the total pie), including the whipped cream topping. Exact values will vary depending on the type of pie crust used, the brand of ingredients, and the thickness of your whipped cream layer.
| Nutrient | Per Serving (1 slice) |
|---|---|
| Calories | ~380 kcal |
| Total Fat | 20g |
| Saturated Fat | 11g |
| Cholesterol | 115mg |
| Sodium | 180mg |
| Total Carbohydrates | 46g |
| Dietary Fiber | 2g |
| Total Sugars | 32g |
| Protein | 5g |
| Calcium | 110mg |
| Iron | 1.5mg |
Nutritional values are estimates only and not intended as medical or dietary advice.
Another classic comfort dessert to explore: Classic Pumpkin Pie Recipe
Health Benefits of Key Ingredients
While chocolate pie is absolutely a treat rather than a health food, a few of its core ingredients do come with some noteworthy nutritional perks. Understanding what’s in the food you’re making adds a layer of appreciation for the ingredients and helps you make informed choices when customizing the recipe.
Cocoa powder, the heart of this filling, is one of the most antioxidant-rich foods available and brings a range of well-studied benefits to the table.
- Unsweetened cocoa powder: Rich in flavonoids and antioxidants, unsweetened cocoa has been linked to improved heart health, better circulation, and even mood-boosting effects. It also contains magnesium, iron, and zinc.
- Egg yolks: A nutrient-dense food, egg yolks deliver fat-soluble vitamins A, D, E, and K, along with choline — an essential nutrient for brain health and liver function.
- Whole milk: Provides calcium for strong bones and teeth, along with riboflavin (B2), potassium, and high-quality protein. The fat content in whole milk also helps with the absorption of fat-soluble vitamins.
- Butter: In moderate amounts, real butter provides vitamin A and vitamin K2, as well as butyrate — a short-chain fatty acid that supports gut health and has anti-inflammatory properties.
- Dark/bittersweet chocolate (if used in variations): Higher in cocoa solids than milk chocolate, dark chocolate adds an extra boost of flavonoids and minerals, including copper and manganese, while being lower in sugar.
This pairs beautifully as a finishing flourish alongside a mug of Hot Chocolate for a full-on chocolate experience on a cozy evening.
Frequently Asked Questions
1. Can I use milk chocolate instead of cocoa powder?
You can, but the texture and sweetness level will change significantly. Cocoa powder combined with sugar gives you full control over the chocolate intensity and sweetness, while milk chocolate will make the filling noticeably sweeter and less deeply chocolatey. If you want to use real chocolate, opt for bittersweet or semi-sweet (around 60–70% cacao) and reduce the sugar in the recipe by about a quarter. Melt the chocolate and stir it into the filling once it’s off the heat.
2. Why didn’t my chocolate pie filling set properly?
The most common reason is that the filling wasn’t cooked long enough. The cornstarch needs to fully activate, which requires bringing the filling to a full, bubbling boil and holding it there for 1 full minute. If you pulled it off the heat too early, the cornstarch won’t have fully thickened. Another possible cause is using reduced-fat or non-dairy milk — lower-fat milks have a different protein and fat content that can affect the final set.
3. Can I make this chocolate pie ahead of time?
Absolutely, and it’s actually one of the best things about this recipe. You can bake your pie crust and prepare the filling up to 1 day ahead. Pour the filling into the cooled crust, cover, and refrigerate. Add the whipped cream topping just before serving for the best presentation and texture. The pie can be refrigerated for up to 3–4 days, though the crust may soften slightly over time.
4. Can I use a store-bought pie crust for this recipe?
Yes, and there’s no shame in it at all. A store-bought refrigerated pie crust or frozen pre-baked shell works perfectly fine here and saves a significant amount of time. If using a refrigerated rolled crust, simply fit it into your pie dish, crimp the edges, and blind bake as directed. If using a pre-baked shell, you can pour the filling right in once it’s cooled.
5. How do I prevent lumps in the chocolate filling?
Lumps usually form when the dry ingredients aren’t mixed thoroughly before the liquid is added, or when the filling is not whisked consistently during cooking. To avoid this, whisk the sugar, cornstarch, cocoa, and salt together until completely blended before adding any liquid. Then, add the milk gradually while whisking. Once on the heat, whisk continuously without stopping. If you do notice small lumps forming, you can quickly press the filling through a fine-mesh strainer right after cooking to remove them before pouring into the crust.
Read Also: Key Lime Pie Recipe
Final Thoughts
This chocolate pie recipe is the kind of dessert that reminds you why classic recipes endure — not because they’re trendy, but because they’re genuinely perfect just as they are.
Every element works in harmony: the buttery, crisp crust, the silky-smooth chocolate custard filling, and the light, airy cloud of whipped cream on top.
Once you make this pie from scratch, you’ll understand exactly why it has appeared on grandmothers’ kitchen tables and holiday buffets for decades.
It’s the dessert you bring to a potluck knowing it will be the first thing finished. It’s what you make when you want to show someone you care.
Give this chocolate pie recipe a try and share it with the people you love most — I think you’ll be making it for years to come.
If you do make it, drop a comment below or share a photo! Hearing how your pies turn out makes all the difference.
Recommended:
- Blueberry Pie Recipe
- Cherry Pie Recipe
- Peach Pie Recipe
- Sweet Potato Pie Recipe
- Lemon Meringue Pie Recipe
- Easy Chocolate Cake Recipe
- Best Chocolate Chip Cookies Recipe
- Vanilla Pudding Recipe
- Eggnog Pie Recipe
- Coconut Pie Recipe with Cream of Coconut


