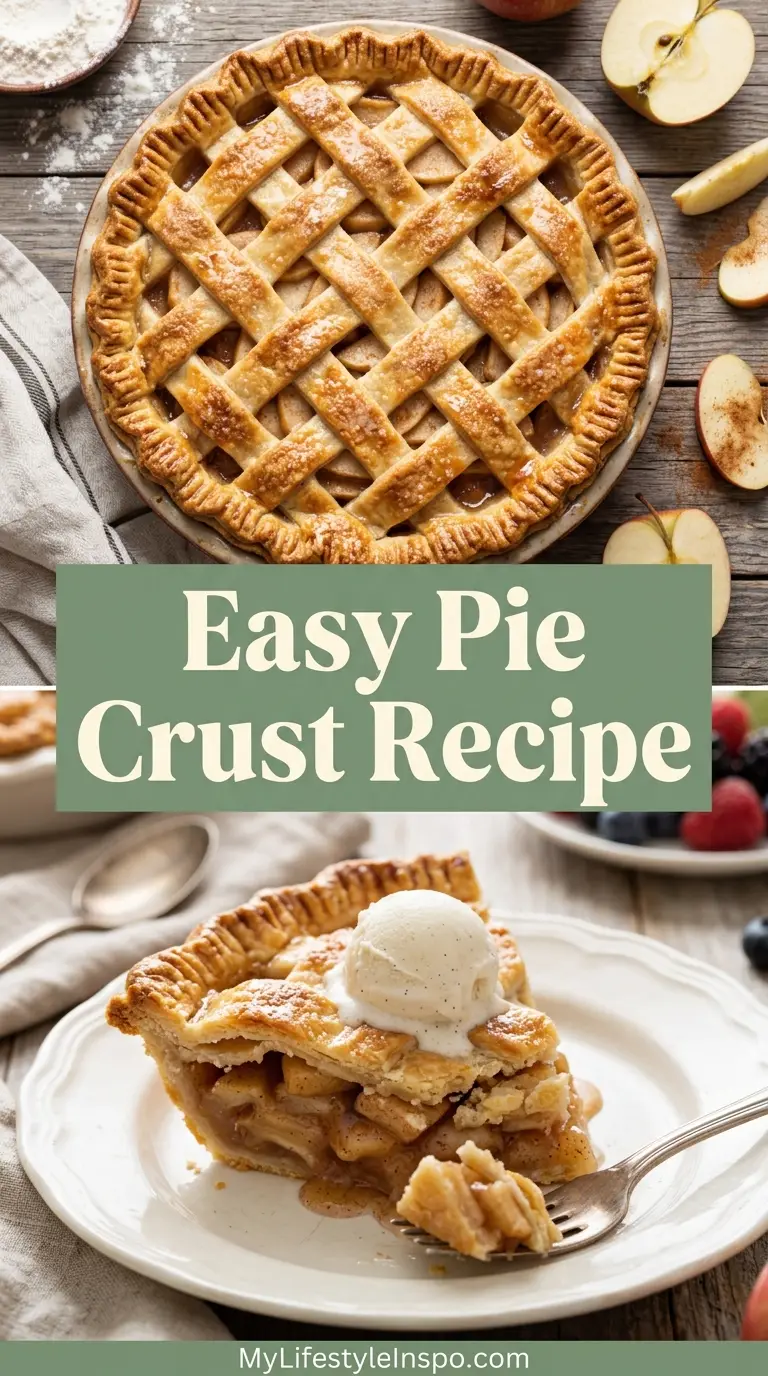
Making your own easy pie crust recipe at home transforms every pie from good to extraordinary. This buttery, flaky crust comes together with just five simple ingredients you probably already have in your kitchen, and the process is so much more straightforward than you might think.
Homemade pie crust elevates everything from fruit pies to savory quiches, and once you master this technique, you’ll never want to go back to store-bought versions. The tender, golden layers and rich butter flavor simply can’t be replicated with pre-made crusts.
This recipe yields two single crusts or one double-crust pie, making it perfect for all your baking needs. The secret lies in keeping everything cold and handling the dough gently to create those beautiful, flaky layers that make homemade pie crust so irresistible.
For those who love making pies, this Classic Apple Pie pairs perfectly with this homemade crust.
Why You’ll Love This Easy Pie Crust Recipe
This easy pie crust recipe delivers bakery-quality results without the intimidation factor. The all-butter formula creates incredible flavor and those sought-after flaky layers that crumble perfectly with each bite.
- Simple ingredients: Just five pantry staples create this amazing crust
- Foolproof method: Clear steps make success easy, even for beginners
- All-butter flavor: Rich, buttery taste that shortening can’t match
- Perfectly flaky: Cold butter creates steam pockets for beautiful layers
- Versatile: Works for sweet and savory pies alike
- Make-ahead friendly: Prepare dough up to 3 days ahead or freeze for 3 months
The dough is easy to roll out and work with when properly chilled. You’ll have complete control over the ingredients, avoiding preservatives and artificial flavors found in store-bought versions.
Ingredients
This recipe requires just five basic ingredients that work together to create the perfect texture and flavor. Each component plays a crucial role in developing the flaky, tender crust.
- 2 ½ cups (315 g) all-purpose flour, plus extra for rolling
- 1 tablespoon (12 g) granulated sugar
- 1 teaspoon (6 g) salt
- 1 cup (227 g) cold unsalted butter, cut into ½-inch cubes
- 6-8 tablespoons (90-120 ml) ice water
Kitchen Equipment Needed
Having the right tools makes creating this pie crust even easier. These items will help you achieve professional results every time.
- Food processor or pastry cutter
- Large mixing bowl
- Measuring cups and spoons
- Rolling pin
- Plastic wrap
- 9-inch pie dish
- Fork for docking (optional)
Recommended Products for This Recipe
These carefully selected products will help you create the best possible pie crust and make the process even more enjoyable.
1. Cuisinart Food Processor
A quality food processor makes incorporating the butter into the flour incredibly easy and ensures you don’t overwork the dough. This tool cuts preparation time significantly and helps maintain the cold temperature of your ingredients for maximum flakiness.
2. French Rolling Pin
A French-style rolling pin gives you better control when rolling out pie dough and helps you achieve an even thickness throughout. The tapered ends make it easier to work the dough from the center outward.
3. European-Style Butter
European butter has a higher fat content than standard American butter, which translates to even richer flavor and better flakiness. The quality difference is noticeable in the finished crust.
4. Silicone Pastry Mat
A silicone pastry mat with measurements printed on it makes rolling dough to the perfect size effortless. It also prevents sticking without requiring excessive flour that can toughen the crust.
Another favorite pairing is this crust with Dutch Apple Pie.
Step-by-Step Instructions
Follow these detailed instructions to create perfect pie crust every single time. Each step builds on the previous one to ensure success.
1. Prepare Your Ingredients
- Cube the cold butter into ½-inch pieces and return it to the refrigerator until needed
- Fill a glass with ice cubes and add cold water, letting it sit while you prepare the dry ingredients
- Measure out all ingredients precisely for best results
- Keep butter as cold as possible by working quickly
2. Combine the Dry Ingredients
- Add flour, sugar, and salt to the food processor bowl
- Pulse 3-4 times to combine everything evenly
- If making by hand, whisk together in a large bowl
- This ensures even distribution throughout the dough
3. Cut in the Butter
- Remove butter from refrigerator and add half of it to the flour mixture
- Pulse 12-15 times until the mixture resembles coarse meal with some pea-sized pieces
- Add remaining butter and pulse 8-10 more times, leaving larger butter pieces visible
- These butter chunks create the flaky layers when baked
- If using a pastry cutter, work the butter into the flour until you have a mixture with both small crumbs and larger pea-sized pieces
4. Add the Ice Water
- Start by adding 6 tablespoons of ice water to the mixture, discarding any ice cubes
- Pulse 5-6 times just until the dough begins to clump together
- The mixture should look crumbly but hold together when squeezed
- Add additional water one tablespoon at a time if needed, pulsing after each addition
- Stop as soon as the dough starts coming together; it doesn’t need to form a ball
- If working by hand, drizzle water over the mixture and stir with a fork until it begins to clump
5. Form the Dough Disks
- Turn the crumbly mixture out onto a clean work surface
- Gently gather it together with your hands, kneading just 2-3 times
- Divide the dough into two equal portions
- Shape each portion into a flat disk about 1 inch thick
- Press firmly but avoid overworking, which develops gluten and toughens the crust
6. Chill the Dough
- Wrap each disk tightly in plastic wrap, ensuring no air pockets
- Refrigerate for at least 1 hour or up to 3 days
- This chilling time is crucial as it allows the gluten to relax and the butter to firm up
- For faster results, freeze for 30 minutes instead
- Before rolling, let refrigerated dough sit at room temperature for 10 minutes if it’s very hard
7. Roll Out the Dough
- Lightly flour your work surface and rolling pin
- Place one chilled disk in the center and begin rolling from the center outward
- Rotate the dough a quarter turn after each roll to maintain a circular shape
- Roll to about 12-13 inches in diameter and ⅛-inch thickness
- Add minimal flour as you work; too much can toughen the crust
- If edges crack, press them back together with your fingers
8. Transfer to Pie Dish
- Carefully roll the dough around your rolling pin
- Position it over your 9-inch pie dish and gently unroll
- Ease the dough into the dish without stretching it
- Stretching causes shrinkage during baking
- Press gently into the corners and up the sides
- Trim excess dough to leave a ½-inch overhang
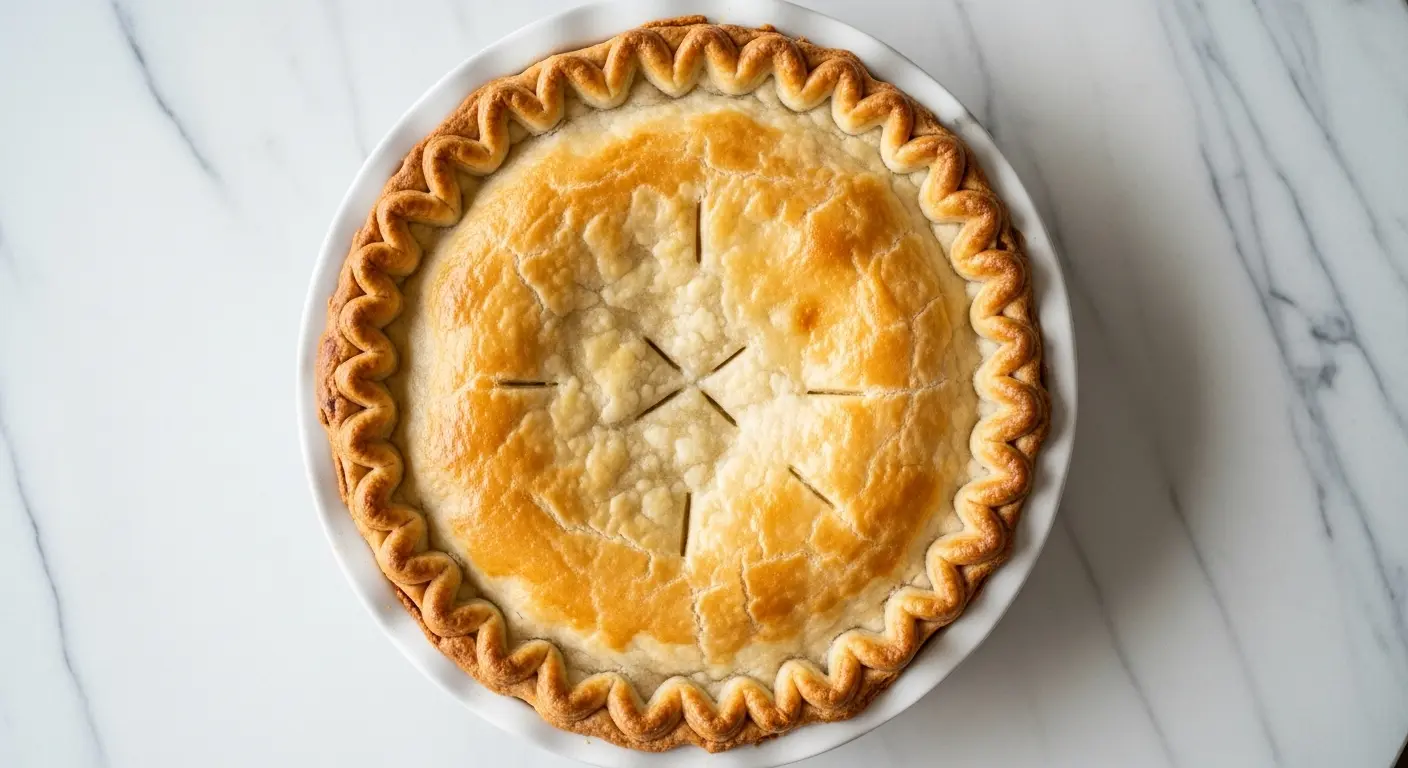
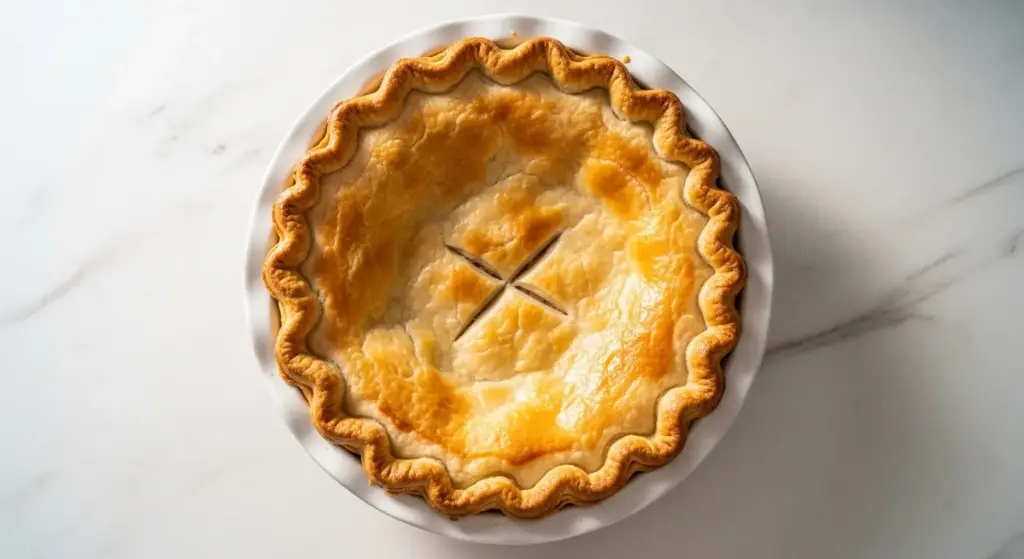
9. Finish the Edges
- Fold the overhanging dough under itself to create a thicker rim
- For a fluted edge, place your index finger on the inside edge
- Use your thumb and index finger of the other hand to pinch the dough from the outside around your inside finger
- Repeat around the entire edge to create an attractive pattern
- Alternatively, press with fork tines for a simpler finish
10. Prepare for Baking
- For filled pies, add your filling and bake according to your recipe
- For blind-baked crusts, prick the bottom and sides with a fork
- Line with parchment paper and fill with pie weights or dried beans
- Chill the prepared crust for 15 minutes before baking
- This final chill helps prevent shrinkage and maintains the shape
You might also enjoy making From Scratch Pumpkin Pie with this crust.
Tips for Success
These expert tips will help you achieve perfect results every time you make pie crust. Small details make a significant difference.
- Keep everything cold: Cold butter and ice water are essential for flaky layers; warm butter melts into the dough and creates a tough crust instead
- Don’t overmix: Stop mixing as soon as the dough comes together; overworking develops gluten and results in a tough, chewy texture
- Chill between steps: If the dough becomes warm while rolling, refrigerate it for 10-15 minutes before continuing
- Use minimal flour: When rolling, add just enough flour to prevent sticking; excess flour toughens the final crust
- Rotate while rolling: Turn the dough frequently to maintain an even circle and prevent sticking
- Let dough rest: If it springs back while rolling, cover and refrigerate for 15 minutes to relax the gluten
This technique also works beautifully for Classic Chicken Pot Pie.
Serving Suggestions
This versatile pie crust works wonderfully with countless fillings and preparations. Here are some delicious ways to use it.
The flaky, buttery crust complements both sweet and savory fillings perfectly. Consider pairing it with seasonal fruit fillings for a classic dessert experience.
- Fill with Classic Pumpkin Pie filling for Thanksgiving
- Create a savory quiche with eggs, cheese, and vegetables
- Make individual hand pies filled with jam or apple filling
- Use for pot pies filled with chicken and vegetables
- Prepare cream pies like chocolate or coconut cream
- Bake with berry fillings and a lattice top
- Try with custard-based pies like pecan or chess pie
Read Also: Easy Shepherds Pie
Variations to Try
Customize this basic recipe to create different flavors and textures. These variations add interest while maintaining the foolproof technique.
- Whole wheat crust: Replace up to half the all-purpose flour with whole wheat flour for a nuttier flavor and heartier texture
- Sweet crust: Increase sugar to 3 tablespoons for sweeter dessert pies
- Herb crust: Add 2 tablespoons fresh chopped herbs like thyme or rosemary for savory pies
- Cheddar crust: Mix in 1 cup shredded sharp cheddar cheese for apple or quiche pies
- Vodka crust: Replace half the ice water with vodka for extra-flaky results; the alcohol evaporates during baking
- Vinegar addition: Add 1 teaspoon apple cider vinegar with the water to inhibit gluten development
- Butter-shortening blend: Use ¾ cup butter and ¼ cup shortening for easier handling while maintaining good flavor
Storage and Reheating
Proper storage keeps your pie crust fresh and ready to use. These methods preserve quality and convenience.
- Unbaked dough: Wrap disks tightly in plastic wrap and refrigerate up to 3 days or freeze up to 3 months
- Frozen dough: Thaw overnight in the refrigerator before rolling; never thaw at room temperature
- Shaped unbaked crust: Cover pie dish with plastic wrap and refrigerate overnight or freeze up to 1 month
- Baked pie: Cover and refrigerate up to 4 days; reheat in a 350°F (175°C) oven for 10-15 minutes to restore crispness
- Baked crust only: Store covered at room temperature for 2 days or refrigerate up to 4 days
- Freezing baked crust: Wrap well and freeze up to 2 months; thaw before filling
For another delicious pie option, try Easy Chicken Pot Pie.
Nutritional Facts
Per serving (1/8 of double crust or 1/16 of recipe):
- Calories: 195
- Total Fat: 12g
- Saturated Fat: 7g
- Cholesterol: 30mg
- Sodium: 150mg
- Total Carbohydrates: 20g
- Dietary Fiber: 1g
- Sugars: 1g
- Protein: 3g
Nutritional information is approximate and based on using standard ingredients. Values will vary depending on specific brands and filling additions.
Health Benefits of Key Ingredients
While pie crust is an indulgent treat, its simple ingredients do offer some nutritional benefits. Understanding what you’re eating helps you make informed choices.
All-purpose flour provides energy-giving carbohydrates and small amounts of iron and B vitamins. When you make your own crust, you control exactly what goes into it, avoiding preservatives and trans fats found in many store-bought versions.
- Butter: Provides vitamins A, D, E, and K, plus conjugated linoleic acid which may have health benefits
- Flour: Contains B vitamins, iron, and essential amino acids that support metabolism
- Homemade control: Eliminates preservatives, artificial colors, and hydrogenated oils
- Portion awareness: Making from scratch helps you be mindful about serving sizes
- Quality ingredients: Using real butter and quality flour provides better nutrition than commercial alternatives
Another great option for homemade goodness is Easy Pizza Dough.
Frequently Asked Questions
1. Why is my pie crust tough instead of flaky?
Overworking the dough develops too much gluten, which creates a tough, chewy texture instead of tender flakiness. Mix just until the dough comes together and handle it as little as possible.
Additionally, using warm butter or water can cause toughness. Always use cold ingredients and work quickly to prevent the butter from melting before baking.
2. Can I make pie crust without a food processor?
Absolutely! Use a pastry cutter, two knives, or even your fingertips to cut the butter into the flour. Work quickly to keep the butter cold, and you’ll achieve excellent results by hand.
The technique is slightly more time-consuming but produces equally flaky crusts. Just make sure to keep everything as cold as possible throughout the process.
3. How do I prevent my pie crust from shrinking?
Avoid stretching the dough when placing it in the pie dish, as stretched dough will shrink back during baking. Let the dough naturally drape into the dish and press it gently into place.
Chilling the shaped crust for 15-30 minutes before baking also helps prevent shrinkage. The cold dough holds its shape better when it hits the hot oven.
4. Should I blind bake my pie crust?
Blind baking is necessary for pies with wet fillings that don’t need to bake long, like cream pies or custard pies. It prevents a soggy bottom crust.
For fruit pies and pies where the filling bakes with the crust, blind baking isn’t necessary. Follow your specific recipe’s instructions for best results.
5. Can I freeze unbaked pie crust?
Yes! Wrap dough disks or shaped crusts tightly in plastic wrap, then aluminum foil, and freeze for up to 3 months. Thaw overnight in the refrigerator before using.
Freezing actually helps the crust maintain its structure, as the cold temperature keeps the butter solid. This often results in even flakier crusts.
You might also enjoy: Baked Mac and Cheese

Easy Pie Crust
Equipment
- Food processor - or pastry cutter
- Large mixing bowl
- Measuring cups and spoons
- Rolling Pin - French-style recommended
- Plastic wrap
- 9-inch pie dish
- Fork - for docking (optional)
- Silicone pastry mat - (optional) for easy rolling
- Pie weights - or dried beans for blind baking
Ingredients
- 2.5 cups all-purpose flour - 315g, plus extra for rolling
- 1 tablespoon granulated sugar - 12g
- 1 teaspoon salt - 6g
- 1 cup unsalted butter - 227g, cold, cut into ½-inch cubes
- 6 tablespoons ice water - 90-120ml; 6-8 tablespoons total
Instructions
- Cube cold butter and return to refrigerator. Fill glass with ice cubes and cold water. Measure all ingredients precisely.
- Add flour, sugar, and salt to food processor bowl. Pulse 3-4 times to combine. If making by hand, whisk together in large bowl.
- Add half the cold butter to flour mixture. Pulse 12-15 times until mixture resembles coarse meal with pea-sized pieces. Add remaining butter and pulse 8-10 more times, leaving larger butter pieces visible.
- Add 6 tablespoons ice water (discard ice cubes). Pulse 5-6 times until dough begins to clump together. Add additional water one tablespoon at a time if needed. Stop as soon as dough starts coming together.
- Turn crumbly mixture onto clean work surface. Gently gather together with hands, kneading just 2-3 times. Divide dough into two equal portions. Shape each into flat 1-inch thick disk. Avoid overworking.
- Wrap each disk tightly in plastic wrap. Refrigerate for at least 1 hour or up to 3 days. For faster results, freeze for 30 minutes. Let refrigerated dough sit at room temperature for 10 minutes before rolling if very hard.
- Lightly flour work surface and rolling pin. Roll dough from center outward. Rotate quarter turn after each roll. Roll to 12-13 inches diameter and ⅛-inch thickness. If edges crack, press together with fingers.
- Roll dough around rolling pin. Position over 9-inch pie dish and gently unroll. Ease dough into dish without stretching. Press gently into corners and up sides. Trim excess to leave ½-inch overhang.
- Fold overhanging dough under itself to create thicker rim. For fluted edge, place index finger on inside edge, use thumb and other index finger to pinch from outside. Alternatively, press with fork tines for simple finish.
- For filled pies, add filling and bake according to recipe. For blind-baked crusts, prick bottom and sides with fork. Line with parchment and fill with pie weights. Chill prepared crust 15 minutes before baking.
Notes
- Keep everything cold: Cold butter and ice water are essential for flaky layers; warm butter melts into the dough and creates a tough crust instead.
- Don’t overmix: Stop mixing as soon as the dough comes together; overworking develops gluten and results in a tough, chewy texture.
- Chill between steps: If the dough becomes warm while rolling, refrigerate it for 10-15 minutes before continuing.
- Use minimal flour: When rolling, add just enough flour to prevent sticking; excess flour toughens the final crust.
- Freezing unbaked dough: Wrap disks tightly in plastic wrap then foil and freeze for up to 3 months. Thaw overnight in refrigerator before using.
- Blind baking: Necessary for pies with wet fillings like cream or custard pies to prevent soggy bottom crust. Bake at 375°F (190°C) for 20 minutes with weights, then 10-15 minutes without.
- Preventing shrinkage: Avoid stretching dough when placing in dish and chill shaped crust for 15-30 minutes before baking to maintain shape.
- Vodka crust variation: Replace half the ice water with vodka for extra-flaky results; the alcohol evaporates during baking, leaving no taste.
- Storing baked pie: Cover and refrigerate up to 4 days. Reheat at 350°F (175°C) for 10-15 minutes to restore crispness.
- Butter quality matters: European butter with higher fat content creates even richer flavor and better flakiness than standard American butter.
Final Thoughts
Mastering this easy pie crust recipe opens up a world of delicious possibilities in your baking repertoire. The combination of simple ingredients, straightforward technique, and incredible results makes this recipe one you’ll turn to again and again.
Once you experience the difference that homemade crust makes, you’ll understand why it’s worth the small extra effort. The buttery, flaky layers and golden-brown finish simply can’t be matched by store-bought versions, and the satisfaction of making everything from scratch is its own reward.
Give this recipe a try for your next pie, and you might just find yourself volunteering to bring dessert to every gathering. We’d love to hear how your pie crust turns out, so please share your experiences and favorite fillings in the comments below!
Recommended:
- Classic Shepherds Pie
- Creamy Mac and Cheese
- Best Carrot Cake
- Classic Tiramisu
- Easy Tiramisu
- Chewy Chocolate Chip Cookies
- Best Chocolate Chip Cookies
- Classic French Toast
- Easy French Toast
- Belgian Waffle


