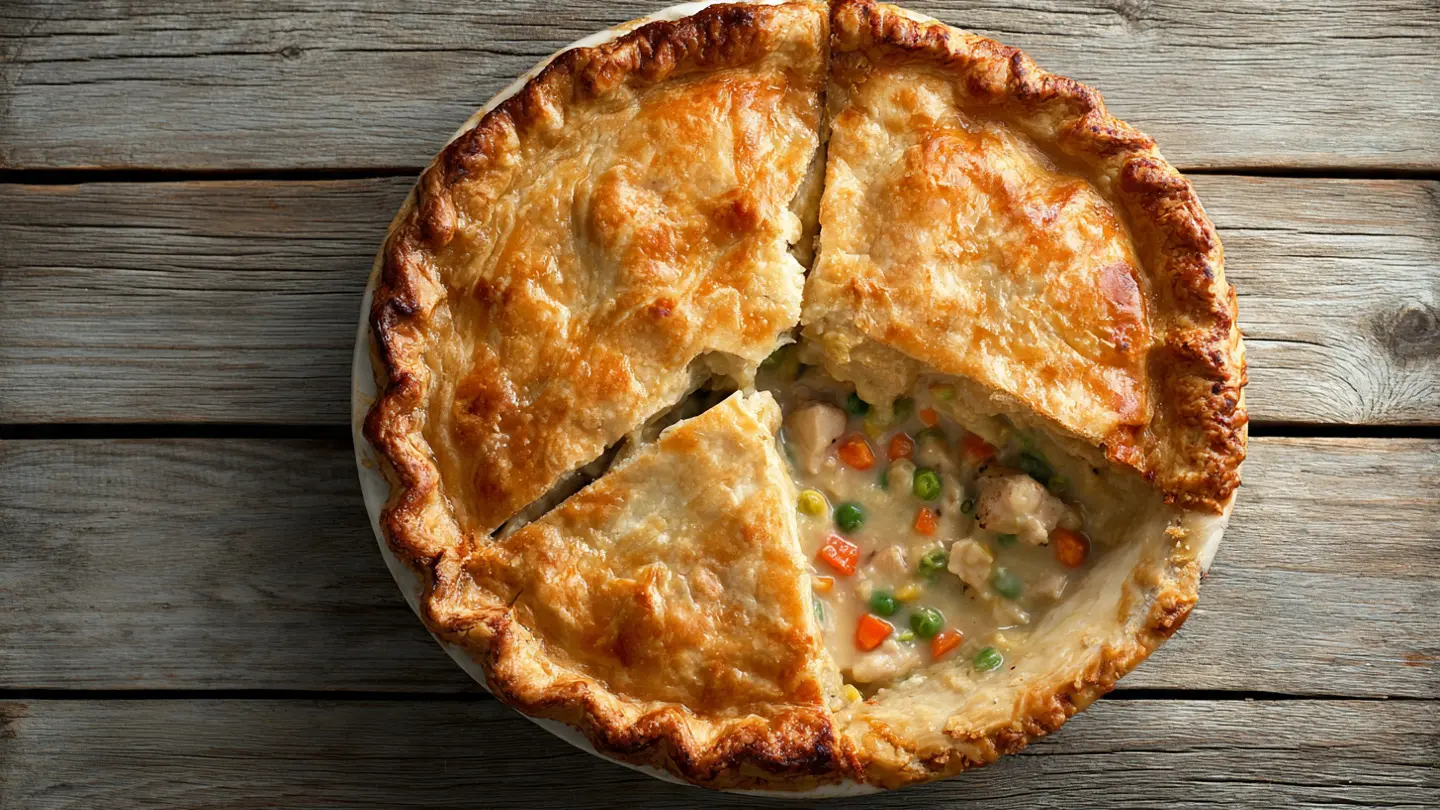
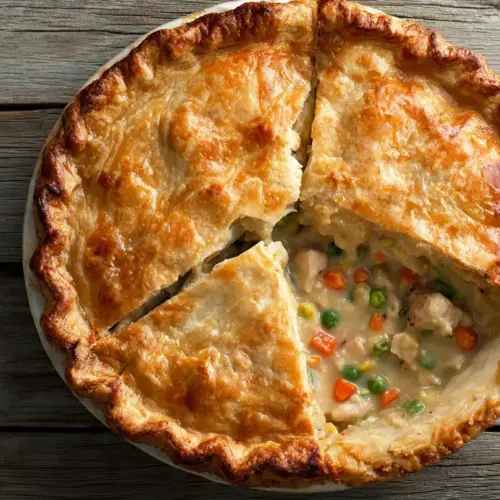
Nothing beats a warm, comforting classic chicken pot pie recipe fresh from the oven. This timeless dish features tender chicken, colorful vegetables, and a rich, creamy sauce all wrapped in a flaky, golden pie crust. The combination of savory filling and buttery pastry creates pure comfort food magic that brings families together around the dinner table.
Making pot pie from scratch might seem intimidating, but this classic chicken pot pie recipe breaks down every step so you can achieve bakery-quality results at home. The secret lies in building layers of flavor through proper seasoning and using the right technique for that silky, thick filling that doesn’t turn your crust soggy.
This recipe delivers on all fronts with perfectly cooked vegetables that aren’t mushy, juicy chicken that stays moist, and a sauce that’s creamy without being too heavy. You’ll learn exactly how to balance the ingredients and get that gorgeous golden-brown crust every single time.
If you’re looking for another comforting casserole dish, try this Easy Chicken Pot Pie for a simpler weeknight version.

Why You’ll Love This Classic Chicken Pot Pie Recipe
This classic chicken pot pie recipe stands out because it uses simple, wholesome ingredients that you probably already have in your kitchen. No fancy techniques or hard-to-find items required.
The homemade filling tastes infinitely better than anything store-bought, with real butter, fresh vegetables, and quality chicken breast that creates authentic, home-cooked flavor. Every bite delivers that perfect balance of creamy sauce and tender vegetables.
Here’s what makes this recipe special:
- Flaky, buttery crust that holds up beautifully without getting soggy
- Rich, velvety filling that’s perfectly seasoned with herbs and spices
- Customizable vegetables so you can use what you have on hand
- Make-ahead friendly for stress-free meal planning
- Freezer-friendly for quick comfort food anytime
- Family-approved even picky eaters love this dish
You might also enjoy: Chicken Casserole Recipe
Ingredients
This recipe calls for simple, everyday ingredients that combine to create an incredibly flavorful filling. The key is using quality chicken and fresh vegetables for the best taste and texture.
- For the Pie Crust:
- 2 refrigerated pie crusts (or homemade)
- 1 egg (for egg wash)
- 1 tablespoon water
- For the Filling:
- 1/3 cup (75g) unsalted butter
- 1 medium onion, diced (about 1 cup/150g)
- 2 medium carrots, peeled and diced (about 1 cup/130g)
- 2 celery stalks, diced (about 1 cup/100g)
- 1/3 cup (40g) all-purpose flour
- 1 3/4 cups (420ml) chicken broth
- 3/4 cup (180ml) whole milk or half-and-half
- 3 cups (450g) cooked chicken breast, diced into bite-sized pieces
- 1 cup (150g) frozen peas
- 1 cup (150g) frozen corn
- 1 teaspoon salt
- 1/2 teaspoon black pepper
- 1/2 teaspoon garlic powder
- 1/2 teaspoon dried thyme
- 1/4 teaspoon celery seed (optional)
- 2 tablespoons fresh parsley, chopped (optional)
Read Also: Tuna Casserole Recipe
Kitchen Equipment Needed
Having the right tools makes assembling this pot pie much easier and ensures even cooking. These are the essentials you’ll need for success.
- 9-inch pie dish (glass or ceramic)
- Large skillet or saucepan
- Wooden spoon or silicone spatula
- Whisk
- Sharp knife and cutting board
- Measuring cups and spoons
- Small bowl (for egg wash)
- Pastry brush
- Aluminum foil (for covering crust edges)
Another favorite: Tuna Noodle Casserole
Recommended Products for This Recipe
These carefully selected products will help you create the best classic chicken pot pie possible. Each recommendation is based on quality, performance, and how well they enhance the cooking process.
1. Le Creuset Enameled Cast Iron Pie Dish
This beautiful pie dish distributes heat evenly, ensuring your crust bakes to golden perfection on both the top and bottom. The enameled surface prevents sticking and makes cleanup incredibly easy, even with baked-on filling. It’s a worthwhile investment that will serve you for countless pies to come.
2. All-Clad Stainless Steel Skillet
The heavy bottom on this skillet prevents hot spots, which means your roux won’t burn and your vegetables will cook evenly. The stainless steel construction allows you to see exactly how your sauce is thickening, giving you better control over the consistency. This pan will last a lifetime with proper care.
3. Better Than Bouillon Roasted Chicken Base
This concentrated chicken base adds incredible depth of flavor to your pot pie filling that regular broth just can’t match. A little goes a long way, and you can adjust the strength to your preference. It’s a game-changer for soups, sauces, and gravies.
4. OXO Good Grips Silicone Pastry Brush
The silicone bristles on this brush make applying egg wash a breeze, and they won’t fall out like traditional brushes. It’s dishwasher safe and won’t hold onto odors or flavors from previous uses. The angled head reaches into corners perfectly.
For a lighter option, try: Healthy Chicken Salad Recipe
Step-by-Step Instructions
Follow these detailed steps to create a perfect classic chicken pot pie with a golden crust and creamy filling. Take your time with each step for the best results.
1. Preheat and Prepare
- Preheat your oven to 425°F (220°C).
- Position a rack in the lower third of the oven to ensure the bottom crust bakes thoroughly.
- If using store-bought refrigerated pie crusts, remove them from the refrigerator and let them sit at room temperature for about 10-15 minutes to make them easier to work with.
- Lightly grease your 9-inch pie dish with butter or cooking spray.
2. Prepare the Vegetables
- Dice the onion into small, uniform pieces (about 1/4-inch cubes).
- Peel the carrots and cut them into small dice, keeping the pieces uniform so they cook evenly.
- Dice the celery stalks to match the size of your other vegetables.
- If using fresh herbs, chop the parsley finely and set aside.
- Measure out your frozen peas and corn, keeping them frozen until you’re ready to add them to the filling.
3. Cook the Vegetables
- In a large skillet or saucepan, melt the 1/3 cup butter over medium heat.
- Add the diced onion, carrots, and celery to the pan.
- Cook for 5-7 minutes, stirring occasionally, until the vegetables begin to soften and the onion becomes translucent.
- The vegetables should still have a slight bite to them since they’ll continue cooking in the oven.
- Season lightly with a pinch of salt to help draw out moisture.
4. Make the Roux
- Sprinkle the 1/3 cup flour evenly over the cooked vegetables.
- Stir constantly with a wooden spoon or whisk for 1-2 minutes until the flour is completely absorbed and no dry spots remain.
- The mixture should turn slightly golden and smell nutty, which means the roux is cooking properly.
- This step is crucial for creating a thick, creamy sauce without any raw flour taste.
5. Add the Liquids
- Slowly pour in the chicken broth while stirring constantly to prevent lumps from forming.
- Add the milk or half-and-half, continuing to stir.
- Bring the mixture to a gentle simmer, stirring frequently.
- Cook for 3-4 minutes until the sauce thickens noticeably and coats the back of a spoon.
- The sauce should have a consistency similar to thick gravy.
6. Season the Filling
- Add the salt, black pepper, garlic powder, dried thyme, and celery seed (if using) to the thickened sauce.
- Stir well to distribute the seasonings evenly throughout the filling.
- Taste and adjust seasoning as needed, keeping in mind that flavors will mellow slightly during baking.
- If you prefer a more pronounced herb flavor, add the fresh parsley now.
7. Combine with Chicken and Vegetables
- Add the diced cooked chicken to the sauce, stirring gently to coat each piece.
- Fold in the frozen peas and frozen corn.
- Mix everything together until well combined.
- Remove the skillet from the heat and let the filling cool for 10-15 minutes before assembling the pie (this prevents the crust from becoming soggy).
8. Assemble the Bottom Crust
- Carefully unroll one pie crust and place it in your prepared pie dish.
- Gently press the crust into the bottom and up the sides of the dish, making sure there are no air pockets.
- Trim any excess dough hanging over the edge, leaving about 1/2 inch of overhang.
- If the crust tears, simply patch it with extra dough and press to seal.
9. Fill the Pie
- Pour the slightly cooled chicken filling into the crust-lined pie dish.
- Spread the filling evenly, making sure to distribute the chicken and vegetables throughout.
- The filling should come up to about 1/4 inch from the top of the crust.
- If you have extra filling, save it in the refrigerator and enjoy it over rice or pasta.
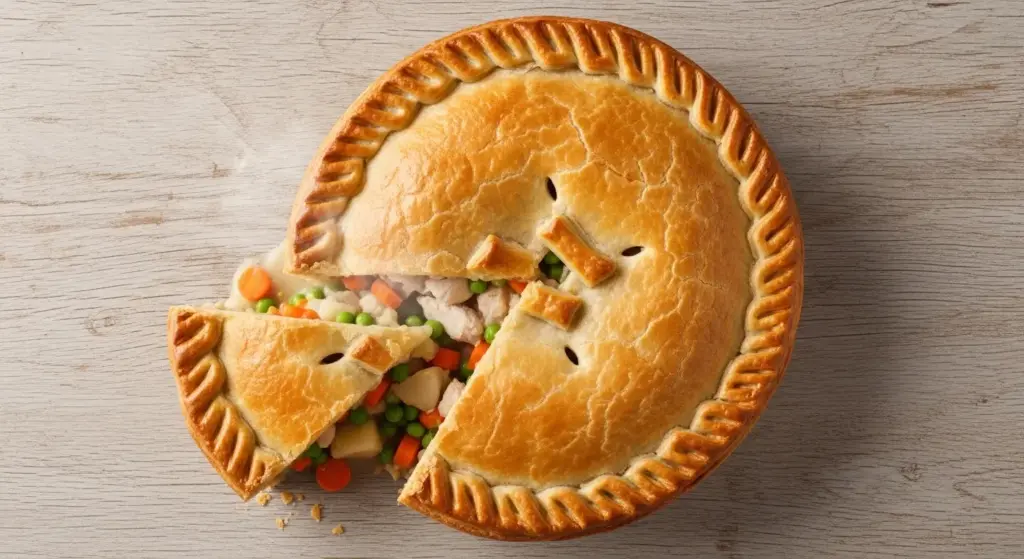
10. Add the Top Crust
- Unroll the second pie crust and carefully place it over the filling.
- Trim the excess dough, leaving about 1/2 inch of overhang to match the bottom crust.
- Fold the edges of the top crust under the edges of the bottom crust.
- Crimp or flute the edges using your fingers or a fork to create a decorative seal that will hold the pie together during baking.
- Make sure the seal is tight so the filling doesn’t leak out.
11. Apply Egg Wash and Vent
- In a small bowl, whisk together the egg and 1 tablespoon of water until well combined.
- Using a pastry brush, gently brush the egg wash over the entire top crust and crimped edges.
- This will give your pie a beautiful golden-brown, glossy finish.
- Cut 4-5 small slits in the top crust to allow steam to escape during baking (this prevents the crust from getting soggy).
- You can also use small cookie cutters to make decorative vents in the shape of leaves or other designs.
12. Bake the Pie
- Place the pie dish on a baking sheet to catch any drips.
- Bake in the preheated 425°F (220°C) oven for 30-35 minutes.
- After 20 minutes of baking, check the crust edges; if they’re browning too quickly, cover them loosely with aluminum foil or use a pie crust shield.
- The pie is done when the crust is deep golden brown and the filling is bubbling through the vents.
- You should be able to see the filling actively bubbling, which means it’s hot all the way through.
13. Cool and Serve
- Remove the pie from the oven and place it on a wire cooling rack.
- Let it cool for at least 15-20 minutes before slicing.
- This cooling time allows the filling to set up properly so it doesn’t run when you cut into it.
- Serve warm and enjoy the delicious, comforting flavors of this classic dish.
This pairs beautifully with Garlic Mashed Potatoes for a complete comfort food feast.
Tips for Success
These expert tips will help you avoid common mistakes and create the best possible pot pie every time. Pay attention to these details for perfect results.
- Don’t skip cooling the filling: Letting the filling cool for 10-15 minutes before adding it to the crust prevents the bottom from getting soggy. Hot filling will steam the crust and make it limp instead of flaky.
- Use cold pie crust: Keep your pie crusts refrigerated until you’re ready to use them. Cold butter in the crust creates those flaky layers everyone loves.
- Cut uniform vegetables: Dice all your vegetables to the same size so they cook evenly. Large chunks will be undercooked while small pieces turn mushy.
- Don’t overfill: Leave about 1/4 inch of space from the top of the filling to the rim. Overfilled pies will bubble over and make a mess in your oven.
- Seal edges properly: Make sure to crimp the top and bottom crusts together tightly to prevent filling from leaking out during baking.
- Vent generously: Cut enough slits in the top crust to allow steam to escape. This keeps the crust crisp instead of soggy.
- Watch the edges: Cover the crust edges with foil if they’re browning too fast. The edges cook faster than the center, so they need protection.
- Use a baking sheet: Always place your pie dish on a baking sheet to catch any drips and prevent oven messes.
- Check for doneness: The filling should be visibly bubbling through the vents when the pie is done. If you only see steam, bake it a few minutes longer.
Read Also: Classic Chicken Salad Recipe
Serving Suggestions
This classic chicken pot pie is a complete meal on its own, but these accompaniments can round out your dinner beautifully. Choose one or two sides to complement the rich, creamy filling.
The pot pie’s hearty nature pairs perfectly with light, fresh sides that add color and brightness to your plate. Simple salads and roasted vegetables balance the richness without overwhelming your palate.
- Simple green salad with vinaigrette to cut through the richness
- Roasted Asparagus with lemon and parmesan
- Cranberry sauce for a touch of sweetness
- Buttermilk biscuits if you want extra carbs
- Steamed green beans with butter and almonds
- Fresh fruit salad for a refreshing contrast
- Coleslaw for crunch and acidity
- Garlic bread to soak up every bit of that creamy sauce
You might also enjoy: Creamy Coleslaw Recipe
Variations to Try
Once you’ve mastered the classic version, these creative variations will keep pot pie night interesting. Each twist brings new flavors while maintaining that comforting essence.
- Turkey Pot Pie: Swap chicken for leftover turkey, especially perfect after Thanksgiving.
- Vegetarian Pot Pie: Replace chicken with chickpeas, mushrooms, and additional vegetables like potatoes and green beans.
- Seafood Pot Pie: Use a combination of shrimp, white fish, and scallops with a lighter cream sauce.
- Herb Upgrade: Add fresh rosemary, sage, or tarragon along with the thyme for more complex flavors.
- Potato Addition: Include 1 cup of diced potatoes for extra heartiness and to help thicken the filling.
- Mushroom Lovers: Add 8 ounces of sliced mushrooms cooked with the vegetables for earthy depth.
- Spicy Kick: Stir in 1/4 teaspoon cayenne pepper or a diced jalapeño for some heat.
- Cheese Please: Add 1/2 cup shredded cheddar or gruyere to the filling for extra richness.
- Biscuit Topping: Skip the top crust and cover with drop biscuits instead for a different texture.
- Individual Pot Pies: Divide the filling among ramekins and top each with a small round of crust.
Another favorite: Classic Shepherds Pie Recipe
Storage and Reheating
Proper storage keeps your pot pie tasting fresh for several days, and you can even freeze it for future meals. Follow these guidelines for the best results.
- Refrigerator Storage: Cover the pie tightly with plastic wrap or aluminum foil and refrigerate for up to 3-4 days. The crust will soften slightly but will still taste delicious.
- Freezing Before Baking: Assemble the pie completely, wrap tightly in plastic wrap and then aluminum foil, and freeze for up to 3 months. Bake directly from frozen, adding 15-20 minutes to the baking time.
- Freezing After Baking: Let the pie cool completely, wrap well, and freeze for up to 2 months. Thaw overnight in the refrigerator before reheating.
- Reheating in Oven: Place refrigerated pie in a 350°F (175°C) oven for 20-25 minutes until heated through. Cover with foil if the crust is browning too much.
- Reheating Individual Slices: Microwave individual slices on medium power for 2-3 minutes, though the crust won’t be as crispy as oven reheating.
- Reviving the Crust: For best results, reheat in the oven rather than the microwave to keep the crust from getting too soft.
For a lighter option, try: Chicken Vegetable Soup Recipe
Nutritional Facts
Per serving (1/8 of pie):
- Calories: 425
- Total Fat: 24g
- Saturated Fat: 11g
- Cholesterol: 95mg
- Sodium: 620mg
- Total Carbohydrates: 32g
- Dietary Fiber: 2g
- Sugars: 4g
- Protein: 22g
- Vitamin A: 60% DV
- Vitamin C: 8% DV
- Calcium: 8% DV
- Iron: 12% DV
Note: Nutritional information is approximate and calculated per serving based on the ingredients listed. Values may vary depending on specific brands used and any modifications made to the recipe.
This pairs wonderfully with Chicken Rice Soup for another comforting meal option.
Health Benefits of Key Ingredients
While this classic chicken pot pie is definitely comfort food, it does contain several nutritious ingredients that offer real health benefits. Understanding what these ingredients bring to the table can help you feel good about enjoying this dish.
The chicken provides lean protein essential for muscle maintenance and keeping you feeling full and satisfied after your meal. Protein also supports immune function and helps your body repair tissues.
- Chicken breast: High-quality protein with essential amino acids, plus B vitamins for energy metabolism
- Carrots: Rich in beta-carotene for eye health and immune support, plus vitamin K
- Celery: Low-calorie vegetable with antioxidants and anti-inflammatory properties
- Peas: Good source of plant-based protein, fiber, and vitamins A, C, and K
- Onions: Contain quercetin and other antioxidants that support heart health
- Garlic powder: Known for immune-boosting properties and heart health benefits
- Thyme: Contains thymol, which has antimicrobial and antioxidant properties
You might also enjoy: Mulligatawny Soup Recipe
Frequently Asked Questions
1. Can I use rotisserie chicken for this recipe?
Absolutely, rotisserie chicken is a fantastic shortcut that saves time and adds great flavor. Simply remove the skin and bones, then dice or shred the meat into bite-sized pieces. You’ll need about one whole rotisserie chicken to get the 3 cups of meat required for this recipe.
2. Why is my pot pie filling runny?
A runny filling usually means the roux wasn’t cooked long enough or the filling didn’t have enough time to thicken. Make sure to cook the flour and butter for at least 1-2 minutes before adding liquids, and let the sauce simmer until it visibly thickens and coats the back of a spoon. Also, allow the filling to cool slightly before adding it to the crust, as it will continue to thicken as it cools.
3. How do I prevent the bottom crust from getting soggy?
The key is making sure your filling isn’t too hot when you add it to the crust, and that you’ve cooked your sauce to the proper thickness. Baking at a high temperature (425°F) also helps set the bottom crust quickly. You can also try blind-baking the bottom crust for 10 minutes before adding the filling for extra insurance.
4. Can I make pot pie without a top crust?
Yes, you can make a single-crust pot pie with just a bottom crust, or you can top it with puff pastry, biscuits, or even mashed potatoes for a shepherd’s pie-style variation. Just adjust your baking time accordingly, as a single crust may bake faster than a double-crust pie.
5. What’s the best way to reheat leftover pot pie?
For best results, reheat pot pie in a 350°F oven for 20-25 minutes until warmed through, covering the crust with foil if it browns too quickly. This method keeps the crust crispy and the filling creamy. While you can microwave individual slices, the crust won’t be as flaky as when oven-reheated.
Read Also: Baked Mac and Cheese Recipe
Classic Chicken Pot Pie
Equipment
- 9-inch pie dish (glass or ceramic)
- Large skillet or saucepan
- Wooden spoon or silicone spatula
- Whisk
- Sharp knife and cutting board
- Measuring cups and spoons
- Small bowl (for egg wash)
- Pastry brush
- Aluminum foil (for covering crust edges)
Ingredients
For the Pie Crust
- 2 refrigerated pie crusts - or homemade
- 1 egg - for egg wash
- 1 tablespoon water
For the Filling
- 1/3 cup unsalted butter - 75g
- 1 medium onion - diced (about 1 cup/150g)
- 2 medium carrots - peeled and diced (about 1 cup/130g)
- 2 celery stalks - diced (about 1 cup/100g)
- 1/3 cup all-purpose flour - 40g
- 1 3/4 cups chicken broth - 420ml
- 3/4 cup whole milk - or half-and-half, 180ml
- 3 cups cooked chicken breast - 450g, diced into bite-sized pieces
- 1 cup frozen peas - 150g
- 1 cup frozen corn - 150g
- 1 teaspoon salt
- 1/2 teaspoon black pepper
- 1/2 teaspoon garlic powder
- 1/2 teaspoon dried thyme
- 1/4 teaspoon celery seed - optional
- 2 tablespoons fresh parsley - chopped, optional
Instructions
- Preheat your oven to 425°F (220°C) and position a rack in the lower third. Lightly grease a 9-inch pie dish.
- Dice the onion, carrots, and celery into small uniform pieces. Measure out the frozen peas and corn.
- In a large skillet, melt the butter over medium heat. Add the onion, carrots, and celery and cook for 5-7 minutes until softened but still with a slight bite.
- Sprinkle the flour over the vegetables and stir constantly for 1-2 minutes until absorbed and nutty smelling to cook the roux.
- Slowly stir in the chicken broth and milk. Bring to a gentle simmer and cook 3-4 minutes until the sauce thickens to a gravy consistency.
- Stir in the salt, pepper, garlic powder, thyme, celery seed (if using), and parsley. Taste and adjust seasoning.
- Add the diced chicken, frozen peas, and corn. Mix well and remove from heat. Cool the filling for 10-15 minutes.
- Unroll one pie crust and press into the prepared pie dish. Trim excess, leaving 1/2 inch overhang.
- Pour the cooled filling into the crust and spread evenly.
- Place the second crust on top. Trim, fold edges under, and crimp to seal tightly.
- Whisk egg with water and brush over the top crust. Cut 4-5 slits for vents.
- Place on a baking sheet and bake for 30-35 minutes until the crust is deep golden brown and filling is bubbling. Cover edges with foil if browning too quickly.
- Remove from oven and cool on a wire rack for at least 15-20 minutes before slicing to allow filling to set.
Notes
- Don’t skip cooling the filling before assembling to prevent a soggy bottom crust.
- Use cold pie crusts straight from the refrigerator for the flakiest layers.
- Cut vegetables into uniform small dice for even cooking without mushiness.
- Leave 1/4 inch headspace when filling to avoid overflow during baking.
- Seal the crust edges tightly by crimping to prevent leaks.
- Vent the top crust generously to allow steam to escape and keep it crisp.
- Place the pie on a baking sheet to catch any drips.
- Rotisserie chicken works great as a time-saving shortcut for the cooked chicken.
- The assembled unbaked pie can be frozen for up to 3 months; bake directly from frozen, adding extra time.
- Reheat leftovers in a 350°F oven for best crust texture rather than microwave.
Final Thoughts
This classic chicken pot pie recipe brings together everything we love about comfort food in one beautiful, golden-brown package. The flaky crust, creamy filling, and tender vegetables create a meal that warms both body and soul.
Making pot pie from scratch takes a little effort, but the results are absolutely worth it. Your kitchen will smell amazing, and your family will gather around the table eager to dig in.
I hope you’ll try this recipe and experience just how satisfying homemade pot pie can be. Don’t forget to share your results in the comments below and let me know if you tried any of the variations!
Recommended:
- Easy Shepherds Pie Recipe
- Breakfast Casserole Recipe
- Cowboy Casserole Recipe
- Potato Casserole Recipe
- Corn Casserole Recipe
- French Toast Casserole Recipe
- Squash Casserole Recipe
- Lasagna Soup Recipe
- Hamburger Soup Recipe
- Chicken Sopas Recipe


