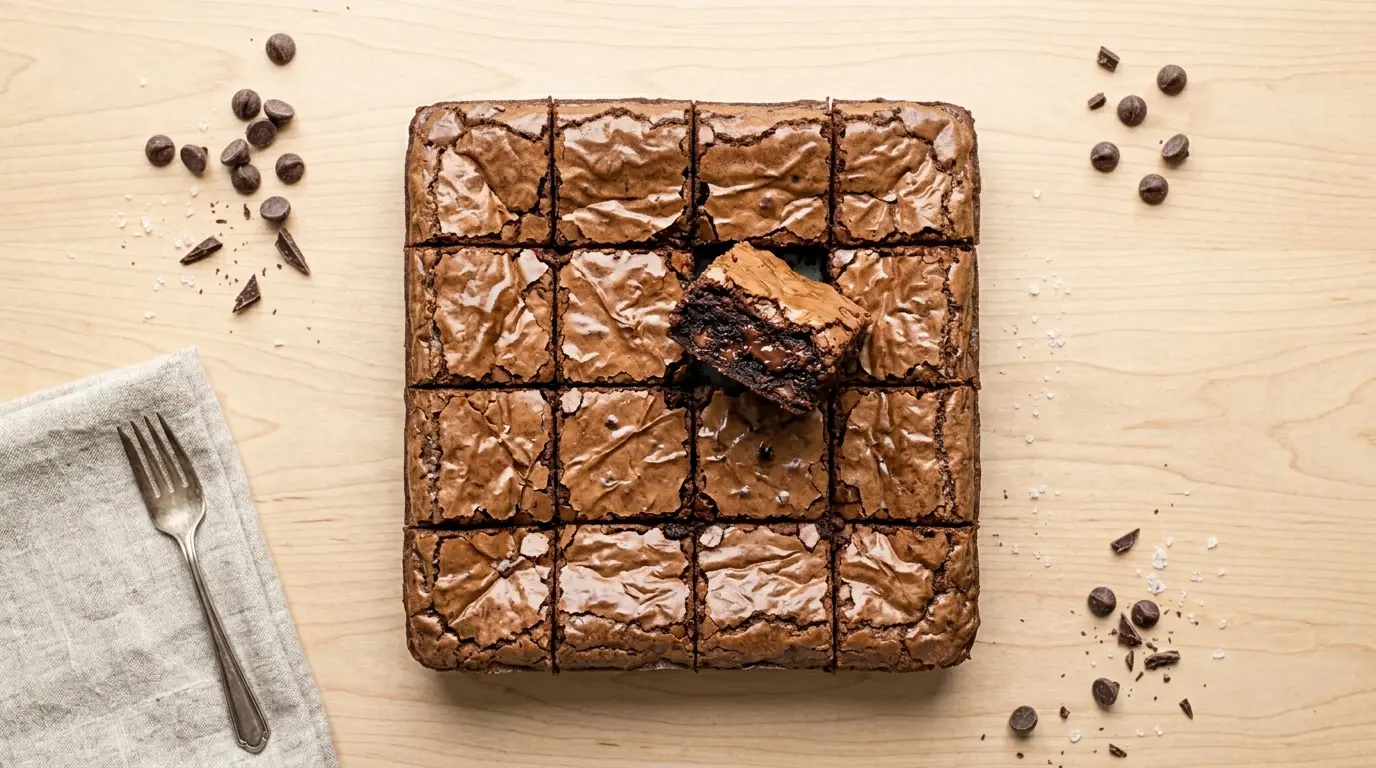
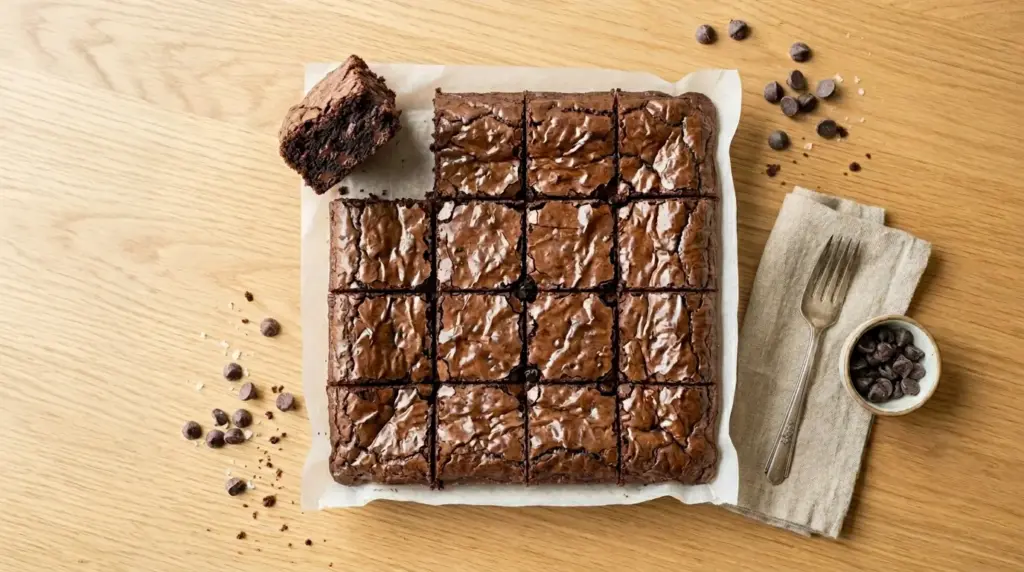
If you’ve been searching for the best way to use up your sourdough starter, this sourdough discard brownies recipe is about to become your new go-to. These brownies are deeply fudgy, loaded with rich chocolate flavor, and made with pantry staples you probably already have on hand. The sourdough discard works quietly in the background, adding a subtle tang that cuts through the sweetness and gives the chocolate an extra depth you just don’t get from regular brownies.
The beauty of this recipe is in its simplicity. You don’t need a stand mixer, you don’t need any fancy equipment, and you don’t need an active starter. Regular discard straight from the fridge works perfectly. The result is a batch of thick, gooey brownies with those coveted crackly tops and dense, fudgy centers that make every bite feel like a reward.
Cocoa powder forms the backbone of the chocolate flavor here, while melted butter adds richness and helps achieve that signature shiny crust. A generous amount of granulated sugar keeps the texture moist and fudgy rather than cakey. Two eggs give structure without making the brownies too light, and a small amount of all-purpose flour ties everything together without drying things out.
Whether you feed your starter weekly or daily, this recipe is one of the most satisfying things you can do with the discard. No waste, no guilt, just an outrageously good brownie that disappears fast.
You might also enjoy: Sourdough Discard Chocolate Chip Cookies

Why You’ll Love This Sourdough Discard Brownies Recipe
These brownies check every single box that a great brownie should.
They are thick and fudgy with a dense, gooey center that holds together perfectly when cut. No crumbly, dry edges here.
The sourdough discard adds a barely-there tanginess that makes the chocolate flavor taste more complex and interesting. It is the kind of depth that makes people ask, “What’s in these?”
This recipe comes together in one bowl with no special equipment needed. From start to finish, you are looking at about 40 minutes total.
It is a brilliant, zero-waste way to use up sourdough discard instead of throwing it down the drain. Every bit of your starter gets put to delicious use.
- Crackly, shiny top with a fudgy, dense center
- Rich double chocolate flavor from both cocoa powder and melted butter
- Subtle tang from the discard that elevates the overall taste
- One-bowl recipe with minimal cleanup
- Ready in under 45 minutes from start to finish
- Uses active or inactive discard straight from the fridge
Read Also: Sourdough Discard Banana Bread Recipe
Ingredients
You only need a handful of pantry staples to make these brownies, plus your sourdough discard. Using high-quality cocoa powder here makes a real difference since it is the primary source of chocolate flavor in the batter.
- 1/2 cup (113g) unsalted butter
- 1 cup (200g) granulated sugar
- 2 large eggs, room temperature
- 1 teaspoon pure vanilla extract
- 1/2 cup (110g) sourdough discard (unfed, room temperature or straight from the fridge)
- 1/2 cup (50g) unsweetened cocoa powder
- 1/2 cup (60g) all-purpose flour
- 1/4 teaspoon fine salt
- 1/2 teaspoon baking powder
- 1/2 cup (85g) semi-sweet chocolate chips
Another favorite: Sourdough Discard Blueberry Muffins
Kitchen Equipment Needed
You do not need anything special to make these brownies. A basic setup from any kitchen will get the job done, though a good quality baking pan makes a noticeable difference in how evenly they bake.
- 9×9 inch (23×23 cm) square baking pan
- Parchment paper
- Medium saucepan or microwave-safe bowl for melting butter
- Large mixing bowl
- Whisk
- Rubber spatula or wooden spoon
- Sifter or fine mesh strainer
- Measuring cups and spoons
- Cooling rack
- Sharp knife for slicing
This pairs beautifully with a batch of Sourdough Discard Waffles for a weekend brunch spread.
Recommended Products for This Recipe
These products are recommended based on quality and performance, and they genuinely make a difference in how this recipe turns out.
1. Nordic Ware Natural Aluminum 9×9 Baking Pan
Aluminum baking pans heat more evenly than glass or ceramic, which means your brownies bake consistently from edge to center. This pan gives you those perfect slightly-chewy edges without over-baking the middle. It is a lightweight, durable option that professional bakers prefer for bar cookies and brownies.
2. Ghirardelli Unsweetened Cocoa Powder
The quality of your cocoa powder directly impacts how rich and deep the chocolate flavor is in these brownies. Ghirardelli’s cocoa powder has a robust, full-bodied flavor that makes a noticeable difference compared to standard store-brand options. It is Dutch-processed enough to give that dark, intense color and taste without bitterness.
3. Guittard Semi-Sweet Chocolate Chips
Not all chocolate chips melt and bake the same way. Guittard chips have a higher cocoa butter content that allows them to stay soft and slightly gooey inside the brownies rather than turning dry or waxy. They create little pockets of melted chocolate throughout each slice.
4. OXO Good Grips Silicone Spatula Set
A flexible silicone spatula is essential for folding the batter gently without overworking the gluten, which would make the brownies tough. The OXO set is heat-resistant and designed to scrape every last bit of batter out of the bowl without tearing. They clean up effortlessly too.
Read Also: Sourdough Discard Cinnamon Rolls Recipe
Step-by-Step Instructions
Step 1: Prepare Your Pan and Preheat the Oven
- Preheat your oven to 350°F (175°C). Place the oven rack in the middle position so the brownies bake evenly from all sides.
- Cut a piece of parchment paper long enough to line the bottom of your 9×9 inch (23×23 cm) baking pan with some overhang on two sides. These “handles” make it easy to lift the brownies out cleanly after baking.
- Lightly grease the two exposed sides of the pan (where the parchment does not cover) with a small amount of butter or non-stick spray. This prevents sticking.
- Set the prepared pan aside on your counter.
Step 2: Melt the Butter
- Place 1/2 cup (113g) of unsalted butter in a medium saucepan over low heat. You can also melt it in a microwave-safe bowl in 30-second bursts, stirring between each burst.
- Heat the butter just until it is fully melted. Do not let it boil or brown at this stage.
- Remove from heat immediately and let it cool for about 3 to 4 minutes. You want the butter to be warm but not so hot that it scrambles the eggs when they are added later.
Step 3: Whisk Together Butter and Sugar
- Pour the warm melted butter into a large mixing bowl.
- Add 1 cup (200g) of granulated sugar to the bowl.
- Whisk the butter and sugar together vigorously for about 60 to 90 seconds, until the mixture looks lighter in color and slightly thickened. This step is important for developing the shiny crackly top on the brownies. The more you whisk here, the more that classic shiny crust forms during baking.
Step 4: Add the Eggs and Vanilla
- Crack 2 large eggs into the butter and sugar mixture, one at a time.
- After adding each egg, whisk it in thoroughly before adding the next. This helps emulsify the batter and ensures an even texture throughout.
- Add 1 teaspoon of pure vanilla extract and whisk again for another 30 seconds.
- The batter should look smooth, glossy, and slightly pale at this point.
Step 5: Stir in the Sourdough Discard
- Add 1/2 cup (110g) of sourdough discard directly to the bowl.
- Fold the discard in using a rubber spatula, mixing until it is fully incorporated with no visible streaks remaining.
- If your discard is cold from the fridge, mixing it into the warm butter mixture will bring it up to temperature quickly. This is perfectly fine and will not affect the recipe.
- Do not worry if the batter looks a little loose at this stage. The flour and cocoa will thicken it up.
Step 6: Sift and Add the Dry Ingredients
- Place a fine mesh strainer or sifter over the bowl.
- Add 1/2 cup (50g) of unsweetened cocoa powder, 1/2 cup (60g) of all-purpose flour, 1/4 teaspoon of fine salt, and 1/2 teaspoon of baking powder to the strainer.
- Sift all the dry ingredients directly into the wet batter. Sifting prevents lumps in the cocoa powder and ensures even distribution throughout the batter.
- Using your rubber spatula, fold the dry ingredients into the wet ingredients with gentle, sweeping motions. Mix until just combined and no dry streaks of flour or cocoa remain.
- Be careful not to overmix at this stage. Overworking the batter develops too much gluten, which makes the brownies tough and cakey rather than fudgy.
Step 7: Fold in the Chocolate Chips
- Add 1/2 cup (85g) of semi-sweet chocolate chips to the batter.
- Fold them in gently using the spatula, distributing them evenly throughout.
- If you want to make the top look extra inviting, reserve a small handful of chips to scatter on top of the batter before baking.
Step 8: Transfer the Batter to the Pan
- Pour the brownie batter into your prepared 9×9 inch baking pan.
- Use the rubber spatula to spread the batter evenly across the pan, reaching into all four corners.
- If you reserved some chocolate chips, scatter them over the top of the batter now.
- Give the pan a gentle tap or two on the counter to release any air bubbles and settle the batter.
Step 9: Bake the Brownies
- Place the pan in the preheated oven on the middle rack.
- Bake for 25 to 30 minutes. Begin checking at the 25-minute mark.
- To test for doneness, insert a toothpick into the center of the brownies. It should come out with a few moist crumbs clinging to it, but not with wet, liquid batter. If it comes out completely clean, the brownies may be slightly overbaked and will be less fudgy.
- The edges should look set and the center should look just barely set. It may look slightly underdone, but it will firm up as it cools.
Step 10: Cool, Slice, and Serve
- Remove the pan from the oven and place it on a cooling rack.
- Allow the brownies to cool in the pan for at least 20 to 30 minutes before attempting to slice them. Cutting too early causes them to fall apart and look messy.
- Once cooled, use the parchment paper handles to lift the entire slab of brownies out of the pan and onto a cutting board.
- Use a sharp knife to slice into 9 or 16 squares, depending on how generous you want your portions. Wiping the knife blade clean between each cut gives you cleaner slices.
- Serve and enjoy.
This technique works wonderfully in Fudge Brownies as well if you want to try a classic version side by side.
Tips for Success
Getting great results with these brownies is straightforward, but a few small details make a big difference. Keep these in mind before you start baking.
- Do not overmix after adding the flour. Fold gently and stop as soon as no dry streaks remain. Overworking the batter creates a tough, cakey texture instead of fudgy.
- Use room temperature eggs. Cold eggs can cause the melted butter to seize and create a greasy or separated batter. If you forgot to pull the eggs out early, set them in a bowl of warm water for 5 minutes.
- Weigh your ingredients if possible. Volume measurements for cocoa powder and flour can vary significantly depending on how packed the measuring cup is. A kitchen scale gives you consistent results every time.
- Do not overbake. Brownies continue to cook from residual heat after leaving the oven. Pull them out while the center still looks slightly underdone.
- Let them cool before cutting. Patience pays off here. The fudgy texture sets as the brownies cool, making slicing much cleaner.
- Discard at any hydration level works. Whether your starter is 100% hydration or not, the small amount used here is flexible enough that it will not significantly alter the outcome.
For more baking inspiration, try these Sourdough Discard Crackers as a savory counterpart to all your sourdough sweet bakes.
Serving Suggestions
These brownies are rich enough to stand alone, but pairing them thoughtfully takes them to another level entirely.
A scoop of vanilla bean ice cream melting over a warm brownie is a classic combination that never gets old. The cold creaminess of the ice cream contrasts beautifully with the dense chocolate richness.
A drizzle of salted caramel sauce over the top of each square adds a sweet-salty element that makes the chocolate taste even deeper.
- Serve warm with a scoop of Vanilla Bean Ice Cream
- Drizzle with warm Caramel Sauce and a pinch of flaky sea salt
- Top with a generous dollop of freshly whipped cream and a few fresh raspberries
- Serve alongside a mug of hot coffee or espresso for a classic pairing
- Crumble over a bowl of Vanilla Pudding for a deconstructed brownie sundae
- Dust with powdered sugar just before serving for a simple, elegant presentation
You might also enjoy: Brownie Pudding
Variations to Try
Once you have mastered the base recipe, there are so many ways to customize these brownies to suit your taste or occasion. Each variation works within the same basic batter without changing the technique.
- Peanut butter swirl: Drop spoonfuls of creamy peanut butter over the top of the batter before baking. Use a skewer to swirl it in for a marbled look and a rich, nutty flavor.
- Espresso brownies: Add 1 teaspoon of instant espresso powder to the dry ingredients. This intensifies the chocolate flavor significantly without making the brownies taste like coffee.
- Walnut brownies: Fold in 1/2 cup (55g) of roughly chopped walnuts along with the chocolate chips for added crunch and a slightly nutty flavor.
- Mint chocolate: Add 1/4 teaspoon of pure peppermint extract to the batter and top with mint-flavored chocolate chips for a festive holiday version.
- White chocolate swirl: Drop dollops of white chocolate chips across the top of the batter and bake as directed for a striking visual contrast and added sweetness.
- Spicy Mexican chocolate: Add 1/2 teaspoon of cinnamon and a pinch of cayenne pepper to the dry ingredients for a warm, complex heat that plays beautifully off the chocolate.
Read Also: Sourdough Discard Pancakes Recipe
Storage and Reheating
These brownies store very well, making them a great make-ahead treat for the week. The texture actually improves slightly on day two as everything settles.
- Room temperature: Store brownies in an airtight container at room temperature for up to 4 days. Place a piece of parchment between layers to prevent sticking.
- Refrigerator: Refrigerate in an airtight container for up to 7 days. Allow them to come back to room temperature before serving, or warm them briefly before eating.
- Freezer: Wrap individual brownies tightly in plastic wrap, then place in a freezer bag or airtight container. Freeze for up to 3 months.
- Reheating: Microwave a single brownie for 10 to 15 seconds to warm it through and restore that soft, fudgy texture. Do not overheat or it will dry out.
- Make ahead tip: You can prepare the batter, transfer it to the lined pan, cover tightly, and refrigerate overnight. Bake straight from the fridge, adding 3 to 5 extra minutes to the bake time.
Another favorite for your sourdough discard baking rotation: Sourdough Discard Pretzels
Nutritional Facts
The following values are approximate and based on one brownie from a 9×9 pan cut into 9 equal squares. Nutrition will vary depending on the size of your cut and specific ingredients used.
| Nutrient | Per Serving (1 brownie) |
|---|---|
| Calories | 310 kcal |
| Total Fat | 15g |
| Saturated Fat | 9g |
| Cholesterol | 65mg |
| Sodium | 110mg |
| Total Carbohydrates | 42g |
| Dietary Fiber | 2g |
| Total Sugars | 30g |
| Protein | 4g |
Nutritional values are estimates only and will vary based on specific brands and portion sizes used.
For a completely different way to use your discard, check out these Sourdough Discard Flatbread as a fun weeknight dinner option.
Health Benefits of Key Ingredients
While these are definitely a treat, a few of the key ingredients do bring some noteworthy nutritional perks to the table.
These benefits do not make brownies a health food, but they do give you a bit more appreciation for what is going into them.
- Sourdough discard: The fermentation process in sourdough starter introduces beneficial organic acids and may improve the digestibility of the small amount of flour present in the discard. Some research suggests fermented grains have better bioavailability of certain nutrients.
- Dark cocoa powder: Rich in flavonoids, a class of plant compounds linked to heart health and improved circulation. Cocoa also contains magnesium and iron, along with mood-boosting compounds like phenylethylamine.
- Eggs: A complete protein source containing all essential amino acids. Eggs also provide choline, which supports brain health and cell membrane function.
- Butter: While a fat-dense ingredient, butter provides fat-soluble vitamins A, D, E, and K, along with conjugated linoleic acid (CLA) when sourced from grass-fed dairy.
- Semi-sweet chocolate chips: Contain a modest amount of cocoa solids, which bring antioxidant properties and trace minerals including manganese and copper.
This recipe pairs naturally with the flavors in Sourdough Discard Rolls if you want to do a whole discard baking session.
Frequently Asked Questions
1. Can I use active (fed) starter instead of unfed discard?
Yes, you can. Active, recently-fed starter will work in this recipe without any issues. The brownies may have a very slightly less tangy flavor since unfed discard tends to be more acidic, but the difference is minimal. The primary reason this recipe calls for discard is to reduce waste, but both forms of starter produce excellent results.
2. Do I need to let the discard come to room temperature before using it?
It is not strictly necessary, but it does help. Cold discard straight from the fridge can slightly thicken the batter and make mixing a little harder. Adding it to the warm butter and sugar mixture will bring it up to temperature quickly. If your kitchen is cold, giving the discard 15 minutes on the counter before starting makes the whole process smoother.
3. Why do my brownies look underdone in the center when I pull them from the oven?
This is perfectly normal and actually what you want. The center of fudgy brownies should look just barely set when they come out of the oven. They continue cooking from residual heat as they cool in the pan. If you wait until the center looks completely firm before pulling them out, they will be dry and over-baked by the time they cool.
4. Can I use a glass baking dish instead of a metal pan?
Yes, but you will need to adjust. Glass dishes heat more slowly and retain heat longer than aluminum pans. Add 7 to 10 extra minutes to the bake time and keep a closer eye on them. The edges may also bake slightly faster than the center, so rotate the pan halfway through if needed.
5. Can I double this recipe for a larger batch?
Absolutely. To double the recipe, use a 9×13 inch (23×33 cm) baking pan and increase all ingredients proportionally. The bake time will increase by about 5 to 10 minutes since the larger pan holds more batter. Begin testing for doneness at the 30-minute mark and go from there.
Read Also: Sourdough Discard Dinner Rolls Recipe
Final Thoughts
This sourdough discard brownies recipe is one of those rare baking wins where you get to feel resourceful and indulgent at the same time. You are turning something you would normally throw away into a pan of thick, fudgy, deeply chocolatey brownies that taste like they came from a bakery.
The sourdough discard gives them a flavor complexity that is hard to put into words until you taste it. It is subtle, but it is there, rounding out the sweetness and making the chocolate taste richer.
If you try this recipe, I would love to hear how it turned out. Drop a comment below and let me know if you added any fun mix-ins or tried any of the variations. And if you share a photo, tag it so I can see your beautiful brownies!
Recommended:
- Sourdough Discard Breadsticks
- Sourdough Discard Tortillas
- Sourdough Discard French Toast
- Sourdough Discard Pizza Dough
- Sourdough Discard Focaccia
- Sourdough Discard Bagels
- Sourdough Discard English Muffins
- Sourdough Discard Naan
- Sourdough Starter Recipe
- Chocolate Cake Recipe
