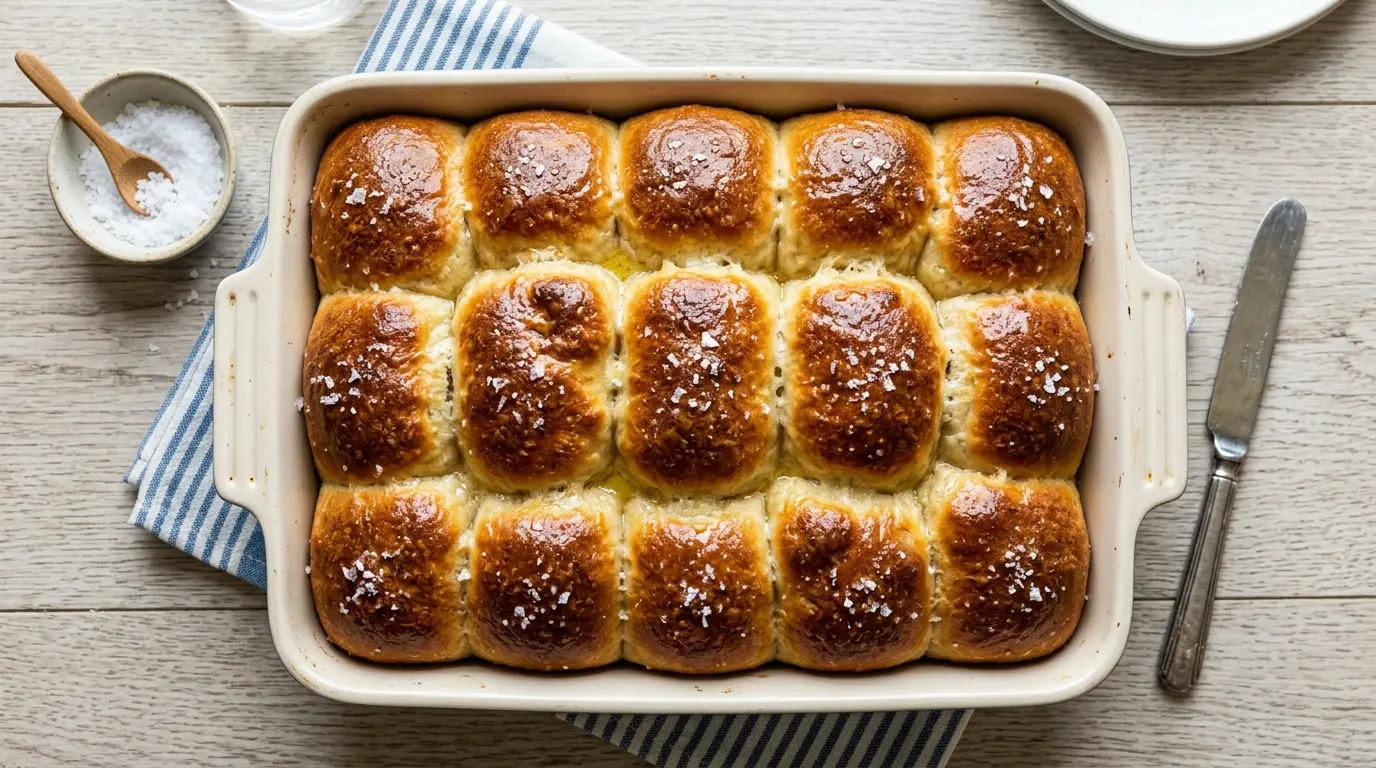
If you have a jar of sourdough discard sitting in your fridge with nowhere to go, this Sourdough Discard Dinner Rolls recipe is exactly what you need. These rolls are soft, pillowy, and golden brown, with just a subtle tang from the discard that makes them taste far more interesting than your average store-bought roll. The discard adds depth of flavor, and because this recipe also uses instant yeast, you get that beautiful, predictable rise without waiting a full day. From start to finish, you can have warm rolls on the table in about two hours, which makes this an incredible option for weeknight dinners, holiday spreads, or whenever you want homemade bread without the all-day commitment.
The secret to these rolls is the combination of warm milk and butter in the dough. Milk adds richness and helps create that ultra-soft crumb, while butter gives the exterior a gorgeous color and a slightly crispy edge when baked. Sourdough discard, even unfed and straight from the fridge, brings an unmistakable complexity that you simply cannot replicate with flour and yeast alone. And because the dough is kneaded until smooth and elastic, each roll bakes up with a tender, pull-apart interior and a lightly golden, buttery top.
These rolls work beautifully for everything from holiday dinners to simple weekday soups and stews. Once you make them, you’ll find yourself looking for excuses to bake them again.
You might also love: Sourdough Discard Rolls Recipe

Why You’ll Love This Sourdough Discard Dinner Rolls Recipe
These rolls are a genuinely satisfying way to put sourdough discard to good use instead of throwing it away. The flavor is noticeably better than plain dinner rolls, with a gentle tang that makes each bite more interesting without being overwhelming.
The recipe is beginner-friendly and forgiving. Even if you have never worked with yeast dough before, the step-by-step process is easy to follow and the results are consistently impressive.
You only need one rise, which dramatically shortens the total time compared to traditional bread recipes. That means you can plan this recipe on the same day you want to serve them.
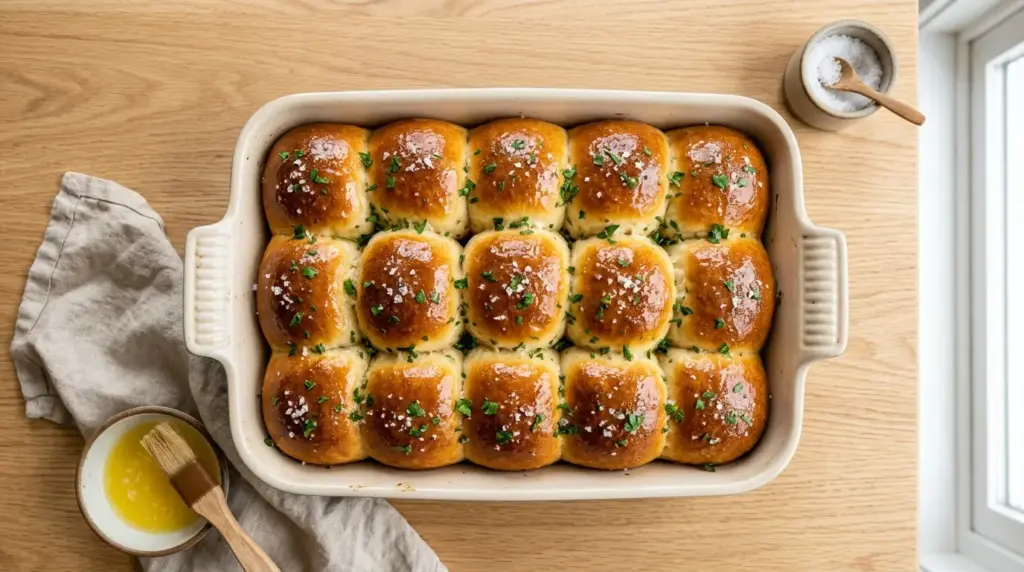
The rolls bake up with a soft, tender interior and a light golden crust. Brushing them with melted butter straight out of the oven takes them to a whole other level.
They are incredibly versatile. Serve them as a dinner side, use them as slider buns, tear them apart at the table, or smear them with honey butter the next morning for breakfast.
These rolls also freeze beautifully, so you can make a big batch and stash the extras for future meals.
Here is a quick summary of why this recipe stands out:
- Uses sourdough discard you would otherwise throw away
- Ready in about 2 hours with just one rise
- Soft, fluffy texture with a rich, buttery flavor
- Subtle sourdough tang that makes them taste homemade
- Easy enough for beginners, impressive enough for guests
- Works as a side dish, sandwich bun, or standalone snack
- Freezes well for up to 3 months
Read Also: Dinner Rolls Recipe
Ingredients
For this recipe, you will need a handful of pantry staples plus your sourdough discard. Bread flour is strongly recommended over all-purpose flour because its higher protein content creates a stronger gluten network, resulting in a chewier, more structured roll. If you only have all-purpose flour, it will still work, but the texture will be slightly softer and less defined.
Here is everything you need to make 12 dinner rolls:
- 120g (½ cup) sourdough discard, at room temperature (unfed is fine)
- 240ml (1 cup) whole milk, warmed to about 100–110°F (38–43°C)
- 57g (4 tablespoons / ½ stick) unsalted butter, melted and cooled slightly, plus extra for brushing
- 1 large egg, at room temperature
- 50g (¼ cup) granulated sugar
- 9g (1 tablespoon) instant yeast (also called rapid-rise or bread machine yeast)
- 10g (1¾ teaspoons) fine salt
- 560g (4½ cups) bread flour, plus a little extra for dusting
- Flaky sea salt for topping (optional but highly recommended)
Note: The sourdough discard should not be more than 2 weeks old and should not smell unpleasant. Fresh discard or discard up to 2 weeks from the fridge works perfectly here.
This recipe pairs wonderfully with sourdough discard biscuits if you want to make a full bread spread for a holiday table.
Kitchen Equipment Needed
Having the right tools on hand makes this recipe much smoother. While you can mix and knead by hand, a stand mixer with a dough hook will save significant time and effort.
- Stand mixer with a dough hook attachment (or a large mixing bowl for hand kneading)
- 9×13-inch (23x33cm) baking dish or a rimmed baking sheet for pull-apart style rolls
- Instant-read thermometer for checking milk temperature and roll doneness
- Kitchen scale for accurate measurements (strongly recommended over cup measures for bread baking)
- Pastry brush for applying melted butter
- Plastic wrap or a clean kitchen towel for covering the dough during rising
- Bench scraper or sharp knife for dividing the dough
- Measuring cups and spoons
- Wire cooling rack for cooling the rolls after baking
Read Also: Sourdough Starter Recipe
Recommended Products for This Recipe
These are products I recommend based on quality and performance for making soft, fluffy dinner rolls. They address common pain points and will genuinely improve your results.
1. KitchenAid Stand Mixer with Dough Hook
A stand mixer takes the hard work out of kneading, which is the most important step in developing the gluten for soft, airy rolls. The dough hook mimics hand kneading and gives you consistently smooth, elastic dough every time. It is one of the best investments for any home baker who makes bread regularly.
2. OXO Good Grips 9×13 Baking Pan
A quality 9×13 baking pan with straight sides ensures your pull-apart rolls bake evenly and release cleanly. Lighter-colored pans prevent over-browning on the bottom, giving you that perfect golden base without burning. The sturdy construction also means it heats consistently throughout the bake.
3. Thermapen ONE Instant-Read Thermometer
Temperature matters more in bread baking than almost any other type of cooking. An instant-read thermometer lets you confirm your milk is the right temperature before adding yeast (too hot kills it, too cold slows it down significantly), and tells you when your rolls have reached an internal temperature of 190–200°F (88–93°C), which signals they are fully baked through.
4. Digital Kitchen Scale
Weighing your ingredients, especially flour, is the single biggest upgrade you can make to your bread baking. A cup of flour can vary wildly depending on how it is scooped, but 560 grams is always 560 grams. A digital kitchen scale removes the guesswork entirely and gives you consistent results every time.
5. Maldon Sea Salt Flakes
A small pinch of flaky sea salt sprinkled over the butter-brushed tops of these rolls just before baking adds a beautiful finishing touch. It creates a subtle crunch and a burst of savory flavor that balances the richness of the butter perfectly. Maldon is widely considered the gold standard for finishing salts.
For more delicious sourdough ideas, check out this Sourdough Discard Focaccia Recipe that uses the same discard in a completely different and equally stunning way.

Step-by-Step Instructions
Step 1: Warm the Milk and Combine the Wet Ingredients
- Gently heat the milk in a small saucepan over low heat or in the microwave in 20-second increments until it reaches 100–110°F (38–43°C). Use an instant-read thermometer to be precise. Milk that is too hot (above 115°F / 46°C) will kill the yeast, so err on the side of slightly cooler rather than hotter.
- Pour the warm milk into the bowl of your stand mixer (or a large mixing bowl if kneading by hand).
- Add the sourdough discard, melted butter (make sure it has cooled slightly and is not steaming hot), egg, and granulated sugar to the warm milk. Use a fork or whisk to lightly combine these ingredients before adding the dry components. This helps the egg incorporate more evenly into the dough.
Step 2: Add the Dry Ingredients
- Add the instant yeast, fine salt, and bread flour to the bowl with the wet ingredients. It is important to add the salt and yeast to the bowl rather than mixing them together directly first, as high concentrations of salt can slow yeast activity. Spreading them across the flour as you add it is the safest approach.
- If using a stand mixer, attach the dough hook. If mixing by hand, use a sturdy wooden spoon or your hands to bring the ingredients together until a shaggy dough forms and no dry flour remains visible at the bottom of the bowl.
Step 3: Knead the Dough
- If using a stand mixer, knead on medium-low speed (speed 2 on a KitchenAid) for 8–10 minutes. The dough is ready when it pulls completely away from the sides of the bowl, feels smooth and slightly tacky (not sticky) to the touch, and passes the windowpane test (see below).
- If kneading by hand, turn the dough out onto a lightly floured surface and knead for 10–12 minutes, using the heel of your hand to push the dough away from you, then fold it back, rotate a quarter turn, and repeat.
- Windowpane test: Take a small piece of dough and gently stretch it between your fingers. If the dough stretches thin enough to be nearly translucent without tearing, the gluten is sufficiently developed. If it tears immediately, knead for another 2 minutes and test again.
- The dough should be soft and pillowy. If it is sticking excessively to the bowl or your hands, add flour one tablespoon at a time. Avoid adding too much flour, as this will make the rolls dense.
Step 4: First Rise
- Lightly grease a large bowl with a small amount of neutral oil or butter. Shape the dough into a smooth ball by pulling the sides down and tucking them underneath.
- Place the dough smooth-side up in the greased bowl. Cover tightly with plastic wrap or a clean damp kitchen towel.
- Set the bowl in a warm, draft-free spot in your kitchen. The ideal proofing temperature is around 75–80°F (24–27°C). If your kitchen is cool, you can place the covered bowl in your oven with just the oven light on, or next to a warm stovetop.
- Allow the dough to rise until it has roughly doubled in size, about 60–75 minutes. Sourdough discard doughs can sometimes rise a little slower than plain yeast doughs because of the slight acidity, so be patient and go by size rather than the clock.
Step 5: Shape the Rolls
- Lightly grease your 9×13-inch (23x33cm) baking dish with butter or non-stick spray.
- Once the dough has doubled, gently punch it down to release the built-up gas. Turn it out onto a lightly floured surface.
- Using a kitchen scale or bench scraper, divide the dough into 12 equal portions (each should weigh approximately 90–100g).
- To shape each roll, flatten a portion of dough slightly into a disc. Pull the edges up toward the center, pinch them together firmly, and then roll the dough ball on the counter using a cupped hand in a circular motion until it is smooth and tight on the outside with no seams visible on the bottom.
- Place each shaped roll seam-side down in the prepared baking dish, arranging them in a 3×4 grid. The rolls should be close together but not touching yet. As they proof and bake, they will expand into each other to create those beautiful pull-apart edges.
Step 6: Second Rise (Proof)
- Cover the baking dish loosely with plastic wrap or a clean kitchen towel.
- Allow the rolls to proof in a warm spot for 30–45 minutes, until they have puffed up noticeably and are just beginning to touch each other at the sides.
- While the rolls are proofing, preheat your oven to 375°F (190°C). Make sure the oven is fully preheated before baking.
Step 7: Bake the Rolls
- Once the rolls have proofed and the oven is hot, uncover the baking dish.
- Optional: Gently brush the tops of the rolls with a little melted butter before baking for extra color and richness.
- Sprinkle flaky sea salt over the tops if using.
- Bake on the center rack of the preheated oven for 20–25 minutes, until the tops are deep golden brown and the internal temperature of the center rolls reads 190–200°F (88–93°C) on an instant-read thermometer. The center rolls take the longest to bake, so always check those rather than the outer edges.
- If the tops are browning too quickly before the rolls are cooked through, loosely tent the baking dish with a sheet of aluminum foil for the last 5–10 minutes of baking.
Step 8: Butter and Serve
- As soon as the rolls come out of the oven, brush the tops generously with melted unsalted butter. This step is not optional if you want that signature soft, shiny top that makes homemade rolls so irresistible.
- Allow the rolls to cool in the pan for at least 5 minutes before serving. This helps the interior set properly and makes them easier to pull apart without tearing.
- Serve warm, directly from the pan, and let everyone pull apart their own roll.
Also try making sourdough discard English muffins for another delicious use of your discard.
Tips for Success
A few key techniques will take these rolls from good to absolutely outstanding. Keep these in mind whether you are making them for the first time or the fiftieth.
- Measure by weight, not volume. Cup measurements for flour can vary significantly depending on how you scoop. Weighing your ingredients is the single most reliable way to get consistent results every time.
- Do not overheat the milk. If your milk is too hot, it will kill the yeast before the dough even comes together. Aim for 100–110°F (38–43°C) and test it with a thermometer rather than guessing.
- Use room temperature discard. Cold discard straight from the fridge can slow fermentation and make the dough harder to incorporate. Take it out about 30 minutes before you begin.
- Knead until the dough passes the windowpane test. Under-kneaded dough will produce dense rolls. Be patient and give it the full time it needs.
- Do not rush the rise. If your kitchen is cold, the dough will take longer to rise. Rising by volume (doubled) is more important than rising by time.
- Brush with butter twice. Once before baking for color, and once immediately after baking for softness. This double-butter method is the reason bakery rolls always look so good.
This technique also works wonderfully when making sourdough discard cinnamon rolls.
Serving Suggestions
These rolls belong on the table alongside almost anything, but they truly shine as a companion to rich, warming dishes. The slight tang in the rolls cuts through heavy flavors beautifully.
Here are some of the best ways to serve them:
- Alongside a big bowl of chicken noodle soup for a complete, comforting meal
- As a side to a holiday roast, whether turkey, prime rib, or baked chicken
- Spread generously with cinnamon butter for a breakfast or brunch treat
- Used as slider buns for pulled pork or mini burgers
- Served warm with soups and stews for dipping into the broth
- As part of a bread basket alongside a cheese board for entertaining
- Toasted the next day and used for egg sandwiches or avocado toast
You might also enjoy: Chicken Soup
Variations to Try
The base dough for these rolls is incredibly versatile and takes well to a wide range of additions and tweaks. Once you have the original version down, try one of these creative spins.
- Garlic Herb Rolls: Add 2 teaspoons of garlic powder and 1 tablespoon of dried Italian herbs (rosemary, thyme, and oregano) to the flour. Brush the finished rolls with garlic butter instead of plain melted butter.
- Honey Butter Rolls: Replace the granulated sugar with 3 tablespoons of honey. The dough will be slightly stickier but the flavor is more complex and lightly floral.
- Cheddar Rolls: Fold in 1 cup (115g) of shredded sharp cheddar cheese just before shaping. The cheese creates pockets of melted goodness throughout the rolls and the tops get beautifully browned and slightly crispy.
- Whole Wheat Variation: Swap up to 25% of the bread flour (about 140g) for whole wheat flour for a nuttier, slightly denser roll with more fiber. Do not go much higher than 25% or the rolls will become too heavy.
- Rosemary Sea Salt Rolls: Press a small sprig of fresh rosemary into the top of each roll before baking and finish with flaky sea salt for an elegant, herbaceous version perfect for dinner parties.
- Milk Bread Style Rolls: Add an extra egg yolk to the dough for an even richer, more brioche-like texture with a golden crumb.
Read Also: Sourdough Discard Bread Recipe
Storage and Reheating
These rolls store well and reheat beautifully, making them a great option for meal prepping or making ahead for a big gathering.
- Room temperature: Store leftover rolls in an airtight container or zip-lock bag at room temperature for up to 3 days. The rolls will start to firm up after the first day, but reheating brings them back to life.
- Refrigerator: Store in an airtight container for up to 5 days, though the texture is best within the first 2–3 days.
- Freezer: Wrap individual rolls tightly in plastic wrap and place them in a freezer-safe bag. Freeze for up to 3 months. Thaw overnight at room temperature or directly in a low oven.
Reheating options:
- Microwave: Wrap a roll in a damp paper towel and microwave for 15–20 seconds. This is the fastest method and restores softness well.
- Oven: Place rolls on a baking sheet, cover loosely with foil, and reheat at 300°F (150°C) for 8–10 minutes. This is the best method for reheating multiple rolls at once and getting the closest result to fresh-baked.
- Air fryer: Reheat at 300°F (150°C) for 3–4 minutes for a slightly crisper exterior.
Never skip the final butter brush when reheating. A small amount of melted butter brushed on right before serving refreshes both the flavor and appearance of stored rolls significantly.
Another great make-ahead bread option to try is this Sourdough Sandwich Bread Recipe.
Nutritional Facts
The following nutritional information is an estimate based on one dinner roll (recipe makes 12). Actual values will vary depending on ingredient brands and exact measurements used.
| Nutrient | Per Roll (approx.) |
|---|---|
| Calories | 265 kcal |
| Total Fat | 6g |
| Saturated Fat | 3.5g |
| Cholesterol | 30mg |
| Sodium | 310mg |
| Total Carbohydrates | 44g |
| Dietary Fiber | 1.5g |
| Total Sugars | 5g |
| Protein | 7g |
These rolls are a satisfying source of carbohydrates for energy and provide a modest amount of protein from the bread flour and egg. Pairing them with a protein-rich main dish and plenty of vegetables makes for a well-balanced meal.
You might also enjoy: Sourdough Discard Crackers Recipe
Health Benefits of Key Ingredients
While dinner rolls are not a health food in the strict sense, the ingredients in this recipe do offer some noteworthy benefits, particularly because of the sourdough discard.
Sourdough discard contains the byproducts of lacto-fermentation, which can support gut health and improve the digestibility of gluten and starch. The organic acids produced during fermentation also lower the glycemic response of bread compared to commercially yeasted bread, meaning you may experience a slower, more gradual rise in blood sugar after eating.
Whole milk and butter provide fat-soluble vitamins, including Vitamins A, D, and K2, which support bone health, immune function, and cell growth. Using real dairy rather than low-fat substitutes also contributes to the soft, enriched texture that makes these rolls so enjoyable.
Bread flour is higher in protein than all-purpose flour, specifically gluten-forming proteins, which create the structure and chew in the finished rolls. It also provides iron and B vitamins, which support energy metabolism.
Here is a quick summary of the key nutritional highlights:
- Sourdough discard supports digestive health and may improve glycemic response
- Whole milk provides calcium, phosphorus, and fat-soluble vitamins
- Butter adds Vitamins A, D, and K2 from dairy fat
- Eggs contribute high-quality complete protein and choline for brain health
- Bread flour is a good source of iron and B vitamins
Read Also: Easy Sourdough Bread Recipe
Frequently Asked Questions
1. Can I use active sourdough starter instead of discard?
Yes, absolutely. If you have an active, recently fed starter at peak activity, you can use the same amount (120g) in place of the discard. The flavor will be slightly less tangy and the rise may be a bit more vigorous since active starter has more live yeast activity.
Keep the instant yeast in the recipe regardless, as it ensures a reliable, predictable rise within the two-hour window.
2. What if my dough is too sticky or too dry?
If the dough is sticking heavily to the bowl and your hands even after 5 minutes of kneading, add flour one tablespoon at a time until it pulls away from the sides cleanly.
If the dough feels dry or is tearing rather than stretching during kneading, add water one teaspoon at a time. Sourdough discard varies in hydration, so small adjustments are completely normal and expected.
3. Can I make these rolls ahead of time?
Yes, there are two great options for making these ahead. The first is to shape the rolls, place them in the baking dish, cover tightly, and refrigerate overnight (up to 16 hours). When you are ready to bake, remove them from the fridge, let them come to room temperature and proof for 45–60 minutes, then bake as directed.
The second option is to bake them fully, let them cool, and freeze them for up to 3 months, then reheat as needed.
4. Why didn’t my rolls rise properly?
The most common reason for poor rise is inactive yeast. This can happen if the milk was too hot (above 115°F / 46°C) and killed the yeast, or if the yeast was expired. Always check the expiration date on your instant yeast and test the milk temperature before adding it to the dough.
A very cold kitchen can also significantly slow the rise. If your home is below 68°F (20°C), find a warmer spot or use the oven-light trick mentioned in the step-by-step instructions.
5. Can I make these rolls without a stand mixer?
Absolutely. These rolls can be made entirely by hand. Combine the ingredients in a large bowl and stir until a shaggy dough forms.
Turn the dough out onto a lightly floured surface and knead by hand for 10–12 minutes. You will know it is ready when the dough is smooth, elastic, and passes the windowpane test. It is a bit of a workout, but the results are just as good as the mixer method.
Read Also: Sourdough Discard Pizza Dough Recipe
Final Thoughts
This Sourdough Discard Dinner Rolls recipe is one of those recipes that becomes a permanent part of your baking rotation after the first time you make it.
The rolls are soft, rich, and fragrant with that unmistakable sourdough flavor, and they come together in a way that feels both approachable and genuinely special. It is a beautiful thing to take something most people throw away and turn it into a basket of warm, golden rolls that disappear within minutes of hitting the table.
If you try this recipe, I would love to hear how it went. Drop a comment below with your experience, any tweaks you made, or a photo of your beautiful rolls. Sharing your bakes is the best part of being part of a food community, and your feedback genuinely helps other readers.
Recommended:
- Sourdough Discard Naan Recipe
- Sourdough Discard Pita Bread Recipe
- Sourdough Discard Flatbread Recipe
- Sourdough Discard Bagels Recipe
- Sourdough Discard Pancakes Recipe
- Sourdough Discard Chocolate Chip Cookies Recipe
- Sourdough Focaccia Recipe
- Buttermilk Biscuit Recipe
- Homemade Biscuit Recipe
- Same Day Sourdough Bread Recipe
