
If you’ve been maintaining a sourdough starter, you know the guilt that comes with tossing that excess discard every time you feed it. This sourdough discard English muffins recipe is the answer to that dilemma. Soft, chewy, golden on the outside, and packed with those signature nooks and crannies, these homemade English muffins are everything you love about the store-bought version, only better.
The tang from the discard adds a depth of flavor that regular English muffins just don’t have.
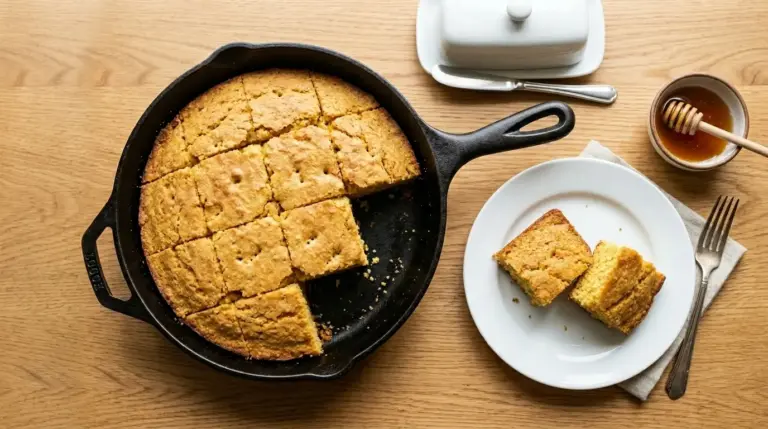
And the best part? You don’t even need to turn on your oven. These cook entirely on the stovetop in a skillet or griddle, making them a surprisingly quick and easy project for any home baker.
Whether you’re a seasoned sourdough baker or just someone who picked up a starter and isn’t sure what to do with the discard, this recipe is made for you. No complicated fermentation schedule, no special equipment, just simple ingredients and a hot pan.

Why You’ll Love This Sourdough Discard English Muffins Recipe
Making English muffins from scratch might sound like a weekend project, but this recipe is genuinely beginner-friendly.
You get real, homemade results without a huge time commitment. The dough comes together quickly and the stovetop cooking method means less waiting and less cleanup.
The sourdough discard gives these muffins a subtle tang that elevates the flavor without being overwhelming. It’s the kind of complexity you just can’t get from a packet of yeast alone.
They also freeze beautifully, so you can make a big batch and have homemade English muffins ready to go on busy mornings.
These are incredibly versatile, too. Fork-split them and load them up with butter and jam, layer them with eggs and cheese, or use them as the base for mini pizzas.
You’ll also love knowing exactly what goes into them since no preservatives, no mystery ingredients, just real food made in your own kitchen.
For another fantastic way to use your sourdough discard, try these Sourdough Discard Cinnamon Rolls.
Ingredients
You only need a handful of pantry staples to make these English muffins, plus that cup of discard you’ve been saving.
- 1 cup (240g) sourdough discard (unfed, straight from the fridge is fine)
- 1 cup (240ml) whole milk, warmed to about 110°F (43°C)
- 2 tablespoons (28g) unsalted butter, melted
- 1 tablespoon (12g) granulated sugar
- 2¼ teaspoons (7g) instant yeast (1 standard packet)
- 3½ to 4 cups (420-480g) all-purpose flour, divided
- 1½ teaspoons (9g) fine sea salt
- Cornmeal or semolina flour, for dusting (about ¼ cup / 40g)
Read Also: Sourdough Discard Crackers Recipe
Kitchen Equipment Needed
You don’t need any specialty baking equipment for this recipe. A large skillet or griddle is really the hero here, and a few basic tools will get you through the rest.
- Large mixing bowl
- Wooden spoon or Danish dough whisk
- Stand mixer with dough hook (optional but helpful)
- Measuring cups and spoons
- Cast iron skillet or flat griddle
- Biscuit cutter (3-inch / 7.5cm round)
- Rolling pin
- Parchment-lined baking sheet (for resting cut muffins)
- Spatula or tongs
- Instant read thermometer (optional but useful for checking doneness)
- Cooling rack
You might also enjoy: Sourdough Discard Pancakes Recipe
Recommended Products for This Recipe
These are products I genuinely recommend for getting the best results with this recipe, chosen for quality and performance.
1. Lodge Pre-Seasoned Cast Iron Skillet
A cast iron skillet is hands-down the best tool for cooking English muffins on the stovetop. It holds heat evenly and consistently, which is exactly what you need to get that golden, slightly crisp exterior while the inside cooks through completely. Cast iron also delivers that beautiful color without any hot spots that can cause uneven browning.
2. KitchenAid Stand Mixer
If you bake bread or work with yeasted doughs regularly, a stand mixer with a dough hook is a worthwhile investment. It takes all the work out of kneading and produces a perfectly smooth, elastic dough in just a few minutes. No tired arms, no guesswork.
3. Bob’s Red Mill Semolina Flour
Semolina or cornmeal dusting is what gives English muffins their signature slightly gritty, golden exterior. Bob’s Red Mill semolina flour is finely milled and adds that perfect texture without being too coarse or interfering with the flavor of the muffins.
4. OXO Good Grips Biscuit Cutter Set
A 3-inch round biscuit cutter gives you perfectly uniform English muffins every time. The sharp edge cuts cleanly through the dough without dragging or compressing the edges, which helps them rise and puff up properly during cooking.
Read Also: Sourdough Discard Pizza Dough Recipe

Step-by-Step Instructions
Step 1: Activate the Yeast
- In a large mixing bowl or the bowl of your stand mixer, combine the warm milk, sugar, and instant yeast.
- Warm the milk to about 110°F (43°C), which feels comfortably warm but not hot to the touch. Milk that’s too hot (above 120°F / 49°C) will kill the yeast.
- Whisk gently to combine, then let the mixture sit for about 5 minutes. Instant yeast doesn’t always foam, but you should see some activity or the mixture will smell yeasty and slightly sweet.
Step 2: Mix the Wet Ingredients
- Add the sourdough discard and melted butter to the yeast mixture.
- Stir everything together with a wooden spoon or dough whisk until combined. The discard will make the mixture look a little lumpy at first, but it will smooth out as you add the flour.
- Make sure your butter has cooled slightly before adding it to the bowl. Very hot melted butter can negatively affect the yeast.
Step 3: Add the Flour and Salt
- Add 2 cups (240g) of the all-purpose flour and the salt to the bowl.
- Mix until a shaggy dough begins to form.
- Continue adding flour, about ¼ cup (30g) at a time, until the dough is soft, slightly tacky, and pulls away from the sides of the bowl cleanly. You may not need all 4 cups, and this can vary based on humidity and how thick your discard is.
- Stop adding flour the moment the dough stops sticking heavily to your hands. A slightly tacky dough is what you want, not a dry or stiff one.
Step 4: Knead the Dough
- If using a stand mixer: attach the dough hook and knead on medium-low speed for 6 to 8 minutes, until the dough is smooth and elastic.
- If kneading by hand: turn the dough out onto a lightly floured surface and knead for 8 to 10 minutes. Push the dough away from you with the heel of your hand, fold it back over itself, rotate a quarter turn, and repeat. The dough is ready when it springs back slightly when you poke it with a finger.
- Avoid adding too much extra flour during kneading. A slightly sticky dough produces softer muffins.
Step 5: First Rise
- Shape the kneaded dough into a ball and place it in a lightly greased bowl. Turn the dough once to coat all sides with oil.
- Cover the bowl tightly with plastic wrap or a clean kitchen towel.
- Let the dough rise at room temperature until doubled in size, about 60 to 90 minutes. The time will vary depending on how warm your kitchen is.
- If you want to make the dough ahead, you can place the covered bowl in the refrigerator at this point and let it cold-ferment overnight. The cold slows the yeast, and a longer ferment develops even more complex flavor.
Step 6: Roll and Cut
- Once the dough has doubled, turn it out onto a lightly floured surface. Gently press it down to deflate the larger air bubbles but don’t overwork it.
- Use a rolling pin to roll the dough out to about 1 inch (2.5cm) thick. This thickness is important: too thin and the muffins won’t have much interior texture; too thick and they won’t cook through properly on the stovetop.
- Use a 3-inch (7.5cm) round biscuit cutter to cut out rounds, pressing straight down without twisting. Twisting can seal the edges and prevent proper rising.
- Gather the scraps, stack them on top of each other (don’t knead them back together, as this develops too much gluten), press gently, and cut more rounds.
Step 7: Dust with Cornmeal and Rest
- Generously dust a parchment-lined baking sheet with cornmeal or semolina flour.
- Place the cut rounds onto the prepared sheet, spacing them a couple of inches apart.
- Sprinkle the tops of each round with more cornmeal or semolina.
- Cover loosely with a clean kitchen towel and let rest for 20 to 30 minutes. This second short rest allows the cut muffins to puff up slightly before cooking, giving them better height and more nooks and crannies inside.
Step 8: Cook on the Stovetop
- Heat a cast iron skillet or flat griddle over medium-low heat. Let it preheat for a few minutes so it’s evenly hot before adding the muffins.
- Do not grease the pan. The cornmeal dusting on the bottom of the muffins prevents sticking and adds texture.
- Cook the muffins in batches, placing them gently in the pan without crowding.
- Cook for 6 to 8 minutes on the first side without moving them, until the bottoms are deep golden brown and the sides start to look set.
- Flip carefully using a wide spatula and cook for another 6 to 8 minutes on the second side.
- If the outsides are browning too fast before the muffins are cooked through, lower the heat to low and cover the pan with a lid for the last few minutes. This traps steam and helps the centers cook through.
- The muffins are done when they reach an internal temperature of 190°F to 200°F (88°C to 93°C), or when they feel firm and springy when pressed gently. They should sound slightly hollow when tapped on the bottom.
Step 9: Cool and Split
- Transfer the cooked muffins to a wire cooling rack.
- Allow them to cool for at least 10 minutes before splitting. This resting time lets the interior crumb finish setting.
- Always split English muffins with a fork rather than a knife. Insert the tines of a fork all around the circumference of the muffin and gently pull apart. This preserves all the nooks and crannies instead of cutting through them with a blade.
- Toast the split muffins in a toaster until golden and crisp for the best texture.
For another incredible stovetop bread recipe, check out this Easy Sourdough Bread Recipe.
Tips for Success
A few simple techniques make a big difference between good English muffins and truly great ones.
- Don’t skip the second rest. Those 20 to 30 minutes after cutting are important. The muffins puff up slightly and develop better structure before hitting the heat.
- Use medium-low heat, not medium. The stovetop cooking for English muffins is all about patience. Too high a heat and the outside will burn before the inside is cooked. Medium-low is the sweet spot.
- Your discard doesn’t need to be fresh. Discard that’s been sitting in the fridge for up to two weeks works beautifully here. Older discard just has more tang.
- The dough should be tacky, not sticky. There’s a difference. Tacky means it very slightly sticks to your hands but releases cleanly. Sticky means it clings and pulls. Add flour only until you reach tacky.
- A cast iron skillet is your best friend. Its heavy base holds heat evenly, which is exactly what you need for consistent browning across every batch.
- Check for doneness with a thermometer. Visual cues are helpful, but an instant-read thermometer takes all the guesswork out of knowing when the muffins are fully cooked through.
Another breakfast staple to perfect at home: Sourdough Sandwich Bread Recipe
Serving Suggestions

These sourdough discard English muffins are incredibly versatile and work well from morning to night.
Fork-split and toasted with salted butter and a drizzle of honey is the classic way to enjoy them, and honestly, it never gets old. The nooks and crannies catch every bit of butter as it melts.
They also make an outstanding base for eggs Benedict. Top your toasted muffin with Canadian bacon, a poached egg, and a generous pour of Hollandaise Sauce for a restaurant-quality breakfast at home.
- Top with cream cheese and smoked salmon for an easy, elegant brunch option
- Use as sandwich buns for breakfast sandwiches with scrambled eggs and cheese
- Spread with Avocado Toast toppings for a quick and satisfying lunch
- Top with pizza sauce, mozzarella, and your favorite toppings for English muffin pizzas
- Pair with Cinnamon Butter for an indulgent sweet treat
- Serve alongside a bowl of soup for a hearty, comforting meal
- Use them as the base for mini sliders at parties or game day spreads
You might also enjoy: Sourdough Discard Chocolate Chip Cookies Recipe
Variations to Try
Once you’ve mastered the base recipe, there are so many fun directions you can take it.
- Whole wheat English muffins: Replace up to half the all-purpose flour with whole wheat flour for a heartier, nuttier flavor. You may need a splash more liquid since whole wheat absorbs more moisture.
- Herb and garlic: Add 1 teaspoon garlic powder and 1 tablespoon dried rosemary or thyme to the dough for a savory version that pairs wonderfully with soups.
- Cinnamon raisin: Add 1 teaspoon cinnamon and ½ cup (75g) of raisins to the dough during the final mixing stage. These are incredible toasted with butter.
- Everything bagel style: Press everything bagel seasoning into the tops of the cut rounds before cooking for a flavor-packed variation.
- Honey wheat: Swap the sugar for honey and use half whole wheat, half all-purpose flour. The result is a slightly sweeter, heartier muffin.
- Overnight version: After the first rise, refrigerate the dough overnight. The next morning, let it sit at room temperature for 30 minutes before rolling, cutting, and cooking. The cold fermentation adds even more sourdough flavor.
Read Also: Sourdough Focaccia Recipe
Storage and Reheating
These muffins store wonderfully, making them perfect for batch baking and meal prep.
- Room temperature: Store cooled muffins in an airtight container or zip-lock bag at room temperature for up to 3 days.
- Refrigerator: They’ll keep in the fridge for up to a week. Toast before eating since refrigeration can make them a little dense.
- Freezer: English muffins freeze exceptionally well. Fork-split them first, then layer them in a zip-lock freezer bag with a piece of parchment between each half. Freeze for up to 3 months.
- To reheat from frozen: Toast straight from the freezer in a toaster or toaster oven for 2 to 3 minutes until golden and hot. No thawing needed.
- To reheat from the fridge: A quick 1 to 2 minute toast is all they need to bring them back to life.
This technique also works well with these Sourdough Discard Cinnamon Rolls Recipe.
Nutritional Facts
The following values are approximate and based on one English muffin from a batch of 12, calculated using standard ingredient amounts.
| Nutrient | Amount Per Muffin |
|---|---|
| Calories | ~190 kcal |
| Total Fat | 3g |
| Saturated Fat | 1.5g |
| Cholesterol | 8mg |
| Sodium | 290mg |
| Total Carbohydrates | 35g |
| Dietary Fiber | 1.5g |
| Sugars | 2g |
| Protein | 6g |
Note: Nutritional values will vary based on exact ingredient brands used, the thickness of your discard, and the size of each muffin. The values above do not include any toppings or spreads.
For another nutrient-rich breakfast option, try this Baked Oatmeal Recipe.
Health Benefits of Key Ingredients
Beyond being delicious, these English muffins contain several ingredients that offer real nutritional advantages.
Sourdough fermentation, even with discard, begins to break down some of the phytic acid naturally found in wheat flour. Phytic acid can bind to minerals like zinc and iron, reducing how well your body absorbs them. The longer fermentation associated with sourdough can increase the bioavailability of these minerals.
- Sourdough discard: Contributes beneficial organic acids and prebiotics that support digestive health. The lactic acid produced during fermentation also gives the dough a lower glycemic index compared to bread made with commercial yeast alone.
- Whole milk: Provides calcium, vitamin D (if fortified), and healthy fats that help keep you satisfied. The fat in whole milk also contributes to a tender crumb texture.
- All-purpose flour: A source of carbohydrates for energy, as well as small amounts of iron and B vitamins. Swapping in some whole wheat flour increases the fiber content.
- Yeast: Nutritional yeast aside, baking yeast is a natural source of B vitamins, particularly B1 and B2, which support energy metabolism.
- Cornmeal dusting: Adds a small amount of whole grain corn, which provides fiber and antioxidants including lutein and zeaxanthin, which are beneficial for eye health.
You might also enjoy: Easy Sourdough Bread Recipe
Frequently Asked Questions
1. Can I use active sourdough starter instead of discard?
Yes, you can use active, fed sourdough starter in this recipe. The muffins will have a slightly stronger sourdough flavor. If your starter is very active and bubbly, you can even omit the commercial yeast, but be prepared for a longer first rise of 3 to 4 hours or even overnight in the fridge.
2. Why don’t my English muffins have nooks and crannies?
The nooks and crannies come from the combination of the yeast activity during the rise and the steam created during stovetop cooking. If your muffins are flat and dense inside, the dough may not have risen enough, or the heat was too high and set the exterior before the interior could puff up properly. Make sure your yeast is fresh, give the dough adequate time to rise, and cook on medium-low heat.
3. Can I make these without a stand mixer?
Absolutely. These can be made entirely by hand. Mix the dough in a large bowl with a wooden spoon until it comes together, then turn it out onto a lightly floured surface and knead by hand for 8 to 10 minutes. Hand kneading is a bit of a workout but very doable, and many bakers prefer the tactile connection to the dough.
4. My muffins are browning too fast on the outside but still raw inside. What went wrong?
This is the most common stovetop muffin issue and it almost always comes down to heat. Lower your heat to low and place a lid on the skillet for the last few minutes of cooking. The trapped steam will help the centers cook through without burning the outside. You can also check the internal temperature with an instant-read thermometer. Aim for 190°F to 200°F (88°C to 93°C) in the center.
5. How far in advance can I make these?
You can make the dough the night before and let it cold-ferment in the refrigerator after the first rise. The next morning, take it out, let it sit for about 30 minutes to come back up to temperature, then roll, cut, and cook as usual. You can also cook a full batch and freeze them for up to 3 months, toasting them directly from frozen whenever you want one.
For more make-ahead breakfast inspiration, check out this Breakfast Casserole Recipe.
Final Thoughts
Homemade sourdough discard English muffins are one of those recipes that genuinely surprises people. They expect something complicated and time-consuming, and instead they discover something approachable, forgiving, and absolutely worth making again and again.
If you’ve been letting your discard go to waste, this is your sign to try this recipe this weekend. One batch and you’ll understand why so many home bakers become a little obsessed with making their own English muffins.
Fork-split one while it’s still warm, add a generous smear of butter, and enjoy every single nook and cranny. You’ve earned it.
I’d love to know how yours turned out. Drop a comment below with your experience, any variations you tried, or photos of your beautiful golden muffins. Sharing is always welcome!
Recommended:
- Sourdough Starter Recipe
- Same Day Sourdough Bread Recipe
- Sourdough Pancake Recipe
- Everything Bagel Recipe
- Homemade Bagel Recipe
- Buttermilk Biscuit Recipe
- Homemade Biscuit Recipe
- Dinner Rolls Recipe
- Dutch Baby Recipe
- Pumpkin Muffin Recipe

