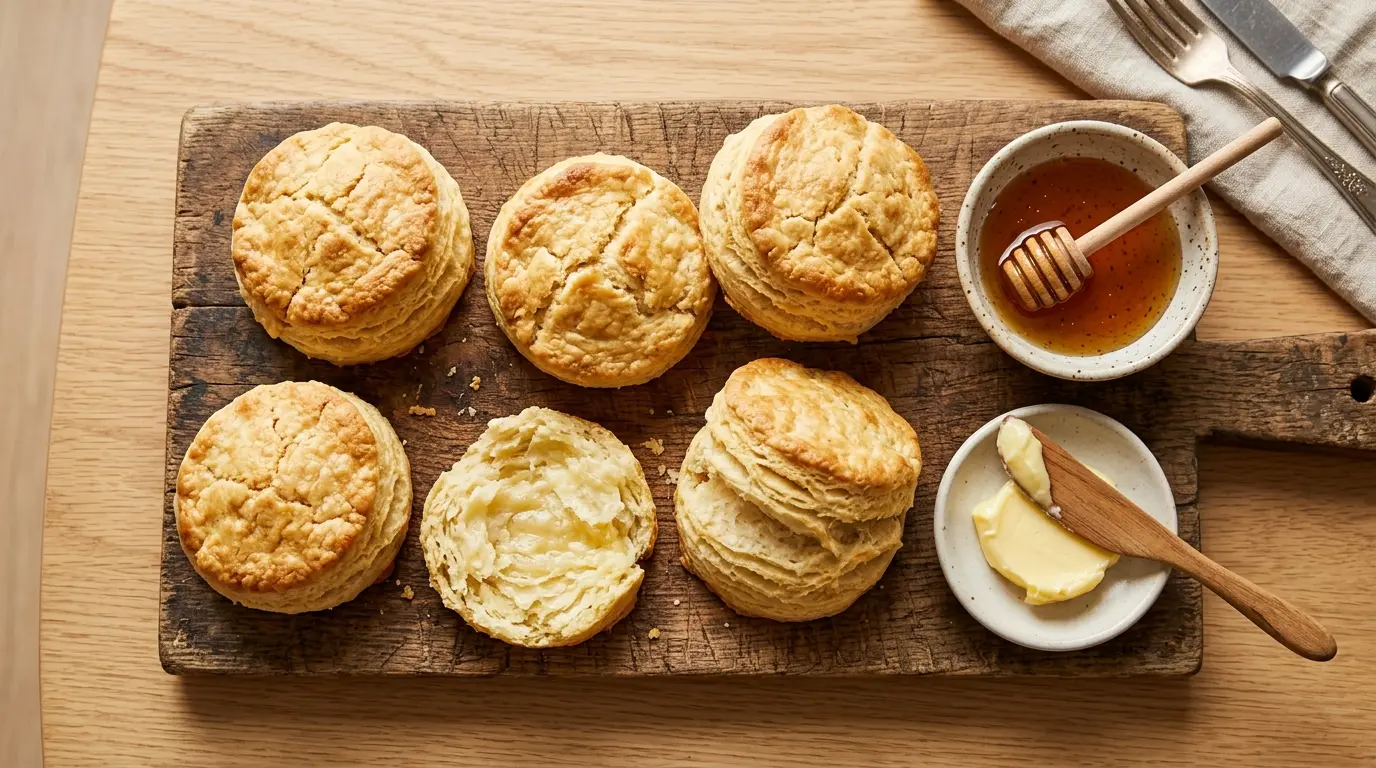
If you keep a sourdough starter, you already know the struggle of what to do with all that discard. This sourdough discard biscuits recipe is one of the best answers to that question. These biscuits come out tall, flaky, and buttery with a subtle tangy depth that ordinary biscuits simply can’t match.
The discard doesn’t just use up what would otherwise go in the trash. It actually improves the biscuits. The natural acids in sourdough discard react with baking powder and baking soda to create a light, tender crumb and those signature pull-apart layers everyone loves.
This recipe comes together in about 40 minutes and uses pantry staples you almost certainly already have. No yeast proofing, no long wait times, no complicated techniques.
Even if you’re a total beginner, you can make these. The key is keeping your butter cold, working your dough gently, and not overthinking it.
If you love using your discard in baked goods, you’ll also want to try these Sourdough Discard Pancakes for a weekend breakfast that feels just as special.

Why You’ll Love This Sourdough Discard Biscuits Recipe
These biscuits are hard not to love. Every single element of them is designed for maximum satisfaction with minimal effort.
The flavor is the first thing people notice. That gentle tang from the discard gives these biscuits a complexity you won’t find in boxed mixes or standard recipes.
The texture is a close second. Because the discard adds just the right amount of liquid and acidity, the biscuits rise high and separate into gorgeous flaky layers.
They’re also incredibly versatile. You can serve them sweet with honey and butter, or go savory alongside a bowl of soup or a plate of eggs.
Here’s a quick summary of what makes this recipe worth bookmarking:
- Uses up sourdough discard so nothing goes to waste
- Ready in about 40 minutes from start to finish
- Flaky, layered texture from cold butter worked into the dough
- Subtle tangy flavor that sets these apart from ordinary biscuits
- No special equipment needed beyond a mixing bowl and a baking sheet
- Beginner-friendly with simple, forgiving steps
- Freezer-friendly so you can bake them fresh any morning
If you enjoy flaky, homemade breads, you’ll also love this Sourdough Focaccia Recipe that’s just as easy to pull together with discard.
Ingredients
You only need a handful of ingredients for these biscuits, and every single one plays a specific role in getting that ideal flaky, buttery result. Here’s a breakdown of what you need and why it matters.
Cold butter is non-negotiable. When cold butter hits the hot oven, it creates steam, and that steam is what produces those gorgeous flaky layers. Buttermilk adds a slight tang and reacts with the leavening to give the biscuits lift. The sourdough discard layers on an additional level of flavor that makes these truly special.
- 2 cups (240g) all-purpose flour, plus extra for dusting
- 1 tablespoon baking powder
- 1/2 teaspoon baking soda
- 1 teaspoon fine sea salt
- 1 teaspoon granulated sugar
- 1/2 cup (113g) cold unsalted butter, cut into small cubes or grated
- 1/2 cup (120g) sourdough discard, stirred down before measuring
- 1/2 cup (120ml) cold buttermilk (or whole milk with 1 teaspoon lemon juice, left to sit 5 minutes)
- 2 tablespoons heavy cream or melted butter, for brushing the tops
You might also enjoy: Sourdough Discard Crackers Recipe
Kitchen Equipment Needed
You don’t need any fancy tools for this recipe. These biscuits are designed to be approachable and simple. That said, a few key items will make the process smoother and your results more consistent.
A sharp biscuit cutter makes a big difference. Pressing straight down without twisting seals the edges so the biscuits can rise straight up instead of leaning to one side. A box grater for the butter is also a fantastic trick if you don’t want to fuss with a pastry cutter.
- Large mixing bowl
- Measuring cups and spoons
- Box grater (for grating cold butter, highly recommended)
- Pastry cutter or two forks (if not grating butter)
- Rolling pin or your hands
- Round biscuit cutter (2.5 to 3 inches / 6.5 to 7.5 cm) or a sharp-rimmed glass
- Rimmed baking sheet
- Parchment paper or a silicone baking mat
- Pastry brush (for brushing tops)
- Wire cooling rack
Read Also: Homemade Biscuit Recipe
Recommended Products for This Recipe
These are products I genuinely recommend based on their quality and how much they can improve your biscuit-making results.
1. OXO Good Grips Stainless Steel Biscuit Cutter Set
A sharp biscuit cutter that cuts straight down without dragging is the single best tool for getting tall, layered biscuits that don’t spread sideways. A dull edge pinches and seals the layers together, which prevents a proper rise. This set gives you multiple sizes and a clean, straight-sided cut every time.
2. Nordic Ware Natural Aluminum Half Sheet Pan
Even, reliable heat distribution is important for biscuits that bake through completely without burning on the bottom. A warp-resistant, heavy-gauge aluminum pan ensures your biscuits bake evenly from edge to edge. This is one of those tools that pays for itself many times over.
3. KitchenAid Pastry Blender
If you prefer not to grate your butter, a sturdy pastry blender lets you cut cold butter into the flour quickly without warming it with your hands. The faster and colder you keep the butter, the flakier the biscuits. This tool makes that much easier to achieve consistently.
4. USA Pan Silicone Baking Mat
A silicone baking mat gives you a non-stick surface and promotes even browning on the bottom of your biscuits. It’s reusable, easy to clean, and eliminates the need for parchment paper on every bake.
Another sourdough discard recipe to add to your repertoire: Sourdough Discard Pizza Dough Recipe

Step-by-Step Instructions
1. Preheat the Oven and Prepare Your Baking Sheet
- Preheat your oven to 425°F (220°C). This high temperature is what creates the steam from the butter and gives the biscuits their rise and golden crust.
- Line a rimmed baking sheet with parchment paper or a silicone mat.
- Place your baking sheet in the refrigerator or freezer while you make the dough. Starting with a cold pan helps the bottoms of the biscuits stay firm.
2. Freeze or Grate Your Butter
- Cut 1/2 cup (113g) of cold unsalted butter into small cubes, then pop them in the freezer for 10 to 15 minutes. Alternatively, freeze a stick of butter for 15 minutes and then grate it directly on the large holes of a box grater.
- Grated butter is the easiest method for beginners because it distributes quickly and evenly through the flour without the risk of overworking.
- Once grated or cubed, return the butter to the freezer until you’re ready to use it. You want it as cold as possible.
3. Measure and Stir Down the Sourdough Discard
- Take your sourdough discard out of the refrigerator. Using a spoon or spatula, stir it down well to remove any large bubbles. Unstirred, bubbly discard can throw off your measurements because the air pockets add volume.
- Measure out 1/2 cup (120g) of the stirred-down discard and set it aside.
- Cold discard straight from the refrigerator works perfectly here and actually helps keep the dough cold.
4. Mix the Dry Ingredients
- In a large mixing bowl, combine 2 cups (240g) all-purpose flour, 1 tablespoon baking powder, 1/2 teaspoon baking soda, 1 teaspoon fine sea salt, and 1 teaspoon granulated sugar.
- Whisk these together for about 30 seconds until evenly mixed. The baking powder and baking soda are your primary leavening agents. They’ll react with the acidity in both the sourdough discard and the buttermilk to create lift and a tender crumb.
5. Cut the Cold Butter Into the Flour
- Add the very cold, grated or cubed butter to the flour mixture.
- If using grated butter, toss it quickly with the flour using your fingertips until the butter is coated and the mixture looks like rough, shaggy crumbs with some pea-sized pieces. This should only take about 30 to 45 seconds.
- If using cubed butter, use a pastry cutter or your fingertips to press and flatten each cube until the entire mixture resembles coarse crumbs with some flat, irregular pieces of butter remaining. Those flat butter pieces are what create the flaky layers.
- Work quickly. The heat from your hands is the enemy here. If the kitchen is warm, pop the bowl into the refrigerator for 5 minutes before continuing.
6. Combine the Wet Ingredients
- In a small bowl or measuring cup, combine the 1/2 cup (120g) sourdough discard and 1/2 cup (120ml) cold buttermilk.
- Stir them together briefly until combined. Don’t whisk vigorously. A gentle stir is all you need.
- If you don’t have buttermilk, you can make a quick substitute by adding 1 teaspoon of lemon juice or white vinegar to 1/2 cup of whole milk. Let it sit for 5 minutes until it curdles slightly. This works because the acid in the buttermilk activates the baking soda.
7. Bring the Dough Together
- Pour the wet ingredients into the bowl with the flour and butter mixture.
- Use a fork or your hands to stir and fold until a shaggy, rough dough forms. Stop as soon as no dry flour is visible.
- The dough should look rough and uneven. Resist the urge to keep mixing. Overworking the dough develops gluten, which makes biscuits tough and dense instead of flaky and tender.
- If the dough feels too dry and won’t come together, add cold buttermilk or milk one tablespoon at a time until it just holds together.
8. Shape and Fold the Dough
- Lightly flour a clean work surface. Turn the dough out onto it.
- Gently press the dough into a rough rectangle about 3/4 inch (2 cm) thick using your hands or a rolling pin. Don’t press too hard.
- Fold the dough in thirds, like you’re folding a letter. This fold creates additional layers in the final biscuit. Rotate the dough 90 degrees and fold again.
- Press the dough out once more to about 3/4 inch (2 cm) thick. You can repeat the fold one more time for extra layers, but do it quickly and don’t overwork the dough.
- The dough should feel cold and slightly tacky but not sticky. If it feels warm and soft, refrigerate it for 10 minutes before cutting.
9. Cut the Biscuits
- Press a sharp 2.5 to 3-inch (6.5 to 7.5 cm) biscuit cutter straight down into the dough without twisting. Twisting seals the edges together and prevents the biscuits from rising properly.
- Place the cut biscuits on your cold, lined baking sheet with the sides touching or just barely apart. Biscuits that touch each other during baking rise taller because they support each other.
- Gather the dough scraps, press them together gently, flatten to 3/4 inch (2 cm) thick, and cut additional biscuits. These second-cut biscuits will be slightly less flaky but still delicious.
- You should get about 8 to 10 biscuits depending on the size of your cutter.
10. Brush and Bake
- Brush the tops of each biscuit generously with 2 tablespoons of heavy cream or melted butter. This helps them get a deep golden brown crust.
- Slide the baking sheet into the preheated 425°F (220°C) oven.
- Bake for 13 to 16 minutes, or until the tops are golden brown and the bottoms are lightly browned. Avoid opening the oven before the 12-minute mark, as a sudden temperature drop can cause the biscuits to fall.
- Remove from the oven and let them cool on the pan for 3 to 5 minutes before serving. They’re best eaten warm.
This biscuit technique is very similar to the one used in this Buttermilk Biscuit Recipe, which is another great classic to have in your rotation.
Tips for Success
Getting consistently great biscuits is all about a few key habits. Once you understand the reasoning behind each tip, they become instinct.
Temperature is the most important factor. Everything that touches this dough should be cold, from the butter to the buttermilk to the discard to the mixing bowl itself. Cold fat and liquid are what create a flaky, layered biscuit.
- Keep everything cold. Refrigerate your bowl, your baking sheet, and even your flour for 15 minutes before starting if your kitchen is warm.
- Don’t overwork the dough. Mix only until the dough just comes together. A shaggy, rough dough makes flakier biscuits than a smooth, overworked one.
- Grate your butter. This is the fastest, most fool-proof method for distributing butter evenly without warming it.
- Press the cutter straight down. Never twist. Twisting seals the layers at the edges and prevents a proper rise.
- Use discard straight from the fridge. Cold discard adds flavor and helps keep the dough temperature low.
- Let biscuits touch on the pan. They rise taller when they have something to lean on. Spacing them far apart leads to flatter, more spread-out biscuits.
- Brush tops generously. Heavy cream or melted butter on the tops promotes even browning and a beautiful, golden crust.
You might also enjoy: Sourdough Discard Cinnamon Rolls Recipe
Serving Suggestions

These sourdough discard biscuits are endlessly versatile. They work just as well on a breakfast plate as they do alongside a hearty dinner.
For a classic breakfast, split a warm biscuit and top it with butter and honey. A drizzle of Honey Butter takes them to another level entirely.
Here are some of the best ways to serve these biscuits:
- With sausage gravy for a traditional Southern-style breakfast that’s deeply satisfying
- Split and topped with Sausage Gravy for a classic, stick-to-your-ribs morning meal
- Alongside scrambled eggs and bacon for a simple weekend breakfast
- With a bowl of soup like chicken noodle, tomato, or a creamy chowder
- As a base for biscuit sandwiches with fried chicken, egg and cheese, or pulled pork
- With jam and clotted cream for an elevated afternoon tea-style treat
- Split and toasted the next day with a smear of cream cheese and fresh fruit
Read Also: Sourdough Discard Chocolate Chip Cookies Recipe
Variations to Try
Once you’ve mastered the base recipe, these biscuits become a canvas for all kinds of delicious additions. The dough is forgiving and works well with both savory and sweet mix-ins.
Add any mix-ins to the dry ingredients before adding the wet ingredients. Fold them in gently with the wet ingredients so they’re distributed without overworking the dough.
- Cheddar and chive biscuits: Fold in 3/4 cup (85g) sharp shredded cheddar and 2 tablespoons of chopped fresh chives for a savory, cheesy version that pairs beautifully with soups
- Garlic herb biscuits: Add 1 teaspoon garlic powder, 1 teaspoon dried rosemary, and 1 teaspoon dried thyme to the dry ingredients for an aromatic, herby biscuit
- Honey butter biscuits: Swap the granulated sugar for 1 tablespoon of honey and brush the tops with honey butter straight out of the oven
- Black pepper and parmesan biscuits: Add 1/2 cup (45g) finely grated parmesan and 1 teaspoon coarsely cracked black pepper for an Italian-inspired biscuit
- Drop biscuits: Skip the rolling and cutting entirely. Drop heaped spoonfuls of the stickier dough onto the lined baking sheet for a more rustic, quicker version
- Apple pie biscuits: Check out this Apple Pie Biscuits Recipe for a sweet, dessert-style take on a similar dough
Storage and Reheating
These biscuits are best eaten fresh and warm, but they store surprisingly well if you have leftovers. Proper storage makes a big difference in keeping them soft and flaky rather than dry and crumbly.
You can also freeze unbaked biscuits on a baking sheet, then transfer them to a zip-lock bag. Pull them out and bake from frozen whenever you want a fresh biscuit, adding 3 to 5 extra minutes to the baking time.
- Room temperature: Store biscuits in an airtight container at room temperature for up to 2 days
- Refrigerator: Wrap tightly and refrigerate for up to 4 days, though they lose some of their flakiness
- Freezer (baked): Freeze cooled biscuits in a sealed bag for up to 3 months. Thaw at room temperature or reheat directly from frozen
- Freezer (unbaked): Freeze cut, raw biscuits on a parchment-lined sheet, then transfer to a bag. Bake from frozen at 425°F (220°C) for 16 to 20 minutes
- To reheat: Warm biscuits in a 350°F (175°C) oven for 5 to 8 minutes until heated through. Avoid the microwave if possible, as it makes them chewy
For a companion recipe that’s just as easy to make ahead, try this Sourdough Sandwich Bread Recipe.
Nutritional Facts
The values below are estimates based on one biscuit from a batch that yields 9 biscuits. Actual values will vary depending on exact ingredient brands and biscuit size.
| Nutrient | Per Biscuit (approx.) |
|---|---|
| Calories | 215 kcal |
| Total Fat | 11g |
| Saturated Fat | 7g |
| Cholesterol | 30mg |
| Sodium | 320mg |
| Total Carbohydrates | 25g |
| Dietary Fiber | 1g |
| Sugars | 1.5g |
| Protein | 4g |
These are quick-bread biscuits, so they sit in a similar caloric range to traditional buttermilk biscuits. They’re a satisfying, occasional treat rather than an everyday staple.
Another great starter project: Sourdough Starter Recipe
Health Benefits of Key Ingredients
While these biscuits are certainly a comfort food, a few of their key ingredients offer genuine nutritional value worth knowing about.
Sourdough discard, even unfed, contains lactic acid bacteria from the fermentation process. These bacteria contribute to a lower glycemic response compared to non-fermented doughs, and they also begin to break down phytic acid, which improves the bioavailability of minerals in the flour.
Here’s a look at the nutritional highlights of the main ingredients:
- Sourdough discard: Fermented flour contributes beneficial organic acids, partially breaks down phytic acid, and gives the biscuits a slightly lower glycemic impact than non-fermented alternatives
- Buttermilk: A good source of calcium and potassium, and its probiotic cultures support gut health. The acids in buttermilk also help activate leavening for a lighter biscuit
- Unsalted butter: Provides fat-soluble vitamins A, D, E, and K2. When used in moderation, quality butter from grass-fed cows offers a favorable fatty acid profile
- All-purpose flour: Provides carbohydrates for energy and some B vitamins. You can substitute up to half with whole wheat flour for added fiber and nutrients
- Salt: Essential for flavor development and also plays a small role in dough strength and structure
Read Also: Easy Sourdough Bread Recipe
Frequently Asked Questions
1. Can I use active sourdough starter instead of discard?
Yes, you can substitute active, bubbly starter for discard in equal amounts. The biscuits will be slightly less tangy since active starter has been fed recently and is less acidic. The texture will still be excellent. If you use active starter, the biscuits may rise a touch more due to the live yeast activity, which is a good thing.
2. How do I prevent my biscuits from spreading instead of rising?
The most common causes of flat, spreading biscuits are warm butter and overworked dough. Make sure your butter is very cold before adding it to the flour. Work quickly so the heat from your hands doesn’t melt it. Also, do not over-mix the dough once the wet ingredients go in. A shaggy dough is the goal, not a smooth one.
3. Can I make the dough ahead of time?
Absolutely. You can cut the biscuits, place them on a lined baking sheet, and refrigerate them overnight. Bake them cold from the refrigerator the next morning. The cold rest can actually improve the flavor and texture slightly, and it makes morning baking much faster and easier.
4. Can I make these without buttermilk?
Yes. Add 1 teaspoon of white vinegar or lemon juice to 1/2 cup (120ml) of whole milk, stir, and let it sit for 5 minutes. It will curdle slightly. This is a perfectly acceptable buttermilk substitute for this recipe. You can also use plain, full-fat yogurt thinned slightly with a splash of milk.
5. What kind of sourdough discard works best?
Both freshly accumulated discard and older refrigerated discard work well. For a more pronounced tangy flavor, use older discard that’s been in the fridge for at least 3 to 5 days. For a milder flavor, use fresher discard. The discard should not smell overly alcoholic or show any signs of mold. If it smells off, discard it and use a fresher batch.
This Same Day Sourdough Bread Recipe is another great use of your active starter when you have extra on hand.
Final Thoughts
These sourdough discard biscuits check every box. They’re quick enough for a weekday morning but special enough to serve to guests.
Once you see how those layers pull apart and feel that buttery flakiness in every bite, this recipe will become a permanent fixture in your kitchen.
Every time you feed your starter, instead of tossing that discard, you now have a reason to reach for your mixing bowl and make something truly worth eating.
Give this recipe a try and let me know how it goes in the comments below. Sharing a photo with a friend who also keeps a sourdough starter? They’ll thank you for it.
Recommended:
- Sourdough Discard Cinnamon Rolls Recipe
- Sourdough Discard Chocolate Chip Cookies Recipe
- Sourdough Pancake Recipe
- Sweet Sourdough Bread Recipe
- Dinner Rolls Recipe
- Breakfast Casserole Recipe
- Easy Scone Recipe
- Skillet Cornbread Recipe
- Sourdough Focaccia Recipe
- Apple Pie Biscuits Recipe

