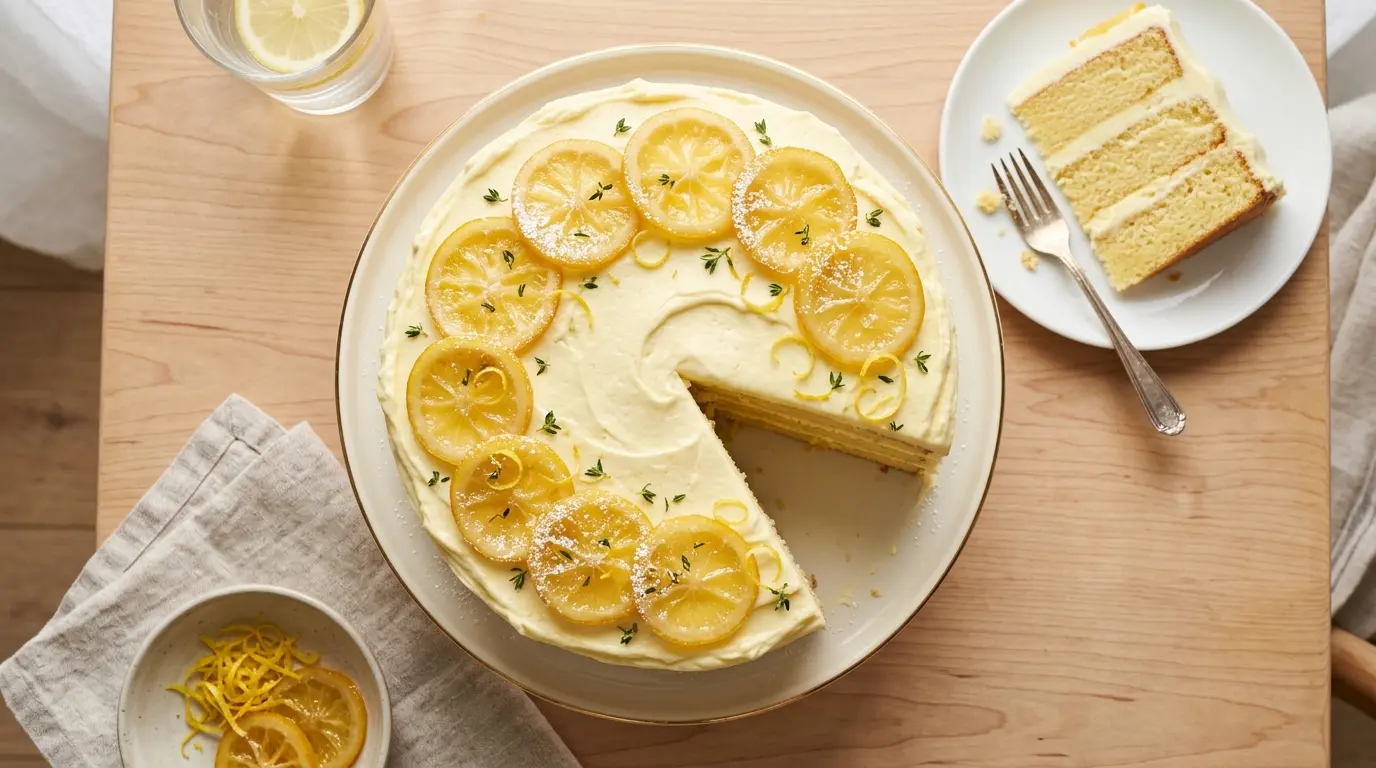
If you love bright, citrusy desserts with that melt-in-your-mouth texture, this lemon velvet cake recipe is exactly what you need in your life.
It takes everything that makes a classic velvet cake so special, that impossibly soft, tender crumb, and wraps it in bold lemon flavor from three sources: fresh lemon juice, lemon zest, and lemon extract.
The result is a stunning layer cake that tastes as good as it looks.
The secret to the velvety texture lies in a combination of buttermilk and a precise balance of fats (butter plus oil), which keeps the crumb moist and impossibly light. Topped with a tangy lemon cream cheese frosting, this cake is the kind of showstopper you’ll want to bring to every spring gathering, birthday, or weekend celebration.
This recipe produces two tall, moist cake layers that you can bake ahead and frost when ready. Whether you go for a two-layer stack or slice each layer horizontally for a dramatic four-layer creation, every bite delivers that signature velvety crumb with a gorgeous lemon punch that is anything but subtle.

Why You’ll Love This Lemon Velvet Cake Recipe
This cake checks every box for a truly memorable dessert.
The texture is genuinely special. Buttermilk breaks down the gluten in the flour and reacts with the leavening agents to create a crumb that is feather-light, springy, and stays moist for days.
The lemon flavor is real and layered. Using fresh zest, juice, and extract together means every single bite tastes like bright, sunshine-y lemon rather than a faint hint of citrus.
The cream cheese frosting ties it all together. It has just enough tang to complement the sweetness of the cake, making the whole thing feel balanced rather than cloying.
It is a truly versatile recipe. You can dress it up with candied lemon zest for a dinner party or keep it simple with a smooth frosting swirl for a casual birthday.
Here is a quick summary of what makes it so good:
- A three-source lemon flavor system (zest, juice, and extract) for bold, authentic citrus taste
- Buttermilk and a fat combination create the signature velvety, tender crumb
- Lemon cream cheese frosting that is tangy, creamy, and perfectly balanced
- Stays moist and fresh for up to 3 days when stored correctly
- Can be made as a 2-layer or dramatic 4-layer cake
- Perfect for spring celebrations, birthdays, Easter, or afternoon tea
You might also enjoy: Orange Velvet Cake Recipe
Ingredients
Here is everything you need to make the cake layers and the lemon cream cheese frosting. Use room-temperature ingredients for the best results, as cold butter or eggs can cause the batter to curdle and lead to a denser crumb.
For the Cake Layers:
- 1 1/4 cups (155 g) all-purpose flour
- 1 1/2 cups (170 g) cake flour
- 1/2 tsp baking soda
- 1 1/2 tsp baking powder
- 1 tsp fine salt
- 1 1/2 cups (300 g) granulated sugar
- 2/3 cup (160 ml) vegetable oil
- 1/3 cup (75 g) vegetable shortening, at room temperature
- 1 tsp pure vanilla extract
- 2 tsp pure lemon extract
- 3 large eggs, room temperature
- 1 1/2 cups (360 ml) buttermilk, room temperature
- Zest of 2 medium lemons (about 2 tablespoons), finely grated
- 2 tbsp fresh lemon juice
For the Lemon Cream Cheese Frosting:
- 16 oz (450 g) full-fat cream cheese, softened to room temperature
- 1 cup (225 g) unsalted butter, softened to room temperature
- 5 cups (600 g) powdered sugar, sifted
- 2 tbsp fresh lemon juice
- 1 tsp pure lemon extract
- 1 tbsp lemon zest
- Pinch of salt
Read Also: Lemon Curd Recipe
Kitchen Equipment Needed
Having the right tools makes this cake much easier to execute, especially when it comes to getting evenly baked layers and a smoothly frosted finish.
- Two 9-inch (23 cm) round cake pans
- Parchment paper
- Stand mixer or electric hand mixer
- Large mixing bowls
- Sifter or fine-mesh sieve
- Rubber spatula
- Microplane or zester
- Juicer or citrus press
- Measuring cups and spoons
- Cooling rack
- Offset spatula for frosting
- Cake turntable (optional but very helpful)
- Toothpick or cake tester
- Serrated knife (if making 4 layers)
For a lighter option after all that cake, try: Lemon Smoothie Recipe
Recommended Products for This Recipe
These are products I genuinely recommend based on quality and performance. They make a real difference in how this cake turns out.
1. Wilton 9-Inch Round Aluminum Cake Pans
Aluminum pans conduct heat more evenly than darker nonstick pans, which means your lemon velvet cake layers bake up with a uniform crumb and no over-browned edges. They are lightweight, easy to handle, and produce consistent results every single time.
2. Nielsen-Massey Pure Lemon Extract
The quality of your lemon extract matters enormously in a velvet cake. Nielsen-Massey uses a cold-process extraction method that preserves the clean, bright lemon flavor without any harsh artificial notes, making a noticeable difference in the final taste.
3. Ateco Offset Spatula Set
A good offset spatula gives you control when spreading frosting between cake layers and creates that smooth, professional-looking finish on the outside. The angled blade keeps your hand away from the frosting while you work, which makes the whole decorating process much more comfortable.
4. OXO Good Grips Cake Turntable
If you want to frost this cake smoothly without frustration, a rotating cake stand is the single best tool to invest in. It lets you turn the cake as you frost, creating an even coat without having to awkwardly reposition your board. It is particularly helpful for the outside coat of cream cheese frosting.
Read Also: Cream Cheese Frosting Recipe

Step-by-Step Instructions
Step 1: Prepare Your Pans and Oven
- Preheat your oven to 350°F (175°C). If your pans are dark or nonstick, lower the temperature to 325°F (165°C) to prevent over-browning on the sides.
- Grease the bottom and sides of two 9-inch round cake pans with butter or cooking spray.
- Cut two circles of parchment paper to fit the bottoms of the pans, press them in, and lightly grease the parchment as well.
- Dust each pan lightly with flour, tapping out the excess. This gives your cake layers a clean release.
Step 2: Sift and Combine the Dry Ingredients
- In a large bowl, sift together the all-purpose flour, cake flour, baking soda, baking powder, and salt.
- Whisk the sifted dry ingredients together until evenly combined. Using both all-purpose and cake flour is key here: cake flour has a lower protein content that keeps the crumb tender, while a portion of all-purpose flour gives the cake structure so it does not collapse.
- Set the dry ingredient mixture aside.
Step 3: Cream the Fat and Sugar
- In the bowl of your stand mixer fitted with the paddle attachment (or in a large bowl with a hand mixer), add the vegetable oil and shortening.
- Beat on high speed for 2 minutes until the mixture is smooth.
- Add the granulated sugar and continue beating on high speed for another 3 to 4 minutes, until the mixture is pale, light, and fluffy. Do not rush this step; the creaming process incorporates air that helps give the cake its lift.
Step 4: Add the Eggs and Flavorings
- Add the eggs to the batter one at a time, beating well after each addition. Scrape down the sides of the bowl between additions to make sure everything is evenly incorporated.
- Add the vanilla extract and lemon extract and beat for about 30 seconds until combined.
- Fold in the finely grated lemon zest and fresh lemon juice using a rubber spatula, stirring gently so you do not deflate the batter.
Step 5: Alternate Dry Ingredients and Buttermilk
- With the mixer on low speed, add the dry ingredient mixture in three additions, alternating with the buttermilk in two additions. Begin and end with the dry ingredients.
- Add the first third of the dry ingredients and mix until just combined. Add half of the buttermilk and mix gently. Continue with the second third of dry ingredients, then the remaining buttermilk, and finish with the final third of dry ingredients.
- Do not overmix. Stop the mixer as soon as the last streak of flour disappears. Overmixing develops gluten, which will make your cake tough instead of velvety.
- Scrape the sides and bottom of the bowl once more with a rubber spatula and give the batter a final gentle fold to ensure it is evenly mixed.
Step 6: Divide and Bake
- Divide the batter evenly between your two prepared cake pans. Use a kitchen scale for precision if you have one, which ensures both layers bake at the same rate.
- Smooth the tops gently with an offset spatula or the back of a spoon.
- Bake at 350°F (175°C) for 28 to 33 minutes. The cakes are done when the tops spring back lightly when pressed in the center, and a toothpick inserted into the middle comes out clean or with just a crumb or two clinging to it.
- Do not overbake. Velvet cakes dry out quickly if left in the oven too long. Start checking at the 28-minute mark.
Step 7: Cool the Cake Layers
- Remove the cakes from the oven and let them cool in their pans on a wire rack for exactly 10 minutes. If you try to remove them too soon, they may crack.
- Run a thin knife or offset spatula around the edges of each pan to loosen the cake, then invert them onto the cooling rack.
- Peel off the parchment paper and allow the layers to cool completely to room temperature before frosting. This takes at least 1 hour. Frosting a warm cake will cause the cream cheese frosting to slide right off.
Step 8: Make the Lemon Cream Cheese Frosting
- In the clean bowl of your stand mixer fitted with the paddle attachment, beat the softened cream cheese on medium speed for about 2 minutes until smooth and free of lumps.
- Add the softened butter and beat together on medium-high speed for another 2 to 3 minutes, scraping down the sides of the bowl as needed.
- Reduce the speed to low and gradually add the sifted powdered sugar in two additions, mixing gently until the sugar is incorporated before increasing the speed to avoid a powdery cloud.
- Add the lemon juice, lemon extract, lemon zest, and a pinch of salt. Beat on medium-high for 1 to 2 minutes until the frosting is smooth, creamy, and fluffy.
- If the frosting feels too soft, refrigerate it for 15 to 20 minutes before using. If it is too thick, add a teaspoon of milk and beat briefly.
Step 9: Assemble and Frost the Cake
- Place one cooled cake layer on your serving plate or cake board. If the top of the layer is domed, use a serrated knife to level it by gently slicing off the dome. This creates a flat, stable surface for stacking.
- Using an offset spatula, spread a generous layer of lemon cream cheese frosting across the top of the first layer, about 3/4 cup (around 175 ml).
- Place the second cake layer on top, aligning the edges as much as possible. If you want a four-layer cake, slice each layer in half horizontally using a serrated knife and a toothpick guide, then repeat the frosting between each layer.
- Apply a thin crumb coat of frosting all over the outside of the cake. This is a very thin, rough layer of frosting that traps all the loose crumbs. Refrigerate the crumb-coated cake for 20 to 30 minutes until the frosting is firm.
- Apply the final, thicker coat of frosting to the top and sides of the cake, smoothing it out with your offset spatula and a cake turntable if you have one.
- Garnish with candied lemon slices, fresh lemon zest curls, or a light dusting of powdered sugar if desired.
This pairs beautifully with a slice alongside lemon cheesecake for a full lemon dessert spread at your next party.
Tips for Success
A few key techniques make the difference between a good cake and a truly exceptional one.
- Use room-temperature ingredients. Cold butter, eggs, or buttermilk can cause the batter to curdle and lead to a dense crumb. Set everything out about an hour before baking.
- Do not skip sifting the flours. Sifting removes lumps and aerates the flour, which contributes to a lighter, more tender texture in the final cake.
- Zest before juicing. It is much easier to zest a whole lemon than a squeezed one. Always grate your zest first, then cut and juice the lemon.
- Alternate your dry and wet ingredients. Starting and ending with the dry ingredients prevents the batter from over-thinning and helps emulsify the fat properly.
- Do not overmix once the flour goes in. As soon as the dry ingredients are incorporated, stop. This prevents tough, dense results.
- Cool the layers completely. Cream cheese frosting is sensitive to heat. Even a slightly warm cake will cause it to slide and pool. Patience here pays off.
- The crumb coat is non-negotiable. It seals in crumbs and gives you a clean canvas for the final layer of frosting.
Here is a quick-reference list of the biggest tips:
- Use room-temperature butter, eggs, and buttermilk
- Sift the flours before measuring and combining
- Zest your lemons before juicing them
- Alternate dry and wet ingredients starting and ending with dry
- Stop mixing the moment the flour disappears
- Cool the cake layers fully before frosting
- Apply a crumb coat and chill before the final frosting layer
- Refrigerate the finished cake to set the frosting before slicing
Another favorite: Red Velvet Cake Recipe
Serving Suggestions
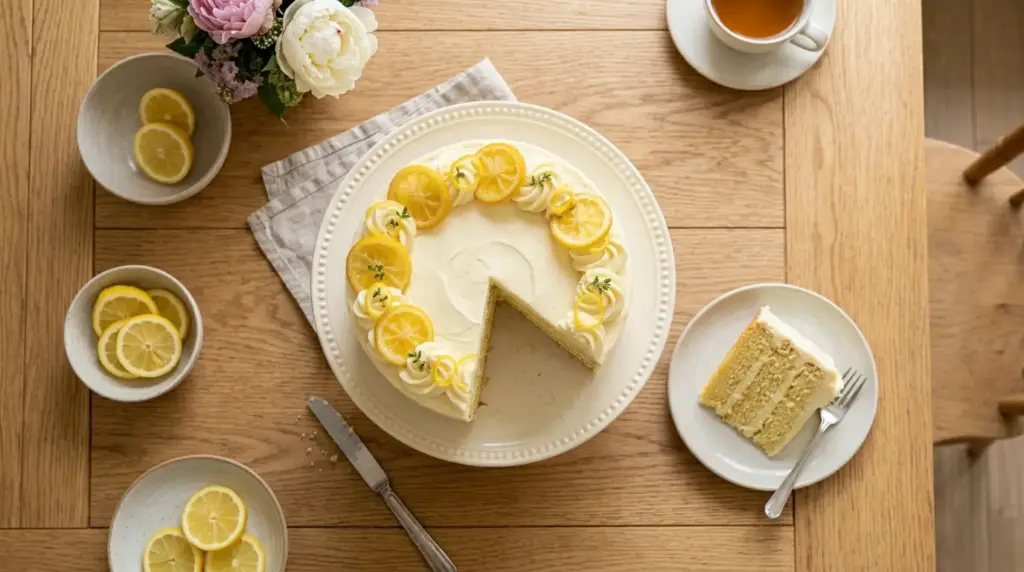
This cake is stunning on its own, but a few thoughtful pairings make it feel even more special.
Serve it with a scoop of vanilla bean ice cream for a classic combination that lets the lemon flavor shine without competing with anything too bold. The cool, creamy ice cream contrasts wonderfully with the tender, moist crumb.
For a spring or summer celebration, pair individual slices with a small pitcher of fresh lemon curd on the side so guests can add an extra drizzle of citrus flavor. If you are serving it at afternoon tea, a fresh fruit plate keeps things light and colorful. Sparkling lemonade or a cold glass of iced tea are the best drinks to serve alongside, as they complement the brightness of the lemon without overpowering it.
Here are a few serving ideas to try:
- Pair with a scoop of Vanilla Bean Ice Cream for a classic combination
- Serve with a ramekin of Lemon Curd on the side for extra citrus richness
- Top individual slices with fresh berries (blueberries and raspberries work beautifully)
- Add a drizzle of Fresh Strawberry Sauce for a vibrant color contrast
- Serve alongside a Fruit Tart for a full spring dessert spread
- Dust with powdered sugar and serve with herbal tea for an elegant afternoon treat
Variations to Try
Once you have mastered the base recipe, there are plenty of ways to put your own spin on it.
The classic version is hard to beat, but small tweaks can make it feel entirely new depending on the occasion or the season.
- Lemon Blueberry Velvet Cake: Fold 1 cup of fresh or frozen blueberries into the batter just before dividing it between the pans. The berries burst during baking and create pockets of jammy fruit inside the cake.
- Lemon Poppy Seed Version: Add 2 tablespoons of poppy seeds to the dry ingredients for a subtle crunch and a classic lemon-poppy flavor combination.
- Lemon Curd Filling: Instead of frosting between the layers, use a layer of homemade lemon curd with a thin barrier of frosting piped around the edge (called a dam) to prevent it from seeping out.
- Lemon Lavender Velvet Cake: Add 1 teaspoon of dried culinary lavender to the buttermilk and let it steep for 10 minutes before using. Strain out the lavender before adding the buttermilk to the batter.
- Four-Layer Version: Slice both cake layers in half horizontally with a serrated knife, creating four thinner layers. The extra frosting layers make the cake even more moist and impressive.
- Mini Lemon Velvet Cupcakes: Use this exact batter to make 24 standard cupcakes, reducing the baking time to 18 to 20 minutes. Top with a swirl of lemon cream cheese frosting.
Read Also: Purple Velvet Cake Recipe
Storage and Reheating
Proper storage keeps your lemon velvet cake moist and fresh for several days.
Because cream cheese frosting contains dairy, this cake must be kept refrigerated after the first couple of hours at room temperature.
- At room temperature: The frosted cake can sit at room temperature for up to 2 hours for serving purposes, but should not be left out longer than that in warm conditions.
- In the refrigerator: Store the cake covered with a cake dome or wrapped loosely in plastic wrap in the refrigerator for up to 4 days. The crumb actually improves slightly after a day in the fridge.
- Bringing slices to room temperature: For the best texture and flavor, pull individual slices from the refrigerator about 30 minutes before eating. Cold cream cheese frosting is denser; at room temperature it becomes soft and creamy again.
- Freezing the cake layers (unfrosted): Wrap each cooled cake layer tightly in plastic wrap and then in a layer of aluminum foil. Freeze for up to 2 months. Thaw overnight in the refrigerator before frosting.
- Freezing frosted slices: Individual frosted slices can be frozen by placing them on a baking sheet for an hour until the frosting is firm, then wrapping them tightly in plastic wrap. Freeze for up to 1 month. Thaw in the refrigerator overnight.
This cake also pairs well with an easy treat on the side, like Lemon Shortbread Cookies.
Nutritional Facts
The following are approximate values per slice based on 12 servings (including frosting). Actual values will vary depending on exact ingredient brands and portion sizes.
| Nutrient | Per Slice (1/12 of cake) |
|---|---|
| Calories | 620 kcal |
| Total Fat | 34 g |
| Saturated Fat | 16 g |
| Cholesterol | 110 mg |
| Sodium | 290 mg |
| Total Carbohydrates | 74 g |
| Dietary Fiber | 0.5 g |
| Sugars | 57 g |
| Protein | 6 g |
| Vitamin C | 4 mg |
| Calcium | 70 mg |
| Iron | 1 mg |
These values reflect a generously frosted slice. If you are watching your intake, serving smaller portions or reducing the frosting quantity will lower the calorie count considerably.
You might also enjoy: Lemon Chiffon Cake Recipe
Health Benefits of Key Ingredients
While this is certainly an indulgent dessert, some of the key ingredients do bring genuine nutritional value to the table.
Fresh lemons are the star ingredient and they pack a notable punch. Lemons are an excellent source of vitamin C, a potent antioxidant that supports immune function and skin health. The zest in particular contains flavonoids that have been linked to anti-inflammatory benefits, and the citric acid in lemon juice may support kidney health.
Eggs contribute more than just structure to this cake. They provide high-quality complete protein with all essential amino acids, along with B vitamins, vitamin D, and choline, which plays a key role in brain health.
Here is a quick look at the benefits of each key ingredient:
- Fresh lemon juice and zest: High in vitamin C, antioxidants, and anti-inflammatory flavonoids
- Eggs: Provide complete protein, vitamin D, choline, and B vitamins for energy metabolism
- Buttermilk: A fermented dairy product that contains probiotics, calcium, and potassium for bone and heart health
- Cream cheese (in the frosting): Provides some calcium and fat-soluble vitamins A and D
- Butter: A natural source of fat-soluble vitamins (A, D, E, K) and conjugated linoleic acid (CLA)
Read Also: Lemon Meringue Cheesecake Recipe
Frequently Asked Questions
1. Can I make lemon velvet cake without cake flour?
You can substitute cake flour with all-purpose flour, but the texture will be slightly denser and less tender. For the closest result, replace every 1 cup of cake flour with 3/4 cup plus 2 tablespoons of all-purpose flour plus 2 tablespoons of cornstarch. The cornstarch lowers the protein content and mimics the effect of cake flour reasonably well.
2. Why did my cake turn out dense instead of light and velvety?
The most common causes are overmixing the batter once the flour is added, using cold ingredients straight from the refrigerator, or overbaking. Make sure your butter, eggs, and buttermilk are all at room temperature before you start, mix only until the flour just disappears, and begin checking for doneness a few minutes before the recipe suggests.
3. Can I make the lemon velvet cake layers ahead of time?
Absolutely. The unfrosted cake layers can be baked up to 2 days in advance and stored at room temperature wrapped tightly in plastic wrap. For longer storage, freeze the wrapped layers for up to 2 months. Thaw completely in the refrigerator before frosting.
4. What can I use instead of buttermilk?
If you do not have buttermilk on hand, make a quick substitute by adding 1 1/2 tablespoons of fresh lemon juice or white vinegar to 1 1/2 cups of whole milk. Stir briefly and let the mixture sit for 5 minutes until it curdles slightly. This homemade buttermilk substitute works well in this recipe and actually adds a bit more lemon flavor.
5. My cream cheese frosting is too soft and runny. What should I do?
This usually happens when the cream cheese or butter is too warm. If your frosting is not holding its shape, refrigerate the bowl of frosting for 20 to 30 minutes, then re-whip briefly. You can also add a few more tablespoons of sifted powdered sugar to stiffen it. Avoid adding more liquid of any kind, as this will thin it further.
This recipe also reminds me of another beautiful citrus dessert: Key Lime Cheesecake Recipe
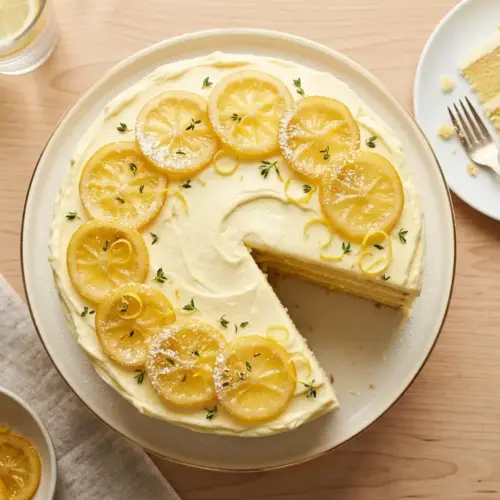
Lemon Velvet Cake

Equipment
- 9-inch round cake pans - two pans
- Parchment paper
- Stand mixer or electric hand mixer
- Large mixing bowls
- Sifter or fine-mesh sieve
- Rubber spatula
- Microplane or zester
- Juicer or citrus press
- Measuring cups and spoons
- Cooling rack
- Offset spatula - for frosting
- cake turntable - optional but very helpful
- Toothpick or cake tester
- Serrated knife - if making 4 layers
Ingredients
- 1 1/4 cups all-purpose flour - 155g
- 1 1/2 cups cake flour - 170g
- 1/2 tsp baking soda
- 1 1/2 tsp baking powder
- 1 tsp fine salt
- 1 1/2 cups granulated sugar - 300g
- 2/3 cup vegetable oil - 160ml
- 1/3 cup vegetable shortening - 75g, at room temperature
- 1 tsp pure vanilla extract
- 2 tsp pure lemon extract
- 3 large eggs - room temperature
- 1 1/2 cups buttermilk - 360ml, room temperature
- 2 tbsp lemon zest - about 2 tablespoons, finely grated, from 2 medium lemons
- 2 tbsp fresh lemon juice
For the Lemon Cream Cheese Frosting
- 16 oz full-fat cream cheese - 450g, softened to room temperature
- 1 cup unsalted butter - 225g, softened to room temperature
- 5 cups powdered sugar - 600g, sifted
- 2 tbsp fresh lemon juice
- 1 tsp pure lemon extract
- 1 tbsp lemon zest
- salt - pinch
Optional Garnishes
- candied lemon slices - optional
- lemon zest curls - optional
- powdered sugar - optional, for dusting
- fresh blueberries - optional, for serving
- fresh raspberries - optional, for serving
Instructions
- Preheat oven to 350°F (175°C). Grease and flour two 9-inch round cake pans, line bottoms with parchment, and set aside.
- Sift together all-purpose flour, cake flour, baking soda, baking powder, and salt into a large bowl. Whisk to combine thoroughly.
- In a stand mixer with paddle attachment, beat vegetable oil and shortening on high for 2 minutes. Add sugar and beat 3-4 minutes until pale and fluffy.
- Add eggs one at a time, beating well after each addition and scraping down the bowl. Add vanilla and lemon extracts, beat 30 seconds. Fold in lemon zest and juice.
- On low speed, alternate adding dry ingredients in three additions with buttermilk in two additions, beginning and ending with dry ingredients. Mix until just combined—do not overmix.
- Divide batter evenly between prepared pans, smooth tops, and bake 28-33 minutes until tops spring back and toothpick comes out clean.
- Cool in pans on wire rack for 10 minutes, then run a knife around edges, invert onto rack, peel off parchment, and cool completely to room temperature.
- Beat softened cream cheese in stand mixer with paddle on medium for 2 minutes until smooth. Add butter and beat 2-3 minutes more until combined.
- Reduce speed and gradually add sifted powdered sugar in two additions. Add lemon juice, lemon extract, lemon zest, and salt. Beat on medium-high 1-2 minutes until fluffy.
- Level cake layers if domed. Place one layer on serving plate, spread with frosting, top with second layer. Apply thin crumb coat, chill 20-30 minutes, then finish with final frosting layer.
Notes
- Use room-temperature butter, eggs, and buttermilk for the best texture. Cold ingredients can cause the batter to curdle and produce a dense crumb.
- Sift your flours before measuring to remove lumps and aerate them for a lighter, more tender cake.
- Zest lemons before juicing—it’s much easier to zest a whole lemon than a squeezed one.
- Do not overmix once the flour goes in. Stop the mixer the moment the last streak of flour disappears to prevent a tough, dense cake.
- Cool the cake layers completely before frosting. Cream cheese frosting is sensitive to heat and will slide off a warm cake.
- A crumb coat is essential for a clean finish—it seals in crumbs and gives you a smooth canvas for the final frosting layer.
- Store the frosted cake in the refrigerator for up to 4 days. Bring slices to room temperature about 30 minutes before serving for the best texture and flavor.
- Unfrosted cake layers can be wrapped tightly in plastic wrap and foil and frozen for up to 2 months. Thaw overnight in the refrigerator before frosting.
- For a four-layer cake, slice each baked layer in half horizontally with a serrated knife, using toothpicks as a guide for even cutting.
- To fold in blueberries or poppy seeds, gently incorporate them into the batter just before dividing between pans.
Final Thoughts
This lemon velvet cake is one of those recipes that earns its place in your permanent rotation.
It delivers something genuinely different from a standard lemon layer cake: a crumb that is softer, more tender, and more luxurious thanks to the velvety technique borrowed from red velvet tradition.
The tangy lemon cream cheese frosting is the perfect match for the bright, citrusy layers, giving you a dessert that is bold without being one-note.
If you have been looking for the ultimate spring celebration cake, a showstopper birthday cake for lemon lovers, or simply a weekend baking project that pays off in a big way, this is your recipe.
Give it a try, and when you do, come back and leave a comment below! I would love to hear how it turned out for you, what variations you tried, or if you shared it at a gathering. Tag your photos and let the lemon love spread.
Recommended:
- Purple Velvet Cake Recipe
- Orange Velvet Cake Recipe
- Lemon Cake Recipe
- Lemon Meringue Pie Recipe
- Lemon Chiffon Cake Recipe
- Carrot Cake with Cream Cheese Frosting Recipe
- Italian Cream Cake Recipe
- Coconut Cake Recipe
- Strawberry Cake Recipe
- Vanilla Buttercream Frosting Recipe