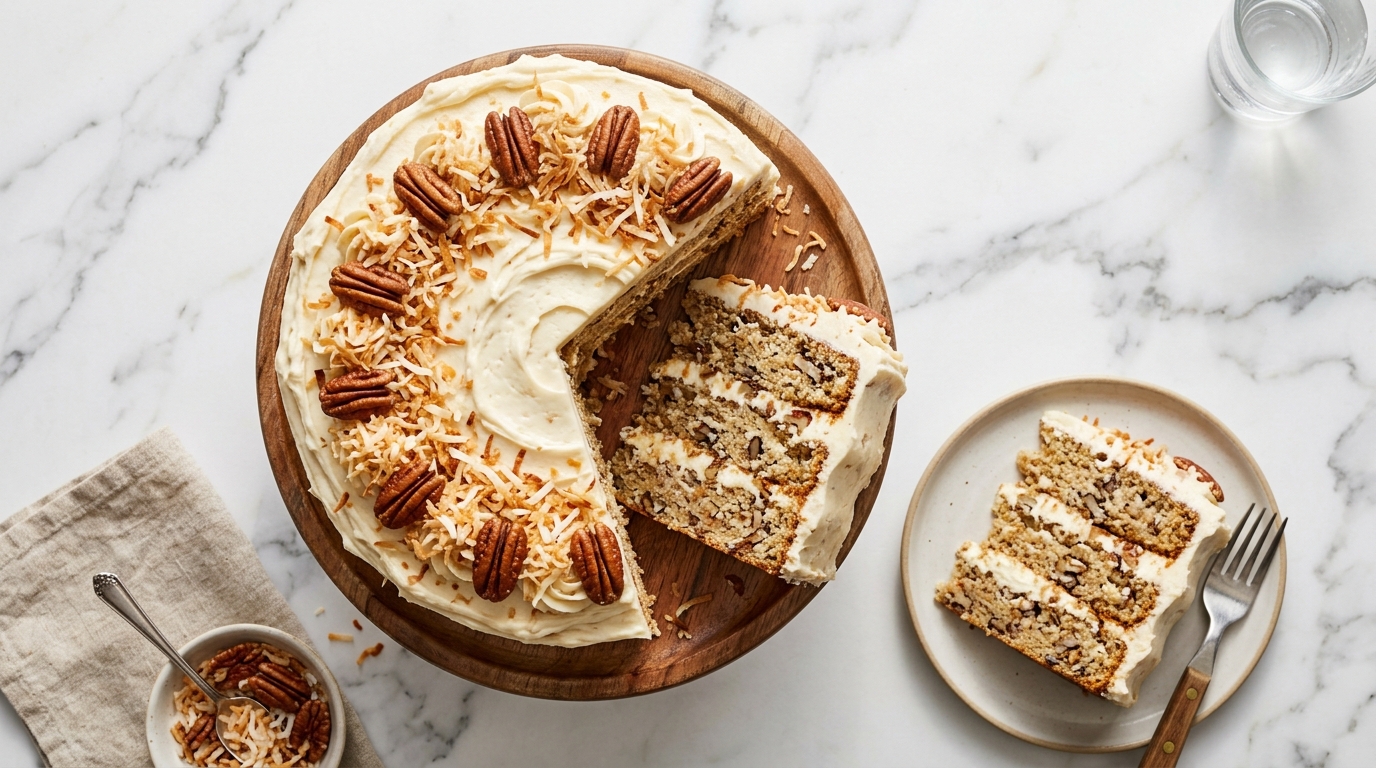
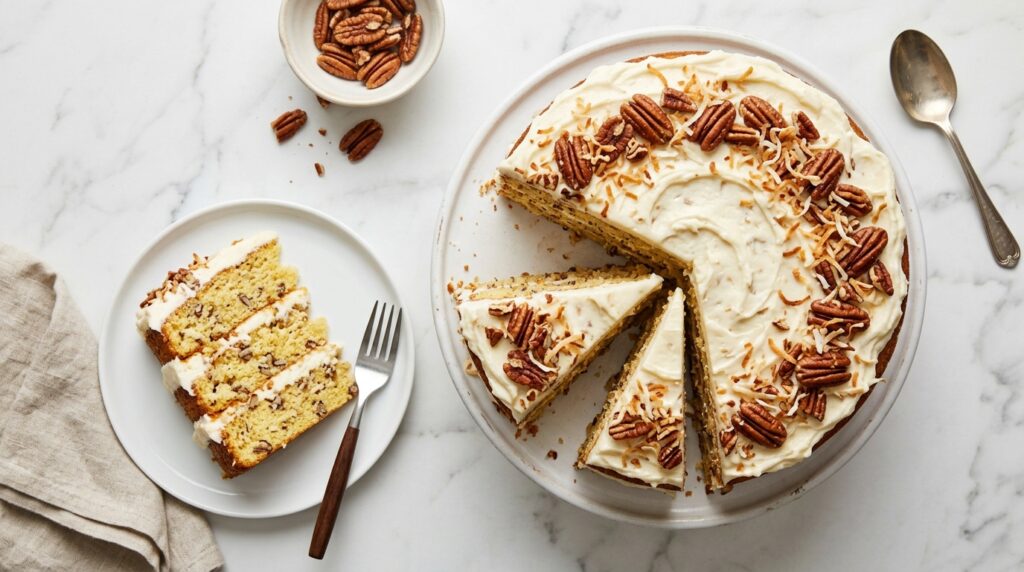
If you’ve never made an Italian Cream Cake Recipe from scratch, you are truly in for a treat. This legendary Southern layer cake is packed with shredded coconut, chopped pecans, and a velvety cream cheese frosting that makes every single bite unforgettable.
Despite the name, Italian Cream Cake has deep roots in the American South, not Italy. It’s a beloved staple at church potlucks, birthday celebrations, and holiday tables across the region.
What makes this cake so special is the combination of textures and flavors working together. The tender, buttery cake layers are studded with coconut and pecans, while the tangy cream cheese frosting provides the perfect counterbalance to all that richness.
The crumb is soft and moist, the frosting is fluffy and slightly tangy, and the toasted pecan and coconut garnish on top adds a gorgeous, nutty finish. It’s the kind of cake that makes people stop mid-bite and ask for the recipe.
This post walks you through every step in detail, from building the perfect batter to frosting the finished layers like a pro. Keep reading, and you’ll have a stunning, crowd-pleasing cake ready to impress.
You might also enjoy: Coconut Cake Recipe
Why You’ll Love This Italian Cream Cake Recipe
This cake truly checks every box when it comes to a memorable dessert.
It delivers an extraordinary combination of flavors and textures in one beautiful, towering cake. The soft crumb, crunchy pecans, chewy coconut, and fluffy cream cheese frosting all come together in perfect harmony.
It’s a made-from-scratch showstopper that looks far more difficult than it actually is. Even a beginner baker can achieve stunning results by following the steps carefully.
The cream cheese frosting is perfectly balanced, with just the right amount of tang to offset the sweetness of the cake. Unlike overly sweet buttercreams, it feels light and indulgent at the same time.
This cake also keeps beautifully, meaning you can bake it a day ahead and it will taste even better the next day after the flavors have time to meld together.
Here’s a quick rundown of what makes this recipe worth bookmarking:
- Incredibly moist crumb thanks to buttermilk in the batter
- Layered with toasted coconut and pecans for rich flavor throughout
- Tangy, creamy frosting made with real cream cheese and butter
- A stunning presentation that looks bakery-level with minimal effort
- Perfect for any occasion, from casual gatherings to elegant celebrations
- Make-ahead friendly, so you’re never rushing at the last minute
Read Also: Red Velvet Cake Recipe
Ingredients
This recipe uses pantry-friendly ingredients that come together to produce a truly spectacular result. Make sure your butter, eggs, and cream cheese are at room temperature before you begin, as this makes a significant difference in the final texture.
For the Cake Layers:
- 2 cups (250g) all-purpose flour
- 1 teaspoon baking soda
- 1/2 teaspoon salt
- 1/2 cup (115g) unsalted butter, softened
- 1/2 cup (120ml) vegetable oil
- 2 cups (400g) granulated sugar
- 5 large eggs, separated
- 1 teaspoon pure vanilla extract
- 1 cup (240ml) buttermilk
- 1 cup (85g) sweetened shredded coconut
- 1 cup (100g) finely chopped pecans
For the Cream Cheese Frosting:
- 16 oz (450g) full-fat cream cheese, softened
- 1/2 cup (115g) unsalted butter, softened
- 6 cups (720g) powdered sugar, sifted
- 2 teaspoons pure vanilla extract
- Pinch of salt
For Garnish:
- 1/2 cup (50g) toasted pecan halves
- 1/2 cup (43g) toasted shredded coconut
For another classic frosted layer cake, check out the Carrot Cake with Cream Cheese Frosting Recipe.
Kitchen Equipment Needed
Having the right tools on hand makes the whole process smoother, especially when it comes to whipping egg whites and frosting multiple cake layers cleanly.
- Stand mixer or hand electric mixer
- Three 9-inch (23cm) round cake pans
- Parchment paper
- Large mixing bowls (at least 3)
- Rubber spatulas
- Fine mesh sieve (for sifting powdered sugar)
- Wire cooling racks
- Offset spatula for frosting
- Rotating cake turntable (optional, but very helpful)
- Cake strips (optional, for flatter layers)
- Measuring cups and spoons
- Toothpick or cake tester
Read Also: Best Carrot Cake Recipe
Recommended Products for This Recipe
These are products I genuinely recommend based on quality, performance, and the difference they make when baking an impressive layer cake like this one.
1. KitchenAid Tilt-Head Stand Mixer
A stand mixer is practically essential for this recipe, especially when it comes to whipping egg whites to stiff peaks and creaming butter and sugar until light and fluffy. The KitchenAid stand mixer delivers consistent, powerful results and frees up your hands during the process.
2. Wilton 9-Inch Round Cake Pans (Set of 3)
Using three matching cake pans ensures your layers bake evenly in the same amount of time. Wilton pans are a trusted baking staple with even heat distribution and durable nonstick coating that releases cakes cleanly every time.
3. Ateco Offset Spatula
An offset spatula is the key to beautifully smooth frosting on a layer cake. The angled blade gives you full control when spreading frosting across each layer and around the sides without dragging crumbs.
4. Rotating Cake Decorating Turntable
A turntable is one of those tools you’ll wonder how you ever baked without. Spinning the cake as you frost it allows for even, effortless coverage on both the top and sides. It’s a small investment that makes a huge visual difference.
5. Premium Pure Vanilla Extract
Since vanilla is a key flavor in both the cake and the frosting, using a good-quality pure vanilla extract is worth it. Imitation vanilla won’t give you the same warm, rounded depth of flavor that a pure extract delivers.
This cake pairs wonderfully with a scoop of Vanilla Bean Ice Cream alongside each slice.
Step-by-Step Instructions
Step 1: Prep Your Pans and Preheat the Oven
- Preheat your oven to 350°F (175°C).
- Grease all three 9-inch round cake pans thoroughly with butter or non-stick cooking spray, making sure to coat the sides as well as the bottom.
- Cut three circles of parchment paper to fit the bottoms of the pans and press them into place. Lightly grease the parchment paper on top as well.
- Dust each pan lightly with flour, tapping out any excess. This double protection ensures your cake layers release cleanly every time.
- Set the prepared pans aside on a flat, clear section of your counter.
Step 2: Whisk the Dry Ingredients
- In a medium mixing bowl, add 2 cups (250g) all-purpose flour, 1 teaspoon baking soda, and 1/2 teaspoon salt.
- Whisk the dry ingredients together thoroughly until everything is evenly combined. This step distributes the leavening and salt throughout the flour so there are no pockets of concentrated baking soda in the finished cake.
- Set the bowl aside while you prepare the wet ingredients.
Step 3: Separate the Eggs
- Carefully separate your 5 large eggs, placing the yolks in a small bowl and the whites in a clean, completely grease-free mixing bowl. Even a tiny trace of yolk or grease in the whites will prevent them from whipping properly.
- Set both bowls aside at room temperature while you proceed. Room-temperature egg whites whip more easily and to greater volume than cold ones.
Step 4: Cream the Butter, Oil, and Sugar
- In the bowl of your stand mixer fitted with the paddle attachment (or using a large bowl with a hand mixer), add 1/2 cup (115g) softened unsalted butter and 1/2 cup (120ml) vegetable oil.
- Add 2 cups (400g) granulated sugar to the bowl.
- Beat on medium-high speed for 4 to 5 minutes, stopping to scrape down the sides halfway through, until the mixture is very light, fluffy, and pale in color. Proper creaming is critical here because it incorporates air into the batter, giving the final cake its tender, light crumb.
Step 5: Add the Egg Yolks and Vanilla
- With the mixer running on medium speed, add the 5 egg yolks to the creamed butter mixture one at a time, mixing for about 30 seconds after each addition before adding the next.
- Add 1 teaspoon pure vanilla extract and mix until fully incorporated.
- Scrape down the sides and bottom of the bowl with a rubber spatula to make sure everything is evenly combined.
Step 6: Alternate Adding Dry Ingredients and Buttermilk
- Reduce the mixer speed to low. Add roughly one-third of the flour mixture to the batter and mix just until incorporated.
- Pour in half of the 1 cup (240ml) buttermilk and mix gently until just combined.
- Add another third of the flour mixture, mix briefly, then add the remaining buttermilk.
- Finish by adding the last third of the flour mixture and mixing until the batter just comes together. Do not overmix at this stage, as overworking the batter develops gluten and can make the cake tough.
- Remove the bowl from the stand mixer.
Step 7: Fold in the Coconut and Pecans
- Using a rubber spatula, gently fold 1 cup (85g) sweetened shredded coconut and 1 cup (100g) finely chopped pecans into the cake batter until they are evenly distributed throughout.
- Use a gentle folding motion, scraping from the bottom and folding over the top, to avoid deflating the batter.
Step 8: Whip the Egg Whites to Stiff Peaks
- In the clean, grease-free bowl containing your separated egg whites, use the whisk attachment on your stand mixer (or a hand mixer) to beat the whites on medium speed until they become foamy, about 1 to 2 minutes.
- Increase the speed to high and continue beating until the egg whites form stiff, glossy peaks that hold their shape when the beater is lifted. This should take about 3 to 4 more minutes.
- Stiff peaks mean the tip of the peak stands straight up without drooping. Properly whipped egg whites are what make this cake exceptionally light and tender.
Step 9: Fold the Egg Whites into the Batter
- Add roughly one-third of the whipped egg whites to the cake batter and stir gently to lighten it. This first addition is meant to loosen the batter slightly, so you don’t need to be precious about deflating the whites here.
- Add the remaining two-thirds of the egg whites in two additions, folding carefully each time with a rubber spatula using a sweeping under-and-over motion.
- Stop folding as soon as no large streaks of egg white remain. A few tiny streaks are fine. Overfold and you’ll lose the airiness you just created.
Step 10: Divide the Batter and Bake
- Divide the finished batter evenly between your three prepared cake pans. Use a kitchen scale if you want perfectly even layers, or simply estimate by eye.
- Smooth the tops of each pan gently with the back of a spoon or an offset spatula.
- Place the pans in the preheated 350°F (175°C) oven. If your oven can’t fit all three pans on one rack with good air circulation, arrange two on the middle rack and one on the upper rack, rotating positions halfway through baking.
- Bake for 22 to 27 minutes, or until a toothpick inserted in the center comes out clean or with just a few moist crumbs attached.
- The cake layers should spring back when lightly pressed in the center and the edges will have just begun to pull away from the sides of the pan.
Step 11: Cool the Cake Layers
- Remove the pans from the oven and let them cool on wire racks for 15 minutes without touching the layers. Rushing this step can cause the layers to break when you try to remove them.
- After 15 minutes, run a thin knife or offset spatula around the edge of each pan to loosen the layers, then invert each pan over a wire rack.
- Peel off the parchment paper carefully.
- Allow the layers to cool completely to room temperature before frosting, at least 1 hour. Warm cake will melt the cream cheese frosting on contact.
Step 12: Toast the Coconut and Pecans for Garnish
- While the cake cools, spread 1/2 cup (43g) shredded coconut and 1/2 cup (50g) pecan halves on a dry baking sheet.
- Toast in the oven at 350°F (175°C) for 5 to 8 minutes, stirring once halfway through, until golden and fragrant. Watch closely because coconut and nuts can go from golden to burnt very quickly.
- Remove from the oven and spread out on a plate to cool completely before using as garnish.
Step 13: Make the Cream Cheese Frosting
- In the bowl of your stand mixer with the paddle attachment, beat 16 oz (450g) softened cream cheese and 1/2 cup (115g) softened unsalted butter together on medium speed until completely smooth and combined, about 2 to 3 minutes.
- Add a pinch of salt and 2 teaspoons pure vanilla extract and mix briefly.
- Reduce the mixer speed to low and gradually add 6 cups (720g) sifted powdered sugar, a cup at a time, mixing between each addition. Sifting the powdered sugar is important because it prevents lumps in the frosting.
- Once all the sugar is incorporated, increase the speed to medium-high and beat for another 2 minutes until the frosting is light, fluffy, and completely smooth.
- Taste the frosting and adjust the sweetness if needed. If the frosting feels too soft, refrigerate it for 15 to 20 minutes before using.
Step 14: Assemble and Frost the Cake
- Place your first cooled cake layer on a cake board, plate, or rotating turntable. Add a small dab of frosting underneath to anchor it in place.
- Using your offset spatula, spread a generous, even layer of cream cheese frosting over the top of the first layer, reaching all the way to the edges.
- Place the second cake layer on top, pressing down very gently to level it. Add another generous layer of frosting on top.
- Place the third and final cake layer on top, bottom-side-up for a flat, even surface.
- Apply a thin “crumb coat” of frosting over the entire outside of the cake, including the sides. This thin layer traps any loose crumbs so they don’t show through the final frosting layer.
- Refrigerate the crumb-coated cake for 20 to 30 minutes until the frosting feels firm to the touch.
- Remove the cake from the refrigerator and apply the final, generous layer of frosting all over the top and sides, smoothing it as neatly as you like.
Step 15: Garnish and Serve
- Press the toasted pecan halves and toasted shredded coconut decoratively onto the sides and top of the frosted cake. You can press coconut into the sides for a beautiful texture, and arrange pecan halves in a ring on top or scatter them across the surface.
- Refrigerate the finished cake for at least 30 minutes before slicing to allow the frosting to set and the layers to settle.
- When ready to serve, use a sharp knife dipped in warm water and wiped clean between each cut for clean, beautiful slices.
The same tangy cream cheese frosting used here is also the star of this Cream Cheese Frosting Recipe if you ever want to make it on its own.
Tips for Success
A few smart techniques go a long way toward getting perfect results with this recipe.
- Room temperature ingredients are non-negotiable. Cold butter won’t cream properly, cold egg whites won’t whip fully, and cold cream cheese leaves lumps in the frosting. Pull everything out of the fridge at least 1 hour before you begin.
- Fold the egg whites carefully. The whole point of separating the eggs and whipping the whites is to add lightness to the batter. Overfold and you lose it. Stop as soon as the streaks disappear.
- Don’t overmix the batter after adding flour. Overmixing develops gluten and results in a tough, dense cake. Mix just until the flour disappears.
- Weigh your batter for even layers. Divide by weight if you want all three layers to be the same height. Uneven layers are difficult to stack and frost cleanly.
- Cool completely before frosting. Even slightly warm cake will melt cream cheese frosting into a soupy mess. Be patient and let the layers fully cool.
- Sift your powdered sugar. This one step eliminates lumps in the frosting and saves you the frustration of bumpy, uneven coverage.
- Use cake strips for flat layers. Soaking cake strips around the outside of your pans during baking slows the rise at the edges, resulting in flat, domed-free layers that are much easier to stack.
- Refrigerate between frosting steps. The crumb coat is your secret weapon for a clean, crumb-free finish. Don’t skip it.
Read Also: Checkerboard Cake Recipe
Serving Suggestions
Italian Cream Cake is a rich, indulgent dessert that shines as the centerpiece of any dessert table. It pairs particularly well with coffee or tea, which cuts through the richness of the cream cheese frosting.
For a beautiful, celebratory dessert spread, try serving it alongside some of these complementary options:
- Fresh Strawberry Sauce drizzled over each slice for a bright, fruity contrast
- A scoop of Vanilla Bean Ice Cream to add a cold, creamy element alongside the rich cake
- Pastry Cream as a filling between the layers for an even more indulgent variation
- Hot coffee, espresso, or a chai latte to balance the sweetness
- Caramel sauce drizzled over the top for extra depth and richness
- A simple fresh berry platter on the side for a bright, refreshing counterpoint
Read Also: Pound Cake Recipe
Variations to Try
Once you’ve mastered the classic version, there’s a world of delicious variations to explore with this recipe.
- Chocolate Italian Cream Cake: Add 3 tablespoons of unsweetened cocoa powder to the dry ingredients and fold 1/2 cup of mini chocolate chips into the batter. Use the same Cream Cheese Frosting or swap it for Chocolate Buttercream Frosting.
- Lemon Italian Cream Cake: Add 2 tablespoons of fresh lemon zest and 1 tablespoon of lemon juice to the batter. Fold a few tablespoons of lemon curd between the layers for a bright, citrusy variation.
- Toasted Coconut Italian Cream Cake: Toast all the shredded coconut before folding it into the batter for a deeper, more complex coconut flavor.
- Single Layer Sheet Cake: Pour the batter into a greased 9×13-inch (23x33cm) baking pan and bake for 35 to 40 minutes for a simpler, more casual presentation that’s perfect for potlucks.
- Cupcakes: Divide the batter into 24 lined cupcake tins, filling each about two-thirds full. Bake at 350°F (175°C) for 18 to 22 minutes. Frost generously with cream cheese frosting and top with a toasted pecan.
- Rum-Spiked Version: Add 2 tablespoons of dark rum to the frosting for a warm, boozy depth of flavor that pairs beautifully with the coconut and pecan. You can also try a similar technique with this Rum Cake Recipe.
For another Southern-inspired layer cake, try the Classic Yellow Cake Recipe.
Storage and Reheating
Italian Cream Cake stores beautifully, and many people argue it tastes even better on day two once the flavors have had time to meld.
- Refrigerator: Because of the cream cheese frosting, this cake must be stored in the refrigerator. Place it in an airtight cake container or cover it loosely with plastic wrap. It will keep well for up to 5 days.
- Counter (short-term): If you plan to serve the cake within 2 to 3 hours, it can sit at room temperature. Avoid leaving it out in warm or humid conditions.
- Freezer: You can freeze the cake as a whole or in individual slices. Wrap tightly in plastic wrap, then in aluminum foil, and freeze for up to 3 months.
- Unfrosted layers: Baked, unfrosted cake layers can be wrapped tightly in plastic wrap and stored at room temperature for 1 day or frozen for up to 2 months.
- To thaw: Thaw a frozen cake overnight in the refrigerator. Never thaw at room temperature, as condensation can make the frosting wet and runny.
- Serving from cold: Let refrigerated cake sit at room temperature for 30 to 45 minutes before serving for the best texture and flavor.
You might also love: Sour Cream Coffee Cake Recipe
Nutritional Facts
Per serving, based on 12 servings:
| Nutrient | Amount |
|---|---|
| Calories | 780 kcal |
| Total Fat | 42g |
| Saturated Fat | 19g |
| Cholesterol | 130mg |
| Sodium | 320mg |
| Total Carbohydrates | 95g |
| Dietary Fiber | 2g |
| Sugars | 76g |
| Protein | 8g |
Please note: Nutritional values are estimates and will vary based on specific ingredient brands and exact measurements used.
Read Also: Lemon Chiffon Cake Recipe
Health Benefits of Key Ingredients
While Italian Cream Cake is absolutely an indulgent treat, a few of its star ingredients bring some real nutritional value to the table.
Enjoyed in moderation, each slice comes with some interesting nutritional upsides worth appreciating.
- Pecans are one of the most antioxidant-rich nuts available. They provide heart-healthy monounsaturated fats, magnesium, zinc, and vitamin E, and have been linked to supporting healthy cholesterol levels.
- Coconut contains medium-chain triglycerides (MCTs), a type of fat that the body metabolizes differently from other fats. It also contributes manganese, copper, and small amounts of fiber.
- Eggs are a complete protein source, delivering all nine essential amino acids. The egg yolks contribute choline, which supports brain health and liver function, while the whites offer high-quality lean protein.
- Buttermilk is lower in fat than regular milk and contains probiotics that support gut health. It also adds a gentle tang that improves the flavor and texture of baked goods without adding significant calories.
- Cream cheese contributes calcium and phosphorus for bone health. While it’s a higher-fat ingredient, it provides a source of fat-soluble vitamins like A and D.
Read Also: Funfetti Cake Recipe
Frequently Asked Questions
1. Why is it called Italian Cream Cake if it’s a Southern recipe?
Despite the name, Italian Cream Cake is widely considered a Southern American dessert with no confirmed Italian origins. Food historians believe the name may have come from the use of Italian-style ingredients like pecans and cream, or it may simply have been a marketing-friendly name that stuck. Regardless of where the name came from, the recipe has been a beloved fixture of Southern baking for generations.
2. Can I make this cake ahead of time?
Yes, absolutely. This cake actually benefits from being made a day in advance. The moisture from the frosting seeps into the cake layers overnight, making the crumb even softer and the flavors more developed. Simply assemble and frost the cake, cover it loosely, and refrigerate until you’re ready to serve.
3. Can I substitute the buttermilk?
If you don’t have buttermilk on hand, you can make a quick substitute by adding 1 tablespoon of white vinegar or lemon juice to 1 cup of regular whole milk. Stir and let it sit for 5 minutes until it curdles slightly. The acidity mimics the tang of buttermilk and reacts with the baking soda to help the cake rise properly.
4. Why do I need to separate the eggs and whip the whites?
Whipping the egg whites separately and folding them into the batter is the key to Italian Cream Cake’s signature light, tender crumb. The air beaten into the whites creates lift and delicacy in the finished cake that you simply can’t achieve by adding whole eggs. It takes a few extra minutes but makes a noticeable difference.
5. My frosting is too soft. What can I do?
Soft cream cheese frosting is usually caused by cream cheese or butter that was too warm when mixed. If your frosting is too loose to hold its shape, pop the bowl into the refrigerator for 20 to 30 minutes and then re-beat briefly. You can also add a bit more sifted powdered sugar, a few tablespoons at a time, until the consistency firms up. Avoid adding liquid of any kind.
For more frosting inspiration, check out the Vanilla Buttercream Frosting Recipe.
Final Thoughts
This Italian Cream Cake Recipe is one of those timeless recipes that deserves a permanent place in your baking repertoire.
It’s rich, beautiful, and deeply satisfying, the kind of cake that turns an ordinary gathering into a genuine occasion.
Once you make it the first time, you’ll understand exactly why this Southern classic has endured for generations and why it keeps showing up at the most important tables.
Give it a try and let the results speak for themselves. Drop a comment below to share how it turned out, or tag a friend who deserves a slice of something truly special!
Recommended:
- White Cake Recipe
- Marble Cake Recipe
- Lemon Cake Recipe
- Strawberry Cake Recipe
- Chocolate Cake Recipe
- Angel Food Cake Recipe
- Tres Leches Cake Recipe
- Classic Pineapple Upside Down Cake Recipe
- Eggnog Cake Recipe
- German Chocolate Cake Bars Recipe


