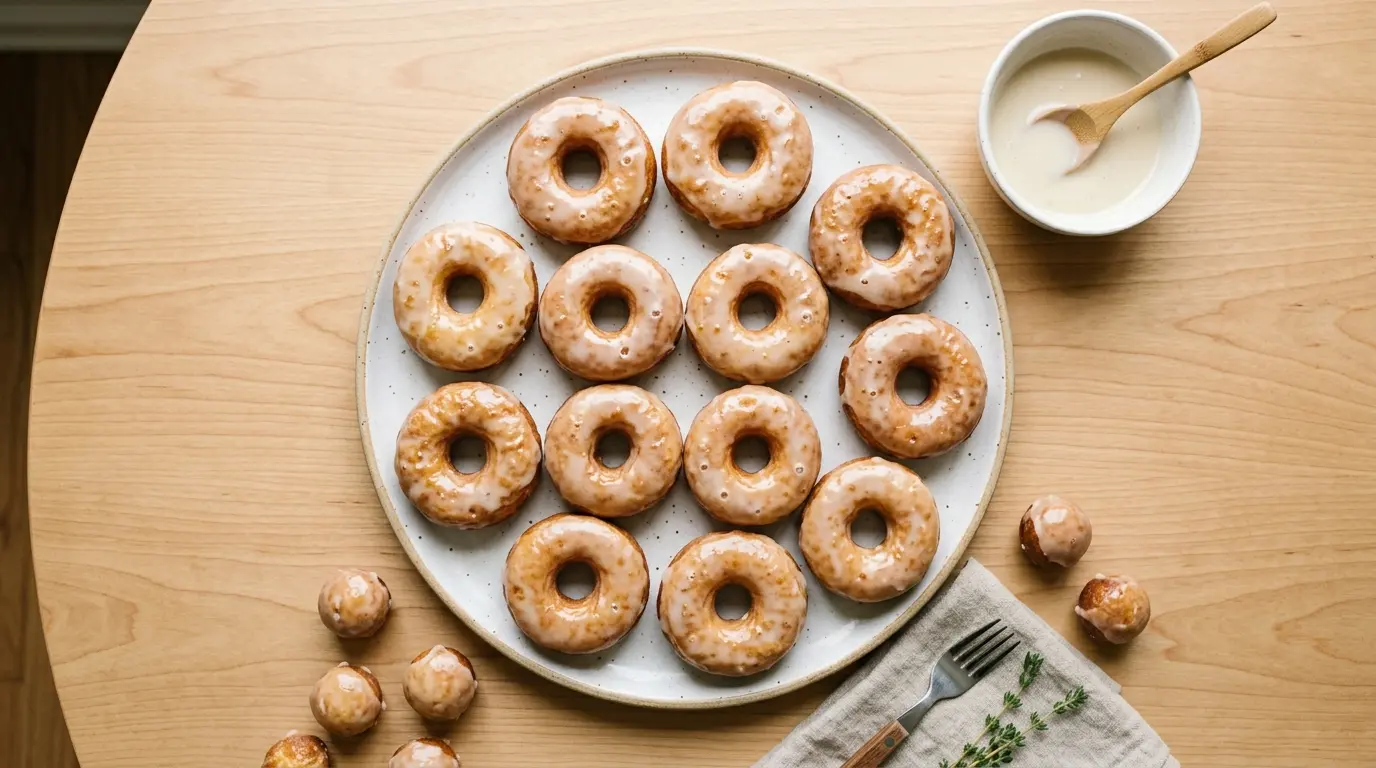
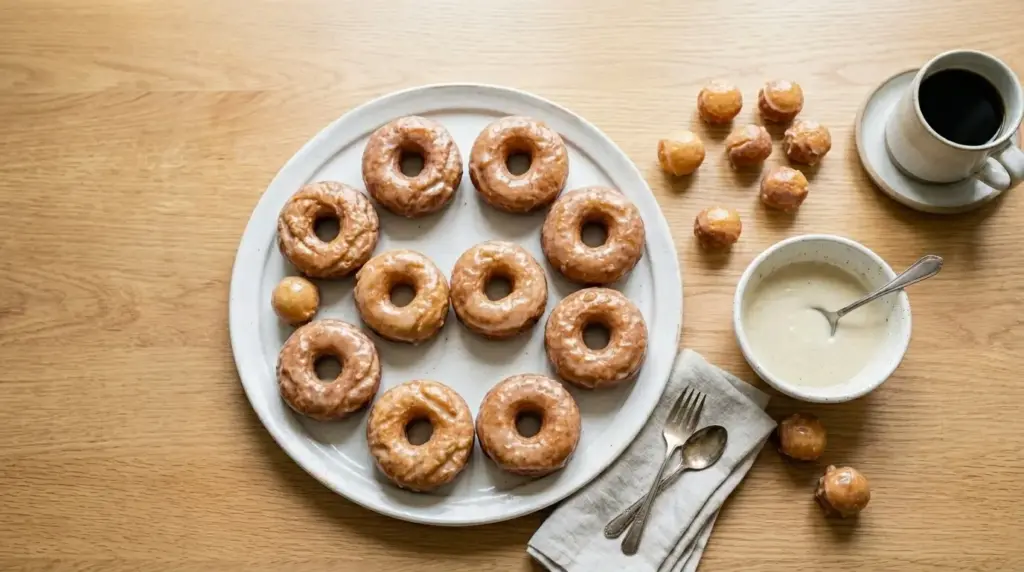
If you have been feeding your sourdough starter and dreading the waste, this sourdough discard donuts recipe is exactly what you need. These are soft, pillowy, ring-shaped donuts made with a yeast-enriched dough that gets a beautiful tang and depth of flavor from your leftover discard. They fry up to a gorgeous golden brown, soak up a classic vanilla glaze, and taste like something straight out of a bakery window.
The key to what makes these donuts so special is the combination of active dry yeast and sourdough discard working together. The yeast does the heavy lifting for the rise, while the discard adds a subtle, almost undetectable sour note that rounds out the sweetness and gives the dough more complexity than a standard glazed donut.
This recipe does not require a stand mixer, although one certainly helps. You can make the dough by hand with a little patience and elbow grease. The reward is a batch of freshly fried, glaze-dipped donuts that your whole family will demolish before they have a chance to cool down completely.
You might also enjoy: Sourdough Discard Cinnamon Rolls

Why You’ll Love This Sourdough Discard Donuts Recipe
These donuts hit every note you want in a homemade fried doughnut. The dough is enriched with butter, eggs, and whole milk, which gives each donut a tender, melt-in-your-mouth crumb.
The sourdough discard adds a depth of flavor that plain donuts simply lack. It is subtle, not sour, just enough to make you wonder what makes these taste so much better than the rest.
They fry up beautifully without absorbing excess oil, especially when the oil is kept at the right temperature. A quick dip in vanilla glaze while still warm means the coating sets into a slightly crispy shell that cracks just a little when you bite through it.
This is a crowd-pleasing recipe for weekend mornings, special occasions, or any time you want something truly homemade. It also uses up that discard you might otherwise pour down the drain, making it a practical and delicious win.
- Uses up sourdough discard that would otherwise go to waste
- Produces light, fluffy, bakery-style glazed donuts
- Mild tang from the discard adds bakery-worthy flavor complexity
- Can be made the night before and fried fresh in the morning
- Simple ingredients you likely already have on hand
- Kid-friendly and crowd-pleasing for brunches and gatherings
Read Also: Sourdough Discard Waffles
Ingredients
You will need pantry staples for this recipe, with the sourdough discard being the star ingredient. Unfed or recently fed discard both work fine here since the yeast provides the rise. Make sure your butter is melted but not hot when added to the dough, so it does not kill the yeast.
For the Donut Dough:
- 1 cup (240 ml) whole milk, warmed to about 110°F (43°C)
- 2 1/4 tsp (7 g / 1 packet) active dry yeast
- 3 tbsp (37 g) granulated sugar, plus 1 tsp for activating the yeast
- 1/2 cup (120 g) sourdough discard, at room temperature
- 2 large eggs, at room temperature
- 4 tbsp (57 g) unsalted butter, melted and cooled
- 1 tsp vanilla extract
- 1/2 tsp fine salt
- 1/4 tsp ground nutmeg
- 3 1/2 cups (438 g) all-purpose flour, plus more for dusting
- Neutral frying oil (vegetable, canola, or refined coconut oil), enough for 2 inches (5 cm) depth in the pot
For the Vanilla Glaze:
- 2 cups (240 g) powdered sugar, sifted
- 4 to 5 tbsp (60 to 75 ml) whole milk
- 1 tsp vanilla extract
- Pinch of salt
For the sourdough discard, use any discard that has been stored in the refrigerator for up to two weeks. The more mature the discard, the more pronounced the tangy flavor will be, though it remains subtle in the finished donut.
Read Also: Sourdough Discard Blueberry Muffins
Kitchen Equipment Needed
You do not need any specialty equipment beyond a few basics. A heavy-bottomed pot is essential for safe, even frying. A candy or deep-fry thermometer is strongly recommended so you can keep the oil at the correct temperature throughout frying.
- Large mixing bowl
- Stand mixer with dough hook (or large bowl and hands for kneading)
- Candy or deep-fry thermometer
- Dutch oven or heavy-bottomed pot (at least 4-quart / 3.8 L)
- Donut cutter or two round biscuit cutters (3-inch / 7.5 cm outer, 1-inch / 2.5 cm inner)
- Rolling pin
- Baking sheets lined with parchment paper
- Wire cooling rack
- Slotted spoon or spider strainer
- Paper towels for draining
- Shallow bowl or plate for glazing
This recipe makes approximately 12 donuts plus 12 donut holes, depending on how thick you roll your dough.
For a lighter option, try: Sourdough Discard Pancakes
Recommended Products for This Recipe
These are products chosen based on quality and performance that will make a real difference when preparing this recipe.
1. Digital Deep Fry Thermometer
Maintaining your oil between 360°F and 375°F (182°C to 190°C) is the single most important factor in getting light, non-greasy donuts. A digital thermometer gives you instant, accurate readings so you can adjust your heat as needed. Without one, you risk undercooked doughy centers or oily donuts that absorbed too much fat.
2. Donut Cutter Set
A dedicated donut cutter cuts both the outer ring and the center hole in one press, giving you perfectly uniform donuts every time. Mismatched sizes fry unevenly, so having the right tool matters more than you might expect.
3. Spider Strainer / Fry Skimmer
A wide spider strainer lets you lower donuts into the hot oil gently and lift them out without tearing the delicate dough. It also helps you skim any crumbs from the oil between batches so they do not burn and affect the flavor of later donuts.
4. Lodge Enameled Cast Iron Dutch Oven
A Dutch oven retains heat exceptionally well, so your oil temperature stays more stable when you add cold dough. This means more consistent frying with fewer temperature swings between batches.
Another favorite for weekend baking: Sourdough Discard Pretzels

Step-by-Step Instructions
1. Activate the Yeast
- Pour the warmed milk into a large mixing bowl or the bowl of your stand mixer. The milk should feel warm to the touch but not hot. If it is above 115°F (46°C), let it cool for a few minutes before proceeding.
- Sprinkle the 1 teaspoon of sugar over the milk, then sprinkle the packet of active dry yeast on top.
- Give it a gentle stir and let it sit undisturbed for 5 to 10 minutes. You are looking for the mixture to become foamy and smell yeasty, which tells you the yeast is alive and active. If the mixture does not foam, your yeast may be old or your milk was too hot. Start over with fresh yeast.
2. Mix the Wet Ingredients
- Once the yeast is foamy, add the sourdough discard to the bowl and stir briefly to combine it with the yeast mixture.
- Add the 2 eggs, one at a time, mixing well after each addition.
- Pour in the melted and cooled butter and the vanilla extract, then stir everything together until uniform.
- Add the remaining 3 tablespoons of granulated sugar and the fine salt. Stir to combine.
3. Add the Flour and Knead the Dough
- Add the all-purpose flour to the bowl in two additions, stirring between each addition until a shaggy dough forms.
- Add the ground nutmeg at this stage as well, mixing it in with the flour.
- If using a stand mixer, attach the dough hook and knead on medium speed for 6 to 8 minutes until the dough is smooth, slightly tacky, and pulls away cleanly from the sides of the bowl.
- If kneading by hand, turn the dough out onto a lightly floured surface and knead for 8 to 10 minutes. The dough should be soft and a little tacky but should not stick aggressively to your hands. Add flour one tablespoon at a time only if truly necessary, as too much flour will make the donuts dense.
- The dough is ready when it passes the windowpane test. Stretch a small piece of dough between your fingers. If it stretches thin enough to let light through without tearing, the gluten is well developed.
4. First Rise (Bulk Fermentation)
- Lightly grease a large clean bowl with a neutral oil or cooking spray.
- Shape the dough into a ball and place it in the greased bowl, turning it once to coat all sides.
- Cover the bowl tightly with plastic wrap or a clean kitchen towel.
- Place it in a warm, draft-free spot in your kitchen and let it rise for 1 to 1.5 hours, or until doubled in size. A turned-off oven with just the light on works well.
- If you want to prepare the dough the night before, cover it and place it in the refrigerator after shaping into a ball. The dough will rise slowly overnight. Pull it out in the morning and let it come to room temperature for about 30 minutes before rolling.
5. Roll and Cut the Donuts
- Once the dough has doubled, turn it out onto a lightly floured work surface.
- Gently press it down to deflate it, then use a rolling pin to roll it out to about 1/2 inch (1.25 cm) thickness. Do not go thinner or the donuts will be too flat after frying.
- Use a 3-inch (7.5 cm) donut cutter to cut out as many rounds as possible. Press straight down without twisting, which can seal the edges and prevent proper rising.
- Gather the scraps, re-roll them gently, and cut out more donuts. Try not to re-roll more than once or twice, as the dough will become tougher with repeated handling.
- Place the cut donuts and donut holes on parchment-lined baking sheets, leaving about 2 inches (5 cm) of space between each one.
6. Second Rise (Proofing)
- Cover the cut donuts loosely with plastic wrap or a clean towel.
- Let them proof at room temperature for 30 to 45 minutes. They should look noticeably puffier and feel slightly jiggly when the tray is shaken gently.
- Do not rush this step. Underproofed donuts will be dense and may crack when frying. Overproofed donuts may collapse or become too airy. The visual cue of “noticeably puffier” is your best guide.
7. Heat the Frying Oil
- While the donuts are proofing, pour enough frying oil into your Dutch oven or heavy pot to reach a depth of about 2 inches (5 cm). This is roughly 4 cups (950 ml) depending on the diameter of your pot.
- Clip the candy thermometer to the side of the pot, making sure the tip is submerged in the oil but not touching the bottom.
- Heat the oil over medium heat until it reaches 360°F to 375°F (182°C to 190°C). This will take about 12 to 15 minutes.
- Line a large plate or baking sheet with paper towels and set a wire cooling rack nearby.
8. Fry the Donuts
- Once the oil is at temperature, carefully lower 2 to 3 donuts into the hot oil using your spider strainer or a slotted spoon. Do not crowd the pot, as adding too many at once will drop the oil temperature significantly and result in greasy, undercooked donuts.
- Fry each donut for about 1 to 1.5 minutes per side, flipping gently with the slotted spoon or spider when the bottom turns a deep golden brown.
- The total fry time is roughly 2 to 3 minutes per donut. They should look deep golden brown on both sides when done.
- Fry the donut holes separately, as they cook faster, about 1 minute per side.
- Lift the cooked donuts out of the oil and let them drain briefly on paper towels. Check the oil temperature between each batch and adjust the heat as needed to bring it back to the target range.
9. Make the Vanilla Glaze
- In a shallow bowl, whisk together the sifted powdered sugar, 4 tablespoons of whole milk, vanilla extract, and pinch of salt until smooth.
- The glaze should be thick but fluid enough to drip slowly off a spoon. If it is too thick, add the remaining tablespoon of milk and whisk again. If it is too thin, add a tablespoon of powdered sugar.
10. Glaze and Serve
- While the donuts are still warm (but not piping hot), dip the top surface of each donut into the glaze. Let the excess drip off for a second before setting it right-side up on the wire rack.
- For a thicker coating, dip each donut twice, letting the first layer set for a minute before the second dip.
- Allow the glaze to set for at least 5 minutes before serving. It will go from glossy and wet to slightly matte and lightly set as it cools.
- Serve immediately for the best texture and flavor.
This recipe also uses the same tangy dough logic found in sourdough discard bread for that extra depth of flavor.
Tips for Success
Small adjustments in technique make a big difference when frying donuts. Keep these pointers in mind from start to finish to get the best possible result.
- Temperature is everything. Keep your frying oil between 360°F and 375°F (182°C to 190°C) at all times. Use a thermometer. Eyeballing oil temperature is the single most common reason homemade donuts turn out greasy or burnt.
- Do not skip the second rise. The proof after cutting is just as important as the first bulk rise. Rushing it leads to dense, bready donuts rather than light, airy ones.
- Use room temperature discard. Cold discard straight from the fridge can slow down the yeast and result in uneven mixing. Let it sit out for 20 to 30 minutes before starting.
- Handle the dough gently. Over-kneading after the first rise or rolling the dough too many times toughens the gluten and produces chewy donuts. Press down with your hands before rolling and be light-handed with the rolling pin.
- Test one donut first. Before frying the whole batch, fry a single donut hole to check your oil temperature and get a sense of timing.
- Work in small batches. Frying two or three donuts at a time keeps the oil temperature stable. Patience here pays off in donuts that are evenly cooked all the way through.
- Glaze while warm, not hot. If the donuts are too hot, the glaze will slide right off. Give them two to three minutes on the rack before dipping.
You might also enjoy: Sourdough Discard Bagels
Serving Suggestions
These glazed sourdough discard donuts are perfect on their own, but a few thoughtful pairings take them to a whole new level. Serve them fresh and warm for maximum impact.
Pair the donuts with a hot cup of coffee or a creamy latte for a classic coffee-shop moment at home. The slight tang of the sourdough glaze contrasts beautifully with bitter espresso.
Set up a glazing station with different toppings like sprinkles, crushed nuts, or chocolate drizzle so guests can customize their own donuts at a brunch gathering.
Serve a platter alongside a spread of Sourdough Discard French Toast for a full sourdough-inspired brunch table.
- Fresh berries on the side for a light, fruity contrast
- Hot coffee, cold brew, or a creamy latte
- A side of extra glaze or a small bowl of cinnamon sugar for dipping
- Warm hot chocolate for a cozy cold-weather treat
- A simple fruit salad to round out a weekend brunch spread
Variations to Try
Once you have the base recipe down, these donuts are incredibly versatile. The dough and frying technique stay the same, and only the finishing changes.
- Cinnamon Sugar Donuts: Skip the glaze entirely and toss the warm donuts in a mixture of 1/2 cup (100 g) granulated sugar and 2 teaspoons ground cinnamon immediately after frying. The heat of the donuts helps the sugar stick.
- Chocolate Glaze: Melt 1/2 cup (85 g) of semi-sweet chocolate chips with 2 tablespoons of butter and 2 tablespoons of heavy cream. Whisk until smooth and use in place of the vanilla glaze.
- Maple Glaze: Replace the milk in the vanilla glaze with 4 tablespoons of pure maple syrup and add 1/4 teaspoon of maple extract for a warm, earthy sweetness.
- Lemon Zest Glaze: Add the zest of one lemon to the vanilla glaze recipe for a bright, citrusy finish that pairs particularly well with the tangy discard dough.
- Filled Donuts: Instead of cutting a hole in the center, fry the rounds whole. Once cooled slightly, use a piping bag to inject jam, pastry cream, or Nutella into the center of each one.
- Baked Version: If you prefer not to fry, brush the proofed donuts with melted butter and bake at 375°F (190°C) for 10 to 12 minutes. The texture will be closer to a cake donut, but still delicious.
The Sourdough Discard Dinner Rolls use a very similar enriched dough if you want another way to work with this same base.
Storage and Reheating
Fresh donuts are always best on the day they are made. That said, they store reasonably well for short periods if you follow a few simple guidelines.
- Room temperature: Place cooled donuts in an airtight container or zip-top bag. They will stay soft for up to 2 days. Do not refrigerate, as refrigeration dries out fried dough quickly.
- Freezer: Freeze un-glazed donuts in a single layer on a baking sheet until solid, then transfer to a freezer bag. They keep well for up to 2 months.
- Reheating: For frozen donuts, let them thaw at room temperature for about 30 minutes, then warm in the oven at 300°F (150°C) for 5 to 8 minutes. Glaze after reheating for the freshest finish.
- Day-old donuts: If your donuts have softened overnight, 30 seconds in the microwave or 5 minutes in a 300°F (150°C) oven revives them nicely.
- Avoid stacking: Stacking glazed donuts causes the glaze to stick and peel. Store them in a single layer or use parchment paper between layers.
Read Also: Sourdough Discard English Muffins
Nutritional Facts
The following is an approximate estimate per glazed donut (1 of 12 donuts, not including donut holes). Values will vary based on the size of your donuts and how much glaze is applied.
| Nutrient | Amount Per Serving |
|---|---|
| Calories | 310 kcal |
| Total Fat | 12 g |
| Saturated Fat | 4 g |
| Cholesterol | 45 mg |
| Sodium | 130 mg |
| Total Carbohydrates | 46 g |
| Dietary Fiber | 1 g |
| Total Sugars | 22 g |
| Protein | 5 g |
These values are estimates only. The type of frying oil, exact amount of glaze used, and individual ingredient brands will all affect the final nutritional content.
Also worth making: Sourdough Discard Tortillas
Health Benefits of Key Ingredients
These are indulgent donuts, no question about it. But a few of the key ingredients do bring genuine nutritional value to the table, even if moderation is still the goal.
Sourdough Discard: The fermentation process in sourdough starter introduces beneficial organic acids and wild yeasts. While discard has not completed a full fermentation cycle, it still contains trace amounts of B vitamins and beneficial microorganisms. Some research also suggests that the acidity of sourdough-based products may slow the glycemic response slightly compared to standard baked goods.
Eggs: The eggs in this recipe provide high-quality complete protein, choline for brain health, and fat-soluble vitamins including A, D, and E. They also contribute to the rich, tender crumb of the donut.
Whole Milk: Whole milk adds calcium, phosphorus, and vitamin D to the dough. The fat content also plays a functional role in creating a tender, moist texture in the finished donut.
- Sourdough discard contributes B vitamins and beneficial organic acids from fermentation
- Eggs provide complete protein and essential choline
- Whole milk supplies calcium and fat-soluble vitamins
- Butter contributes fat-soluble vitamins A, D, E, and K
- Nutmeg contains small amounts of antioxidants and anti-inflammatory compounds
Read Also: Sourdough Discard Banana Bread
Frequently Asked Questions
1. Can I use active sourdough starter instead of discard?
Yes, you can use an active, recently fed starter in place of discard. The flavor will be slightly milder since a freshly fed starter is less acidic than aged discard. The dough will also have a bit more leavening power, so keep an eye on the first rise as it may go faster. Use the same quantity, 1/2 cup (120 g), as called for in the recipe.
2. Why are my donuts greasy?
Greasy donuts are almost always caused by oil that is not hot enough. When the oil temperature drops below 350°F (177°C), the donuts absorb more fat rather than quickly forming a crust. Use a thermometer to monitor your oil and fry in small batches so the temperature recovers between each one.
3. Can I make the dough ahead of time?
Absolutely. After the first rise, punch down the dough, wrap it tightly in plastic wrap, and refrigerate overnight. The next morning, let the dough sit at room temperature for 30 minutes before rolling and cutting. Then continue with the second rise and frying as directed. The overnight rest actually develops the flavor further, which many bakers prefer.
4. Do these donuts taste sour?
Not in an obvious way. The sourdough discard adds a very subtle, background tang that you would more accurately describe as “depth of flavor” rather than sourness. Most people will not be able to identify the sourdough flavor specifically but will notice that these taste more interesting and less one-dimensional than a standard glazed donut.
5. What oil is best for frying donuts?
Neutral oils with a high smoke point are ideal. Vegetable oil, canola oil, and refined coconut oil are all excellent choices. Avoid extra virgin olive oil or butter, as they have low smoke points and will impart off flavors at frying temperatures. Refined coconut oil is particularly popular for donuts because it produces a light mouthfeel and does not leave the donuts tasting greasy.
Another great sourdough discard bake to try: Sourdough Discard Focaccia
Final Thoughts
Making sourdough discard donuts from scratch is one of those kitchen projects that feels ambitious until you are halfway through and realize how straightforward the whole thing actually is.
The dough comes together quickly, the rises are hands-off, and the frying goes faster than you might expect. What you get in return is a batch of soft, golden, perfectly glazed donuts that taste better than anything from a box and are genuinely made with love and a little sourdough magic.
If you have been sitting on a jar of sourdough discard wondering what to do with it, this is your answer. Pull out your pot, warm up that oil, and treat yourself to something truly special.
Give this recipe a try and let us know how it goes in the comments below. Did you stick with the classic vanilla glaze or experiment with one of the variations? Share your results and tag us on social media so we can see your beautiful donuts!
Recommended:
- Sourdough Discard Breadsticks
- Sourdough Discard Pita Bread
- Sourdough Discard Naan
- Sourdough Discard Flatbread
- Sourdough Discard Crackers
- Sourdough Discard Chocolate Chip Cookies
- Sourdough Discard Biscuits
- Sourdough Discard Pizza Dough
- Sourdough Discard Rolls
- Easy Sourdough Bread