If you’ve been tossing your sourdough discard down the drain, this sourdough discard pretzels recipe is about to change everything. These soft, golden-brown pretzels have that classic chewy bite, a deep savory crust, and a subtle tang from the discard that you simply cannot get from a standard pretzel dough. They look impressive, taste incredible, and come together with pantry staples you likely already have on hand.
The secret to that iconic pretzel crust is the baking soda bath. Before the pretzels go into the oven, they take a quick dip in boiling water loaded with baking soda. This alkaline bath triggers a reaction with the dough’s surface proteins, creating that signature deep brown color and slightly chewy exterior. Without it, you’d just have flavored bread rolls.
Sourdough discard adds more than just a tangy flavor here. It contributes to the dough’s texture, making it just a touch more tender and complex than a plain yeasted pretzel. Because discard is unfed starter, you still need active dry or instant yeast to give the dough its rise. That combination of discard flavor and reliable yeast lift is exactly what makes this recipe so satisfying.
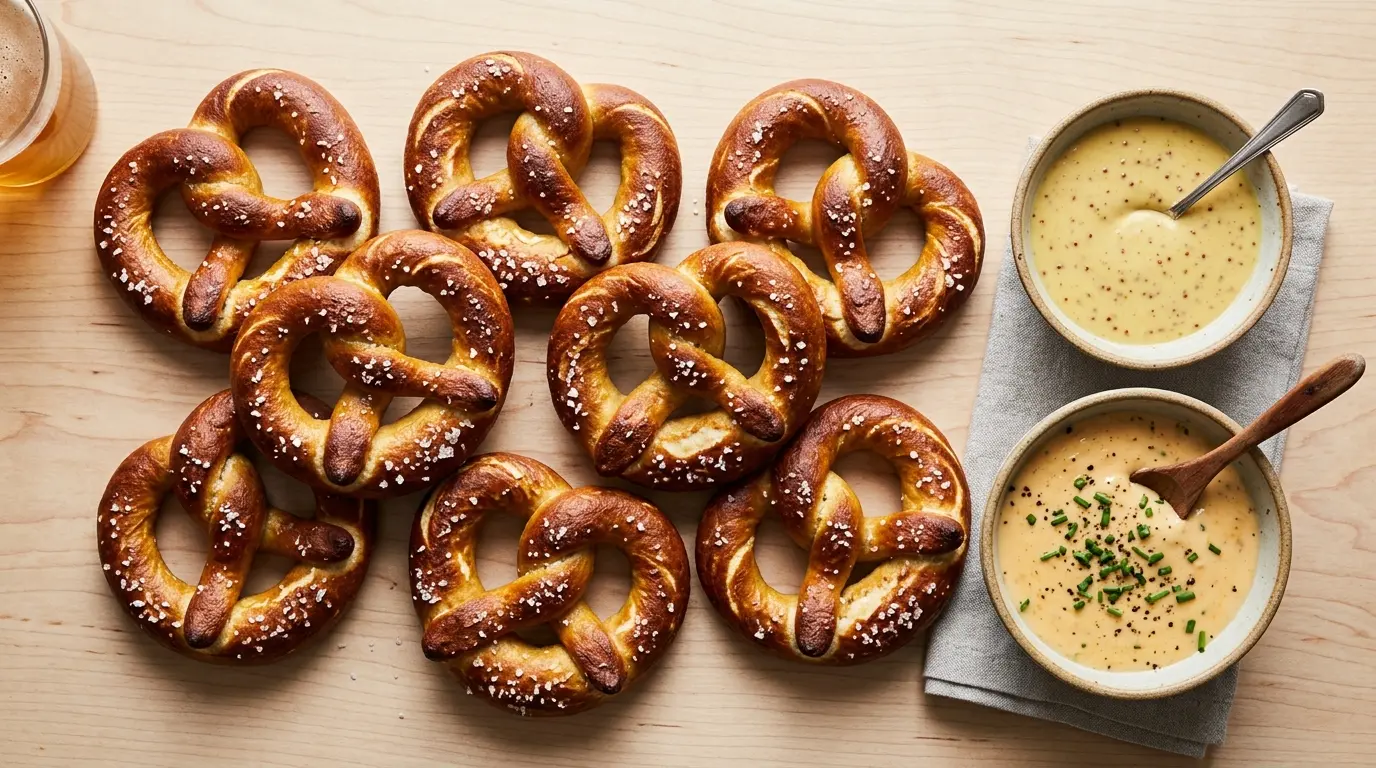
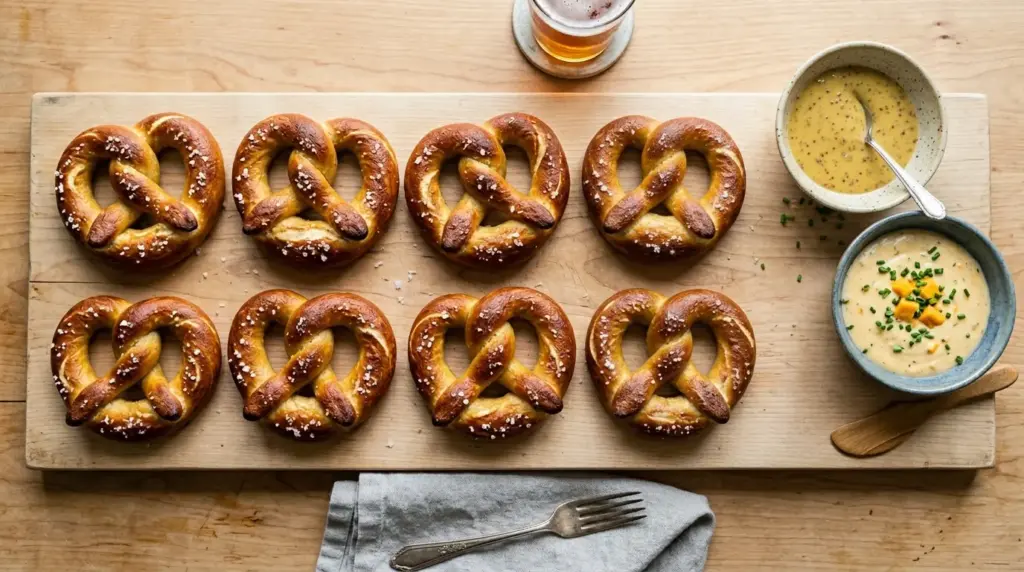
This recipe makes 8 large soft pretzels shaped into the classic twisted pretzel form. Once you try them, you’ll wonder why you ever bought the frozen kind.
Read Also: Sourdough Discard Bagels Recipe

Why You’ll Love This Sourdough Discard Pretzels Recipe
Using sourdough discard is one of the most satisfying zero-waste baking moves you can make. Instead of discarding that unfed starter, you fold it into a dough that rewards you with soft, bakery-quality pretzels in just a couple of hours.
These pretzels are also wildly versatile. Top them with coarse salt for the classic savory version, or go sweet with a cinnamon sugar coating after the bake.
They’re a crowd-pleaser at game days, movie nights, after-school snack time, or served alongside a big bowl of soup.
Even beginner bakers can nail this recipe. The dough is forgiving, the shaping takes just a little practice, and the baking soda bath does all the heavy lifting for that professional pretzel look.
- No specialty ingredients needed, just pantry staples and your sourdough discard
- Ready from start to finish in about 2 hours, including rise time
- Great for meal prep since they freeze beautifully
- Customizable with sweet or savory toppings
- The baking soda bath method gives you a truly authentic pretzel texture at home
- Kids love helping with the shaping and dipping steps
You might also enjoy: Sourdough Discard Dinner Rolls Recipe
Ingredients
You’ll need simple baking staples for this dough, plus a few items specifically for the baking soda bath and finishing. Using warm milk instead of water adds richness to the dough and helps the finished pretzels stay softer inside.
- 3 cups (360g) all-purpose flour, plus more for dusting
- 1 cup (240g) sourdough discard (unfed, room temperature)
- 3/4 cup (180ml) warm whole milk (about 110°F / 43°C)
- 2 teaspoons instant yeast (or active dry yeast)
- 1 tablespoon granulated sugar
- 1 teaspoon fine salt
- 2 tablespoons unsalted butter, melted and slightly cooled
For the baking soda bath:
- 8 cups (2 liters) water
- 1/3 cup (80g) baking soda
For finishing:
- 1 large egg, beaten with 1 tablespoon water (egg wash)
- Coarse pretzel salt or flaky sea salt, for topping
Read Also: Sourdough Discard Bread Recipe
Kitchen Equipment Needed
Having the right setup makes the process smoother. A stand mixer with a dough hook is the easiest route, but you can also knead this dough by hand since it’s a firm, low-hydration dough that responds well to hand kneading.
- Stand mixer with dough hook attachment (or large mixing bowl for hand kneading)
- Large pot for the baking soda bath
- Large baking sheets (2 recommended)
- Parchment paper or silicone baking mats
- Kitchen scale (highly recommended for accurate dough division)
- Slotted spoon or spider strainer for the boiling bath
- Pastry brush for the egg wash
- Sharp knife or bench scraper for dividing the dough
- Plastic wrap or a damp towel for covering the dough during rising
Read Also: Sourdough Discard Pizza Dough Recipe
Recommended Products for This Recipe
These are personally selected products based on quality and performance. Each one addresses a specific step in the pretzel-making process that can really elevate your results.
1. KitchenAid Stand Mixer with Dough Hook
Pretzel dough is stiff, and kneading it by hand for 8 to 10 minutes can be tiring. A stand mixer handles the kneading effortlessly, building the gluten structure that gives your pretzels their signature chew. This is the single most useful piece of equipment for any yeast bread baking you plan to do.
2. Coarse Pretzel Salt
Regular table salt dissolves too fast and disappears into the crust. Coarse pretzel salt holds its structure during baking, giving you those satisfying crunchy salt crystals on every bite. A little goes a long way, and this is the detail that makes your homemade pretzels look and taste bakery-grade.
3. OXO Good Grips Spider Strainer
Lowering pretzels into boiling baking soda water and lifting them out without breaking the shape is much easier with a wide spider strainer than with a slotted spoon. It gives you control and keeps the pretzels intact as they transfer to the baking sheet.
4. Silicone Baking Mats
After the baking soda bath, pretzels can stick to parchment if it’s not sprayed well. Silicone baking mats provide a naturally non-stick surface, and the pretzels slide off effortlessly after baking. They’re also reusable and easy to clean.
This pairs beautifully with sourdough discard focaccia if you love putting your discard to work in a variety of baked goods.

Step-by-Step Instructions
Step 1: Activate the Yeast
- Pour the warm milk (110°F / 43°C) into the bowl of your stand mixer or a large mixing bowl.
- Add the granulated sugar and stir briefly to dissolve.
- Sprinkle the instant yeast over the milk and stir once to combine.
- Let the mixture sit for 5 minutes. You should see it become slightly foamy or bubbly at the surface, which tells you the yeast is alive and active.
- If using active dry yeast instead of instant, wait until you see a noticeable foam layer, about 8 to 10 minutes, before proceeding.
Step 2: Build the Dough
- Add the sourdough discard to the yeast mixture and stir briefly to combine.
- Add the melted butter, making sure it has cooled to room temperature so it doesn’t kill the yeast.
- Add the fine salt to one side of the bowl (keeping it away from direct contact with the yeast at this stage).
- Add the all-purpose flour, starting with 2 3/4 cups (330g), reserving the remaining 1/4 cup (30g) in case the dough needs it.
- If using a stand mixer, attach the dough hook and mix on low speed until the dough begins to come together, about 2 minutes.
- Increase to medium-low speed and knead for 6 to 8 minutes, until the dough is smooth, firm, and pulls cleanly away from the sides of the bowl.
- If kneading by hand, turn the shaggy dough out onto a lightly floured surface and knead firmly for 8 to 10 minutes, using your body weight to push the dough away from you, then fold and rotate.
- The finished dough should not be sticky. If it clings to your hands or the bowl, add the reserved flour a tablespoon at a time and continue kneading until the dough is firm and smooth.
Step 3: First Rise
- Lightly grease a large mixing bowl with a neutral oil or nonstick spray.
- Shape the dough into a ball and place it in the greased bowl, smooth side up.
- Cover tightly with plastic wrap or a clean damp kitchen towel.
- Place the bowl in a warm, draft-free area of your kitchen. A turned-off oven with just the oven light on works perfectly.
- Let the dough rise for 60 to 90 minutes, or until it has roughly doubled in size.
- While the dough rises, line two large baking sheets with parchment paper or silicone baking mats and set aside.
Step 4: Prepare the Baking Soda Bath
- About 20 minutes before the dough finishes rising, pour 8 cups (2 liters) of water into a large pot.
- Bring the water to a full rolling boil over high heat.
- Once boiling, carefully add the baking soda. Add it slowly, as the water will fizz and bubble vigorously.
- Reduce the heat to a steady medium boil and keep the pot on the stove while you shape the pretzels. You don’t want it at a raging boil, but you need it actively simmering.
Step 5: Divide and Shape the Pretzels
- Once the dough has doubled, punch it down gently to release the gas.
- Turn the dough out onto a clean, un-floured work surface. A little surface friction actually helps with rolling, so don’t add flour here.
- Using a bench scraper or sharp knife, divide the dough into 8 equal pieces. For consistent pretzels, weigh the total dough on a kitchen scale and divide that number by 8, then weigh each piece.
- Working with one piece at a time, roll the dough into a long rope about 22 to 24 inches (56 to 60cm) long. Keep the thickness even throughout. If the dough springs back and resists rolling, let it rest for 2 minutes to relax the gluten, then try again.
- To shape the pretzel twist: form the rope into a U-shape, then cross the two ends over each other twice (like a twist), and fold the twisted portion down toward the bottom curve of the U, pressing the ends firmly onto the dough to seal.
- Place the shaped pretzel on the prepared baking sheet.
- Repeat with all 8 pieces.
- Preheat your oven to 425°F (220°C) at this point if you haven’t already.
Step 6: Boil the Pretzels
- Working in batches of 2 to 3 at a time, gently lower the shaped pretzels into the baking soda bath using a slotted spoon or spider strainer.
- Boil each pretzel for 30 seconds on one side, then carefully flip and boil for another 15 to 20 seconds on the other side.
- The pretzels will puff slightly and the surface will look slightly matte and set.
- Use the spider strainer to lift each pretzel out and allow excess water to drip off briefly.
- Transfer back to the lined baking sheet. Leave about 2 inches of space between pretzels.
- Repeat until all pretzels are boiled.
Step 7: Add the Egg Wash and Salt
- Beat the egg with 1 tablespoon of water in a small bowl until smooth.
- Using a pastry brush, brush a light, even layer of egg wash over the top and sides of each pretzel.
- Make sure you cover all surfaces so the color bakes evenly.
- Immediately sprinkle coarse pretzel salt over each pretzel while the egg wash is still wet so the salt adheres.
- For sweet pretzels, skip the salt at this stage and add cinnamon sugar right after baking.
Step 8: Bake
- Slide the baking sheets into the preheated 425°F (220°C) oven.
- Bake for 12 to 16 minutes, until the pretzels are a deep golden-brown color all over.
- Rotate the pans halfway through baking if your oven has uneven hot spots.
- Remove from the oven and let the pretzels cool on the baking sheet for at least 5 minutes before serving. They firm up as they cool and the crust becomes even chewier.
Read Also: Sourdough Discard Flatbread Recipe
Tips for Success
A few small details make the difference between pretzels that just look good and pretzels that taste like they came from a specialty bakery. These tips address the most common beginner pitfalls.
- Use room-temperature discard. Cold discard straight from the fridge can inhibit yeast activity and make the dough harder to work with. Let it sit on the counter for 30 minutes before using.
- Don’t skip the baking soda bath. This step is what makes a pretzel a pretzel. The alkaline bath chemically transforms the dough surface, producing that dark, chewy crust that no other method can replicate at home.
- Roll on a bare counter. Flour on the work surface when rolling the ropes will cause the dough to slip instead of grip, making it harder to roll out to the right length. Trust the friction.
- Pinch the ends firmly. When attaching the twisted ends to the bottom of the pretzel shape, press hard. If the seam is weak, the pretzel can open up during boiling.
- Don’t overboil. 30 seconds per side is plenty. Longer than that and you risk a metallic or soapy taste from excess baking soda.
- Keep the baking soda bath at a medium boil. A violent boil can break the shaped pretzels apart. Steady and moderate is the goal.
- Bake until deeply golden. Pale pretzels lack that distinct pretzel flavor. The Maillard reaction (browning) is where the flavor lives, so don’t pull them out early.
You might also enjoy: Sourdough Discard Cinnamon Rolls Recipe
Serving Suggestions
Soft sourdough discard pretzels are best served warm, ideally within 30 minutes of coming out of the oven when the crust is at its chewiest and the inside is still soft and pillowy. They pair beautifully with an almost endless array of dips and sides.
Here are some favorite ways to serve them:
- Beer cheese dip: The ultimate pretzel companion. A warm, creamy beer cheese sauce served in a small bowl for dipping makes this feel like a proper pub snack.
- Honey mustard: A classic combination. Homemade or store-bought honey mustard balances the salty, savory pretzel perfectly.
- Soup dipper: Pretzels make an excellent alternative to bread for dipping into cream of mushroom soup or any thick, creamy soup.
- Charcuterie boards: Whole or torn pretzels look stunning on a board alongside cured meats, sharp cheddar, cornichons, and grainy mustard.
- Cinnamon sugar version: Brush warm pretzels with melted butter and toss in a mix of cinnamon and sugar for a sweet dessert-style pretzel.
- Sandwich-style: Slice a large pretzel in half horizontally and fill it with deli meat and cheese for a hearty pretzel sandwich.
Variations to Try
Once you’ve mastered the classic version, there are several fun directions you can take this recipe. The base dough is incredibly adaptable.
- Pretzel bites: Instead of shaping full twisted pretzels, roll each dough piece into a rope and cut into 1-inch (2.5cm) pieces. Boil and bake the same way, but reduce the baking time to 10 to 12 minutes. Pretzel bites are perfect for dipping and sharing.
- Cinnamon sugar pretzels: Skip the pretzel salt, and after baking, brush generously with melted butter and coat with a mixture of 1/4 cup sugar and 1 teaspoon cinnamon. These are irresistible as a snack or dessert.
- Everything bagel pretzels: Replace the coarse salt with everything bagel seasoning sprinkled right after the egg wash. The combination of garlic, onion, sesame, and poppy seeds on a pretzel is fantastic.
- Parmesan herb pretzels: After the egg wash, dust pretzels with finely grated Parmesan and dried herbs like rosemary or thyme before baking.
- Pretzel dogs: Wrap a rope of dough around a hot dog or sausage before boiling and baking. These are a guaranteed hit with kids and adults alike.
- Cheese-stuffed: Flatten a dough piece, place a cube of sharp cheddar in the center, seal the dough around it, and then roll and shape as normal. The cheese melts inside during baking for a gooey surprise.
If you love working with sourdough discard, you’ll also want to try these sourdough discard crackers for another crunchy, satisfying snack.
Storage and Reheating
Sourdough discard pretzels are best eaten fresh on the day they’re baked, but they do store reasonably well with the right method. Proper storage prevents them from drying out or going stale.
- Room temperature: Store cooled pretzels in an airtight container or zip-lock bag at room temperature for up to 2 days. Avoid the refrigerator for short-term storage, as it tends to make bread-based items go stale faster.
- Freezing: Pretzels freeze exceptionally well. Let them cool completely, then wrap each pretzel individually in plastic wrap and store in a freezer-safe bag for up to 2 months. Freeze without any toppings like cinnamon sugar (add those after reheating).
- Reheating from room temperature: Wrap in foil and reheat in a 350°F (175°C) oven for 8 to 10 minutes, or until warmed through.
- Reheating from frozen: Let thaw at room temperature for 30 to 45 minutes, then warm in a 350°F (175°C) oven for 10 to 12 minutes.
- Microwave option: For a quick fix, microwave a pretzel for 20 to 30 seconds. Note that microwaving softens the crust rather than crisping it, so oven reheating is preferred for texture.
Read Also: Sourdough Discard English Muffins Recipe
Nutritional Facts
The following values are approximate and based on one pretzel (1 of 8) made according to this recipe, without dipping sauces. Values will vary slightly depending on the hydration level of your sourdough discard and the specific brand of ingredients used.
| Nutrient | Per Pretzel |
|---|---|
| Calories | 240 kcal |
| Total Fat | 4g |
| Saturated Fat | 2g |
| Cholesterol | 35mg |
| Sodium | 980mg (with salt topping) |
| Total Carbohydrates | 43g |
| Dietary Fiber | 1.5g |
| Sugars | 2g |
| Protein | 7g |
The high sodium comes primarily from the pretzel salt topping and the baking soda bath, which is typical for soft pretzels. If you’re managing sodium intake, use a lighter hand with the coarse salt on top.
This pairs wonderfully with sourdough discard naan for a spread of sourdough-flavored breads to serve at a gathering.
Health Benefits of Key Ingredients
While soft pretzels are a treat rather than a health food, several ingredients in this recipe carry genuine nutritional and functional value worth noting.
All-purpose flour provides carbohydrates, which serve as the body’s primary energy source. It also contains B vitamins including thiamine, riboflavin, and niacin, which support energy metabolism. While not as fiber-rich as whole wheat, all-purpose flour contributes meaningful protein to the dough.
Here are the standout health-relevant properties of key ingredients:
- Sourdough discard: Even unfed discard retains some of the organic acids produced during fermentation, particularly lactic and acetic acid. These acids can contribute to a lower glycemic impact compared to commercial yeast breads, and the fermentation process partially breaks down phytic acid in the flour, which can improve the bioavailability of certain minerals like iron, zinc, and magnesium.
- Whole milk: Contributes calcium, vitamin D (in fortified varieties), and protein. The fat in milk helps keep the crumb of the pretzels tender.
- Eggs (in the egg wash): While only a small amount makes contact with the final product, eggs are a complete protein source and contribute choline, which supports brain function and liver health.
- Butter: In moderation, butter provides fat-soluble vitamins A, D, E, and K2, which support immune function and bone health.
The fermentation influence from the sourdough discard is a real and meaningful bonus, even when using commercial yeast for the rise.
You might also enjoy: Sourdough Discard Biscuits Recipe
Frequently Asked Questions
1. Can I make these pretzels without a stand mixer?
Yes, absolutely. The dough is a firm, low-hydration dough that is actually well-suited to hand kneading. Turn the combined dough out onto a clean surface and knead firmly for 8 to 10 minutes until smooth and elastic. It takes more effort than a wet bread dough, but it’s completely manageable. Rest your hands for a minute midway through if needed.
2. My dough isn’t rising. What went wrong?
The most likely culprit is yeast that is no longer active. If your yeast did not foam during the activation step, it’s dead and needs to be replaced. This can happen if the yeast is past its expiration date or if the milk was too hot (above 120°F / 49°C) when the yeast was added. Always check that your yeast is fresh and that your milk is warm, not hot.
3. Can I use active sourdough starter instead of discard?
Yes. Use the same amount (1 cup / 240g) of active, fed starter in place of the discard. If your starter is very active and bubbly, you could try reducing the commercial yeast to 1 teaspoon, though keeping the full amount is safer and more predictable. Active starter will contribute more lift but the flavor will be similar.
4. Why do my pretzels look pale and not brown after baking?
Pale color usually means one of two things: the baking soda bath wasn’t at a proper boil, or the oven temperature was too low. Make sure the bath is at a steady medium boil when you add the pretzels, and verify your oven temperature with an oven thermometer if you suspect it runs cool. Baking at 425°F (220°C) with a full 12 to 16 minute bake time should give you deeply golden-brown pretzels.
5. Can I freeze the shaped dough before baking?
Yes, with some adjustments. After shaping the pretzels, skip the rise and baking soda bath and instead freeze them on a baking sheet until solid, then transfer to a freezer bag. When ready to bake, thaw in the refrigerator overnight, then bring to room temperature for 30 to 45 minutes, complete the baking soda bath, and bake as normal. You may need to add 2 to 3 extra minutes to the bake time.
This technique is similar to what you’d use for sourdough discard pita bread, where the dough can also be prepped ahead.
Final Thoughts
Making sourdough discard pretzels at home is one of those kitchen projects that delivers far more reward than effort. You start with something that would otherwise go down the drain, and you end up with golden, fragrant, perfectly chewy pretzels that fill your kitchen with the most incredible smell.
The process is forgiving and fun, and once you’ve done it once, you’ll know the dough by feel. The baking soda bath stops feeling mysterious and starts feeling like second nature.
Give this recipe a try the next time your sourdough discard jar is full. Share your results in the comments below, I’d love to hear how yours turned out, and feel free to tag a friend who needs a good pretzel recipe in their life!
Recommended:
- Sourdough Discard Rolls Recipe
- Sourdough Discard Pancakes Recipe
- Sourdough Discard Chocolate Chip Cookies Recipe
- Sourdough Sandwich Bread Recipe
- Sourdough Focaccia Recipe
- Everything Bagel Recipe
- Easy Sourdough Bread Recipe
- Sourdough Starter Recipe
- Pizza Hut Breadstick Recipe
- Dinner Rolls Recipe
