The holidays just hit differently when there’s a tin of homemade christmas shortbread cookies recipe sitting on the counter. These buttery, tender cookies have been a staple of Christmas baking for centuries, and for good reason: they come together with just a handful of pantry ingredients, hold their shape beautifully when cut with festive cookie cutters, and taste like pure holiday magic.
What makes shortbread so special is its simplicity. There are no eggs, no leavening agents, and no fuss. Just butter, sugar, flour, and a touch of vanilla doing exactly what they’re supposed to do. The result is a crisp, crumbly cookie that quite literally melts the moment it hits your tongue.
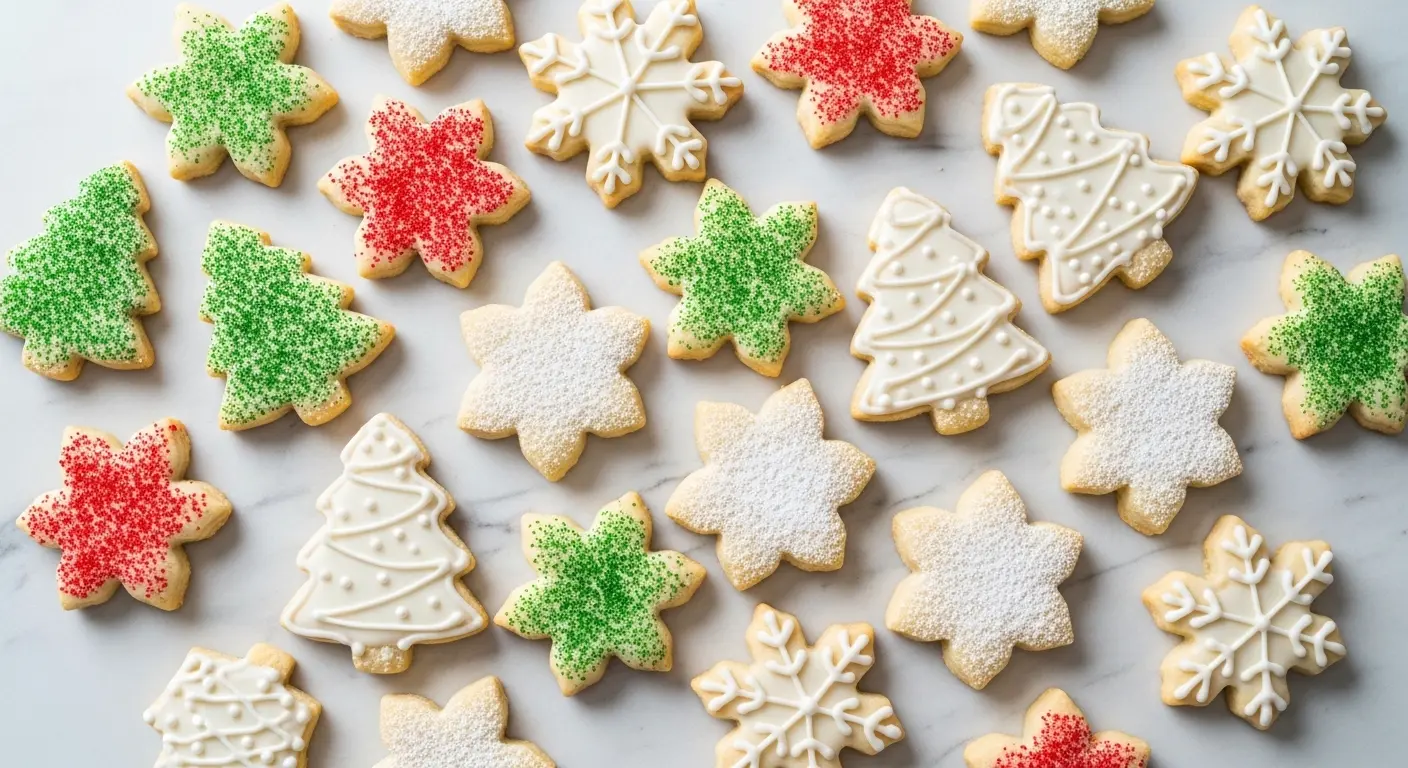
This recipe follows the classic cut-out style: the dough is chilled, rolled out, cut into Christmas shapes, and baked low and slow until just golden at the edges. You can leave them plain for a rustic look, dust them with powdered sugar, or decorate them with a simple royal icing glaze and festive sprinkles.
Whether you’re baking for a cookie exchange, assembling holiday gift boxes, or just want something beautiful to set out for guests, this recipe delivers every single time.
For another shortbread classic you’ll love year-round, check out the Shortbread Cookie Recipe as your go-to base.
Why You’ll Love This Christmas Shortbread Cookies Recipe
This recipe has earned its spot on holiday baking lists everywhere, and it’s not hard to see why.
It starts with just a few ingredients that almost everyone already has at home. No specialty items, no obscure flours, and no expensive add-ins required.
The dough is incredibly easy to make. You cream the butter and sugar, add flour and vanilla, chill, and roll. Even first-time bakers can nail it on their first try.
These cookies hold their shape. Because shortbread uses no eggs and no baking powder, the dough doesn’t spread or puff up in the oven. Your Christmas tree or snowflake will look just as crisp coming out of the oven as it did going in.
They’re ideal for decorating. The smooth, firm surface of a baked shortbread cookie is basically a blank canvas. Royal icing, colored sugar, sprinkles, drizzled chocolate: all of it works beautifully.
Shortbread ships and stores exceptionally well. Unlike delicate frosted sugar cookies, plain shortbread stays fresh and intact in a tin for up to two weeks, making it perfect for mailing to loved ones.
The flavor is timeless. Butter-forward, lightly sweet, and just slightly salty, these cookies pair perfectly with tea, coffee, hot cocoa, or a cold glass of milk.
- Simple 4-ingredient base that even beginners can master
- Dough can be made ahead and refrigerated for up to 3 days or frozen for up to 2 months
- Holds shape beautifully, so your festive cut-outs come out picture-perfect
- Sturdy enough for decorating with icing, sprinkles, or sanding sugar
- Makes a generous batch: perfect for gifting, cookie trays, and holiday parties
- Naturally egg-free
You might also enjoy: Whipped Shortbread Cookies for a lighter, melt-in-your-mouth twist on the classic.
Ingredients
Classic Christmas shortbread keeps the ingredient list short and intentional. Every element plays a key role in creating that signature buttery texture, so it’s worth using the best quality you can find. High-fat European-style butter, for example, contains less water than standard American butter and produces an exceptionally tender, flavorful cookie.
- 1 cup (225g) unsalted European-style butter, softened to room temperature
- ½ cup (60g) powdered sugar (confectioners’ sugar), sifted
- 2 tablespoons (25g) granulated sugar
- 1 teaspoon pure vanilla extract
- ¼ teaspoon fine salt
- 2¼ cups (280g) all-purpose flour, spooned and leveled, plus extra for dusting
For optional decoration:
- Royal icing or powdered sugar glaze
- Festive holiday sprinkles or sanding sugar
- Red and green nonpareils
Read Also: Cranberry Shortbread Cookies Recipe
Kitchen Equipment Needed
You don’t need a professional kitchen setup to make these cookies, but a few quality tools will make the process much smoother and more enjoyable. A stand mixer is a real advantage here because it creams the butter and sugar quickly and evenly, which is critical to developing the right texture in shortbread dough.
- Stand mixer or hand mixer
- Large mixing bowl
- Silicone spatula for scraping the bowl
- Rolling pin
- Christmas cookie cutters set (trees, stars, snowflakes, etc.)
- Parchment paper-lined baking sheets
- Heavy-duty rimmed baking sheet
- Plastic wrap for chilling the dough
- Wire cooling rack
- Fine-mesh sieve (for dusting flour or powdered sugar)
For another fun holiday baking project, the Easy Royal Icing Recipe pairs perfectly with these cut-out cookies for beautiful decorating results.
Recommended Products for This Recipe
These are products recommended based on quality and performance. They make a genuine difference in your results.
1. European-Style Unsalted Butter
European-style butter has a higher fat content than standard American butter, which means less water in your dough and a richer, more tender shortbread. Brands like Plugra or Kerrygold are widely available and produce noticeably superior results in any shortbread recipe.
2. Christmas Cookie Cutters Set
A good set of stainless steel Christmas cookie cutters gives you clean, sharp edges with every press. Flimsy plastic cutters tend to drag and distort the dough. A set with trees, stars, snowflakes, and bells covers all the holiday classics.
3. Nordic Ware Natural Aluminum Baker’s Half Sheet
This baking sheet conducts heat evenly and resists warping, which prevents hot spots that can cause uneven browning. Shortbread bakes at a low temperature, so consistent heat distribution is crucial.
4. OXO Good Grips Non-Stick Rolling Pin
This rolling pin gives you even pressure across the dough for consistent thickness every time. The comfortable handles and smooth surface release dough cleanly without sticking, which matters a lot when you’re working with a butter-rich dough.
5. Holiday Sprinkles and Sanding Sugar Decorating Set
A quality sprinkle mix with red, green, gold, and white pieces makes decorating these cookies a real joy. Sets that include sanding sugar, nonpareils, and shaped confetti give you the most flexibility for holiday designs.
The Lemon Shortbread Cookies Recipe uses the same equipment and is a wonderful flavor variation to bake alongside these for a holiday cookie tray.
Step-by-Step Instructions
Step 1: Prepare Your Workspace and Ingredients
- Take the butter out of the refrigerator at least 1 hour before you begin. It should be soft enough to leave an indent when pressed with your finger, but it should NOT be melted or greasy. Properly softened butter is absolutely critical to the texture of shortbread.
- Sift the powdered sugar into a small bowl to remove any lumps. Lumps of sugar can create uneven spots in your dough.
- Measure out your flour using the spoon-and-level method: spoon flour into the measuring cup, then level it off with a straight edge. Never scoop directly from the bag, as this packs in extra flour and can make the cookies dry and crumbly.
- Line two large baking sheets with parchment paper and set them aside.
Step 2: Cream the Butter and Sugars
- Add the softened butter, sifted powdered sugar (60g / ½ cup), and granulated sugar (25g / 2 tablespoons) to the bowl of your stand mixer fitted with the paddle attachment. If using a hand mixer, use a large mixing bowl.
- Beat on medium speed for 3 to 4 minutes, stopping once to scrape down the sides and bottom of the bowl with a silicone spatula. The mixture should become pale, smooth, and noticeably fluffy.
- Do not overbeat at this stage. The goal is to combine the ingredients and incorporate a small amount of air, not to whip it fully. Overbearing can cause the cookies to spread slightly in the oven.
- Add the vanilla extract (1 teaspoon) and salt (¼ teaspoon) and mix on low for 30 seconds until incorporated.
Step 3: Add the Flour
- With the mixer on the lowest speed, gradually add the all-purpose flour (280g / 2¼ cups) in three additions, about 3 to 4 tablespoons at a time.
- Mix only until the flour is just incorporated after each addition. Stop the moment the dough comes together and pulls away from the sides of the bowl. It will look slightly crumbly but should hold its shape when you press a small piece in your palm.
- Overworking the dough after the flour is added will develop gluten, which creates tough, dense cookies. Mix as little as possible at this stage.
- If the dough feels too dry to come together, use your hands to press it gently into a cohesive mass. A little warmth from your hands is all it needs.
Step 4: Divide and Chill the Dough
- Turn the dough out onto a clean work surface and divide it into two equal portions.
- Flatten each portion into a disc about 1 inch (2.5cm) thick. This makes it easier to roll out evenly later.
- Wrap each disc tightly in plastic wrap.
- Refrigerate for a minimum of 1 hour, or up to 3 days. Chilling the dough is non-negotiable for cut-out shortbread: it firms up the butter, which prevents spreading in the oven and keeps your shapes sharp and clean.
- If you’re in a hurry, you can place the dough in the freezer for 20 to 25 minutes instead. It should feel firm and cold all the way through before you attempt to roll it.
Step 5: Preheat the Oven and Roll Out the Dough
- Set your oven to 325°F (165°C). Shortbread bakes at a lower temperature than most cookies because the goal is to dry out the dough slowly without browning the outside. A hot oven will over-brown the bottoms while leaving the centers underdone.
- Lightly flour your work surface and rolling pin.
- Unwrap one disc of chilled dough and place it on the floured surface. Dust the top lightly with flour.
- Roll the dough out to an even ¼ inch (6mm) thickness. Rotate the dough a quarter turn every few rolls to prevent it from sticking and to keep the thickness even. If it starts to stick, gently lift the dough and re-flour underneath.
- Work quickly. The warmer the dough gets, the harder it is to cut cleanly. If the dough becomes soft and sticky while you’re working, slide it onto a parchment-lined baking sheet and refrigerate it for 10 minutes before continuing.
Step 6: Cut Out the Cookies
- Dip your Christmas cookie cutters into a small bowl of flour before each use. This prevents the cutter from dragging or sticking to the dough.
- Press the cutter firmly straight down into the dough. Do not twist or rock the cutter, as this distorts the edge of the shape.
- Cut the shapes as close together as possible to minimize scraps. Use a thin offset spatula or bench scraper to gently lift each cut-out and transfer it to the prepared baking sheet, spacing the cookies about 1 inch (2.5cm) apart.
- Gather the scraps, press them gently back together, re-chill if necessary, then re-roll and cut more cookies. Avoid over-working the scraps: the more you handle the dough, the tougher the cookies will be.
- Repeat with the second disc of dough.
- Once the cookies are on the baking sheets, place the sheets in the refrigerator for 15 minutes before baking. This extra chill helps the cookies hold their shape perfectly in the oven.
Step 7: Bake the Cookies
- Place the chilled baking sheets in the preheated 325°F (165°C) oven, one sheet at a time on the middle rack.
- Bake for 12 to 15 minutes. The exact time will depend on the size of your cookies and the accuracy of your oven. Smaller cookies (about 2 inches / 5cm) may be done closer to 12 minutes, while larger ones may need the full 15 minutes or slightly more.
- The cookies are done when the edges are just barely turning a very light golden color. The tops and centers should look set and pale, not wet or shiny. Be careful not to let them brown too much: well-made shortbread is pale gold, not dark golden brown.
- If you’re unsure, pull the cookies at 12 minutes. They will continue to firm up as they cool on the pan.
Step 8: Cool the Cookies
- Remove the baking sheet from the oven and let the cookies rest on the pan for 5 minutes. They will be very fragile when they first come out of the oven, and trying to move them immediately will cause them to break.
- After 5 minutes, use a thin spatula to carefully transfer the cookies to a wire cooling rack.
- Allow the cookies to cool completely before decorating, at least 30 minutes. Decorating warm cookies will cause any icing to melt and slide off.
Step 9: Decorate (Optional)
- Once completely cooled, decorate the cookies as desired.
- For a simple, classic look: sift powdered sugar generously over the tops of the cookies using a fine-mesh sieve.
- For a glazed finish: mix 1 cup (120g) of sifted powdered sugar with 1 to 2 tablespoons of milk and ½ teaspoon of vanilla or almond extract until smooth and pourable. Spoon or drizzle over cookies and top with holiday sprinkles before the glaze sets.
- For full royal icing decoration: prepare a batch of royal icing and use a piping bag or squeeze bottle to pipe outlines and flood the cookies with color. Add sprinkles, sanding sugar, or edible glitter before the icing dries.
- Allow decorated cookies to dry completely, at least 1 to 2 hours for a glaze and up to 8 hours for royal icing, before stacking or packaging.
This recipe pairs perfectly with a mug of homemade Hot Chocolate for the ultimate holiday baking experience.
Tips for Success
Making perfect shortbread is less about complicated technique and more about respecting a few important fundamentals. Once you understand why these rules exist, they become second nature.
- Use room-temperature butter. Butter that is too cold will not cream properly and will leave lumps in the dough. Butter that is too warm or melted will make a greasy dough that spreads. Aim for butter that leaves an indent when pressed but holds its shape.
- Spoon and level your flour. Too much flour is the most common reason shortbread turns out dry and crumbly. Always spoon flour into your measuring cup and level with a straight edge, or better yet, weigh it on a kitchen scale.
- Do not skip chilling the dough. Chilling firms up the fat in the dough, which prevents spread in the oven and gives you clean, sharp edges on your cut-outs. It also allows the gluten to relax, resulting in a more tender cookie.
- Mix the flour in on low speed. High speed after adding flour will develop too much gluten, making your cookies tough instead of tender.
- Roll to an even thickness. Cookies of uneven thickness will bake unevenly. Thicker spots will be underdone while thinner spots overbrown. Using rolling pin guides (rubber bands or dowels) helps ensure consistency.
- Chill cut cookies again before baking. That 15-minute chill after cutting and before baking is what guarantees picture-perfect edges. Do not skip it.
- Watch the oven carefully. Shortbread goes from perfectly done to over-baked quickly. Check at the 12-minute mark. Pale golden edges, not brown, is what you’re looking for.
Read Also: Scottish Shortbread Cookie Recipe
Serving Suggestions

Christmas shortbread cookies are endlessly versatile when it comes to serving and presentation. Their neutral, buttery flavor pairs well with both warm and cold beverages, and their beautiful shapes make them a natural choice for festive platters.
Arrange them on a tiered cookie tray alongside other holiday favorites for a stunning dessert spread at a Christmas party or family gathering.
Package them in clear cellophane bags tied with a red ribbon for a heartfelt homemade gift. A tin lined with wax paper is equally beautiful and keeps them fresh longer.
- Serve with a warm mug of Hot Chocolate for the perfect holiday pairing
- Place on a cookie exchange platter with Gingerbread Cookies and Snickerdoodle Cookies
- Set out alongside a glass of cold Eggnog for a classic Christmas treat
- Tuck them into holiday gift boxes with a ribbon for a personal, thoughtful gift
- Set them out on Christmas Eve as part of the traditional cookies-for-Santa spread
- Dust with powdered sugar and serve on a decorative plate as part of a dessert buffet
For another festive cookie that looks beautiful on a holiday platter, try the Pecan Shortbread Cookies Recipe.
Variations to Try
The classic butter-sugar-flour base of shortbread is a starting point, not a limitation. Once you’ve mastered the original, these variations offer easy ways to customize the flavor or presentation for different preferences and occasions.
- Lemon Shortbread: Add 1 tablespoon of fresh lemon zest and ½ teaspoon of lemon extract to the dough for a bright, citrusy version. A simple lemon glaze on top makes them extra special.
- Almond Shortbread: Replace the vanilla extract with ½ teaspoon of almond extract. Top each cookie with a whole blanched almond pressed gently into the center before baking.
- Cranberry Pistachio Slice-and-Bake: Mix in ¼ cup of finely chopped dried cranberries and ¼ cup of chopped pistachios into the dough, roll into a log, chill, slice, and bake for a festive, no-cutter option.
- Chocolate Dipped: Bake the plain shortbread and dip half of each cooled cookie into melted dark or white chocolate. Lay flat on parchment to set and sprinkle with crushed candy cane or sea salt.
- Eggnog Shortbread: Substitute 1 tablespoon of eggnog for the vanilla extract and add a pinch of ground nutmeg to the dough for a seasonal twist.
- Brown Butter Shortbread: Brown the butter in a saucepan before creaming. This adds a deep, nutty flavor that makes these cookies taste incredibly sophisticated with very little extra effort. Allow the browned butter to cool and resolidify before using.
- Spiced Shortbread: Add ½ teaspoon of ground cinnamon, ¼ teaspoon of ground ginger, and a pinch of cardamom for a warm, holiday-spiced variation.
Also on the list of must-try holiday cookies: Cherry Almond Shortbread Cookies Recipe.
Storage and Reheating
Shortbread is one of the best cookies for making ahead because it only gets better after a day or two, as the flavors meld and deepen. Proper storage keeps them fresh and delicious throughout the holiday season.
- Room temperature: Store fully cooled, undecorated cookies in an airtight tin or container at room temperature for up to 2 weeks. Layer them between sheets of parchment or wax paper to prevent scratching.
- Decorated cookies: Cookies decorated with royal icing can also be stored at room temperature for up to 2 weeks once the icing has fully dried and hardened. Store them in a single layer, or use wax paper between layers.
- Refrigerator (dough): Wrapped dough discs can be refrigerated for up to 3 days before rolling and baking.
- Freezer (dough): Wrap dough discs tightly in plastic wrap, place in a zip-top freezer bag, and freeze for up to 2 months. Thaw overnight in the refrigerator before rolling.
- Freezer (baked cookies): Fully cooled, undecorated cookies freeze beautifully for up to 3 months. Layer in an airtight container with parchment between each layer. Thaw at room temperature for about 30 minutes before serving.
- Reheating: These cookies are best enjoyed at room temperature. If you prefer them slightly warm, place them on a baking sheet in a 300°F (150°C) oven for 3 to 5 minutes. Do not microwave them, as this will make them soft and chewy rather than crisp.
Read Also: Almond Shortbread Cookies Recipe
Nutritional Facts
The following values are approximate per cookie, based on a recipe that yields approximately 30 cookies (2-inch / 5cm cut-outs), undecorated.
| Nutrient | Per Cookie |
|---|---|
| Calories | 95 kcal |
| Total Fat | 6g |
| Saturated Fat | 4g |
| Cholesterol | 16mg |
| Sodium | 20mg |
| Total Carbohydrates | 10g |
| Sugars | 3g |
| Protein | 1g |
Note: Nutritional values will vary based on cookie size, the specific ingredients used, and any toppings or decorations added. These figures are estimates only.
For a festive holiday cookie with a very different flavor profile, the Gingerbread Cookie Recipe is another wonderful seasonal choice.
Health Benefits of Key Ingredients
While shortbread is certainly a treat, the key ingredients do offer a few genuine nutritional contributions worth noting.
Butter is a source of fat-soluble vitamins A, D, E, and K2. High-quality European-style butter from grass-fed cows contains conjugated linoleic acid (CLA), a fatty acid that has been studied for its potential metabolic benefits.
All-purpose flour provides carbohydrates for energy and a small amount of protein. If you need a gluten-free option, a 1-to-1 gluten-free flour blend can be substituted without significantly altering the texture.
- Butter provides fat-soluble vitamins A, D, E, and K2, which support immune function and bone health
- Vanilla extract contains trace amounts of antioxidants and adds flavor depth that reduces the need for extra sugar
- Flour supplies B vitamins including thiamine and niacin, which support energy metabolism
- Powdered sugar in the moderate amounts used here keeps the overall sweetness controlled compared to many other cookie recipes
- These cookies are naturally egg-free, making them a suitable choice for those with egg allergies
- When made with unsalted butter, the sodium content is naturally low compared to many commercial cookies
This recipe is a delicious treat meant to be enjoyed as part of a balanced holiday season. For a cookie with fruit and nuts added for nutritional variety, the Cranberry Pistachio Shortbread Cookies Recipe is a great option.
Frequently Asked Questions
1. Why did my shortbread cookies spread in the oven?
The most common cause of spreading shortbread is butter that was too warm or too soft when you started. If the butter is greasy or begins to melt before the dough goes into the oven, the fat will run out of the cookies during baking. Always make sure your dough is properly chilled before baking, and chill your cut-out cookies on the baking sheet for an additional 15 minutes before they go into the oven. Using too little flour can also cause spreading, which is why the spoon-and-level measuring method is so important.
2. Can I make the dough ahead of time?
Absolutely. Shortbread dough is actually ideal for making ahead of time because chilling improves both the flavor and the texture. You can refrigerate the wrapped dough discs for up to 3 days, or freeze them for up to 2 months. Thaw frozen dough overnight in the refrigerator before rolling.
3. Do I need a stand mixer to make shortbread?
A stand mixer makes the job easier and faster, but it is not required. You can use a hand mixer with the same results. Some bakers even make shortbread by hand, using a pastry cutter or simply their fingertips to work the butter into the sugar and flour. The key is to avoid overworking the dough once the flour is added.
4. Can I use salted butter instead of unsalted?
Yes, you can use salted butter, but omit the added salt in the recipe. Salted butter will actually produce a very flavorful shortbread, since the salt enhances the buttery taste. Many traditional Scottish shortbread recipes use salted butter by default. Just be aware that the salt level in different brands of salted butter varies, so the final flavor may vary slightly.
5. Why is my shortbread hard or dry instead of tender and crumbly?
The most likely cause is too much flour. Even a small amount of extra flour can significantly change the texture of shortbread, making it hard and dry rather than tender and crumbly. Always weigh your flour if possible, or use the spoon-and-level method. Overmixing after the flour is added can also cause toughness by developing gluten in the dough. Mix only until the flour is just incorporated and the dough comes together.
You might also enjoy: Chocolate Shortbread Cookies Recipe.
Final Thoughts
Christmas shortbread cookies are one of those recipes that never go out of style.
They’re simple enough for a weeknight baking session with the kids, yet impressive enough to bring to the most elegant holiday party.
The buttery, melt-in-your-mouth texture and the clean, classic flavor make them a crowd-pleaser every single time.
Once you make this recipe, it has a way of becoming a permanent part of your holiday baking tradition.
Give these christmas shortbread cookies a try this season, and see for yourself why they’ve been a Christmas staple for generations.
If you bake them, leave a comment below and let me know how they turned out! Share a photo on social media and tag us, because your beautifully decorated cookies deserve to be seen.
Recommended:
- Cranberry Orange Shortbread Cookies Recipe
- Raspberry Shortbread Cookies Recipe
- Lavender Shortbread Cookies Recipe
- Rosemary Shortbread Cookies Recipe
- Strawberry Shortbread Cookies Recipe
- Cut Out Sugar Cookie Recipe
- Peanut Butter Blossom Cookies Recipe
- Best Chocolate Chip Cookies Recipe
- Eggnog Cookies Recipe
- Sugar Cookies Recipe


