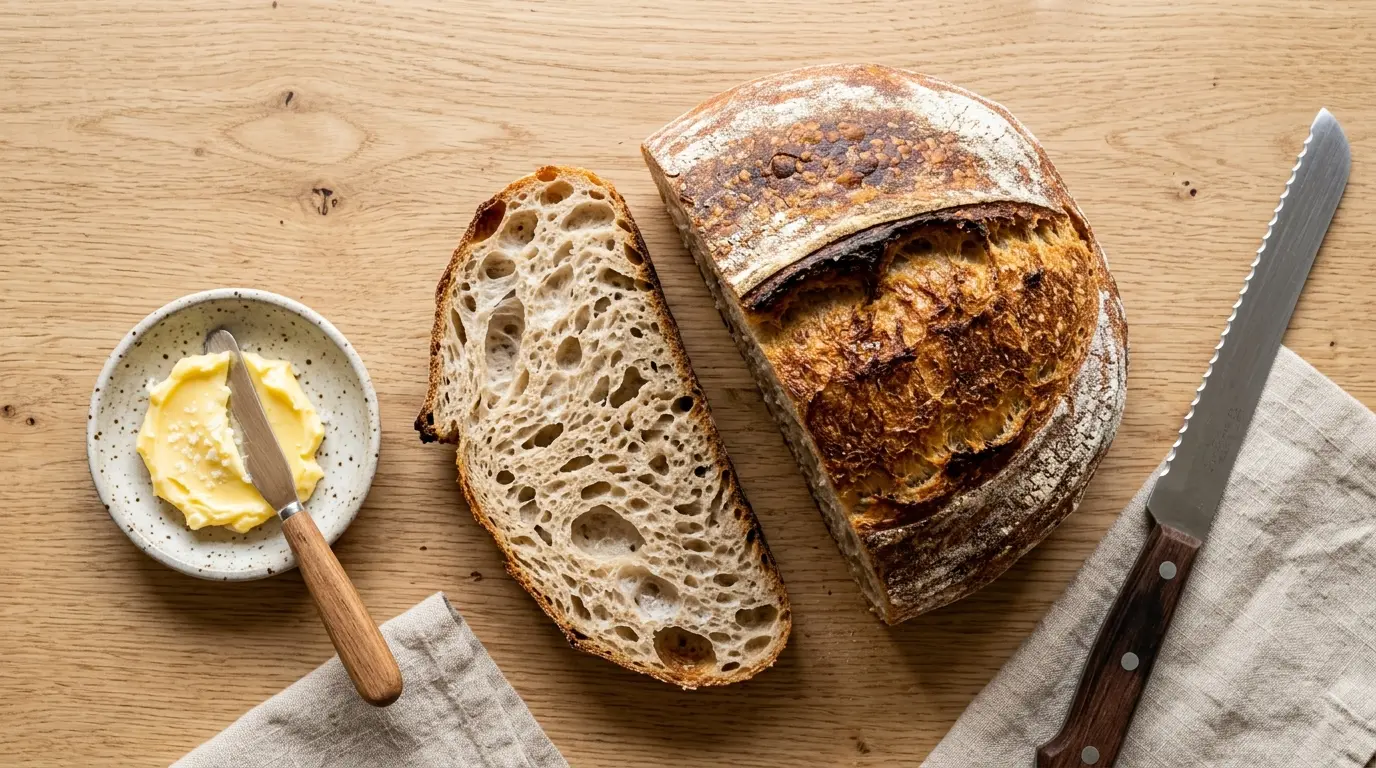
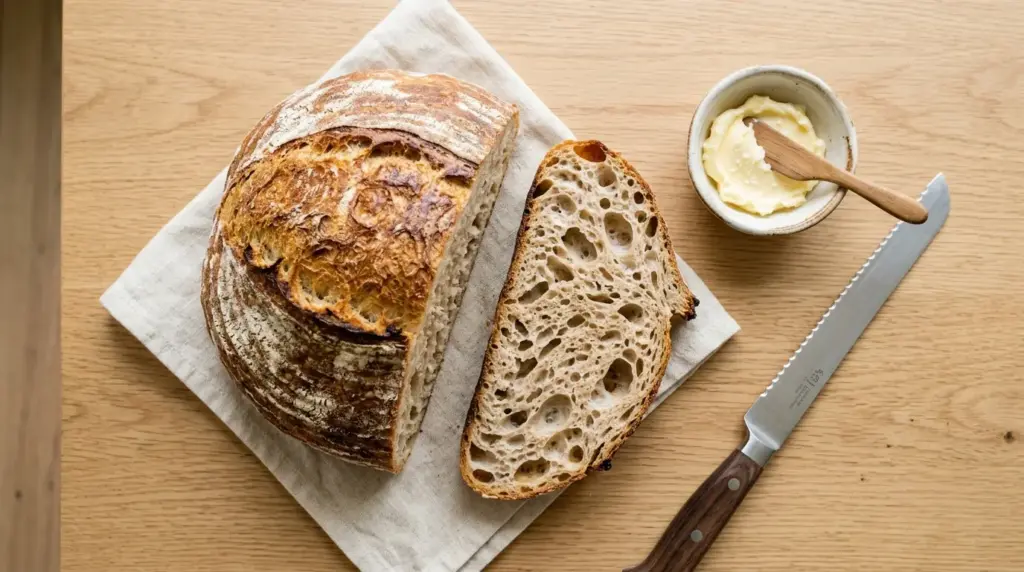
Making a gluten free sourdough bread recipe at home might sound intimidating, but once you understand the process, it becomes one of the most rewarding bakes you can master. This loaf delivers everything you love about classic sourdough: a deeply golden, crackling crust, an open and airy crumb, and that signature tangy flavor, all without a single gram of gluten.
The secret is a well-fed gluten-free sourdough starter paired with the right flour blend. Instead of regular wheat, we use a 1:1 gluten-free flour blend that already contains xanthan gum. The xanthan gum acts as a binder to mimic the stretch and structure that gluten normally provides.
This recipe follows the traditional sourdough process, using wild yeast from a gluten-free starter to naturally leaven the loaf. There is no commercial yeast involved. The result is a bread that is safe for those with Celiac disease, genuinely delicious, and impressive enough to serve to anyone at the table.
Read Also: Easy Sourdough Bread Recipe
Why You’ll Love This Gluten Free Sourdough Bread Recipe
This loaf checks every box for gluten-free bakers who want real, satisfying bread.
It uses a short, manageable ingredients list with no obscure flours or hard-to-find additives. The bulk fermentation builds incredible depth of flavor that store-bought gluten-free bread simply cannot replicate.
The baking method uses a preheated Dutch oven, which traps steam and gives the loaf that iconic sourdough crust. Even beginners can achieve bakery-level results with this approach.
It is also extremely versatile. Slice it thick for toast, cut it thin for sandwiches, or serve it alongside soups and stews.
- Made with a naturally fermented gluten-free starter, so no commercial yeast is needed
- Safe for people with Celiac disease and gluten intolerance when using certified gluten-free ingredients
- Produces a genuine artisan-style crust and an open, chewy crumb
- Deeply flavorful thanks to the slow fermentation process
- Freezes well, so you can always have a loaf ready to go
- Customizable with seeds, herbs, or other add-ins
This is the kind of bread you will want to bake on repeat, and once you nail your timing, it fits beautifully into a weekend baking routine. If you love baking with sourdough, you will also enjoy this Whole Wheat Sourdough Bread Recipe for a heartier, fiber-rich option.
Ingredients
You need just a handful of quality ingredients to make this gluten free sourdough bread. Every item on this list plays a specific role in building structure, flavor, or crust.
- 200g (1 cup) active gluten-free sourdough starter (bubbly and recently fed)
- 400g (3 cups) gluten-free 1:1 flour blend (must contain xanthan gum, such as Bob’s Red Mill 1-to-1 or King Arthur Measure for Measure)
- 300ml (1¼ cups) filtered or room-temperature water (avoid chlorinated tap water, which can inhibit fermentation)
- 1½ tsp fine sea salt
- 1 tbsp olive oil (adds moisture and helps soften the crumb)
- 1 tsp apple cider vinegar (helps strengthen the dough structure and adds a touch of tang)
- Optional: 2 tbsp seeds for topping, such as sesame seeds or pumpkin seeds
You might also love this 4 Ingredient Gluten Free Bread Recipe if you are looking for an even more minimal approach.
Kitchen Equipment Needed
Having the right tools makes this recipe much easier and more successful.
- Large mixing bowl or stand mixer with paddle attachment
- Digital kitchen scale (highly recommended for accurate gluten-free baking)
- 5.5 quart Dutch oven with a lid (essential for creating steam and a proper crust)
- Banneton proofing basket (optional but helps the loaf hold its shape during the cold proof)
- Parchment paper
- Bread lame or sharp serrated knife for scoring
- Wire cooling rack
- Plastic wrap or damp tea towel
- Danish dough whisk (optional but helpful for mixing sticky gluten-free dough)
Read Also: Sourdough Starter Recipe
Recommended Products for This Recipe
These are products chosen based on quality and performance that will genuinely help you get the best results from this gluten free sourdough bread recipe.
1. Bob’s Red Mill Gluten Free 1-to-1 Baking Flour
This is the most widely tested and trusted gluten-free flour blend for sourdough baking. It already contains xanthan gum, which means you do not need to add any separately. The consistent texture and reliable absorption rate make it the ideal choice for this recipe.
2. Lodge 5 Quart Cast Iron Dutch Oven
Baking gluten-free sourdough in a preheated Dutch oven is one of the most impactful things you can do for the final loaf. The heavy cast iron traps steam during the first half of the bake, giving the bread a beautiful oven spring and a deeply caramelized crust. The Lodge Dutch Oven is a workhorse piece of equipment that will last for decades.
3. Breadtopia Banneton Proofing Basket
Shaping gluten-free dough is tricky because it is much stickier and less forgiving than wheat dough. A banneton basket supports the loaf during the cold proof, helping it hold a beautiful round shape. It also imprints those classic spiral lines on the crust.
4. KitchenAid Stand Mixer
Gluten-free dough is thick, wet, and sticky, which makes hand mixing challenging. A stand mixer with a paddle attachment brings the dough together effortlessly and ensures even distribution of the starter and salt throughout the batter-like mixture.
5. Lame Bread Scoring Tool
Scoring the top of the loaf just before baking is not just for looks. It controls where the bread expands in the oven, preventing it from cracking randomly on the sides. A proper lame with a curved blade gives you clean, precise cuts even on sticky gluten-free dough.
For another beautiful no-yeast bake from your sourdough starter, check out this Sourdough Focaccia Recipe.

Step-by-Step Instructions
1. Feed and Activate Your Gluten-Free Sourdough Starter
- Begin this step at least 4 to 12 hours before you plan to mix your dough, or the night before.
- Feed your gluten-free sourdough starter with equal parts (by weight) of gluten-free flour and filtered water. For example, discard all but 50g of starter, then add 50g of flour and 50g of water.
- Stir the starter well until fully combined and no dry flour remains.
- Cover loosely and leave at room temperature (ideally between 70-75°F / 21-24°C).
- Your starter is ready to use when it has roughly doubled in size, is full of bubbles, and smells pleasantly sour and yeasty. If you drop a small spoonful into a glass of water, it should float (this is called the float test).
- Do not use starter that has deflated past its peak, as the wild yeast will be less active and the bread may not rise properly.
2. Mix the Dough
- In a large mixing bowl or the bowl of your stand mixer, combine the 400g of gluten-free 1:1 flour blend with 1½ tsp of fine sea salt.
- Stir to distribute the salt evenly through the flour. This step matters because adding salt directly onto the starter can inhibit the live cultures.
- In a separate smaller bowl or measuring jug, combine the 200g of active starter, 300ml of filtered water, 1 tbsp of olive oil, and 1 tsp of apple cider vinegar.
- Whisk the wet ingredients together briefly until combined.
- Pour the wet mixture into the dry flour mixture.
- If using a stand mixer, mix on medium-low speed with the paddle attachment for 2 to 3 minutes until a thick, sticky dough forms. The dough will look more like a thick batter than traditional bread dough, which is completely normal for gluten-free sourdough.
- If mixing by hand, use a Danish dough whisk or a sturdy spatula and mix vigorously for 2 to 3 minutes until the dough is uniform with no dry streaks of flour.
- The finished dough should be sticky and slightly shaggy, similar in consistency to thick muffin batter.
3. Bulk Fermentation (First Rise)
- Lightly oil the mixing bowl or use a clean, lightly oiled bowl and transfer the dough into it.
- Cover the bowl tightly with plastic wrap or a damp tea towel.
- Leave the dough to bulk ferment at room temperature (70-75°F / 21-24°C) for 4 to 6 hours.
- The dough is ready when it has puffed up noticeably, looks bubbly on the surface, and has increased in volume by approximately 50 to 75%. Unlike wheat sourdough, it will not fully double, and that is normal.
- If your kitchen is cooler, bulk fermentation can take up to 8 hours. Avoid placing the dough in a cold or drafty spot.
- Do not rush this stage. Adequate bulk fermentation is what builds the flavor and structure of your loaf.
4. Shape the Loaf
- Line a banneton proofing basket with a clean cloth dusted lightly with rice flour to prevent sticking. Alternatively, line a medium-sized mixing bowl with a well-floured tea towel. If you do not have either, line a round bowl with plastic wrap and lightly oil it.
- Lightly wet your hands to prevent the dough from sticking to your palms.
- Gently turn the dough out onto a lightly floured (gluten-free flour) surface or directly into the lined banneton.
- Gluten-free sourdough dough cannot be shaped the same way as wheat dough because it lacks the elasticity. Instead, gently coax it into a round shape using a bowl scraper or wet spatula, tucking the edges underneath to create surface tension on top.
- Once shaped, smooth the top gently with wet fingers.
- Dust the top of the loaf lightly with rice flour or gluten-free flour.
5. Cold Proof (Second Rise in the Refrigerator)
- Cover the shaped dough in the banneton loosely with plastic wrap.
- Transfer to the refrigerator and allow it to proof cold overnight, for 8 to 16 hours. This slow, cold rise builds additional flavor and makes the dough easier to handle and score before baking.
- The dough should feel firm and slightly puffed when you take it out of the refrigerator the next morning. It should spring back gently when poked.
- A longer cold proof of up to 24 to 36 hours is possible but avoid going beyond that with gluten-free dough, as extended fermentation can weaken the structure and result in a gummy loaf.
6. Preheat the Oven and Dutch Oven
- At least 45 minutes to 1 hour before you plan to bake, place your Dutch oven (with its lid on) inside the oven.
- Preheat the oven to 500°F (260°C). It is critical that both the oven and the Dutch oven reach full temperature before the bread goes in. This initial blast of heat causes the bread to spring up dramatically in the first few minutes of baking, forming the open crumb and crust.
- Do not rush this preheat. Cold Dutch ovens produce flat, dense loaves.
7. Score and Bake
- Tear off a piece of parchment paper large enough to lower the loaf into the Dutch oven. Place the parchment on your counter.
- Remove the shaped loaf from the refrigerator directly before baking. Working quickly, gently invert the loaf from the banneton onto the parchment paper so the smooth side faces up.
- Using a sharp lame or serrated knife, score the top of the loaf with one or two swift cuts, about ½ inch (1.25 cm) deep. A single slash down the center or an X pattern both work well. Score decisively in one clean motion, do not drag the blade.
- Very carefully remove the hot Dutch oven from the oven (use thick oven mitts). Lift the loaf using the parchment paper and lower it into the Dutch oven. Place the lid on securely.
- Return the Dutch oven to the oven and immediately reduce the temperature to 450°F (230°C).
- Bake covered for 25 minutes. The steam trapped inside the Dutch oven creates a humid environment that allows the crust to expand without setting too early.
- After 25 minutes, carefully remove the lid. The loaf should have risen and turned a pale golden color.
- Continue baking uncovered for another 20 to 25 minutes, until the crust is a deep golden brown and the internal temperature reads 205 to 210°F (96 to 99°C) on an instant-read thermometer.
8. Cool Completely Before Slicing
- Remove the baked loaf from the Dutch oven using the parchment paper and transfer it to a wire cooling rack.
- Allow the loaf to cool for a minimum of 1 hour before slicing. Two hours is even better.
- This step is not optional. Gluten-free bread continues to set internally as it cools, and slicing too early will result in a gummy, undercooked-looking interior, even if the bread is fully baked. The internal structure needs time to firm up completely.
- Once fully cooled, slice with a sharp serrated bread knife.
For more sourdough-based baking ideas using your starter, try this Sourdough Discard Bread Recipe to make the most of every feeding.
Tips for Success
Gluten-free sourdough has a few unique quirks that are worth knowing before you begin.
Here are the most important tips to guarantee a great loaf every time.
- Use a digital kitchen scale. Volume measurements like cups are less reliable with gluten-free flours because different blends pack differently. Grams are always more accurate.
- Your starter must be truly active. If it hasn’t peaked with bubbles and a good rise, your bread will not rise properly. When in doubt, give it another feeding and wait.
- Use filtered water. Chlorine in tap water can kill or suppress the live cultures in your starter. Filtered or bottled water produces much more reliable results.
- Do not skip the cold proof. Refrigerating the shaped dough overnight makes it firmer, easier to score, and far more flavorful than a room-temperature proof alone.
- Preheat the Dutch oven fully. The dramatic initial heat is what gives gluten-free sourdough its oven spring and crust. 45 to 60 minutes of preheating is not excessive.
- Let it cool fully. Cutting into a warm gluten-free loaf is the most common mistake. The crumb needs at least an hour to set after coming out of the oven.
- Expect a stickier dough. Gluten-free sourdough dough looks and behaves very differently from wheat dough. It is supposed to be thick and tacky. Trust the process.
You might also enjoy: Same Day Sourdough Bread Recipe
Serving Suggestions
This gluten free sourdough bread is incredibly versatile and pairs well with so many things.
It shines as toasted slices with generous amounts of salted butter and honey. The open crumb soaks up toppings beautifully, making it perfect for sweet spreads like jam or savory toppings like avocado.
- Toast thick slices and top with Avocado Toast for a satisfying, nutrient-dense breakfast
- Serve alongside a warming bowl of Tomato Soup for a classic combination
- Use as the base for an open-faced sandwich with roasted vegetables and hummus
- Slice thinly and serve with a cheese board for entertaining
- Enjoy fresh with cinnamon butter or Honey Butter for a simple and indulgent treat
- Use day-old slices for gluten-free French toast or bruschetta
Read Also: Gluten Free Banana Bread Recipe
Variations to Try
Once you are comfortable with the base recipe, it is easy to customize the loaf.
These variations all work within the same process, just with small adjustments to the dough.
- Seeded Crust: Before placing the loaf in the Dutch oven, brush the surface lightly with water and press a mixture of sesame seeds, sunflower seeds, and poppy seeds onto the top for a beautiful and nutty crust.
- Herb and Garlic: Fold 1 tablespoon of dried rosemary and 2 minced garlic cloves into the dough just after mixing. This creates a savory, aromatic loaf perfect for serving with soups and stews.
- Olive and Thyme: Fold in ½ cup (75g) of roughly chopped kalamata olives and 1 teaspoon of fresh thyme during mixing for a Mediterranean-inspired variation.
- Multigrain: Replace 50g of the 1:1 flour blend with certified gluten-free oat flour and add 2 tablespoons of chia seeds for added fiber, texture, and nutrition.
- Honey Oat: Add 2 tablespoons of honey to the wet ingredients and press gluten-free rolled oats onto the top of the loaf before the cold proof for a slightly sweet, wholesome finish.
- Dairy-Free Version: This recipe is already dairy-free as written. For a richer flavor, substitute the olive oil with melted refined coconut oil.
For another gluten-free baking option, check out this Gluten Free Dairy Free Bread Recipe.
Storage and Reheating
Proper storage keeps this loaf tasting fresh far longer than most gluten-free breads.
Here is how to store and reheat it for the best texture.
- Room Temperature: Store the fully cooled loaf in an airtight bag or container at room temperature for up to 2 days. Keep it cut-side down or tightly wrapped to prevent the crumb from drying out.
- Refrigerator: Refrigerate for up to 5 days. The cold slows down staling, but refrigerating bread can dry it out, so always toast slices before eating when storing this way.
- Freezer: This loaf freezes beautifully. Slice the fully cooled loaf, lay the slices on a parchment-lined tray, and freeze until solid. Then transfer to a freezer bag. Freeze for up to 3 months.
- Reheating: Toast individual slices directly from frozen in a toaster or under the broiler for 2 to 3 minutes per side. To warm a larger piece, wrap in foil and place in a 350°F (175°C) oven for 10 to 15 minutes.
- Tip: Gluten-free bread generally tastes better toasted. Even a freshly baked loaf at room temperature benefits from light toasting to bring out the crumb texture.
Read Also: Sourdough Sandwich Bread Recipe
Nutritional Facts
The following values are approximate per slice, based on a loaf yielding 12 slices, using a standard gluten-free 1:1 flour blend. Values may vary depending on the specific brand of flour used.
| Nutrient | Per Slice (approx.) |
|---|---|
| Calories | 145 kcal |
| Total Fat | 2g |
| Saturated Fat | 0.3g |
| Carbohydrates | 29g |
| Fiber | 1.5g |
| Sugar | 0.5g |
| Protein | 2.5g |
| Sodium | 220mg |
This gluten free sourdough bread is lower in protein than traditional wheat sourdough due to the different flour profile. However, the fermentation process does improve the digestibility of certain starches and may lower the glycemic impact slightly compared to non-fermented gluten-free breads.
Another wholesome baking option to explore is this Healthy Banana Bread Recipe.
Health Benefits of Key Ingredients
The ingredients in this gluten free sourdough bread recipe each bring something meaningful to the table beyond just flavor and structure.
The fermentation process at the heart of sourdough baking improves digestibility and may provide benefits for gut health by encouraging beneficial bacterial activity during the long rise.
- Gluten-Free Flour Blend: Allows those with Celiac disease or gluten sensitivity to enjoy real, fermented bread without the inflammatory response triggered by gluten-containing grains.
- Wild Yeast from Sourdough Starter: Naturally leavens the bread and produces lactic and acetic acids during fermentation. These organic acids give sourdough its tangy flavor and may help lower the glycemic response of the bread compared to commercial-yeast versions.
- Apple Cider Vinegar: Contains acetic acid and has been shown in some studies to support blood sugar regulation. In bread baking, it also strengthens the dough structure and extends shelf life naturally.
- Olive Oil: A source of heart-healthy monounsaturated fats. In this recipe, it adds moisture, helps keep the crumb tender, and adds a subtle richness.
- Sea Salt: Provides essential trace minerals and plays a crucial functional role in dough development by slowing fermentation to a controlled pace and strengthening the overall structure.
- Xanthan Gum (in the flour blend): Replaces the binding function of gluten and is generally well tolerated by most people with gluten intolerance, though those with corn allergies should verify the source.
You might also enjoy this Almond Flour Banana Bread Recipe for another nutrient-rich gluten-free bake.
Frequently Asked Questions
1. Can I make gluten-free sourdough bread without a Dutch oven?
Yes, you can. If you do not own a Dutch oven, place the shaped loaf on a parchment-lined baking sheet and bake at 450°F (230°C). To create steam during the first part of the bake, place an oven-safe dish filled with a cup of boiling water on the rack below the bread. Bake for 20 minutes with the steam, then remove the water dish and continue baking for another 20 to 25 minutes. The crust will be slightly less dramatic than a Dutch oven loaf but still very good.
2. Why is my gluten-free sourdough gummy inside?
The most common reason is slicing the bread too soon after baking. Gluten-free bread must cool for at least 1 hour, ideally 2, before cutting. If the bread is consistently gummy after full cooling, check that your internal temperature reached 205 to 210°F (96 to 99°C) and ensure your starter was fully active at the time of mixing.
3. Does my sourdough starter need to be gluten-free?
Absolutely, yes. A traditional wheat-based sourdough starter contains gluten, which makes the entire loaf unsafe for anyone with Celiac disease or serious gluten intolerance. Your starter must be made and maintained exclusively with certified gluten-free flour and filtered water. Even a small amount of cross-contamination can cause a serious reaction in sensitive individuals.
4. Can I use a different gluten-free flour blend?
You can experiment, but results will vary depending on the blend. The recipe is specifically developed for a 1:1 gluten-free flour blend that already contains xanthan gum. Blends that do not contain xanthan gum will produce a crumbly, structurally weak loaf unless you add your own xanthan gum (typically around ¾ tsp per cup of flour). Single gluten-free flours like almond flour or coconut flour are not appropriate substitutes for this recipe.
5. How long does it take from start to finish?
The total timeline from feeding the starter to a baked loaf is approximately 24 to 36 hours, most of which is hands-off fermentation and proofing time. The actual active preparation time is only around 20 to 30 minutes. Plan to feed your starter the night before you want to mix, mix the dough the following morning, let it bulk ferment during the day, shape it in the evening, cold proof overnight, and bake the following morning.
Read Also: Gluten Free Pancake Recipe
Final Thoughts
Making gluten free sourdough bread from scratch is one of those kitchen projects that rewards patience and practice with something genuinely spectacular.
It won’t happen overnight, but once you find your rhythm with your starter and your timing, you will have a reliable, delicious loaf that outperforms anything you can buy at a store.
Give this recipe a try this weekend and experience just how good gluten-free bread can actually be. If you bake it, share your results in the comments below. I love hearing how it turns out and what variations you tried!
Recommended:
- Whole Wheat Sourdough Bread Recipe
- Sourdough Bagel Recipe
- Sourdough English Muffin Recipe
- Sourdough Discard Pancakes Recipe
- Sourdough Discard Waffles Recipe
- Sourdough Discard Banana Bread Recipe
- Sourdough Discard Crackers Recipe
- Sweet Sourdough Bread Recipe
- Sourdough Discard Focaccia Recipe
- Sourdough Discard Cinnamon Rolls Recipe


