
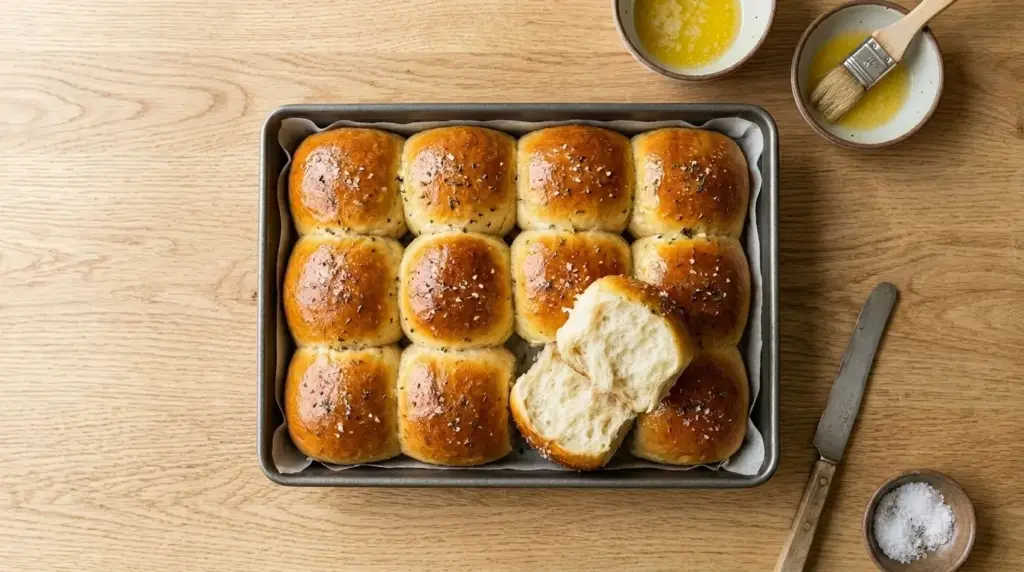
If you have sourdough discard sitting in your fridge and no idea what to do with it, this sourdough discard rolls recipe is exactly what you need. These rolls are soft, pillowy, and lightly tangy, with that gorgeous golden-brown top that makes them impossible to resist.
The secret behind these rolls is the combination of sourdough discard and a small amount of commercial yeast. The discard adds depth of flavor and a mild tang that plain dinner rolls simply can’t match, while the yeast does the heavy lifting to get a reliable, fast rise.
You don’t need an active, bubbly starter for this recipe. Unfed discard straight from the fridge works perfectly. That’s what makes this recipe such a great option for any day of the week, not just when your starter is peaking.
From start to table, you’re looking at about 90 minutes, most of which is hands-off rise time. These are the rolls you’ll want at holiday dinners, Sunday suppers, and everything in between.
For more sourdough discard baking inspiration, you might also love this Sourdough Discard Focaccia if you’re in the mood for something a little more freeform and herby.

Why You’ll Love This Sourdough Discard Rolls Recipe
These rolls hit every mark you want in a homemade dinner roll, and then some.
They come together in a single afternoon with no overnight fermentation required. That means fresh, warm rolls are always within reach, even on a busy weeknight.
The flavor is what really sets them apart from standard dinner rolls. The discard gives them a subtle tang that makes them taste like they took way more effort than they did.
They’re also incredibly versatile. Serve them as a side, use them as sandwich buns, or just tear them apart fresh out of the oven with a smear of butter.
The texture is everything you want: a thin, lightly crisp exterior with a fluffy, tender crumb inside. No dense, gummy disappointments here.
They reheat beautifully, making them ideal for meal prep or leftovers.
- Soft and fluffy with a lightly golden crust
- Subtle sourdough tang from the discard
- Quick rise time thanks to commercial yeast
- Great for dinner, sandwiches, or holiday spreads
- Uses up sourdough discard so nothing goes to waste
- Beginner-friendly recipe with clear, simple steps
Read Also: Sourdough Discard Bread Recipe
Ingredients
These rolls use simple, pantry-staple ingredients alongside your discard. Bread flour gives the rolls a slightly chewier, sturdier crumb, but all-purpose flour works too if that’s what you have on hand.
- 1 cup (240g) sourdough discard, unfed and at room temperature
- 1/2 cup (120ml) warm water (around 100-110°F / 38-43°C)
- 2 1/4 tsp (7g) active dry yeast or instant yeast (one standard packet)
- 2 tbsp (25g) granulated sugar
- 1 large egg, at room temperature
- 3 tbsp (42g) unsalted butter, melted and cooled slightly
- 1 tsp (6g) salt
- 3 to 3 1/2 cups (360-420g) bread flour, plus extra for dusting
- 2 tbsp (28g) softened butter, for brushing after baking
Read Also: Sourdough Discard Biscuits Recipe
Kitchen Equipment Needed
Having the right tools makes the process smooth from start to finish. A stand mixer with a dough hook is the easiest route, but this dough can absolutely be made by hand with a bit of elbow grease.
- Stand mixer with dough hook attachment (or large mixing bowl for hand kneading)
- Measuring cups and spoons
- Kitchen scale (highly recommended for accuracy)
- Instant-read thermometer (for checking water and yeast activation)
- 9×13 inch baking pan or 12-inch cast iron skillet
- Parchment paper
- Plastic wrap or a clean kitchen towel (for covering during rise)
- Wire cooling rack
- Pastry brush (for buttering the tops)
You might also love making Sourdough Discard English Muffins with a similar set of tools.
Recommended Products for This Recipe
These are products I genuinely recommend based on quality, performance, and how much of a difference they make when baking rolls like these.
1. KitchenAid Stand Mixer with Dough Hook
A quality stand mixer takes the effort out of kneading and ensures the dough develops the gluten structure it needs for those fluffy, chewy rolls. The dough hook does the work in about 8 minutes, compared to 10-15 minutes by hand. It’s one of those kitchen investments you’ll use for years across dozens of recipes.
2. USA Pan 9×13 Inch Baking Pan
This pan distributes heat evenly, giving you rolls that bake consistently from edge to center. The nonstick coating means clean release every time, and the reinforced steel construction ensures it won’t warp. It’s the ideal size for 12 pull-apart rolls.
3. Thermapen Instant-Read Thermometer
Getting your water temperature right is one of the most important steps in yeast baking. Too hot and you kill the yeast; too cool and it won’t activate properly. A reliable instant-read thermometer removes all the guesswork.
4. Maldon Sea Salt Flakes
A sprinkle of flaky sea salt on top of these rolls just before baking adds a beautiful finishing touch and a pop of flavor. Maldon flakes are light and delicate, so they don’t overpower the rolls.
5. Lodge 12-Inch Cast Iron Skillet
Baking these rolls in a cast iron skillet creates a slightly crispier bottom crust and stunning presentation right at the table. The retained heat from cast iron keeps the rolls warm for longer, too.
For more sourdough discard recipes that use similar tools, check out this Sourdough Discard Flatbread Recipe.

Step-by-Step Instructions
Step 1: Proof the Yeast
- Measure out your warm water. It should feel like a warm bath, right around 100-110°F (38-43°C). If it’s too hot, it will kill the yeast; too cool, and the yeast won’t activate.
- Pour the warm water into the bowl of your stand mixer (or a large mixing bowl).
- Add the granulated sugar and sprinkle the yeast over the water.
- Stir gently to combine, then let the mixture sit undisturbed for 5 to 10 minutes.
- After 5-10 minutes, the mixture should look foamy and slightly puffed. This means your yeast is alive and active. If nothing happens after 10 minutes, your yeast may be expired and you’ll need a fresh packet.
Step 2: Add the Wet Ingredients
- Add the sourdough discard to the foamy yeast mixture.
- Stir gently to break up the discard and incorporate it into the liquid. It doesn’t need to be perfectly smooth at this point.
- Add the egg (room temperature is important; a cold egg can shock the dough and slow down the yeast).
- Pour in the melted butter. Make sure it has cooled to just warm and not hot, so it doesn’t cook the egg or kill the yeast.
- Stir everything together until the wet ingredients are roughly combined.
Step 3: Add the Flour and Salt
- Add the salt to the bowl. Salt controls yeast activity and improves flavor, but adding it directly onto the yeast at the start can inhibit it. Adding it now after the yeast is already active is fine.
- Begin adding the bread flour, starting with 3 cups (360g). Add it one cup at a time if mixing by hand, or add it gradually with the mixer on low speed.
- Mix until a shaggy dough forms that starts to come together.
- Assess the dough. If it’s still very sticky and clinging to the sides of the bowl, add a little more flour, one tablespoon at a time, up to 3 1/2 cups total. The dough should be soft and slightly tacky but not sticky enough to coat your hands completely.
Step 4: Knead the Dough
- If using a stand mixer: attach the dough hook and knead on medium-low speed (speed 2 on a KitchenAid) for 7 to 9 minutes.
- If kneading by hand: turn the dough out onto a lightly floured surface and knead by pushing the dough away with the heel of your hand, folding it back, rotating a quarter turn, and repeating. Knead for 10 to 12 minutes.
- The dough is ready when it’s smooth, elastic, and springs back slightly when poked. It should pull away cleanly from the sides of the bowl.
- Avoid adding too much flour during kneading. A slightly tacky dough will produce softer rolls than one that’s too dry.
Step 5: First Rise (Bulk Fermentation)
- Lightly grease a large bowl with a neutral oil or cooking spray.
- Shape the dough into a ball and place it in the greased bowl, smooth side up.
- Turn it once so all sides are lightly coated in oil, which prevents a dry skin from forming.
- Cover the bowl tightly with plastic wrap or a damp kitchen towel.
- Place the bowl in a warm spot to rise. An oven with just the light on works perfectly, as does a spot near a warm stovetop. Aim for an environment around 75-80°F (24-27°C).
- Let the dough rise for 45 to 60 minutes, or until it has doubled in size.
Step 6: Shape the Rolls
- Once the dough has doubled, gently punch it down to release the gas.
- Turn the dough out onto a lightly floured surface.
- Divide the dough into 12 equal portions. A kitchen scale is helpful here; each portion should weigh roughly 70-80g.
- To shape each roll: flatten a piece of dough slightly, then pull the edges up and toward the center, pinching them together at the top to create surface tension. Flip it over so the seam is on the bottom.
- Cup your hand over the dough ball and roll it in a circular motion against the surface to form a smooth, tight ball.
- Repeat with all 12 portions.
- Place the shaped rolls into a lightly greased or parchment-lined 9×13 inch baking pan or 12-inch cast iron skillet. For pull-apart rolls, place them so they’re just touching or very close together. For rolls with a crust on all sides, space them out a bit more.
Step 7: Second Rise (Proofing)
- Cover the pan loosely with lightly greased plastic wrap or a clean towel.
- Let the rolls rise in a warm spot for 30 to 45 minutes, or until they are noticeably puffy and have expanded to fill the gaps between each roll.
- Don’t rush this step. The second rise is what gives the rolls their airy, fluffy texture. Under-proofed rolls will be dense and tight.
- While the rolls are proofing, preheat your oven to 375°F (190°C).
Step 8: Bake the Rolls
- Once the rolls are puffed and the oven is preheated, optionally mist or lightly spray the tops of the rolls with water. This helps create a slightly crispier exterior.
- Place the pan in the center of the oven.
- Bake for 18 to 22 minutes, or until the tops are deep golden brown.
- If the tops are browning too quickly before the rolls are fully cooked, tent the pan loosely with foil for the last 5 minutes.
- The rolls are done when the tops are golden and a roll from the center of the pan sounds hollow when tapped on the bottom.
Step 9: Butter and Cool
- Remove the rolls from the oven and immediately brush the tops generously with the softened butter. This gives them that gorgeous sheen and rich flavor.
- Allow the rolls to cool in the pan for at least 5 to 10 minutes before serving.
- They’re absolutely best served warm, but they’re still wonderful at room temperature.
For another satisfying baking project with your discard, try this Sourdough Discard Naan Recipe.
Tips for Success
A few small adjustments make the difference between good rolls and truly exceptional ones.
- Use room-temperature ingredients. Cold egg, cold discard, or cold butter can slow down yeast activity and affect dough texture. Take everything out of the fridge 30 minutes before you start.
- Don’t over-flour the dough. It’s tempting to add more flour when the dough feels sticky, but slightly tacky dough produces softer rolls. Err on the side of less flour.
- Let the second rise finish. Rushing the proof is the most common cause of dense rolls. The rolls should look noticeably puffy before you put them in the oven.
- Check your yeast first. If your yeast doesn’t foam within 10 minutes of mixing with warm water and sugar, it’s dead. Don’t waste your time proceeding with the recipe; start fresh with new yeast.
- Butter while hot. Brush the rolls with butter the moment they come out of the oven so the butter melts in and soaks into the top.
- Use a kitchen scale. Weighing your flour instead of scooping it prevents accidentally using too much, which is the number one cause of tough, dense rolls.
Read Also: Sourdough Discard Bagels Recipe
Serving Suggestions
These rolls are endlessly adaptable and work beautifully alongside so many meals.
Serve them warm alongside a cozy bowl of soup or stew. They’re ideal for mopping up broth and go especially well with hearty options.
Split them open and use them as slider or sandwich buns. Their soft crumb and mild tang make them a fantastic base for both cold deli fillings and warm roasted meats.
They’re a natural side for holiday meals. Place a basket of warm rolls on the table alongside roasted meats and vegetables, and watch them disappear first.
- Alongside a creamy Chicken Wild Rice Soup
- Served with Collard Greens and a Sunday roast
- As a side with a hearty Beef Stroganoff
- Split and filled with leftover pulled pork or turkey
- Smeared with Honey Butter for breakfast or as a snack
- Alongside a Thanksgiving or Christmas spread
- Served warm with Cinnamon Butter for a slightly sweet treat
Another favorite: Dinner Rolls Recipe
Variations to Try
Once you’ve made the base recipe, there are so many delicious directions to take it.
The classic recipe is wonderful on its own, but these variations are all worth a try for different occasions and flavor preferences.
- Garlic herb rolls: Mix 2 tsp of garlic powder and 1 tbsp of finely chopped fresh rosemary or parsley into the dough. Brush with garlic butter after baking.
- Everything bagel rolls: After shaping and before the second rise, brush the tops with egg wash and sprinkle generously with everything bagel seasoning.
- Honey butter rolls: Swap the granulated sugar for 2 tbsp of honey. The rolls will have a slightly more golden color and a gentle floral sweetness.
- Cheesy pull-apart rolls: Tuck a small cube of sharp cheddar or gruyere into the center of each roll before shaping. The cheese melts and creates a gooey center.
- Vegan rolls: Substitute the egg with a flax egg (1 tbsp ground flaxseed plus 3 tbsp water, rested for 5 minutes) and use vegan butter in place of regular butter.
- Whole wheat rolls: Replace up to half of the bread flour with whole wheat flour for a nuttier flavor and slightly denser texture.
- Overnight rolls: After shaping, place the pan of rolls in the fridge covered tightly with plastic wrap. The next day, pull them out, let them come to room temperature and finish proofing for about 1 hour, then bake as directed.
You might also enjoy: Sourdough Discard Cinnamon Rolls Recipe
Storage and Reheating
These rolls stay fresh for several days and freeze beautifully, making them great for batch baking.
Proper storage ensures they stay soft and don’t dry out before you can finish them.
- Room temperature: Store cooled rolls in an airtight container or zip-top bag at room temperature for up to 3 days.
- Refrigerator: The rolls can be refrigerated in an airtight container for up to 5 days, though they may dry out slightly faster than at room temp.
- Freezer: Freeze fully baked, cooled rolls in a zip-top freezer bag for up to 3 months. Freeze them in a single layer first, then transfer to a bag once solid.
- To reheat from room temperature: Wrap a roll in a damp paper towel and microwave for 15-20 seconds, or warm in a 300°F (150°C) oven for 8-10 minutes.
- To reheat from frozen: Thaw overnight in the fridge or at room temperature for a couple of hours, then warm in the oven as above. You can also microwave frozen rolls for 30-40 seconds from frozen.
- Refresh the crust: For rolls that have been stored, a quick 5-minute warm in a 350°F oven, uncovered, will bring back some of that freshly baked quality.
Read Also: Sourdough Discard Pizza Dough Recipe
Nutritional Facts
The following is an estimate for one roll (recipe makes 12 rolls) based on standard ingredient measurements:
| Nutrient | Per Roll (Approx.) |
|---|---|
| Calories | 195 kcal |
| Carbohydrates | 33g |
| Protein | 5g |
| Fat | 5g |
| Saturated Fat | 3g |
| Fiber | 1g |
| Sugar | 2g |
| Sodium | 200mg |
Nutritional values are approximate and will vary based on the exact ingredients used, the hydration of your sourdough discard, and whether you use bread flour or all-purpose flour.
For more sourdough discard ideas, check out this Sourdough Discard Pancakes Recipe.
Health Benefits of Key Ingredients
These rolls are more than just delicious. Several key ingredients bring meaningful nutritional value to the table.
While rolls are a treat best enjoyed as part of a balanced diet, knowing what goes into them makes you feel a little better about reaching for seconds.
- Sourdough discard: The fermentation process in sourdough starter breaks down some of the phytic acid present in wheat, which can improve the absorption of minerals like iron, zinc, and magnesium. Fermented grains are also easier to digest for many people compared to conventionally leavened bread.
- Bread flour: Higher in protein than all-purpose flour (typically 12-14% protein vs. 10-11%), bread flour supports gluten development for a better texture. That same protein makes the rolls more satisfying and slightly more filling.
- Eggs: One egg adds high-quality complete protein, healthy fats, and B vitamins including choline, which supports brain health. Eggs also contribute to the rich, tender crumb texture of the rolls.
- Butter: Butter brings fat-soluble vitamins A, D, E, and K to the recipe. In moderation, quality butter from grass-fed cows also contains conjugated linoleic acid (CLA), a beneficial fatty acid.
- Active dry yeast: Beyond its leavening role, yeast is a source of B vitamins, particularly B1 (thiamine), B2 (riboflavin), and B3 (niacin), which support energy metabolism.
Read Also: Sourdough Discard Crackers Recipe
Frequently Asked Questions
1. Can I use active sourdough starter instead of discard?
Yes, you can swap active, bubbly starter for the discard using the same amount (1 cup / 240g). If you do this, you may want to reduce or omit the commercial yeast since the active starter can leaven the dough on its own. Keep in mind that without the commercial yeast, the rise times will be significantly longer, usually 3-6 hours for the bulk rise depending on the temperature of your kitchen.
2. Why are my rolls dense instead of fluffy?
Dense rolls are almost always caused by one of three things: under-proofing (not letting the dough rise long enough), too much flour in the dough, or yeast that was killed by water that was too hot. Make sure your water is in the 100-110°F range, don’t skip the second rise, and resist the urge to keep adding flour until the dough feels completely dry.
3. Can I make these rolls ahead of time?
Absolutely. The easiest method is the overnight fridge rise. After shaping the rolls and placing them in the pan, cover tightly and refrigerate overnight (up to 16 hours). The next day, pull them out and let them sit at room temperature for about 1 to 1.5 hours until they’re puffy and have completed their second rise. Then bake as directed.
4. Do I need to use bread flour, or can I substitute all-purpose flour?
All-purpose flour works well in this recipe. The rolls will be slightly softer and less chewy than those made with bread flour, which many people actually prefer for a dinner roll. If you’re using all-purpose flour, start with 2 3/4 cups and work up from there, as all-purpose flour absorbs liquid slightly differently than bread flour.
5. Can I freeze the rolls before baking them?
Yes. After shaping the rolls, place them on a parchment-lined baking sheet and freeze until solid (about 2 hours). Transfer to a freezer bag and freeze for up to 6 weeks. When ready to bake, place the frozen rolls in your greased pan, cover, and let them thaw and proof at room temperature for 3-5 hours (or overnight in the fridge), then bake as usual.
For another fluffy baked good using your discard, check out this Sourdough Discard Bread Recipe.
Final Thoughts
This sourdough discard rolls recipe is the kind of bake you’ll want to make on repeat. It’s approachable enough for beginners, fast enough for weeknights, and impressive enough for holidays.
The magic of turning discard into something this delicious never gets old. Every time you pull a pan of golden, butter-brushed rolls out of the oven, it feels like a small victory.
If you give these rolls a try, I’d love to hear how they turned out. Leave a comment below, share your photos, or tag me if you post them. And if you passed this recipe along to a fellow sourdough baker, even better!
Recommended:
- Sourdough Discard Focaccia Recipe
- Sourdough Discard Flatbread Recipe
- Sourdough Discard Naan Recipe
- Sourdough Discard English Muffins Recipe
- Sourdough Discard Bagels Recipe
- Sourdough Sandwich Bread Recipe
- Sourdough Focaccia Recipe
- Easy Sourdough Bread Recipe
- Homemade Biscuit Recipe
- Buttermilk Biscuit Recipe

