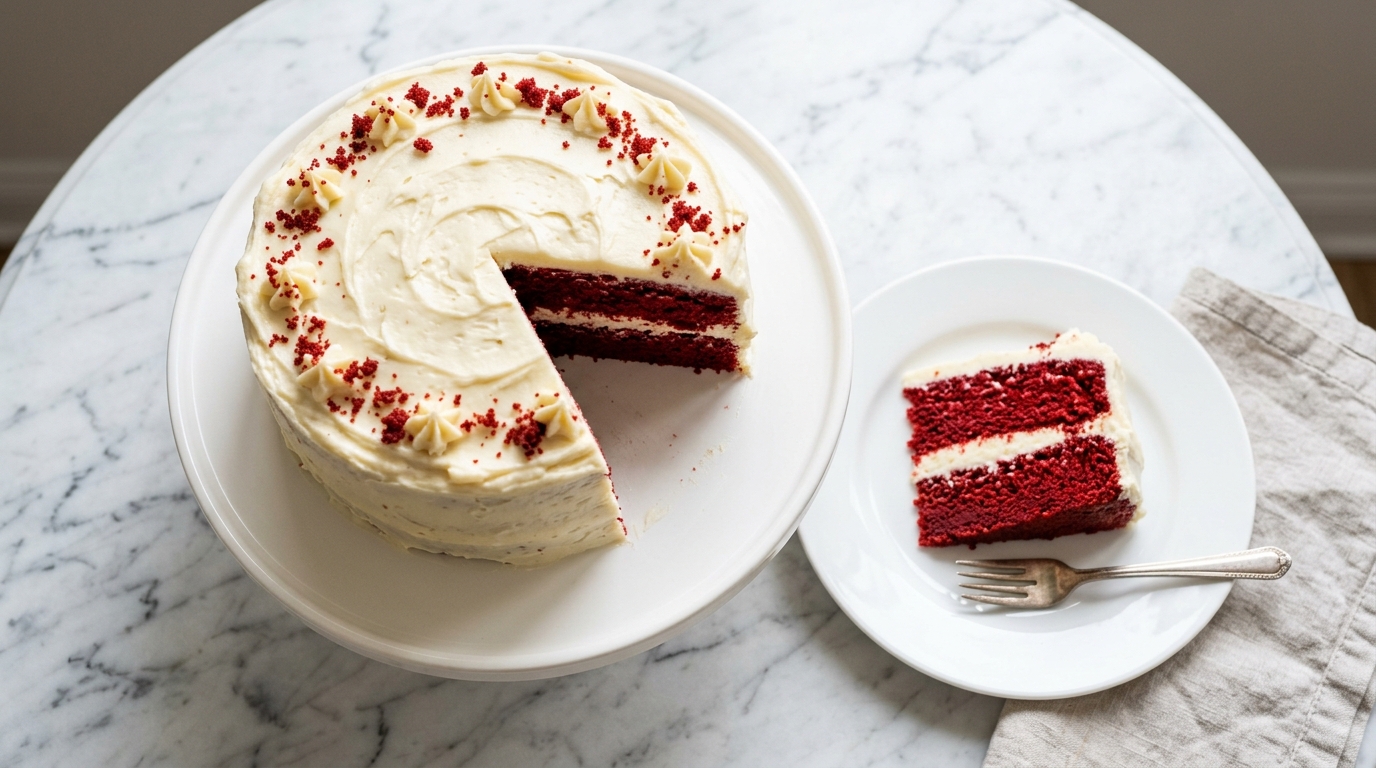
If you’ve ever taken a bite of a perfectly made red velvet cake recipe and found yourself speechless, you already know why this cake has held a place in the hearts of bakers for generations. That deep crimson color, the tender velvety crumb, the subtle whisper of cocoa, and the tangy cream cheese frosting layered generously between each tier — it’s a dessert that demands a second slice.
Red velvet cake is not simply a chocolate cake dyed red. It’s a Southern classic built on the chemistry of buttermilk and vinegar working together to create a texture so soft and delicate it practically melts on your tongue.
Every ingredient plays a specific role, and that’s what makes this cake both a science and an art. The cocoa powder adds depth without overwhelming, the buttermilk creates a tender crumb and subtle tang, and the vinegar reacts with baking soda to give the layers the perfect lift.
This recipe is the classic two-layer version most people know and love — baked in 9-inch round pans and finished with a thick, silky cream cheese frosting. It’s the version you’ll find at church potlucks, birthday tables, and holiday spreads across the South, and for good reason.
Whether you’re making this for Valentine’s Day, Christmas, a birthday celebration, or just because the craving hit, this guide will walk you through every step clearly. No guesswork, no skipped details — just a foolproof path to a showstopping cake.
For another stunning layer cake that uses cream cheese frosting beautifully, check out this Carrot Cake with Cream Cheese Frosting.
Why You’ll Love This Red Velvet Cake Recipe
This recipe has been tested to deliver that perfect balance of flavors and textures that makes red velvet cake so iconic. It’s the kind of cake that impresses a crowd but is genuinely achievable at home, even for beginner bakers.
Here’s why readers keep coming back to this recipe:
- Incredibly moist crumb — thanks to vegetable oil, buttermilk, and the right ratio of wet to dry ingredients
- Perfectly balanced flavor — mild cocoa, a hint of vanilla, and the gentle tang from buttermilk and vinegar
- Stunning appearance — that bold crimson interior makes every slice look like it came from a bakery
- Beginner-friendly method — no complicated techniques, just straightforward steps with clear explanations
- Classic cream cheese frosting — silky, tangy, and perfectly sweet to complement the cake
- Crowd-pleasing — universally beloved at parties, holidays, and family gatherings
- Versatile — great as a layer cake, cupcakes, or even a sheet cake
You might also enjoy: Best Carrot Cake Recipe
Ingredients
Here’s everything you need for both the cake layers and the cream cheese frosting. Make sure all refrigerated ingredients are brought to room temperature before you start — this is key to a smooth, evenly mixed batter.
For the Red Velvet Cake Layers:
- 2 ½ cups (300g) all-purpose flour, spooned and leveled
- 2 tablespoons (12g) unsweetened cocoa powder
- 1 teaspoon baking soda
- 1 teaspoon fine salt
- 1 ¾ cups (350g) granulated sugar
- 1 cup (240ml) vegetable oil
- 2 large eggs, room temperature
- 1 cup (240ml) buttermilk, room temperature
- 2 teaspoons pure vanilla extract
- 1 tablespoon (15ml) white distilled vinegar
- 1 to 2 teaspoons red gel food coloring (adjust to desired shade)
For the Cream Cheese Frosting:
- 16 oz (450g) full-fat block cream cheese, room temperature
- ½ cup (113g) unsalted butter, room temperature
- 4 cups (480g) powdered sugar, sifted
- 2 teaspoons pure vanilla extract
- Pinch of salt
The cream cheese frosting that tops this cake is the perfect finishing touch — don’t skip making it from scratch.
Kitchen Equipment Needed
Having the right tools on hand will make this recipe much smoother. You don’t need anything overly specialized, but a few key items will really help.
- Two 9-inch round cake pans
- Parchment paper rounds
- Stand mixer or hand mixer
- Large mixing bowl and medium mixing bowl
- Fine mesh sieve or sifter
- Rubber spatula
- Cake turntable (optional but helpful for frosting)
- Offset spatula
- Serrated bread knife (for leveling cake layers)
- Wire cooling rack
- Measuring cups and spoons
Read Also: Chocolate Ganache Recipe
Recommended Products for This Recipe
These are products I genuinely recommend based on quality and how much they improve the red velvet cake-making experience. Each one solves a common pain point in the process.
1. Wilton Performance Pans Aluminum 9-Inch Round Cake Pans
These commercial-grade aluminum pans distribute heat evenly, which means no overdone edges and a uniformly baked crumb throughout. The straight sides give your layers a clean, professional look that makes stacking and frosting much easier.
2. AmeriColor Soft Gel Paste Food Color in Super Red
Getting that signature deep red color without using cups of liquid food coloring is a challenge — gel paste is the solution. This concentrated formula means you need very little to achieve a vibrant crimson hue, and it won’t thin out your batter.
3. Ateco Offset Spatula Set
Spreading frosting evenly between layers and around the exterior of a layer cake is infinitely easier with an offset spatula. This set gives you multiple sizes so you can tackle both the coarse frosting work and finer finishing details.
4. KitchenAid Stand Mixer
Creaming butter and sugar to a fluffy, pale consistency — which is critical for this frosting — is something a stand mixer does perfectly with minimal effort. It also frees up your hands during the wet and dry ingredient combining steps.
5. OXO Good Grips Cake Turntable
Frosting a cake is dramatically easier when you can spin the cake toward you rather than awkwardly reaching around it. This non-slip turntable is sturdy, smooth, and makes it possible to get a perfectly smooth or beautifully textured finish.
The same vanilla buttercream frosting technique used in layer cakes works beautifully for decorating this red velvet cake too.
Step-by-Step Instructions
1. Preheat the Oven and Prepare Your Pans
- Set your oven to 350°F (175°C) and allow it to fully preheat before baking.
- Trace the bottom of your two 9-inch cake pans on parchment paper, then cut out the circles.
- Grease each pan generously with butter or non-stick spray, press the parchment circles into the bottom, then grease the parchment as well.
- Lightly dust the sides and bottom with flour, tapping out any excess. This double layer of preparation ensures the cakes release cleanly.
2. Combine the Dry Ingredients
- In a medium bowl, add the 2 ½ cups (300g) all-purpose flour, 2 tablespoons (12g) unsweetened cocoa powder, 1 teaspoon baking soda, and 1 teaspoon fine salt.
- Whisk everything together for a full 30 seconds until the cocoa is evenly distributed throughout the flour. This prevents any pockets of cocoa from appearing in your batter.
- Set the bowl aside.
3. Mix the Wet Ingredients
- In a large bowl (or the bowl of your stand mixer fitted with the paddle attachment), combine the 1 ¾ cups (350g) granulated sugar and 1 cup (240ml) vegetable oil.
- Mix on medium speed for about 1 minute until well combined and slightly lighter in appearance.
- Add the 2 room-temperature eggs, one at a time, beating well after each addition for about 30 seconds per egg.
- Add the 2 teaspoons of vanilla extract and mix briefly to combine.
4. Add the Buttermilk, Vinegar, and Food Coloring
- With the mixer on low, pour in the 1 cup (240ml) buttermilk gradually.
- Add the 1 tablespoon (15ml) white distilled vinegar and mix on low until incorporated.
- Squeeze in 1 to 2 teaspoons of red gel food coloring — start with 1 teaspoon and check the color once the batter is fully combined. Add more if you want a deeper red.
- Mix until the color is fully blended throughout and the batter looks uniformly red.
5. Add the Dry Ingredients to the Wet Ingredients
- With the mixer on low, add the dry ingredient mixture gradually in three additions, mixing gently between each one.
- Stop mixing as soon as the last streak of flour disappears — overmixing at this stage develops gluten and results in a tough, dense crumb.
- Use a rubber spatula to scrape down the sides and bottom of the bowl and give the batter one final gentle fold to ensure everything is evenly incorporated.
6. Divide and Bake the Cake Layers
- Pour the batter evenly between your two prepared 9-inch pans. You can use a kitchen scale to ensure the layers are identical in weight, or eyeball it as evenly as you can.
- Smooth the tops gently with a spatula.
- Place both pans in the center rack of your preheated oven.
- Bake for 28 to 32 minutes. The cake is done when a toothpick inserted into the center comes out with just a few moist crumbs attached — not wet batter.
- Avoid opening the oven during the first 25 minutes, as the sudden temperature drop can cause the layers to sink.
7. Cool the Cake Layers Completely
- Remove the pans from the oven and let the cakes cool in the pans on a wire rack for exactly 15 minutes.
- Run a thin knife or small offset spatula around the edge of each pan to loosen the cake.
- Carefully invert the pans onto the wire rack, lift away the pan, and peel off the parchment paper.
- Allow the layers to cool completely at room temperature — this takes about 1 to 2 hours. Frosting a warm cake will melt the cream cheese frosting and cause it to slide off.
8. Make the Cream Cheese Frosting
- In the bowl of your stand mixer (or a large bowl with a hand mixer), beat the 16 oz (450g) room-temperature block cream cheese on medium-high speed for about 2 minutes until completely smooth and fluffy.
- Add the ½ cup (113g) room-temperature unsalted butter and continue beating for another 1 to 2 minutes until the two are fully combined and creamy.
- Reduce the speed to low and add the sifted 4 cups (480g) powdered sugar in two or three additions, mixing slowly after each addition to prevent a powdered sugar cloud.
- Once the sugar is incorporated, add the 2 teaspoons vanilla extract and pinch of salt.
- Increase the speed to medium-high and beat for 2 to 3 minutes until the frosting is light, smooth, and spreadable. If it feels too soft, refrigerate for 15 to 20 minutes before using.
9. Level and Assemble the Cake
- If the tops of your cake layers have domed during baking, use a long serrated knife to gently slice off the dome so the surface is flat. This ensures the layers stack evenly without wobbling.
- Place the first cake layer on your cake board, plate, or turntable, cut side up.
- Spoon about 1 to 1 ½ cups of frosting onto the center of the layer and use an offset spatula to spread it evenly all the way to the edges in a flat, even layer.
- Gently place the second cake layer on top, pressing it lightly to adhere, cut side down.
10. Frost and Finish the Cake
- Apply a thin “crumb coat” — a very thin, rough layer of frosting over the entire outside of the cake to trap any loose crumbs.
- Refrigerate the crumb-coated cake for 20 to 30 minutes until the crumb coat is firm to the touch.
- Apply the remaining frosting to the top and sides of the cake, using the offset spatula to create your desired finish — smooth and sleek or rustic and swooping.
- If you saved any cake trimmings, crumble them finely and press the crumbs around the base of the cake or sprinkle them on top for a decorative and delicious finishing touch.
This recipe pairs beautifully as a companion to a Classic Yellow Cake Recipe — both are must-have classics in any baker’s repertoire.
Tips for Success
Getting a red velvet cake right the first time comes down to a few key techniques. Keep these in mind before you begin.
- Room temperature ingredients are non-negotiable — cold eggs and buttermilk won’t emulsify properly with the oil and sugar, leading to a lumpy batter and uneven texture
- Use gel food coloring, not liquid — gel is more concentrated and won’t thin the batter the way liquid coloring does
- Don’t skip the vinegar — it reacts with the baking soda to help the cake rise and brightens the red color
- Spoon and level your flour — scooping the cup directly from the bag packs it too tightly and can add up to 20% more flour than intended, making the cake dry and dense
- Stop mixing once the flour disappears — this is the most important tip for a soft, tender crumb; overmixing builds gluten and toughens the cake
- Cool completely before frosting — even slightly warm cake will melt cream cheese frosting; patience pays off here
- Crumb coat and chill — this professional technique takes 20 extra minutes but results in a cleaner, more polished finished cake
Read Also: Lemon Chiffon Cake Recipe
Serving Suggestions
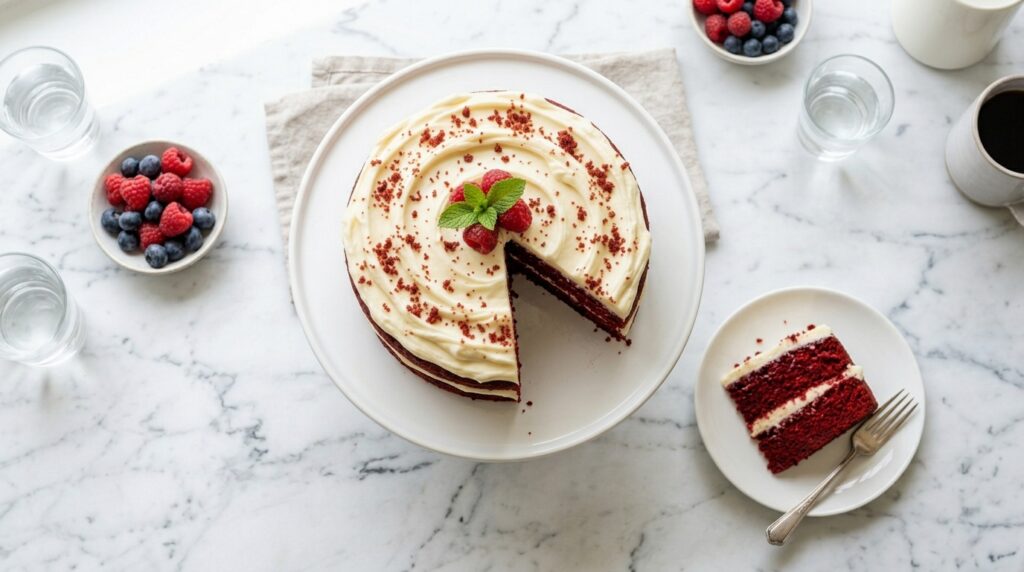
Red velvet cake is stunning on its own, but a few thoughtful accompaniments can take it to the next level for special occasions.
The bold red color and creamy frosting make this cake a natural centerpiece — here are some wonderful ways to serve and pair it:
- Serve with a scoop of Vanilla Bean Ice Cream alongside each slice for a classic and indulgent pairing
- Spoon a few tablespoons of Fresh Strawberry Sauce over each plate before adding the cake for an elegant restaurant-style presentation
- Brew a pot of strong coffee or a rich espresso — the slight bitterness of coffee cuts through the sweetness of the cream cheese frosting beautifully
- For a Valentine’s Day spread, plate individual slices on white dessert plates with a drizzle of Caramel Sauce and a few fresh raspberries
- Serve at room temperature, not cold — chilled cake can taste a bit dense; let slices sit at room temperature for 20 to 30 minutes before serving for the best texture and flavor
Variations to Try
Once you’ve nailed the classic version, there are several fun directions you can take this recipe. Each variation stays true to the red velvet spirit while offering something a little different.
- Red Velvet Cupcakes — divide the batter into lined muffin tins and bake at 350°F (175°C) for 18 to 22 minutes; frost with the same cream cheese frosting
- Red Velvet Sheet Cake — pour the batter into a greased 9×13-inch pan and bake for 30 to 35 minutes; frost directly in the pan for an easy crowd-feeding option
- Red Velvet Bundt Cake — grease and flour a Bundt pan generously, pour in the batter, and bake for 45 to 55 minutes; glaze with a simple cream cheese drizzle
- Red Velvet Cake with Chocolate Frosting — swap the cream cheese frosting for a Chocolate Buttercream Frosting for a more intensely chocolatey experience
- Mini Red Velvet Layer Cakes — use 6-inch pans and divide each layer in half horizontally to create adorable 4-layer mini cakes perfect for individual servings
- Beet-Colored Natural Version — replace the red food coloring with 1 to 2 teaspoons of beet powder mixed with 2 teaspoons of water for a naturally colored alternative
Storage and Reheating
Proper storage keeps this cake tasting fresh and delicious for days. Since the frosting contains cream cheese, storage guidelines are important.
- Room temperature (unfrosted layers): Wrap cooled, unfrosted cake layers tightly in plastic wrap and store at room temperature for up to 1 day, or refrigerate for up to 3 days
- Refrigerator (assembled frosted cake): Cover loosely with a cake dome or plastic wrap and refrigerate for up to 5 days; the cream cheese frosting must be kept cold
- Freezer (frosted or unfrosted): Wrap individual slices or whole unfrosted layers tightly in plastic wrap, then in foil, and freeze for up to 3 months; thaw overnight in the refrigerator
- Bringing to room temperature: For the best flavor and texture, remove refrigerated slices from the fridge 20 to 30 minutes before serving — cold cake tastes denser than room-temperature cake
- Reheating: Red velvet cake is best served at room temperature, not reheated; if you want a slightly warm slice, microwave for just 8 to 10 seconds maximum
Another cake that stores beautifully and tastes just as good the next day is this Sour Cream Coffee Cake.
Nutritional Facts
Per serving (1 slice, based on 12 servings)
| Nutrient | Amount |
|---|---|
| Calories | 620 kcal |
| Total Fat | 32g |
| Saturated Fat | 14g |
| Cholesterol | 80mg |
| Sodium | 370mg |
| Total Carbohydrates | 80g |
| Dietary Fiber | 1g |
| Total Sugars | 62g |
| Protein | 7g |
| Calcium | 90mg |
| Iron | 2mg |
Note: Nutritional values are estimates and will vary depending on specific brands and exact measurements used.
You might also enjoy: Angel Food Cake Recipe
Health Benefits of Key Ingredients
While red velvet cake is certainly a treat to be enjoyed in moderation, a few of its core ingredients do offer some nutritional value.
This cake isn’t health food, but knowing a little more about what goes into it makes each bite even more satisfying:
- Cocoa powder contains flavonoids — plant-based antioxidants that have been studied for potential benefits to heart health and circulation; even the small amount in red velvet adds some antioxidant value
- Eggs provide complete protein with all nine essential amino acids, along with fat-soluble vitamins A, D, E, and K that support everything from vision to immune function
- Buttermilk is lower in fat than regular whole milk and contains probiotics, calcium, and potassium; the lactic acid it provides also gives the cake its signature tender texture
- Cream cheese contributes calcium and some protein, and using full-fat block cream cheese (rather than a spread) actually results in a more stable frosting that sets better and tastes richer with less processed additives
- Vegetable oil keeps the crumb moist even after chilling — unlike butter-based cakes that firm up significantly in the fridge, an oil-based cake stays supple, meaning you’ll be less likely to over-eat leftover slices quickly because each one still tastes great over time
Read Also: Pound Cake Recipe
Frequently Asked Questions
1. Why is my red velvet cake not red?
The most common reason is using liquid food coloring instead of gel, or not using enough coloring. Gel food coloring is far more concentrated — start with 1 teaspoon of red gel and add more until you reach your desired shade. Also, cocoa powder quantity matters: too much will make the batter too brown to look red, so stick to the 2 tablespoons called for in this recipe.
2. Can I substitute the buttermilk?
Yes, you can make a quick buttermilk substitute by adding 1 tablespoon of white vinegar or lemon juice to 1 cup of regular whole milk, stirring briefly, and letting it sit for 5 minutes until slightly curdled. However, real buttermilk produces a more tender and flavorful crumb, so use it if you can find it.
3. Can I make this cake ahead of time?
Absolutely. You can bake the cake layers up to 2 days in advance, wrap them tightly in plastic wrap, and store them at room temperature or in the refrigerator. You can also make the cream cheese frosting up to 3 days ahead and store it in an airtight container in the fridge — just re-whip it briefly before using.
4. Why is my cream cheese frosting runny?
This almost always comes down to two things: the cream cheese was too cold or too warm when you started, or the butter and cream cheese weren’t at the same temperature. Both should be properly room temperature — soft enough to leave an indent when you press your finger in, but not greasy or shiny. If your frosting is runny, refrigerate the bowl for 20 to 30 minutes, then whip again.
5. Can I make red velvet cake without food coloring?
Yes — the cake will still taste exactly the same without the food coloring. Without it, the cocoa powder gives the batter a deep brown color. You can also use 1 to 2 teaspoons of beet powder mixed with 2 teaspoons of water as a natural alternative that provides a reddish-pink hue without artificial dyes.
Read Also: Checkerboard Cake Recipe
Final Thoughts
A classic red velvet cake recipe is one of those timeless bakes that never goes out of style. It’s got history, drama, and flavor all working together in every slice.
Once you try it from scratch — the soft crimson layers, the tangy cream cheese frosting, the way it just pulls apart on the fork — you’ll understand why bakers have been making it for decades.
This recipe is designed to be approachable, even if you’re not an experienced baker. Follow the steps, trust the process, and you’ll pull a truly beautiful cake out of the oven.
If you make this recipe, leave a comment below and let me know how it turned out. Share your photos — nothing makes a baker’s day quite like seeing someone else’s perfect red velvet cake.
Recommended:
- Chocolate Cake Recipe
- Moist Chocolate Cake Recipe
- Easy Chocolate Cake Recipe
- Tres Leches Cake Recipe
- Pastry Cream Recipe
- Lemon Curd Recipe
- Pumpkin Roll Recipe
- Classic Vanilla Cake Recipe
- Hot Fudge Cake Recipe
- Cannoli Poke Cake Recipe
