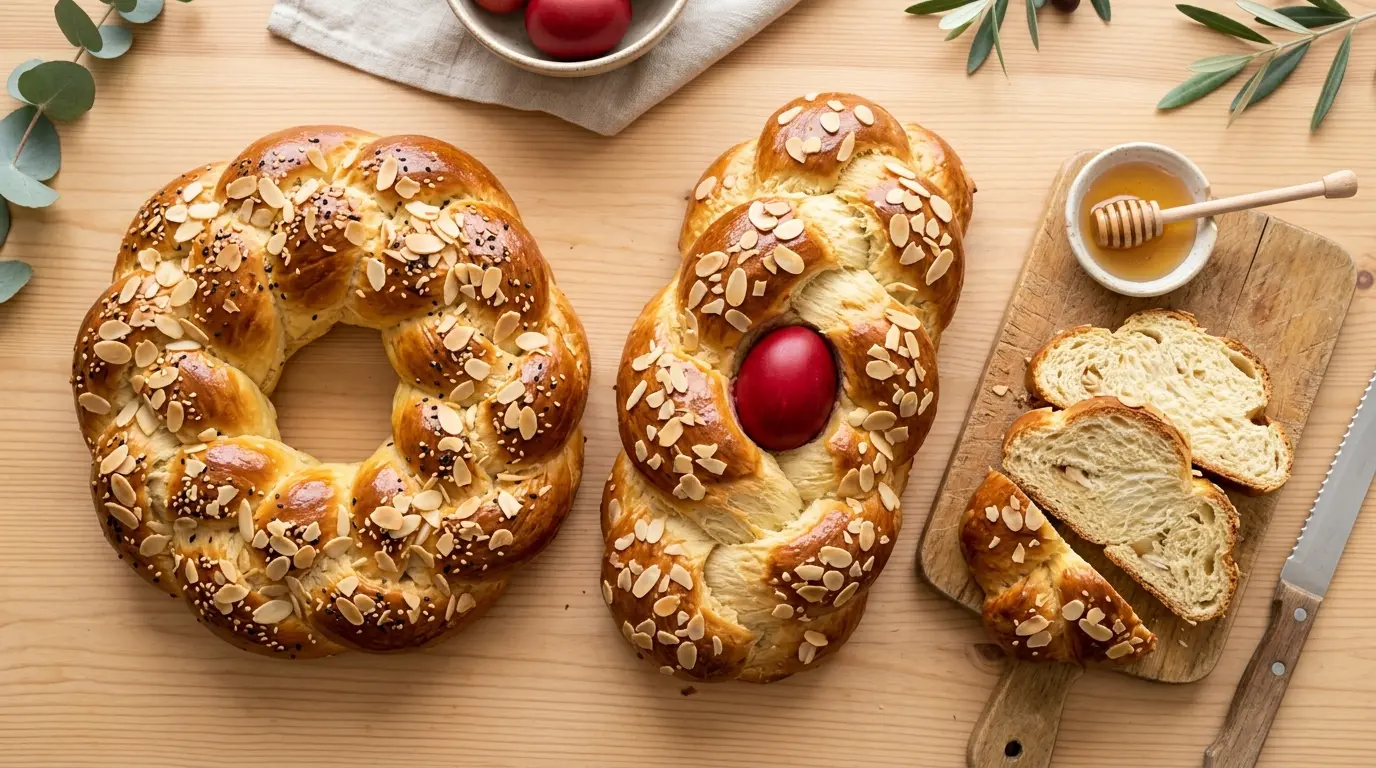
If you have ever tasted a slice of Greek Easter Bread, you already know how unforgettable it is. This Greek Easter Bread recipe, known in Greece as tsoureki, is a soft, pillowy sweet bread with a golden, glossy crust and a pull-apart interior that practically melts in your mouth.
What makes it truly unique is the combination of two exotic spices: mahleb (also spelled mahlepi), made from ground cherry seeds, and mastic, a resinous gum from the Greek island of Chios. These two ingredients give tsoureki its signature fragrance and a flavor that is deeply warming, faintly floral, and unlike anything you have tasted in an ordinary loaf.
Tsoureki is braided, traditionally into three strands that symbolize the Holy Trinity in Greek Orthodoxy. A red-dyed hard-boiled egg is often nestled into the braid before baking, representing the blood of Christ and the promise of resurrection. It is made on Holy Thursday and enjoyed on Easter Sunday to break the 40-day Lenten fast.
This recipe walks you through every step in detail, from blooming the yeast to achieving that gorgeous, stringy interior texture that every great tsoureki should have.
You might also enjoy: Easter Bread Recipe

Why You’ll Love This Greek Easter Bread Recipe
Making tsoureki at home is a deeply rewarding experience, and the results are extraordinary.
The aroma alone is reason enough. As it bakes, your kitchen will fill with the warm, complex scent of orange zest, vanilla, mahleb, and mastic, and it is absolutely incredible.
The texture is in a class of its own. A well-made tsoureki has a soft, cloud-like crumb with long, stringy pull-apart fibers, much like a good brioche but with even more character.
It is a showstopper at any Easter table. Braided into a beautiful loaf and glazed with egg wash for a deep mahogany color, this bread looks like it came straight from a Greek bakery.
It keeps surprisingly well. Wrap it tightly and it stays soft and fresh for 4 to 5 days at room temperature, even longer if you add a light syrup glaze after baking.
It can be enjoyed in so many ways. Eat it plain, toasted with butter and honey, or use it to make next-level French toast. The flavors only deepen as the bread ages.
- Beautifully braided, golden-brown appearance that is perfect for gifting or table centerpieces
- The signature mahleb and mastic spices give it a flavor that is completely distinct from other sweet breads
- Deeply cultural and meaningful, rooted in Greek Orthodox Easter tradition
- Soft and pillowy with a genuinely stringy, pull-apart crumb
- Makes two loaves, so you can share one and keep one for yourself
- Freezes well for up to 2 months without losing quality
This loaf is very similar in spirit to Challah, which uses a comparable braiding technique and enriched dough, if you want a comparison from Jewish baking tradition.
Ingredients
Before you begin, know that the two specialty spices, mahleb and mastic, are non-negotiable for authentic flavor. They can be found at Greek or Middle Eastern specialty grocers, or easily ordered online. Everything else is pantry-friendly.
- 5 cups (625g) bread flour, plus extra for dusting (bread flour is important as it has more protein, which creates the ideal stringy crumb)
- 2 1/4 teaspoons (7g) active dry yeast
- 1/2 cup (120ml) warm water (100 to 110°F / 38 to 43°C) for proofing the yeast
- 1 cup (240ml) whole milk, warm
- 1/2 cup (100g) granulated sugar, divided
- 1/2 cup (115g) unsalted butter, softened to room temperature, cut into small pieces
- 3 large eggs, at room temperature (2 for the dough, 1 for egg wash)
- 1 tablespoon (8g) mahleb (mahlepi), finely ground
- 1/2 teaspoon mastic gum (mastiha), finely ground (do not exceed this amount, as too much makes the bread bitter)
- Zest of 1 large orange
- 1 teaspoon pure vanilla extract
- 1/4 teaspoon salt
- 1 tablespoon milk (for egg wash)
- Optional: red-dyed hard-boiled eggs, slivered almonds for topping, or sesame seeds
Read Also: Panettone Recipe
Kitchen Equipment Needed
The dough requires extended kneading to develop gluten and achieve that signature stringy texture, so a stand mixer with a dough hook is strongly recommended. If kneading by hand, add an extra 5 to 8 minutes of vigorous kneading.
- Stand mixer with dough hook (highly recommended for proper gluten development)
- Digital kitchen scale (for precise measurements, especially important in bread baking)
- Instant-read thermometer (to check water temperature for yeast and internal bread temperature)
- Large mixing bowls
- Mortar and pestle or spice grinder (for grinding whole mahleb seeds and mastic if using whole pieces)
- Baking sheet lined with parchment paper
- Plastic wrap or a clean kitchen towel (for covering rising dough)
- Pastry brush (for applying egg wash)
- Wire cooling rack
The same enriched dough technique used here applies beautifully to Brioche if you want to explore other pillowy sweet breads in a similar style.
Recommended Products for This Recipe
These are hand-picked products that genuinely make a difference when baking tsoureki, based on quality and performance.
1. Ground Mahleb (Mahlepi) Spice
Mahleb is the single most essential flavoring in tsoureki and cannot be substituted. Sourcing a high-quality ground mahleb from a reputable spice vendor makes a noticeable difference in the final aroma. Look for a bright, fresh-smelling product with a slightly sweet, cherry-like fragrance.
2. Mastic Gum (Mastiha Chios)
Authentic mastic resin from the island of Chios gives tsoureki its distinct, slightly piney, resinous note that no other ingredient can replicate. Small pieces or crystals need to be ground with a pinch of sugar to prevent sticking. Freeze the mastic crystals briefly before grinding for best results.
3. KitchenAid Stand Mixer
An extended kneading time of 15 to 20 minutes is required for tsoureki’s gluten to develop properly. A reliable stand mixer with a dough hook takes the effort out of this stage and ensures consistent results every time. It is the single biggest investment you can make in this recipe.
4. Parchment-Lined Heavy Aluminum Baking Sheet
Dark or glass pans can cause uneven browning and burned bottoms on tsoureki. A heavy aluminum baking sheet with a parchment lining gives you even, controlled heat and the cleanest release.
5. Digital Kitchen Scale
Bread baking is a science, and measuring by weight rather than volume makes a meaningful difference in consistency. A digital scale ensures you use exactly the right amount of flour every time, which is critical for that soft, stringy texture.
For another festive European sweet bread worth your attention, the Authentic German Stollen is a wonderful holiday bake using many of the same enriched dough principles.

Step-by-Step Instructions
1. Grind the Spices
- If you are using whole mastic crystals and whole mahleb seeds (rather than pre-ground), prepare them first.
- Place the mastic crystals in a small bowl or bag and freeze for about 10 to 15 minutes. Mastic softens and becomes sticky at room temperature, which makes it difficult to grind.
- Remove from the freezer and add the cold mastic pieces to a spice grinder or mortar and pestle with a pinch of sugar (the sugar prevents clumping).
- Grind until you have a very fine powder with no visible chunks. Measure out 1/2 teaspoon and set aside.
- Grind the mahleb seeds separately until very fine. Measure out 1 tablespoon and set aside.
- Pre-ground mahleb and mastic may be used directly without this step.
2. Bloom the Yeast
- In a small bowl, combine the 1/2 cup (120ml) of warm water (between 100 and 110°F / 38 to 43°C) with 1 teaspoon of the sugar and the active dry yeast.
- Stir gently with a fork or spoon to dissolve.
- Cover loosely with plastic wrap and set aside for 8 to 10 minutes.
- After 10 minutes, the mixture should look foamy and bubbly, which means the yeast is alive and active. If you see no activity at all, your yeast may be expired. Start over with fresh yeast before continuing.
3. Warm the Butter-Milk Mixture
- In a small saucepan over low heat, combine the 1 cup (240ml) of whole milk, the softened butter pieces, orange zest, vanilla extract, and the ground mahleb and mastic.
- Heat gently, stirring frequently, until the butter has fully melted and the mixture is warm to the touch (around 100°F / 38°C). Do not bring it to a boil.
- Remove from heat and allow to cool slightly if it got too warm. It should feel warm, not hot, when you test it with your finger.
4. Mix the Dough
- In the bowl of your stand mixer, add the remaining sugar, the salt, 2 of the eggs (room temperature), and the cooled butter-milk mixture. Stir briefly with a spoon to loosely combine.
- Add the yeast mixture and stir to incorporate.
- Add all 5 cups (625g) of the bread flour to the bowl.
- Using the paddle attachment on low speed, mix until the flour is mostly incorporated and a shaggy dough begins to form, about 1 to 2 minutes.
- Switch to the dough hook attachment.
5. Knead the Dough
- Knead the dough on medium to medium-high speed for 15 to 20 minutes. This is not optional. The extended kneading is what develops the gluten strands responsible for tsoureki’s famous stringy, pull-apart interior.
- After 15 minutes, the dough should be smooth, elastic, and slightly tacky but should not stick aggressively to your hands or the bowl walls.
- The dough will be softer and stickier than regular bread dough. Resist the urge to add extra flour. A softer dough makes a more tender, fluffy loaf.
- If kneading by hand, flour your work surface lightly and knead with the heels of your hands for 20 to 25 minutes.
6. First Rise
- Transfer the kneaded dough to a large clean bowl that has been lightly greased with a neutral oil or a small amount of butter.
- Turn the dough over so the top is lightly coated.
- Cover the bowl tightly with plastic wrap or a clean kitchen towel.
- Place the bowl in a warm, draft-free location. A great trick: preheat your oven to 95°F (35°C), turn it off, then place the bowl inside. This provides the ideal rise environment.
- Allow the dough to rise until it has doubled in size, which will take approximately 2 to 4 hours depending on the warmth of your environment. Do not rush this step.
7. Divide and Rest
- Once the dough has doubled, gently press down on it to deflate the gases without tearing.
- Turn the dough out onto a clean, un-floured work surface. (Do not flour the surface during this step, as the slight resistance helps with rolling and braiding.)
- Using a bench scraper or knife, divide the dough into 6 equal pieces if making 2 loaves (3 strands per loaf), or 3 equal pieces for 1 large loaf.
- Cover the pieces loosely with plastic wrap and let them rest for 10 minutes. This relaxes the gluten and makes rolling much easier.
8. Shape and Braid
- Take one piece of dough and use your palms to gently roll it on the work surface into an even rope, approximately 14 to 16 inches (35 to 40 cm) long.
- Repeat with the other two pieces for that loaf, rolling each to the same length.
- Lay the three ropes side by side on a parchment-lined baking sheet and pinch the tops together firmly.
- Braid the three strands as you would braid hair: take the left strand over the middle, then the right strand over the middle, alternating until you reach the end.
- Pinch the bottom ends together firmly and tuck both ends slightly underneath the loaf to give it a neat, finished look.
- If you are adding a red-dyed hard-boiled egg, press it gently into the top of the braid now, nestling it between the strands so it is secure.
- Repeat the shaping and braiding process with the second set of three dough pieces for your second loaf.
9. Second Rise
- Cover both loaves loosely with plastic wrap or a clean damp kitchen towel.
- Allow them to rise in a warm place for 45 minutes to 1 hour, or until the loaves look puffed and noticeably larger.
- To test if the dough is ready, gently press your fingertip into the side of the loaf. If the indentation springs back slowly and partially, the dough is perfectly proofed. If it springs back immediately, it needs more time. If the indentation holds without springing back at all, the dough may be over-proofed.
10. Apply Egg Wash and Bake
- Preheat your oven to 350°F (175°C) while the loaves are on their second rise.
- In a small bowl, whisk together the remaining egg with 1 tablespoon of milk to create the egg wash.
- Using a pastry brush, gently brush the egg wash all over the surface of each loaf. Be thorough but gentle so you do not deflate the risen dough.
- Optionally, sprinkle the tops with slivered almonds or sesame seeds.
- Place the baking sheet in the center rack of the preheated oven.
- Bake for 30 to 35 minutes, until the loaves are a deep golden-brown mahogany color and sound hollow when you tap the bottom.
- If the tops are browning too quickly (after about 15 minutes), loosely tent the loaves with aluminum foil to prevent over-browning while the insides finish baking.
- The internal temperature should read around 190 to 195°F (88 to 90°C) when fully baked.
11. Cool Completely
- Remove the loaves from the oven and transfer them to a wire cooling rack.
- Allow the tsoureki to cool for at least 45 minutes to 1 hour before slicing.
- Cutting into a hot loaf causes the interior to compress and become gummy. Patience here is worth it.
Read Also: Vasilopita Bread Recipe
Tips for Success
These practical tips are the difference between a good tsoureki and a truly great one. Read through all of them before you start.
- Use room-temperature ingredients. Cold butter, eggs, or milk slow down yeast activity and affect how the dough comes together. Pull everything out of the fridge at least 1 hour before baking.
- Do not skip the kneading time. 15 to 20 minutes is genuinely needed. Under-kneaded dough will produce a dense bread without the characteristic stringy texture.
- Do not over-measure the mastic. Even a small amount extra can turn the bread noticeably bitter. Measure carefully, using the 1/2 teaspoon guideline.
- Check your yeast. If you do not see foam after 10 minutes during the bloom stage, start over with a fresh packet. Baking with dead yeast produces a flat, brick-like loaf.
- Resist adding extra flour. The dough is meant to be soft and slightly tacky. Adding too much flour results in a dry, tough loaf instead of that soft, cloud-like crumb.
- Give the rises their full time. Rushing the first rise especially leads to poor texture and less flavor development.
- Freeze mastic before grinding. Room-temperature mastic becomes gummy and sticks to everything. A quick freeze makes it brittle and easy to grind into powder.
- Bake on the center rack. This ensures even heat distribution and prevents the bottoms from over-browning.
This technique of enriching a dough with eggs, butter, and milk is also used in Cinnamon Babka, which is another stunning braided sweet bread worth baking alongside tsoureki.
Serving Suggestions
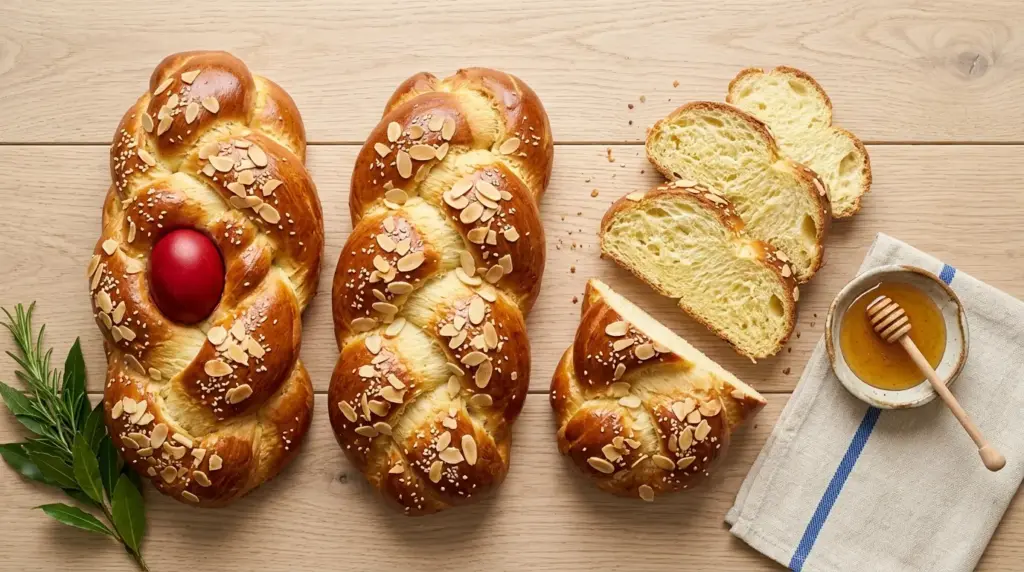
Tsoureki is incredibly versatile and works beautifully at any point in the day. It shines just as well at a festive Easter breakfast as it does as a late-afternoon treat with coffee.
Pair it with a pot of strong coffee or traditional Greek coffee, which is a combination deeply embedded in Greek culture. The slightly sweet, aromatic bread and a bitter cup of coffee are a match made in heaven.
Spread a thick slice with good-quality honey or a dollop of jam, whether it is apricot, fig, or blackberry, for a simple and stunning breakfast.
- Toast a thick slice and serve alongside Deviled Eggs and fresh fruit for a complete Easter morning spread
- Serve a warm slice with Tzatziki Sauce and olives on the side for a savory contrast that works surprisingly well
- Use leftover slices to make extraordinary French toast, as the sweet, spiced dough makes the best Brioche French Toast you have ever had
- Pair with a bowl of classic Greek Avgolemono Soup for a traditional Easter Sunday feast
- Slice and serve with whipped butter, a drizzle of honey, and flaky sea salt for a quick, elegant treat that requires almost no effort
Variations to Try
Once you have mastered the classic version, these variations are a wonderful way to put your own stamp on this beloved bread.
- Chocolate Tsoureki: After the first rise, flatten each dough rope slightly with a rolling pin, spread a thin layer of chocolate hazelnut spread down the center, then fold and roll closed before braiding. Take inspiration from Chocolate Babka for how to incorporate a filling into a braided loaf.
- Overnight Proofing: After shaping and braiding, place the loaves in the refrigerator overnight for a slow cold proof. Remove them 1 to 2 hours before baking to allow them to come to room temperature. This intensifies the flavor.
- Mini Individual Loaves: Divide the dough into smaller portions and braid individual mini loaves. These are perfect for gifting to family members, which is a traditional Greek Easter custom.
- Muffin Tin Rolls: Skip the braiding and simply roll portions of dough into balls. Place 3 balls together in each cup of a muffin tin for charming tsoureki buns.
- Orange Syrup Glaze: After baking, brush the still-warm loaves with a simple syrup made from equal parts sugar and water with the juice of half an orange. This keeps the bread exceptionally moist for up to 2 weeks.
- Without Mastic: If you genuinely cannot source mastic, the bread is still wonderful made with just mahleb and orange zest. The mastic adds an extra layer of complexity, but the mahleb is the real star.
For a similarly spiced, enriched sweet bread from a different culture, Pan Dulce is a great exploration of how different traditions approach sweet bread.
Storage and Reheating
Tsoureki stores remarkably well, especially compared to most homemade bread, because the high fat content from butter and eggs helps it retain moisture.
For the best results, allow the bread to cool completely before wrapping, as sealing warm bread creates condensation that can make it soggy.
- Room temperature: Wrap tightly in plastic wrap and store in an airtight bag. It will stay soft and fresh for 4 to 5 days.
- Freezing: Wrap the fully cooled loaf (or individual slices) tightly in plastic wrap, then place in a freezer bag. Freeze for up to 2 months.
- Thawing: Place the frozen loaf or slices at room temperature, still wrapped, to thaw gradually. Do not microwave a frozen whole loaf as it dries out the bread.
- Reheating slices: Warm individual slices in a toaster or a 300°F (150°C) oven for 5 to 8 minutes for that just-baked softness.
- Optional syrup glaze for extended freshness: Brush the warm baked loaves with a light simple syrup immediately after baking. This keeps tsoureki incredibly moist for up to 1 to 2 weeks.
You might also enjoy turning any slightly stale tsoureki into a Bread Pudding, which uses enriched breads to create an ultra-decadent dessert.
Nutritional Facts
The values below are approximate and based on 1 slice from a loaf cut into 12 slices. These figures will vary depending on exact ingredient brands and slice thickness.
| Nutrient | Per Slice (Approx.) |
|---|---|
| Calories | 265 kcal |
| Total Fat | 10g |
| Saturated Fat | 5.5g |
| Cholesterol | 70mg |
| Sodium | 75mg |
| Total Carbohydrates | 38g |
| Dietary Fiber | 1g |
| Total Sugars | 9g |
| Protein | 6g |
| Calcium | 55mg |
| Iron | 2mg |
Tsoureki is a celebratory bread, rich and lightly sweet, and best enjoyed as a special occasion treat. The eggs and whole milk contribute a good amount of protein and calcium per serving.
Read Also: Honey Butter Recipe
Health Benefits of Key Ingredients
Tsoureki is a festive bread, not a health food, but several of its core ingredients do carry genuine nutritional and wellness benefits worth knowing about.
Mahleb, derived from the seeds of the St. Lucie cherry, contains antioxidants and has been studied for anti-inflammatory properties in traditional Mediterranean medicine. It has a long history of use not just as a flavoring but as a natural health-supporting ingredient.
Mastic gum from Chios has been the subject of ongoing scientific interest. It has well-documented antibacterial properties and has been used in Greek folk medicine for centuries to support digestive health.
- Whole eggs are a complete protein source, providing all essential amino acids, and are rich in B vitamins, particularly B12 and choline, which support brain health
- Whole milk and butter contribute fat-soluble vitamins A, D, E, and K
- Orange zest is a concentrated source of vitamin C and flavonoids, which support immune function
- Mastic gum has shown antimicrobial and anti-inflammatory properties in clinical research
- Mahleb provides antioxidants and trace minerals and has historically been used in Mediterranean folk medicine as a digestive aid
- Bread flour provides a meaningful amount of iron and B vitamins, including thiamine and niacin
For another recipe celebrating Mediterranean food culture, this Greek Lentil Soup is a nutritionally dense complement to any Easter table.
Frequently Asked Questions
1. Can I make tsoureki without a stand mixer?
You absolutely can make it by hand, but it requires serious commitment. The dough needs 20 to 25 minutes of vigorous kneading by hand to develop enough gluten for the proper stringy texture. Use the heel of your hand to push and fold, rotating the dough as you go. Be patient, because under-kneaded dough will not produce the right result.
2. Where can I buy mahleb and mastic?
Both spices are available at Greek or Middle Eastern grocery stores. If you do not have one nearby, both can be ordered online through Amazon or specialty spice retailers. Search for “mahleb” or “mahlepi” and “mastic gum” or “mastiha.” Buy whole seeds or crystals if possible, then grind fresh for the most vibrant flavor.
3. What if my dough does not rise?
The most common culprit is inactive yeast. Always bloom your yeast in warm (not hot) water first, and look for visible foam before proceeding. Water above 120°F (49°C) will kill yeast. If your kitchen is very cold, place the covered dough inside a slightly warmed oven for the best rise environment.
4. Can I freeze the dough instead of the baked loaf?
Yes, you can freeze the shaped, braided loaves after the second rise. Wrap them tightly in plastic wrap and place in a freezer bag. To use, thaw overnight in the refrigerator, then let them come to room temperature for 1 to 2 hours before applying egg wash and baking as directed. This is a practical make-ahead strategy for busy Easter weeks.
5. Is tsoureki the same as challah?
They are similar in that both are enriched, braided, egg-enriched sweet breads, but they are distinct. Challah is traditionally made without dairy (butter or milk) as Jewish dietary laws prohibit mixing meat and dairy, while tsoureki includes both milk and butter. More importantly, the flavoring is completely different. Challah is often flavored with honey and poppy or sesame seeds, while tsoureki’s identity comes entirely from mahleb, mastic, and orange zest.
Read Also: Cinnamon Swirl Bread Recipe
Greek Easter Bread (Tsoureki)

Equipment
- Stand mixer with dough hook - highly recommended for proper gluten development
- Digital kitchen scale - for precise measurements
- Instant-read thermometer - to check water temperature and internal bread temperature
- Large mixing bowls
- Mortar and pestle or spice grinder - for grinding whole mahleb seeds and mastic
- Baking sheet lined with parchment paper
- Plastic wrap or a clean kitchen towel - for covering rising dough
- Pastry brush - for applying egg wash
- Wire cooling rack
- Heavy aluminum baking sheet - recommended for even heat distribution
Ingredients
- 5 cups bread flour - 625g, plus extra for dusting
- 2.25 teaspoons active dry yeast - 7g
- 0.5 cup warm water - 120ml, 100-110°F / 38-43°C
- 1 cup whole milk - 240ml, warm
- 0.5 cup granulated sugar - 100g, divided
- 0.5 cup unsalted butter - 115g, softened
- 3 large eggs - room temperature, 2 for dough, 1 for egg wash
- 1 tablespoon mahleb - 8g, finely ground
- 0.5 teaspoon mastic gum - finely ground, do not exceed this amount
- orange zest - from 1 large orange
- 1 teaspoon pure vanilla extract
- 0.25 teaspoon salt
- 1 tablespoon milk - for egg wash
Optional Toppings
- red-dyed hard-boiled eggs - for traditional garnish
- slivered almonds - for sprinkling on top
- sesame seeds - for sprinkling on top
Instructions
- Grind the spices: Freeze mastic crystals for 10-15 minutes, then grind with a pinch of sugar into a fine powder. Grind mahleb seeds separately until very fine. Measure 1/2 teaspoon mastic and 1 tablespoon mahleb.
- Bloom the yeast: Combine warm water with 1 teaspoon of sugar and active dry yeast. Let stand for 8-10 minutes until foamy and bubbly.
- Warm butter-milk mixture: In a saucepan over low heat, combine milk, butter, orange zest, vanilla, mahleb, and mastic. Heat until butter melts and mixture is warm (100°F/38°C). Do not boil.
- Mix the dough: In stand mixer bowl, combine remaining sugar, salt, 2 eggs, cooled butter-milk mixture, and yeast mixture. Add flour and mix with paddle until shaggy dough forms. Switch to dough hook.
- Knead the dough: Knead on medium-high for 15-20 minutes until smooth, elastic, and slightly tacky. Do not add extra flour. The dough should be soft and pull away from bowl walls.
- First rise: Transfer dough to a greased bowl, cover, and let rise in a warm place until doubled in size, about 2-4 hours.
- Divide and rest: Gently deflate dough and divide into 6 equal pieces for 2 loaves or 3 for 1 large loaf. Cover and let rest for 10 minutes.
- Shape and braid: Roll each piece into a 14-16 inch rope. Braid 3 strands together, pinching ends firmly. Tuck ends underneath. Repeat for second loaf. Press red-dyed egg into top if desired.
- Second rise: Cover loaves and let rise for 45 minutes to 1 hour until puffed. Gently press side; it should spring back slowly.
- Apply egg wash and bake: Preheat oven to 350°F (175°C). Brush loaves with egg wash (1 egg whisked with 1 tablespoon milk). Sprinkle with almonds or sesame seeds if desired. Bake 30-35 minutes until deep golden brown. Tent with foil if browning too quickly. Internal temperature should reach 190-195°F (88-90°C).
- Cool completely: Transfer to wire rack and cool for at least 45 minutes to 1 hour before slicing to prevent gummy texture.
Notes
- Room temperature ingredients: Pull butter, eggs, and milk out of the fridge at least 1 hour before baking. Cold ingredients slow down yeast activity.
- Don’t skip kneading: The 15-20 minutes of kneading is essential for developing the gluten strands that create tsoureki’s signature stringy, pull-apart texture.
- Measure mastic carefully: Even a small amount extra can make the bread noticeably bitter. Use the 1/2 teaspoon guideline exactly.
- Check your yeast: If you don’t see foam after 10 minutes during the bloom stage, start over with a fresh packet. Dead yeast produces a flat, brick-like loaf.
- Resist adding extra flour: The dough is meant to be soft and slightly tacky. Adding too much flour results in a dry, tough loaf.
- Freeze mastic before grinding: Room-temperature mastic becomes gummy and sticks to everything. A quick freeze makes it brittle and easy to grind into powder.
- Storage: Wrap tightly in plastic wrap and store at room temperature for 4-5 days. For longer storage, freeze for up to 2 months.
- Make ahead: Shape and braid the loaves, then refrigerate overnight for a slow cold proof. Remove 1-2 hours before baking to come to room temperature.
- Orange syrup glaze: For extra moisture, brush warm baked loaves with a simple syrup made from equal parts sugar and water with juice of half an orange.
- Variations: Try chocolate tsoureki by rolling chocolate hazelnut spread into each rope before braiding, or make mini individual loaves for gifting.
Final Thoughts
Baking Greek Easter Bread at home is one of the most meaningful things you can do in the kitchen. The process is involved, yes, but every step, from grinding the mastic to watching the braided loaves puff in the oven, feels connected to something larger than just a recipe.
Tsoureki is the kind of bread that becomes a family tradition. The smell of it baking is something people remember for decades.
Whether this is your first time making it or you are reviving a childhood memory, this Greek Easter Bread recipe is designed to give you a truly authentic result. The mahleb and mastic do the heavy lifting when it comes to flavor, and the detailed steps ensure that beautiful stringy texture.
Give it a try this Easter season and see how quickly it disappears from the table. Leave a comment below to let me know how it turned out, and share the recipe with anyone who loves beautiful homemade bread.
Recommended:
- Chocolate Babka Recipe
- Hokkaido Milk Bread Recipe
- Japanese Milk Bread Recipe
- Cinnamon Raisin Bread Recipe
- Cranberry Orange Bread Recipe
- Sweet Dinner Rolls Recipe
- Monkey Bread Recipe
- Soft Dinner Rolls Recipe
- Baklava Recipe
- Croissant Recipe



