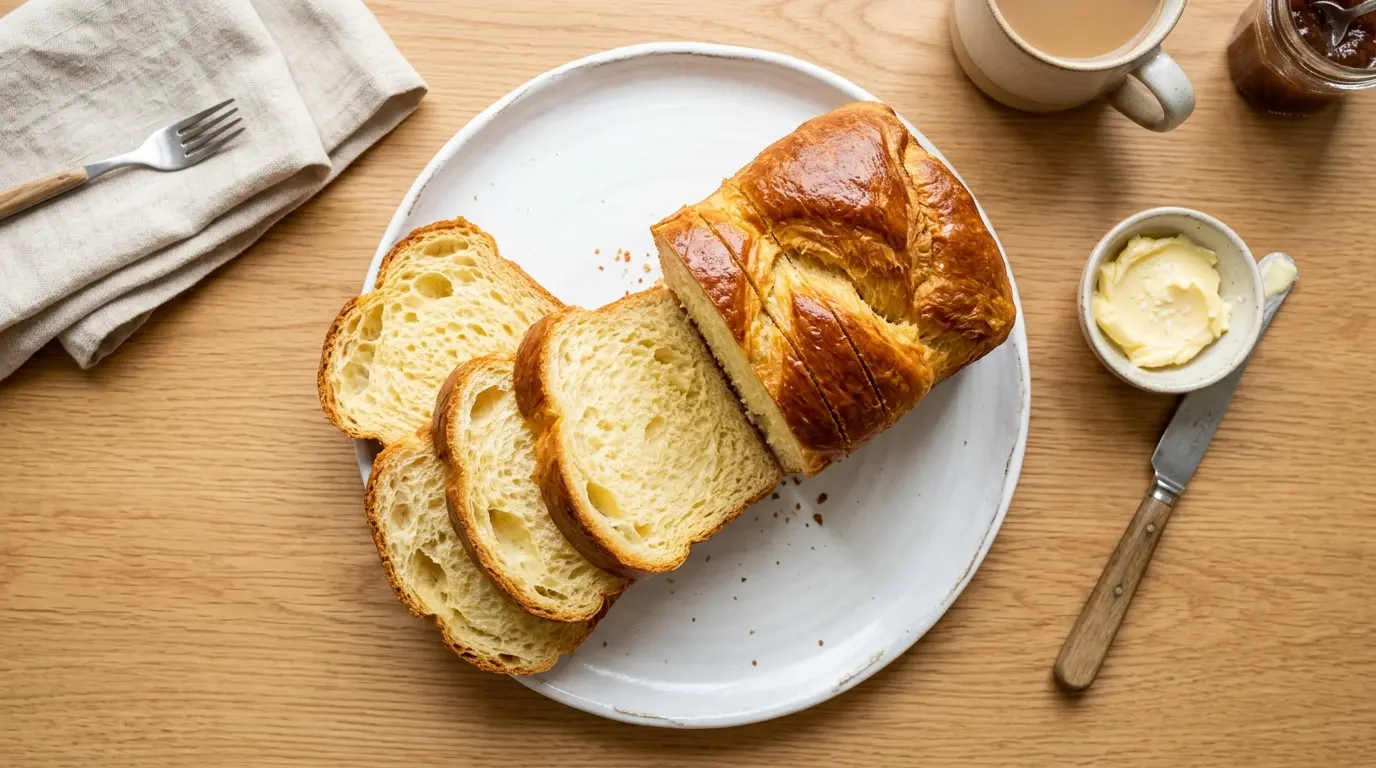
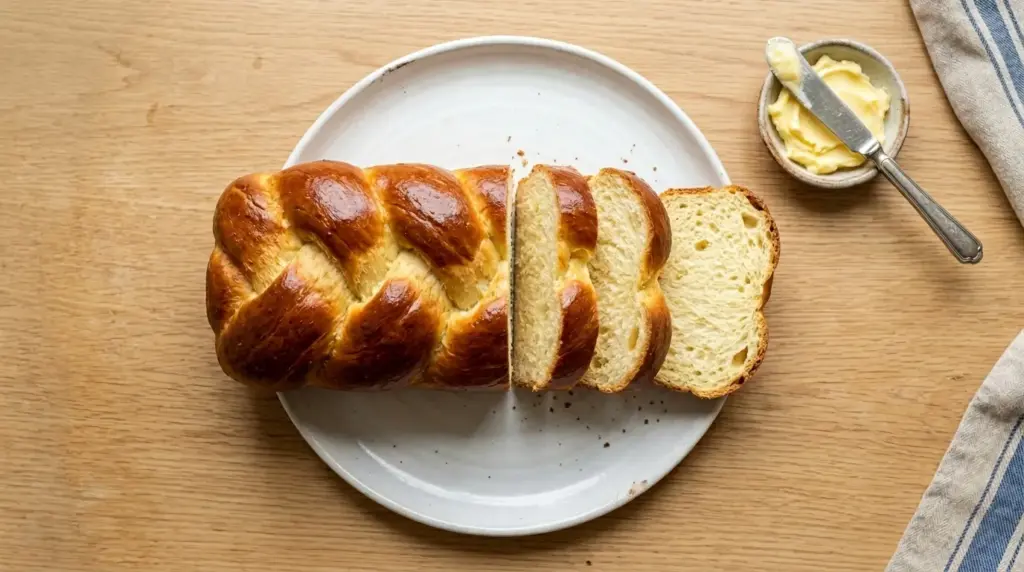
If you have been wanting to try a brioche recipe at home, this is the one to bookmark. This bread is rich, golden, and impossibly soft thanks to a generous amount of butter and eggs worked into the dough.
It takes a little patience, but the process is simple enough for a first time baker to follow. Once you pull that deep golden loaf out of the oven, you will understand why brioche has such a devoted following.
This recipe leans on classic French technique, the kind of dough that is enriched slowly so the butter fully incorporates instead of greasing up the dough. The result is a tender, almost cake like crumb with a glossy, burnished crust. You can shape it into a loaf, rolls, or even a braided top knot loaf, and it works beautifully for breakfast, French toast, or simply slathered with jam.
If you love bread baking, you might also enjoy this Challah Recipe, another enriched dough with a similarly soft and slightly sweet crumb.

Why You’ll Love This Brioche Recipe
Brioche has a reputation for being intimidating, but once you understand the rhythm of the dough, it becomes a recipe you will want to make again and again.
This version is written with clear timing and temperature cues, so you always know what to look for at each stage.
- Soft, pillowy texture with a rich, buttery flavor in every bite
- Glossy, deep golden crust from a simple egg wash
- Works as a loaf, rolls, or a braided top knot shape
- Great base for French toast, bread pudding, or simply toasted with butter
- Make ahead friendly, since the dough rests overnight in the fridge
- Freezes well, so you can bake a loaf now and save one for later
For another rich, slightly sweet breakfast bread, try this Croissant Recipe, which uses a different technique but shares that same indulgent, buttery quality.
Ingredients
This brioche dough comes together with pantry staples, but the quality of a few key ingredients really shows in the final loaf. Using good butter and fresh eggs makes a noticeable difference in both flavor and color.
- 4 cups (500g) all purpose flour, plus extra for dusting
- 1/4 cup (50g) granulated sugar
- 2 1/4 teaspoons (7g) active dry yeast
- 1 teaspoon (6g) fine sea salt
- 4 large eggs, at room temperature
- 1/2 cup (120ml) whole milk, lukewarm
- 1 cup (225g) unsalted European style butter, softened and cut into small cubes
- 1 egg plus 1 tablespoon water, for the egg wash
For the dough to come together smoothly, it helps to use European Style Butter, which has a higher fat content and incorporates into the dough more evenly than standard butter. A good Bread Flour can also be swapped in for part of the all purpose flour if you want an even chewier crumb.
If you are looking for another enriched dough recipe to round out your baking lineup, check out this Dinner Rolls Recipe, which uses a similar method for soft, fluffy rolls.
Kitchen Equipment Needed
Brioche dough is sticky and butter heavy, so having the right tools on hand makes the whole process much easier and less messy.
- Stand mixer with a dough hook attachment
- Large mixing bowl
- Kitchen scale for accurate measurements
- 9×5 inch loaf pan
- Plastic wrap or a reusable cover for proofing
- Pastry brush for the egg wash
- Instant read thermometer
A Stand Mixer is honestly the most important tool here, since brioche dough is too sticky and butter laden to knead comfortably by hand. A sturdy Loaf Pan also helps the bread hold its shape and bake evenly with a beautiful domed top.
For more sourdough inspired baking projects, this Sourdough Discard Bread Recipe is a great way to use up extra starter while you wait for your brioche dough to chill.
Recommended Products for This Recipe
These are a few products that I have found genuinely useful for making brioche turn out well, based on quality, durability, and how much easier they make the process.
1. KitchenAid Stand Mixer
A stand mixer takes the guesswork out of kneading this butter heavy dough, which is nearly impossible to work by hand without it turning into a greasy mess. The dough hook attachment develops the gluten properly while keeping the butter evenly distributed throughout. This is the kind of tool that pays for itself many times over if you bake bread regularly.
2. USA Pan Loaf Pan
This heavy duty loaf pan conducts heat evenly, which helps the brioche bake through without burning on the bottom or sides. Its nonstick coating also makes turning out a sticky, buttery loaf much simpler. A good loaf pan is one of those small investments that consistently improves your bread baking results.
3. Instant Read Meat Thermometer
Checking the internal temperature is the most reliable way to know when brioche is fully baked without drying it out. A quick read instant thermometer takes the guesswork out of timing, especially since enriched doughs can look golden on the outside before they are fully cooked inside.
4. Digital Kitchen Scale
Brioche dough is sensitive to ratios of flour, butter, and liquid, so weighing your ingredients gives far more consistent results than measuring by volume. A digital scale is inexpensive and makes a noticeable difference in how predictable your dough turns out from batch to batch.
If you want to put your finished brioche to good use, this Sourdough Discard Cinnamon Rolls Recipe shares a similar enriched dough approach and is a fun next project once you have the technique down.

Step-by-Step Instructions
1. Activate the Yeast and Combine Wet Ingredients
- Warm the milk gently until it reaches about 95 to 105°F (35 to 40°C). It should feel warm but not hot to the touch.
- Pour the warm milk into the bowl of your stand mixer.
- Sprinkle the active dry yeast over the milk and let it sit for about 5 minutes, until it looks foamy.
- Add 2 of the 4 eggs to the bowl with the yeast mixture and whisk briefly to combine.
2. Mix the Dry Ingredients and Form the Dough
- In a separate bowl, whisk together the flour, sugar, and salt until evenly combined.
- Add the dry ingredient mixture to the bowl with the yeast and egg mixture.
- Fit the stand mixer with the dough hook attachment and mix on low speed until a rough, shaggy dough forms, about 2 minutes.
- Add the remaining 2 eggs, one at a time, mixing for about a minute after each addition until fully incorporated.
3. Knead the Dough
- Increase the mixer speed to medium and knead the dough for about 8 to 10 minutes.
- The dough should become smooth, elastic, and slightly sticky, pulling away cleanly from the sides of the bowl.
- If the dough looks too wet after 5 minutes, add an extra tablespoon of flour at a time until it comes together.
4. Incorporate the Butter
- With the mixer running on low speed, add the softened butter cubes a few pieces at a time.
- Wait until each addition is mostly absorbed before adding the next, which usually takes 1 to 2 minutes per addition.
- Once all the butter is incorporated, increase the speed to medium and knead for another 5 to 7 minutes.
- The finished dough should be smooth, shiny, and elastic, and it will still feel quite soft and slightly sticky.
5. First Rise
- Transfer the dough to a large, lightly greased bowl.
- Cover the bowl tightly with plastic wrap.
- Let the dough rise at room temperature for about 1 to 1.5 hours, or until it has roughly doubled in size.
- Once doubled, gently deflate the dough with your hands, then cover the bowl again and refrigerate it for at least 4 hours, or up to overnight.
6. Shape the Loaf
- Remove the chilled dough from the refrigerator. It will be firm and much easier to handle than before.
- Lightly flour your work surface and turn the dough out onto it.
- Divide the dough into 3 equal pieces and roll each piece into a smooth, even ball.
- Grease your 9×5 inch loaf pan, then place the 3 dough balls side by side along the length of the pan.
7. Second Rise
- Cover the shaped dough loosely with plastic wrap or a clean kitchen towel.
- Let it rise in a warm spot for about 1.5 to 2 hours, or until the dough has puffed up and nearly doubled, rising just above the rim of the pan.
- While the dough is rising, preheat your oven to 375°F (190°C).
8. Egg Wash and Bake
- In a small bowl, whisk together the remaining egg and 1 tablespoon of water to make the egg wash.
- Gently brush the egg wash evenly over the top of the risen dough, taking care not to deflate it.
- Bake the brioche for 30 to 35 minutes, until the top is deeply golden brown.
- Use an instant read thermometer to check that the internal temperature reaches about 190°F (88°C).
9. Cool Before Slicing
- Remove the loaf from the oven and let it cool in the pan for about 10 minutes.
- Carefully turn the loaf out onto a wire rack to finish cooling.
- Allow the brioche to cool for at least 30 minutes before slicing, so the crumb has time to set.
If you end up with extra slices, they make an excellent base for a Classic French Toast Recipe, which soaks up the custard beautifully thanks to the bread’s open, soft crumb.
Tips for Success
A few small adjustments can make the difference between a good loaf of brioche and a truly great one. Keep these in mind as you work through the recipe.
- Make sure your butter is softened but still cool to the touch, not melted or greasy
- Do not rush the kneading time, since this is what develops the dough’s structure
- Chilling the dough overnight makes it much easier to shape and improves the flavor
- Watch the dough during the second rise so it does not overproof and collapse
- Tent the loaf loosely with foil if the top is browning too quickly before it is fully baked
For an easier weekday version of an enriched breakfast bread, this Easy French Toast Recipe is a nice companion recipe to keep in your back pocket.
Serving Suggestions
Brioche is versatile enough to serve at almost any meal, from a simple breakfast to a special occasion brunch spread.
Its slightly sweet flavor and soft texture pair well with both sweet and savory toppings.
- Toasted with salted butter and a drizzle of honey
- Topped with jam, marmalade, or fruit preserves
- Sliced and used for a decadent grilled cheese sandwich
- Served alongside soft scrambled eggs and crispy bacon
- Made into French toast with a dusting of powdered sugar
If you want to turn your loaf into a comforting breakfast bake, try this Sourdough Discard French Toast, which works wonderfully with thick slices of brioche instead of regular bread.
Variations to Try
Once you are comfortable with the base recipe, brioche dough is a great starting point for other shapes and flavors.
These variations use the same dough with a few small tweaks.
- Brioche rolls, shaped into individual balls and baked in a muffin tin or on a sheet pan
- Braided top knot loaves for a more decorative presentation
- Brioche buns for burgers or sandwiches, shaped flatter and slightly wider
- Cinnamon sugar swirl brioche, with a layer of cinnamon sugar rolled into the dough before shaping
- Chocolate chip brioche, with mini chocolate chips folded in during the final knead
This same enriched dough technique is also the foundation for these Sourdough Discard Donuts, which are fried instead of baked but share that same soft, rich crumb.
Storage and Reheating
Brioche stays fresh for a few days when stored properly, and it also freezes well if you want to save some for later.
A little extra care when storing helps keep that soft texture intact.
- Store cooled brioche in an airtight container or resealable bag at room temperature for up to 3 days
- For longer storage, slice the loaf and freeze individual pieces in a freezer safe bag for up to 2 months
- Thaw frozen slices at room temperature or warm them directly in a toaster
- To refresh a slightly stale loaf, wrap it in foil and warm it in a 300°F (150°C) oven for about 10 minutes
If you are batch baking for the week, this Air Fryer French Toast Recipe is a quick way to repurpose any slices that have gone slightly stale.
Nutritional Facts
Brioche is an enriched bread, so it is naturally higher in fat and calories than a basic white bread, largely thanks to the butter and eggs.
A typical slice of homemade brioche, based on a loaf cut into about 12 slices, contains roughly the following.
- Calories: approximately 220 per slice
- Total fat: approximately 9g
- Saturated fat: approximately 5g
- Carbohydrates: approximately 28g
- Protein: approximately 5g
- Sugar: approximately 4g
These values are estimates and will vary depending on the exact ingredients and slice thickness. For another comforting breakfast option to compare nutritionally, this Sourdough Discard Cinnamon Rolls Recipe is a fun alternative for special occasion mornings.
Health Benefits of Key Ingredients
While brioche is best enjoyed as an occasional treat, a few of its ingredients do offer some nutritional value worth mentioning.
Understanding what these ingredients contribute can help you appreciate the recipe beyond just flavor.
- Eggs provide protein, vitamin D, and choline, which supports brain health
- Milk adds calcium and a small amount of additional protein
- Butter contains fat soluble vitamins like vitamin A
- Yeast is a source of B vitamins, including thiamine and folate
- Flour provides carbohydrates for energy, especially important for an active morning
For a slightly lighter breakfast bread option, this French Toast Casserole Recipe can be made with a mix of breads to balance richness with lighter ingredients.
Frequently Asked Questions
1. Why is my brioche dough too sticky to handle?
Brioche dough is naturally sticky because of the high butter and egg content, so some stickiness is completely normal.
If it feels unworkable, chilling the dough for a longer period in the refrigerator will firm it up significantly and make shaping much easier.
2. Can I make brioche without a stand mixer?
It is possible, but it requires a lot of arm strength and patience, since the butter needs to be worked into the dough gradually without overheating it.
A stand mixer is strongly recommended for the best texture and to avoid an overly greasy dough.
3. Why didn’t my brioche rise as much as expected?
This is often due to yeast that is too old or milk that was too hot, which can kill the yeast before it has a chance to activate.
Make sure your milk is warm rather than hot, and check the expiration date on your yeast before starting.
4. Can I shape this dough into rolls instead of a loaf?
Yes, this dough works beautifully as rolls. Divide it into smaller, equal portions, shape each into a ball, and reduce the baking time slightly, checking for that same deep golden color and internal temperature.
5. How do I get that shiny, golden crust?
The shiny crust comes from the egg wash brushed on right before baking.
For an extra glossy finish, you can brush on a second light layer of egg wash about 10 minutes into baking.
If you are dealing with questions about bread texture in general, this Creme Brulee French Toast Recipe shares some helpful notes on working with rich, custardy breads.
Final Thoughts
Brioche might take a bit of time, but the process is genuinely enjoyable once you get into the rhythm of it.
That first warm slice, with butter melting into the soft crumb, makes every step worth it.
Give this recipe a try this weekend, and let it become a regular part of your baking routine. If you make it, I would love to hear how it turned out, so feel free to leave a comment or share a photo of your loaf.
Recommended:
- Sourdough Bagel Recipe
- Sourdough English Muffin Recipe
- Rosemary Focaccia Recipe
- Whole Wheat Sourdough Bread Recipe
- Gluten Free Sourdough Bread Recipe
- Sourdough Discard Dinner Rolls Recipe
- Sourdough Discard Pretzels Recipe
- Sourdough Discard Naan Recipe
- Creme Brulee French Toast Casserole Recipe


