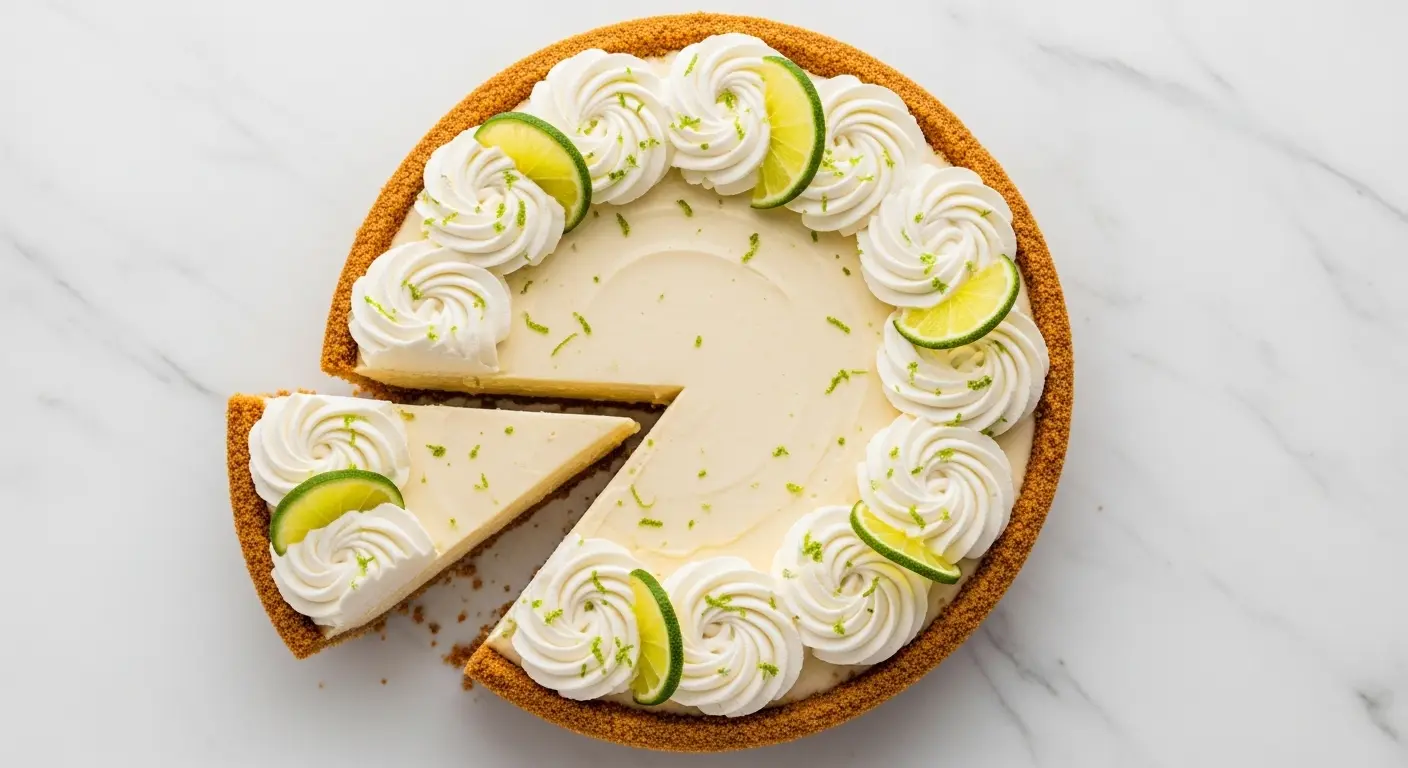
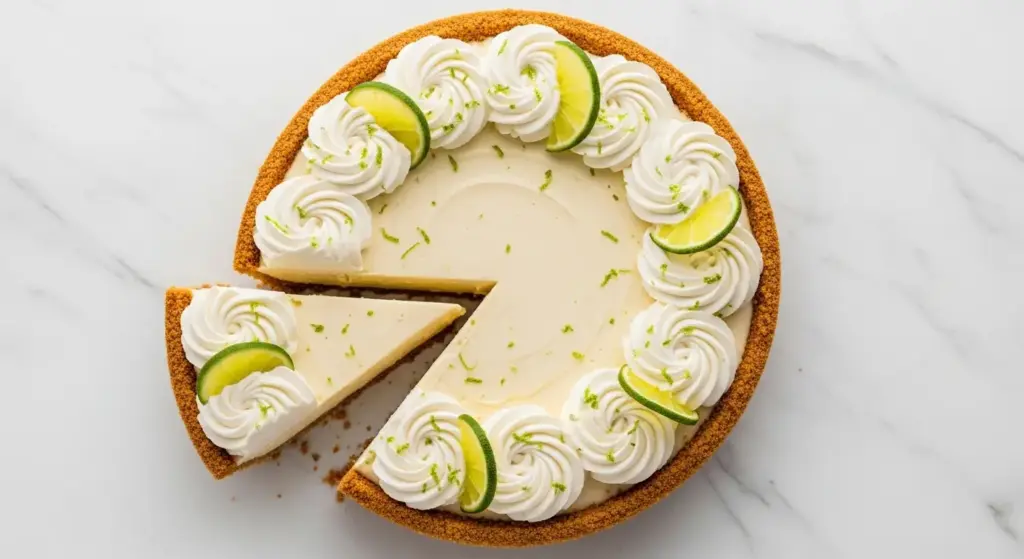
If you’ve been searching for the perfect key lime pie recipe, you’ve just found it. This classic Florida dessert is one of those pies that looks impressive, tastes incredible, and is secretly very simple to pull off at home. It starts with a buttery graham cracker crust, a silky smooth filling made with sweetened condensed milk, egg yolks, and real lime juice, and it finishes with a cloud of freshly whipped cream on top.
The magic of key lime pie lies in that filling. The acid in the lime juice actually “cooks” the condensed milk, creating a custard that sets beautifully without much fuss.
It’s tangy, it’s sweet, it’s luscious, and it comes together with just a handful of ingredients most people already have on hand.
No mixer required. No complicated techniques. Just a bowl, a whisk, and about 30 minutes of active prep before the oven does the rest.
Whether you’re making it for a summer cookout, a holiday dinner table, or just a random weeknight when you need something extraordinary, this recipe delivers every single time.
Read Also: Lemon Cheesecake Recipe
Why You’ll Love This Key Lime Pie Recipe
This pie earns a permanent spot in your dessert rotation for good reason.
It’s one of the easiest pies you’ll ever make, yet it tastes like something from a high-end bakery. The contrast between the sweet, buttery crust and the bright citrus filling is truly hard to beat.
The filling has this gorgeous, silky texture that slices cleanly and holds its shape beautifully. It doesn’t fall apart or weep, and it firms up perfectly after just a few hours in the refrigerator.
Here’s everything you’ll love about this recipe:
- Only a handful of ingredients needed for each component, nothing obscure or hard to find
- No fancy equipment required — just a mixing bowl, a whisk, and a pie dish
- Make-ahead friendly — the pie actually improves overnight as the flavors deepen and the filling firms up completely
- Perfectly balanced flavor — the sweetness of the condensed milk and the sharpness of the lime juice complement each other flawlessly
- Crowd-pleasing and versatile — welcome at potlucks, dinner parties, holidays, and backyard barbecues alike
- Takes under 45 minutes of total hands-on time to prep and bake, leaving most of the “work” to the refrigerator
You might also enjoy: Lemon Meringue Pie
Ingredients
Every ingredient in this recipe plays a specific role, and using quality components makes a real difference in the finished pie. The good news is that everything is straightforward and easy to find.
Here’s everything you’ll need:
For the Graham Cracker Crust:
- 1½ cups (150g) graham cracker crumbs (about 10 full graham crackers)
- 3 tablespoons (36g) granulated sugar
- Pinch of fine salt
- 6 tablespoons (85g) unsalted butter, melted
For the Key Lime Filling:
- 4 large egg yolks, at room temperature
- 2 teaspoons key lime zest (from key limes or regular limes)
- 1 can (14 oz / 397g) sweetened condensed milk
- ½ cup (120ml) fresh key lime juice (from about 20-25 key limes, or substitute fresh Persian lime juice)
For the Whipped Cream Topping:
- 1 cup (240ml) heavy whipping cream, cold
- 2 tablespoons (14g) powdered sugar
- ½ teaspoon pure vanilla extract
For Garnish (Optional):
- Thin lime slices or lime wheels
- Extra lime zest
Read Also: Banana Cream Pie Recipe
Kitchen Equipment Needed
You don’t need much to make this pie shine. Most of what you need is probably already sitting in your kitchen right now.
Here’s your equipment checklist:
- 9-inch pie dish (glass or ceramic works best for even heat distribution)
- Citrus juicer or reamer (for extracting the lime juice efficiently)
- Microplane zester (for fine, fragrant lime zest)
- Medium mixing bowl (for crust)
- Large mixing bowl (for filling)
- Whisk
- Hand mixer or stand mixer (for whipped cream topping)
- Measuring cups and spoons
- Rubber spatula
- Wire cooling rack
- Plastic wrap (for chilling)
Another favorite: Blueberry Pie
Recommended Products for This Recipe
These are products chosen based on genuine quality and performance — the kind of tools and ingredients that make a real difference in how your pie turns out.
1. Nellie & Joe’s Famous Key West Lime Juice
If you can’t find fresh key limes near you (they can be tricky to source depending on where you live), this bottled key lime juice is the closest thing to the real deal. It’s made from authentic Florida key limes and delivers that distinct, slightly more tart and floral flavor that sets key lime pie apart from pies made with regular lime juice. Many bakeries and restaurants swear by it.
2. OXO Good Grips Citrus Juicer
Juicing a large quantity of small key limes by hand without a proper juicer is genuinely exhausting. This countertop citrus press extracts maximum juice with minimal effort, and it handles both small key limes and larger Persian limes with ease. The pour spout directs juice right into your measuring cup with no mess.
3. Emile Henry 9-Inch Pie Dish
A quality pie dish makes a noticeable difference in how evenly the crust bakes. This ceramic option retains heat beautifully, which helps set the filling from the edges inward. It also looks elegant enough to go straight from oven to table.
4. Microplane Classic Zester/Grater
Lime zest is one of the most aromatic, flavor-forward ingredients in this pie — and a good Microplane grater is the difference between feathery, fragrant zest and big clunky pieces. This one is the gold standard for a reason: fine, consistent results every single time.
For a similarly luscious no-bake option, try this No-Bake Cheesecake.
Step-by-Step Instructions
Step 1: Preheat the Oven and Prep Your Pan
- Preheat your oven to 350°F (175°C). Place the oven rack in the center position for even heat distribution.
- Lightly grease your 9-inch pie dish with a little melted butter or non-stick cooking spray. Even though the buttery crust will likely release on its own, a light coating ensures nothing sticks to the sides.
- Set the prepared pie dish aside on a clean work surface while you make the crust.
Step 2: Make the Graham Cracker Crust
- If starting with whole graham crackers, add them to a food processor and pulse until you have fine, even crumbs with no large pieces remaining. Alternatively, place the crackers in a zip-top bag and crush them thoroughly with a rolling pin. You need 1½ cups (150g) of crumbs.
- In a medium mixing bowl, combine the graham cracker crumbs, granulated sugar (3 tablespoons / 36g), and a pinch of fine salt. Stir them together with a fork until everything is evenly mixed.
- Pour the melted butter (6 tablespoons / 85g) over the crumb mixture. Stir with a fork first, then use your hands or a spoon to mix until all the crumbs are moistened and hold together when you press them between your fingers. The mixture should feel like damp sand.
- Transfer the crumb mixture to your greased pie dish. Using your fingers, press the mixture firmly and evenly across the bottom and up the sides of the dish. Work the crumbs up the sides first, then press the bottom flat. Use the flat bottom of a measuring cup or a glass to compact the base really firmly — a tightly packed crust holds together much better when you slice the pie.
- The crust should be roughly ¼-inch (6mm) thick and even all the way around.
Step 3: Pre-Bake the Crust
- Place the assembled crust in the preheated oven and bake for 8-10 minutes, until it turns slightly golden at the edges and smells toasty and buttery.
- Remove the crust from the oven and set it on a wire rack to cool slightly while you prepare the filling. You don’t need to let it cool completely — a warm crust is fine.
- Keep the oven temperature at 350°F (175°C).
Step 4: Prepare the Key Lime Filling
- Zest your key limes (or regular limes) using a fine Microplane grater before juicing them — it’s much easier to zest a whole lime than a juiced one. Zest enough limes to give you 2 teaspoons of zest. Set the zest aside.
- Juice your limes using a citrus press or reamer until you have ½ cup (120ml) of fresh juice. Strain the juice through a fine mesh sieve to remove any seeds or large pulp pieces.
- In a large bowl, add the 4 egg yolks and the 2 teaspoons of lime zest. Whisk vigorously for about 2 minutes until the mixture becomes slightly pale and the zest is well integrated. Whisking the zest with the yolks helps release the essential oils, which deepens the lime flavor throughout the entire filling.
- Pour in the entire can of sweetened condensed milk (14 oz / 397g). Whisk until the condensed milk and egg yolk mixture are thoroughly combined and smooth, about 1 minute.
- Add the ½ cup (120ml) of fresh lime juice all at once. Whisk gently but thoroughly until the filling is completely combined and uniform. The filling will start to thicken slightly due to the reaction between the citric acid in the lime juice and the proteins in the condensed milk — this is normal and a good sign.
- Let the filling sit at room temperature for 2-3 minutes. This brief resting period allows it to thicken a little more before baking, which helps it set evenly.
Step 5: Fill and Bake the Pie
- Pour the lime filling carefully into the warm pre-baked graham cracker crust. Use a rubber spatula to smooth the top into an even, level layer, making sure the filling reaches all the way to the edges.
- Gently transfer the filled pie dish to the center rack of the oven.
- Bake at 350°F (175°C) for 15-17 minutes. The filling should appear set around the outer 2 inches but still have a slight jiggle in the very center when you carefully nudge the pan — similar to a baked cheesecake. It will firm up completely as it chills.
- Do not overbake. An overbaked key lime pie filling can crack on top and lose its signature silky, creamy texture.
Step 6: Cool and Chill
- Remove the pie from the oven and let it cool completely on a wire rack at room temperature. This usually takes about 1 hour. Do not rush this step by placing a hot pie directly in the refrigerator, as condensation can form and make the crust soggy.
- Once fully cooled to room temperature, cover the pie loosely with plastic wrap. Press the wrap gently over the surface to prevent a skin from forming on the filling.
- Refrigerate the pie for a minimum of 4 hours, though overnight chilling is strongly recommended. The longer it chills, the firmer and more flavorful it becomes.
Step 7: Make the Whipped Cream Topping
- Just before you’re ready to serve, pour the cold heavy whipping cream (1 cup / 240ml) into a chilled medium bowl or the bowl of your stand mixer.
- Add the powdered sugar (2 tablespoons / 14g) and vanilla extract (½ teaspoon).
- Beat on medium-high speed until soft, billowy peaks form. Don’t overwhip — you want the cream to be thick enough to hold its shape when piped or spooned, but still look soft and cloud-like, not stiff and grainy.
- You can either pipe the whipped cream in decorative swirls around the edge of the pie using a piping bag fitted with a star tip, or simply spoon generous dollops across the top just before serving.
Step 8: Garnish and Serve
- Garnish the finished pie with a scattering of fresh lime zest over the whipped cream for a pop of color and extra citrus aroma.
- If desired, add thin lime wheels or small lime half-slices along the edges for an elegant presentation.
- Slice the pie using a sharp chef’s knife dipped in warm water and wiped clean between each cut. This gives you those beautiful, clean slices.
You might also enjoy: Cherry Pie
Tips for Success
Even the simplest recipes benefit from a few insider tips. These small details are what separate a good key lime pie from a truly spectacular one.
Keep these in mind every time you make this pie:
- Use fresh citrus whenever possible. Fresh lime juice is noticeably brighter and more aromatic than bottled alternatives. If fresh key limes aren’t available, fresh Persian limes (regular supermarket limes) work beautifully and are much easier to juice.
- Zest before you juice. It sounds obvious once you’ve made the mistake, but always zest your limes first. A juiced lime is nearly impossible to zest properly.
- Don’t skip the egg yolks. They give the filling its rich, golden color and that smooth, custardy texture. Without them, the filling would be much thinner and less luxurious.
- Pack the crust firmly. A loosely pressed crust falls apart when you slice the pie. Use a flat-bottomed measuring cup to really compress the crumbs tightly against the bottom and sides of the dish.
- Chill overnight for the best results. A pie chilled for only 4 hours is good. A pie chilled overnight is exceptional. The extra time allows the flavors to meld and the filling to become perfectly sliceable.
- Make the whipped cream fresh. Pre-made whipped cream deflates quickly in the fridge. Whip it just before serving for the best texture and appearance.
- Let the pie come to room temperature slightly before slicing. About 10-15 minutes out of the fridge makes slicing much easier and gives the filling a creamier, smoother texture on the palate.
Read Also: Peach Pie Recipe
Serving Suggestions
Key lime pie is a showstopper on its own, but pairing it thoughtfully elevates the entire experience.
The bright, citrusy profile of this pie makes it a natural fit for light, tropical-inspired meals or as a refreshing finale to heavier dishes.
Here are some of the best ways to serve and enjoy it:
- Top each slice with a generous dollop of freshly whipped cream for the classic finishing touch — the cool richness of the cream softens the tartness of the filling beautifully
- Pair it with a Fruit Salad made with tropical fruits like mango, pineapple, and kiwi for a sunny, summery spread
- Serve alongside a Classic Pina Colada for a tropical pairing that feels like a real celebration
- Pair a slice with a tall glass of Easy Lemonade for a citrus lover’s dream dessert experience
- Add a small scoop of vanilla ice cream alongside a slice for an indulgent hot-weather treat
- Garnish each plate with a sprig of fresh mint for a restaurant-style presentation that takes no effort at all
Variations to Try
Once you’ve nailed the classic version, this recipe is a wonderful canvas for experimenting with different flavors and textures.
Here are some crowd-pleasing variations worth trying:
- Coconut Key Lime Pie: Add ⅓ cup (28g) of toasted shredded coconut to your graham cracker crust mixture for a tropical flavor boost. You can also replace 2 tablespoons of the lime juice with coconut cream for a creamier, more mellow filling.
- Frozen Key Lime Pie: Skip the baking step for the filling and simply freeze the assembled pie for 4-6 hours instead. Slice it straight from the freezer for a refreshing, ice-cream-like texture that’s perfect for summer.
- Key Lime Pie with Meringue Topping: The most traditional version of the pie actually features a fluffy meringue topping instead of whipped cream. Beat 3 egg whites with a pinch of cream of tartar and gradually add ¼ cup sugar until stiff peaks form. Spread over the cooled filling and bake at 325°F (165°C) for 12-15 minutes until golden.
- Key Lime Pie Bars: Press the crust into a greased 9×13-inch baking pan and spread the filling in an even layer. Bake as directed and chill before cutting into bars — perfect for serving a crowd at a party.
- Pretzel Crust Key Lime Pie: Swap the graham crackers for crushed pretzels to create a salty-sweet crust that takes the flavor contrast of the filling to the next level.
- Mini Key Lime Pies: Divide the crust and filling between a 12-cup muffin tin lined with paper cups. Reduce baking time to about 10-12 minutes. These are adorable for parties and incredibly easy to serve.
Another favorite: Classic Pumpkin Pie
Storage and Reheating
One of the best things about key lime pie is how well it keeps in the refrigerator, making it an ideal make-ahead dessert for busy schedules and entertaining.
Follow these storage guidelines to keep your pie in peak condition:
- Refrigerator: Store the pie covered loosely with plastic wrap or in an airtight container in the refrigerator for up to 5 days. The filling will remain creamy and the crust will stay firm for several days.
- Freezer: You can freeze the pie (without whipped cream topping) for up to 2 months. Wrap it tightly in plastic wrap and then in a layer of aluminum foil before freezing. Thaw overnight in the refrigerator before serving.
- Make-Ahead Tip: Bake the pie up to 2 days in advance and keep it refrigerated. Add the whipped cream topping fresh on the day of serving for the best presentation.
- Whipped Cream Storage: If you have leftover whipped cream, store it separately in an airtight container in the fridge and use within 24 hours.
- Reheating: Key lime pie is always served cold — no reheating needed or recommended. Simply remove the pie from the refrigerator about 10-15 minutes before slicing for the ideal serving temperature.
Read Also: Classic Apple Pie Recipe
Nutritional Facts
The following nutritional information is an estimate for one slice of key lime pie (based on 8 equal slices), including the graham cracker crust and filling. Whipped cream topping is not included.
| Nutrient | Amount Per Serving |
|---|---|
| Calories | ~385 kcal |
| Total Fat | 17g |
| Saturated Fat | 9g |
| Cholesterol | 140mg |
| Sodium | 210mg |
| Total Carbohydrates | 53g |
| Dietary Fiber | 0.5g |
| Sugars | 44g |
| Protein | 7g |
| Calcium | 18% DV |
| Vitamin C | 8% DV |
| Iron | 4% DV |
Nutritional values are approximate and will vary based on specific brands of ingredients used.
For a lighter creamy dessert option, try this Easy Crème Brûlée Recipe.
Health Benefits of Key Ingredients
While key lime pie is certainly a treat to be enjoyed in moderation, some of its core ingredients carry real nutritional benefits worth knowing about.
Here’s a look at what the key components bring to the table:
- Key Lime Juice and Zest: Citrus fruits are excellent sources of Vitamin C, a powerful antioxidant that supports immune function and skin health. Lime juice also contains small amounts of folate, potassium, and flavonoids, and research suggests that citrus consumption is associated with reduced inflammation in the body.
- Egg Yolks: Despite their reputation, egg yolks are nutritional powerhouses. They are rich in fat-soluble vitamins A, D, E, and K, as well as choline, which is essential for brain function and liver health. The yolks also provide high-quality protein and contribute to the pie’s satisfying, rich filling texture.
- Sweetened Condensed Milk: Condensed milk is a concentrated source of calcium and phosphorus, both of which are important for strong bones and teeth. It also provides a source of quick energy from its natural sugars and milk protein, which supports muscle maintenance.
- Graham Crackers: While primarily a vehicle for butter and sweetness in the crust, graham crackers do provide small amounts of complex carbohydrates, dietary fiber, and B vitamins like niacin and thiamine that support energy metabolism.
- Heavy Whipping Cream: The whipped cream topping adds fat-soluble vitamins and a source of conjugated linoleic acid (CLA), a naturally occurring fatty acid associated with metabolic benefits when consumed as part of a balanced diet.
Read Also: Boston Cream Pie Recipe
Frequently Asked Questions
1. Can I use regular limes instead of key limes?
Yes, absolutely. Regular Persian limes (the large green limes found in every grocery store) make an excellent substitute for key limes in this recipe. The flavor is slightly less tart and aromatic than true key limes, but the difference is subtle and the finished pie is still wonderfully delicious.
Key limes, when available, do offer a more complex, floral tartness. But don’t let the hunt for key limes stop you from making this pie — Persian limes work beautifully.
2. Can I use bottled key lime juice instead of fresh?
You can use bottled key lime juice if fresh limes are unavailable. Look for Nellie & Joe’s Famous Key West Lime Juice, which is made from real key limes and is widely considered the best bottled option.
Keep in mind that bottled juice is often more intensely tart than freshly squeezed juice, so taste the filling before baking. If it’s very sharp, you can reduce the bottled juice by a tablespoon or two.
3. Why is my key lime pie filling not setting properly?
The most common cause is underbaking. The filling should have a firm outer ring and only a slight wobble in the very center when you remove it from the oven.
The pie also needs adequate refrigeration time to fully set. If the pie was only chilled for an hour or two, it simply hasn’t had enough time to firm up. Give it a full 4-8 hours in the fridge, and ideally overnight, for best results.
4. Can I make this pie without eggs?
Egg yolks are an important part of the traditional key lime pie filling — they add richness, structure, and that beautiful pale yellow color. However, you can make an egg-free version by using a combination of cream cheese and sour cream in place of the egg yolks.
Blend 4 ounces (113g) of softened cream cheese with the condensed milk before adding the lime juice. The texture will be slightly denser and tangier, but still very good and much closer to a cheesecake-style filling.
5. Should key lime pie be yellow or green?
A traditional, authentic key lime pie is always pale yellow, not green. The yellow color comes from the egg yolks in the filling and from key lime juice itself, which has a slightly yellowish tint compared to regular Persian lime juice.
Green key lime pies are colored with food dye, which is not traditional and doesn’t add anything to the flavor. If someone tells you a key lime pie needs to be green to be authentic, you can politely correct them — real key lime pie is naturally, beautifully yellow.
This recipe uses zero artificial coloring, just real ingredients doing what they do best.
For more creamy dessert inspiration, check out: Peanut Butter Pie
Final Thoughts
This key lime pie recipe is the real deal — no shortcuts, no artificial colors, no fuss. Just a buttery crust, a silky bright filling, and a cloud of fresh whipped cream that ties it all together beautifully.
It’s the kind of dessert that gets requests at every gathering. Once you’ve made it from scratch, store-bought pie will never feel the same.
If you give this recipe a try, I’d love to hear how it turned out for you! Drop a comment below with any questions, tips you discovered along the way, or just to let me know it was a hit at your table.
And if you snapped a photo of your finished pie, share it — nothing makes my day quite like seeing this beauty recreated in your kitchen.
Recommended:
- Fruit Tart Recipe
- Dutch Apple Pie
- Chocolate Pie Recipe
- Sweet Potato Pie
- Easy Pie Crust
- Flaky Pie Crust
- Classic Tiramisu
- Easy Crème Brûlée
- Strawberry Cheesecake
- Classic Pecan Pie