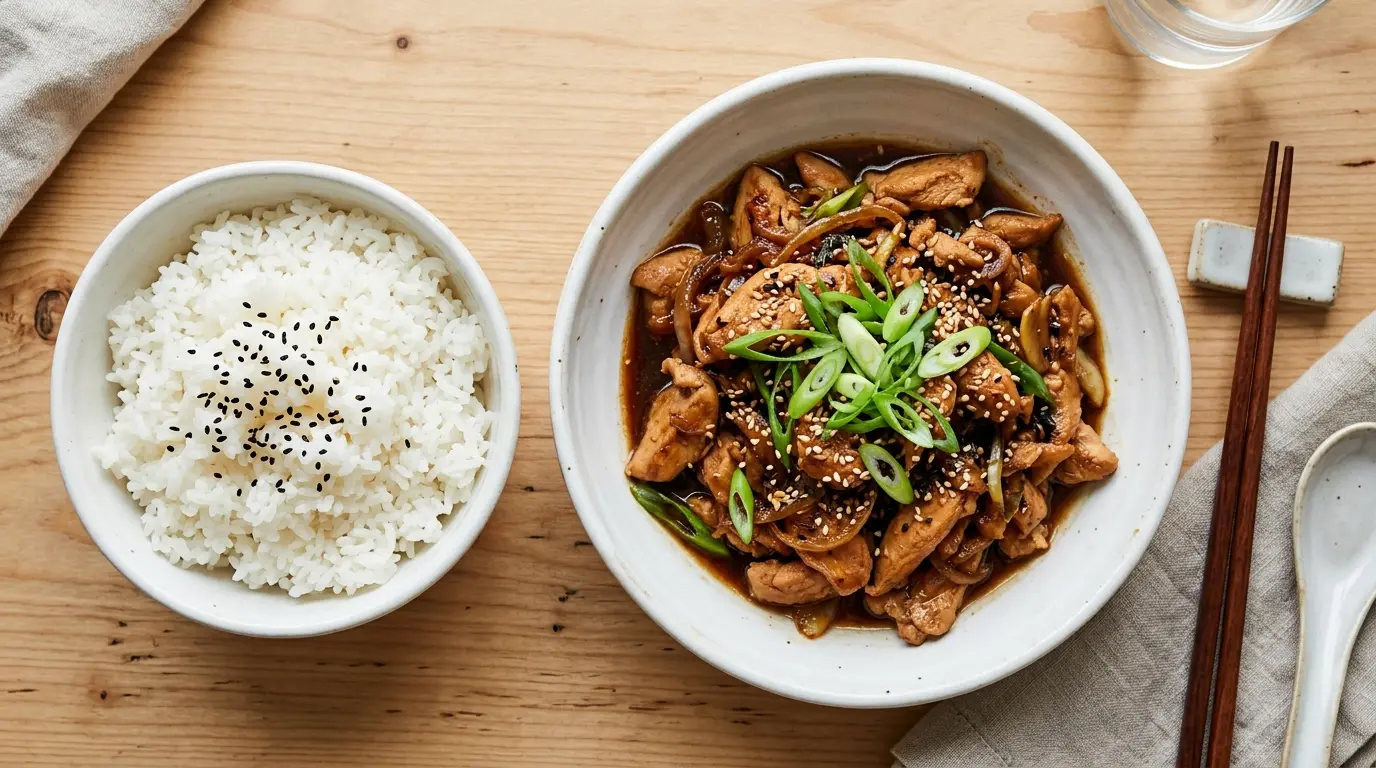
Korean BBQ nights don’t have to mean hours of prep or a special grill setup. This skillet chicken bulgogi recipe brings bold, caramelized, sweet-savory flavors right to your stovetop in under 30 minutes. Dak bulgogi, which literally translates to “fire chicken” in Korean, is a beloved dish that uses thin, marinated pieces of boneless chicken thighs cooked at high heat until the edges char and the sauce transforms into something deeply delicious.
The secret to a great bulgogi isn’t a long ingredient list. It’s the balance in the marinade. Soy sauce delivers umami and saltiness, sesame oil adds nuttiness, garlic and ginger bring warmth and aroma, and a touch of sweetness from brown sugar and Asian pear helps the chicken caramelize beautifully in the skillet.
This recipe stays true to the classic soy-based dak bulgogi style that you’d find at Korean restaurants and home kitchens across Korea. It’s quick enough for a weeknight dinner but special enough to share with guests.
You might also enjoy: Chicken Skillet Recipe
Why You’ll Love This Skillet Chicken Bulgogi Recipe
This dish hits all the right notes without asking too much of you.
The marinade takes just five minutes to put together, and the cooking is done in a single pan. Fewer dishes, more flavor.
The caramelized glaze you get from cooking over high heat in a skillet is genuinely stunning. The edges of the chicken get slightly charred and crispy while the inside stays tender and juicy.
Boneless, skinless chicken thighs are used in most traditional versions, and for good reason. They absorb the marinade deeply and don’t dry out the way chicken breast can.
The dish is naturally gluten-friendly with a simple swap of tamari for soy sauce, and it’s dairy-free, making it a solid option for various dietary needs.
Here’s a quick rundown of what makes this recipe a keeper:
- Ready in under 30 minutes from start to finish
- Uses everyday pantry staples plus a couple of Korean ingredients
- Works beautifully as meal prep since the chicken reheats perfectly
- Naturally pairs with steamed rice, lettuce wraps, or noodles for multiple serving styles
- The bulgogi marinade is versatile and works with beef or pork too
If you love Asian-inspired skillet meals, check out these Asian Ground Beef Noodle Bowls for another weeknight favorite.
Ingredients
The marinade is the heart of this recipe. Using fresh garlic and ginger (not powdered) makes a noticeable difference. Asian pear is traditional because its natural enzymes help tenderize the meat, but a ripe Bosc pear or even a small amount of kiwi works if pear isn’t available.
Here’s everything you’ll need:
For the Chicken:
- 2 lbs (900g) boneless, skinless chicken thighs
- 1 tablespoon neutral oil (vegetable or avocado oil) for cooking
For the Bulgogi Marinade:
- 3 tablespoons soy sauce (or tamari for gluten-free)
- 1 tablespoon sesame oil
- 2 tablespoons brown sugar (packed)
- 1 tablespoon mirin (Japanese sweet rice wine)
- 1/2 medium Asian pear (or Bosc pear), grated (about 3 tablespoons grated pear)
- 5 cloves garlic, minced (about 1.5 tablespoons)
- 1 teaspoon fresh ginger, grated
- 1/4 small yellow onion, grated or very finely minced
- 1/2 teaspoon black pepper
- 1 tablespoon gochujang (Korean chili paste, optional for heat)
For Garnish:
- 2 green onions (scallions), thinly sliced
- 1 teaspoon toasted sesame seeds
This recipe pairs really nicely with a side of Chicken Stir Fry vegetables if you want to round out the meal.
Kitchen Equipment Needed
A large skillet is key here. The wider the surface, the better your chicken will caramelize rather than steam. A cast iron skillet or stainless steel pan holds heat exceptionally well and produces the best browning.
Here’s what you’ll need:
- 12-inch cast iron skillet or large stainless steel skillet
- Large mixing bowl (for marinating)
- Box grater (for grating pear, onion, and ginger)
- Sharp chef’s knife and cutting board
- Tongs for turning the chicken
- Measuring spoons and cups
- Garlic press or microplane zester (optional but helpful)
Read Also: Chicken Teriyaki Recipe
Recommended Products for This Recipe
These are products I recommend based on quality and performance to help you get the best results from this skillet chicken bulgogi.
1. CJ Haechandle Gochujang Korean Chili Paste
Gochujang is the ingredient that adds depth, a gentle heat, and that gorgeous deep red color to bulgogi. A quality Korean brand like CJ Haechandle uses fermented chili paste with the right balance of sweet, spicy, and savory. One tub lasts months and can be used across dozens of Korean recipes.
2. Lodge 12-Inch Cast Iron Skillet
A cast iron skillet retains and distributes heat evenly, which is exactly what you need to caramelize the bulgogi marinade without burning it. Lodge is trusted by home cooks for its durability and heat retention, making it perfect for this recipe and so many others.
3. Kikkoman Toasted Sesame Oil
Sesame oil in the marinade is non-negotiable for authentic bulgogi flavor. The toasted variety delivers a rich, nutty aroma that raw sesame oil simply can’t match. A small amount goes a long way.
4. Marukan Genuine Brewed Mirin
Mirin adds a gentle sweetness and helps the marinade stick to the chicken. Genuine brewed mirin (as opposed to mirin-style condiment) has a cleaner, more balanced sweetness that makes a real difference in your final dish.
5. Kikkoman Less Sodium Soy Sauce
Soy sauce is the backbone of the bulgogi marinade. Using a lower-sodium version gives you control over the saltiness without sacrificing the deep, savory flavor that makes this dish so satisfying.
For another great skillet dinner idea, try this Taco Skillet Recipe.
Step-by-Step Instructions
1. Prepare and Slice the Chicken
- Remove the boneless, skinless chicken thighs from the packaging and pat them completely dry with paper towels. This is an important step because excess moisture on the surface of the chicken will cause it to steam instead of sear when it hits the hot pan.
- Place the chicken thighs on your cutting board. Trim away any large pockets of fat or any jagged edges, but don’t remove everything because some fat is what keeps the chicken juicy.
- Slice the chicken into thin, uniform pieces roughly 1/4 inch (6mm) thick. You want fairly thin slices so they cook quickly and the marinade can penetrate all the way through. Consistent sizing also ensures even cooking.
- Set the sliced chicken aside in a large mixing bowl.
2. Make the Bulgogi Marinade
- Peel and grate the Asian pear (or Bosc pear) using the fine side of a box grater directly over the mixing bowl. You need about 3 tablespoons of grated pear. The enzymes in the pear act as a natural tenderizer and add a subtle sweetness.
- Grate the 1/4 small yellow onion using the same grater. The onion juice adds savory depth to the marinade.
- Peel and mince 5 cloves of garlic very finely, or press them through a garlic press. Fresh garlic is essential here because it delivers a pungency that garlic powder simply cannot replicate.
- Grate 1 teaspoon of fresh ginger using a microplane or the fine side of your box grater.
- In the mixing bowl with the chicken, add the soy sauce, sesame oil, brown sugar, mirin, grated pear, grated onion, minced garlic, grated ginger, and black pepper.
- If you want to add heat, stir in 1 tablespoon of gochujang. This gives the chicken a deeper color and a bold, slightly smoky kick.
- Mix everything thoroughly until all the chicken pieces are evenly coated with the marinade. The brown sugar should mostly dissolve into the sauce.
3. Marinate the Chicken
- Cover the mixing bowl tightly with plastic wrap or transfer the chicken and marinade to a zip-top bag, pressing out as much air as possible.
- For best results, marinate in the refrigerator for at least 30 minutes. If you have more time, 2 to 4 hours produces even more deeply flavored chicken. Overnight marinating is fine too.
- If you are short on time, even a 15-minute marinade at room temperature will give you noticeably better results than no marinating at all.
- When you’re ready to cook, remove the chicken from the fridge and let it sit at room temperature for about 10 minutes so it doesn’t hit a cold pan.
4. Heat the Skillet
- Place your 12-inch cast iron skillet or large stainless steel skillet on the stove over medium-high heat.
- Allow the pan to preheat for 2 full minutes. A properly heated skillet is what creates that caramelized crust on the chicken. If the pan isn’t hot enough, the chicken will release moisture and steam rather than sear.
- Add 1 tablespoon of neutral oil (vegetable or avocado oil) to the pan and swirl to coat. The oil should shimmer almost immediately if your pan is at the right temperature.
5. Cook the Chicken
- Using tongs or a spoon, add the marinated chicken pieces to the hot skillet in a single layer. Do not crowd the pan. If needed, cook in two batches. Overcrowding drops the pan temperature and prevents caramelization.
- Cook undisturbed for 2 to 3 minutes on the first side. You want to see golden-brown, slightly charred edges forming on the bottom before you flip.
- Flip the chicken pieces and cook for another 2 to 3 minutes on the other side. The internal temperature of the chicken should reach 165°F (74°C) for safe eating.
- As the chicken finishes cooking, the sugars from the brown sugar and pear in the marinade will start to caramelize in the pan, creating a glossy, sticky coating on the chicken pieces.
- If the pan gets too dry before the chicken is fully cooked, add a tablespoon of the reserved marinade at a time. This prevents burning while keeping the chicken moist.
6. Add the Second Batch (If Needed) and Finish
- If you cooked in batches, return all the chicken to the pan and toss everything together briefly over medium heat for about 1 minute to combine the flavors and coat every piece in the caramelized glaze.
- Remove the skillet from the heat.
7. Garnish and Serve
- Transfer the chicken bulgogi to a serving plate or serve directly from the skillet.
- Scatter the sliced green onions (scallions) and toasted sesame seeds over the top.
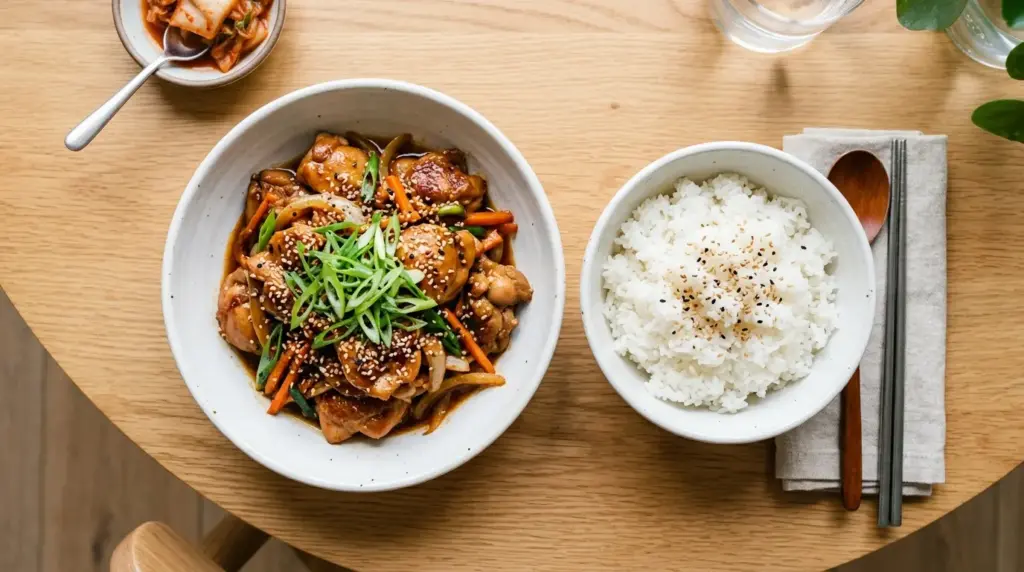
- Serve immediately with steamed rice, inside lettuce wraps, or over noodles for a full Korean BBQ-inspired meal.
Another Asian-inspired favorite to try: Chicken Lo Mein Recipe
Tips for Success
Getting the most out of this recipe comes down to a few simple techniques that make a real difference.
Here are the most important ones to keep in mind:
- Don’t skip patting the chicken dry. Wet chicken won’t sear properly. Dry surfaces are what allow that caramelized crust to form, which is what gives bulgogi its signature flavor.
- Use chicken thighs, not breasts. Thighs are more forgiving, stay juicy even over high heat, and absorb the marinade more deeply. Breast meat tends to dry out quickly and doesn’t caramelize as well.
- Grate the pear and onion, don’t chop. Grating releases their juices into the marinade, which is what tenderizes the meat and distributes their flavor evenly.
- Get the pan genuinely hot before adding the chicken. A lukewarm pan will cause steaming instead of searing. Give your skillet a full 2 minutes over medium-high heat.
- Cook in batches if needed. Resist the urge to pile all the chicken in at once. Spacing the pieces out is what gives you browned, caramelized chicken rather than pale, soggy pieces.
- Watch the pan toward the end. The sugars in the marinade can go from beautifully caramelized to burned quickly. Reduce the heat slightly if you see the sauce darkening too fast.
- Marinate as long as you can. Even 30 minutes makes a difference, but if you can marinate for several hours, the chicken flavor will be significantly richer.
For another bold and flavorful Asian dinner option, check out this Chicken Pad Thai recipe.
Serving Suggestions
Skillet chicken bulgogi is wonderfully versatile, and there are many ways to enjoy it beyond a simple plate of chicken and rice.
Traditional Korean BBQ style calls for serving the chicken alongside steamed white rice, with banchan (small Korean side dishes) like kimchi, pickled cucumbers, and spinach namul. You can also serve the chicken wrapped in crisp butter lettuce or perilla leaves as a handheld meal, which is how many Koreans enjoy bulgogi at home.
Here are some of the best ways to round out your meal:
- Steamed white rice or Basmati Rice as the base for soaking up the caramelized juices
- Butter lettuce or perilla leaves for building DIY lettuce wraps
- Kimchi for its tangy, spicy contrast that cuts through the sweetness of the bulgogi marinade
- Steamed or sauteed Bok Choy for a light, slightly bitter veggie pairing
- Bibimbap style: serve the chicken over rice with julienned vegetables and a fried egg on top
- Sesame cucumber salad (thinly sliced cucumber with rice vinegar, sesame oil, and a pinch of chili flakes) for a refreshing crunch
- Noodles tossed in a small amount of extra marinade for a bulgogi noodle bowl
Variations to Try
The classic soy-based marinade used here is the most widely recognized version of skillet chicken bulgogi, but the dish adapts beautifully to a few popular variations.
Here are some great ways to put your own spin on the recipe:
- Spicy Chicken Bulgogi: Add 1 to 2 tablespoons of gochujang and a teaspoon of gochugaru (Korean red pepper flakes) to the marinade for a fiery, deeply red version that’s popular at Korean street food stalls.
- Non-spicy version: Simply leave out the gochujang entirely. The soy-garlic-pear marinade is delicious on its own without any heat.
- Chicken Breast Bulgogi: Slice chicken breasts very thinly (about 1/8 inch) against the grain and reduce cook time to 1 to 2 minutes per side to avoid drying them out.
- Bulgogi Rice Bowl: Serve the chicken over Cilantro Lime Rice with sliced avocado and a drizzle of sriracha mayo for a fusion-style bowl.
- Bulgogi Lettuce Wraps: Serve the cooked chicken in butter lettuce cups with a spoonful of rice, sliced cucumber, and a dollop of ssamjang or gochujang for dipping. This style closely mirrors the traditional Korean BBQ experience.
- Freezer-Friendly Meal Prep: Combine the raw chicken and marinade in a freezer bag and freeze for up to one month. Thaw overnight in the refrigerator and cook directly from thawed.
- Pork Bulgogi: Use the same marinade on thinly sliced pork shoulder for a spicy pork bulgogi (jeyuk bokkeum) variation that’s also a Korean BBQ staple.
Storage and Reheating
Chicken bulgogi stores and reheats exceptionally well, making it a great candidate for meal prep.
Here are the storage guidelines and the best ways to reheat:
- Refrigerator: Store cooked chicken bulgogi in an airtight glass container in the refrigerator for up to 4 days.
- Freezer: Transfer cooled chicken to a freezer-safe zip-top bag or airtight container. Freeze for up to 1 month. Thaw overnight in the refrigerator before reheating.
- Reheating on the stovetop: Add a splash of water or a teaspoon of soy sauce to a skillet over medium heat and warm the chicken for 2 to 3 minutes, tossing occasionally, until heated through. This is the best method for maintaining the texture.
- Reheating in the microwave: Place the chicken in a microwave-safe dish, cover loosely with a damp paper towel to retain moisture, and heat in 30-second intervals until warmed through.
- Marinated raw chicken: You can store the raw, marinated chicken in the refrigerator for up to 24 hours before cooking. For longer storage, freeze the marinated raw chicken for up to 1 month.
Read Also: Chicken Lettuce Wraps Recipe
Nutritional Facts
The following nutritional information is an estimate based on one serving (approximately 5 oz / 140g of cooked chicken bulgogi), assuming the recipe serves 4. Values will vary based on specific ingredients used.
| Nutrient | Per Serving |
|---|---|
| Calories | ~310 kcal |
| Protein | 35g |
| Total Fat | 14g |
| Saturated Fat | 3g |
| Carbohydrates | 10g |
| Sugars | 7g |
| Fiber | 0.5g |
| Sodium | ~700mg |
| Cholesterol | 130mg |
Note: Nutritional values are approximate and may vary based on the specific brands of ingredients used and exact portion size. This calculation does not include rice, lettuce wraps, or other accompaniments.
For another lighter, protein-rich meal idea, try this Chicken Stir Fry Recipe.
Health Benefits of Key Ingredients
This skillet chicken bulgogi recipe isn’t just delicious. Several of its core ingredients bring genuine nutritional value to your plate.
Boneless skinless chicken thighs are an excellent source of complete protein, providing all nine essential amino acids your body needs for muscle repair and immune function. They also supply zinc, B vitamins (especially B6 and niacin), and more iron than chicken breast.
Here’s a closer look at why the other key ingredients are worth celebrating:
- Garlic contains allicin, a compound that has been studied for its potential antibacterial and anti-inflammatory properties. It also supports cardiovascular health when consumed regularly.
- Fresh ginger is well-known for its anti-nausea effects and contains gingerols and shogaols, which have antioxidant and anti-inflammatory properties that support digestion.
- Sesame oil is rich in monounsaturated and polyunsaturated fats, which are considered heart-healthy fats. It also contains sesamol and sesamin, antioxidants linked to reduced inflammation.
- Asian pear provides fiber, vitamin C, and natural enzymes (particularly bromelain-like compounds) that help with protein digestion and meat tenderization.
- Soy sauce delivers glutamate, the compound responsible for umami flavor, and provides some amino acids. Opting for low-sodium soy sauce helps keep sodium in a reasonable range.
- Toasted sesame seeds (used as a garnish) are a small but mighty source of calcium, magnesium, and zinc, along with healthy fats and lignans that support hormonal balance.
Another Asian-inspired recipe you’ll love is this Chicken Teriyaki.
Frequently Asked Questions
1. What does “bulgogi” mean?
Bulgogi is a Korean word that combines “bul” (fire) and “gogi” (meat). It literally means “fire meat.” The name refers to the traditional cooking method of grilling meat over an open flame or very high heat, which creates the characteristic char and caramelization.
Chicken bulgogi, or dak bulgogi, simply means “fire chicken,” with “dak” being the Korean word for chicken.
2. Can I use chicken breasts instead of thighs?
Yes, but you’ll need to adjust your technique. Slice chicken breasts very thinly, about 1/8 inch (3mm) thick, and cut against the grain. Reduce your cook time to about 1 to 2 minutes per side, as breasts dry out much more quickly than thighs over high heat.
For the juiciest, most flavorful result, chicken thighs are strongly recommended because they absorb the marinade more deeply and stay tender even with high-heat cooking.
3. What is gochujang, and where can I buy it?
Gochujang is a fermented Korean red chili paste made from red peppers, glutinous rice, fermented soybeans, and salt. It has a complex flavor that is simultaneously spicy, sweet, and savory. It’s not the same as sriracha or regular hot sauce.
You can find gochujang at most Asian grocery stores, many large supermarkets in the international aisle, and online. It keeps in the refrigerator for months after opening.
4. What can I use instead of Asian pear?
If you can’t find Asian pear, a ripe Bosc pear works well as a substitute. Half a kiwi (peeled and grated) is another popular alternative because kiwi also contains natural tenderizing enzymes. Approximately 3 tablespoons of unsweetened apple juice can be used in a pinch, though it won’t tenderize the meat quite as well.
Avoid using lemon or lime juice as a substitute, as the acidity can change the texture of the chicken if marinated for too long.
5. Can I make this recipe ahead of time for meal prep?
Absolutely. The marinated raw chicken can be stored in the refrigerator for up to 24 hours before cooking, which actually deepens the flavor considerably. You can also fully cook the chicken and store it in an airtight container in the fridge for up to 4 days.
For longer-term meal prep, combine the raw chicken and marinade in a freezer bag and freeze for up to one month. Thaw overnight in the refrigerator and cook as directed.
Read Also: Asian Ground Beef Noodle Bowls
Final Thoughts
Skillet chicken bulgogi is one of those recipes that feels a little special every single time you make it, even though it comes together on a Tuesday night in about 25 minutes.
The combination of that sweet, garlicky, slightly smoky marinade and the caramelized edges from a hot cast iron skillet is genuinely hard to beat.
If you’ve been looking for a new weeknight dinner to add to your rotation, this is it. The ingredients are easy to find, the technique is simple, and the results taste like something you’d order at your favorite Korean restaurant.
Give this skillet chicken bulgogi recipe a try and let me know how it goes in the comments below. I’d love to hear what you served it with, any tweaks you made, or how your family reacted when they took their first bite.
Recommended:
- Bibimbap Recipe
- Chicken Pad Thai
- Mexican Beef and Rice Skillet Recipe
- Teriyaki Sauce Recipe
- Hoisin Sauce Recipe
- Stir Fry Sauce Recipe
- Peanut Sauce Recipe
- Chicken Fajita Recipe
- Enchilada Skillet Recipe
- Cilantro Lime Rice Recipe


