If you’ve ever craved a chicken teriyaki recipe that delivers the real deal, this is the one. We’re talking golden, pan-seared chicken thighs glazed in a shiny, sweet-savory homemade sauce made from just four classic Japanese pantry staples.
No complicated marinating steps. No bottled shortcuts.
The word “teriyaki” actually comes from two Japanese words: teri, meaning luster or shine, and yaki, meaning grilled or broiled. That beautiful gloss isn’t just for looks. It signals that the sauce has properly caramelized and clung to the chicken, locking in both flavor and moisture.
Boneless chicken thighs are the traditional cut for a reason. They have a higher fat content than breast meat, which means they stay tender and juicy under the heat of the pan, and they absorb that savory-sweet glaze beautifully.
The sauce itself is a simple blend of soy sauce, mirin, sake, and sugar. These four ingredients work together in a way that’s greater than the sum of their parts: the soy provides saltiness and umami depth, the mirin adds gentle sweetness and helps the glaze adhere, the sake brings subtle complexity and tenderizes the meat slightly, and the sugar ties everything together into that signature sticky finish.
This is a quick weeknight dinner that feels every bit as satisfying as your favorite Japanese restaurant order.
This recipe is the pan-seared stovetop version, which is both the most common home-cooking method in Japan and the easiest for beginners. Skin-on thighs are traditional, but skinless work beautifully here too, and that’s what this recipe uses since skinless, boneless thighs are far easier to find.
For even more Asian-inspired chicken dishes, check out this Chicken Lo Mein Recipe that’s equally fast and packed with flavor.
Why You’ll Love This Chicken Teriyaki Recipe
This dish earns a permanent spot in weeknight dinner rotation for so many good reasons.
It comes together in about 20 minutes from start to finish, which makes it one of the fastest restaurant-quality meals you can make at home.
The sauce requires no specialty shopping trip. Soy sauce, mirin, sake, and sugar are easy to find at most grocery stores or Asian markets.
Chicken thighs are budget-friendly and far more forgiving than chicken breast. Even if you leave them on the heat a minute longer than planned, they stay juicy.
The glossy sauce clings to the chicken in a way that bottled teriyaki sauce never quite manages. That caramelized glaze is the whole point of the dish.
- Ready in 20 minutes – one pan, minimal cleanup
- Only 4 sauce ingredients – soy sauce, mirin, sake, and sugar
- No marinating needed – the sauce cooks right in the pan with the chicken
- Naturally gluten-free adaptable – use tamari in place of regular soy sauce
- Kid-friendly – mildly sweet with a savory depth that almost everyone loves
- Pairs with almost anything – steamed rice, stir-fried vegetables, noodles, or salad
You might also enjoy: Chicken Pad Thai Recipe
Ingredients
The beauty of an authentic chicken teriyaki recipe is how simple the ingredient list is. Every component plays a key role in building that signature sweet, savory, glossy sauce.
- 1.5 lbs (680g) boneless, skinless chicken thighs – the traditional cut; more flavorful and juicy than breast
- 1 tablespoon neutral oil – vegetable, canola, or avocado oil all work well
- 3 tablespoons (45ml) soy sauce – use a Japanese brand like Kikkoman for the best balance of salt and umami
- 3 tablespoons (45ml) mirin – a sweet rice wine; look for “hon mirin” for the most authentic flavor
- 3 tablespoons (45ml) sake – Japanese rice wine; dry sherry is a reasonable substitute
- 1 tablespoon (12g) granulated white sugar – brings sweetness and helps the sauce caramelize into a glaze
- Salt – a light pinch to season the chicken before cooking
- Sesame seeds (optional, for garnish) – adds a subtle nuttiness and visual appeal
- Sliced green onions (optional, for garnish) – brings a fresh, mild bite
Read Also: Teriyaki Sauce Recipe
Kitchen Equipment Needed
You don’t need any specialized tools for this recipe. A good heavy-bottomed pan makes all the difference when it comes to achieving that golden sear.
- Large non-stick or stainless steel skillet – 10 to 12 inches; non-stick is easiest for beginners, stainless gives a better sear
- Tongs – for flipping the chicken safely without piercing the meat
- Small mixing bowl – for whisking the teriyaki sauce together before cooking
- Whisk or fork – to dissolve the sugar into the sauce ingredients
- Cutting board – for trimming and slicing the cooked chicken
- Sharp knife – for slicing the finished chicken against the grain
- Meat thermometer – helpful for beginners; chicken is done at 165°F (74°C) internal temperature
- Paper towels – for blotting excess oil from the pan if needed
Read Also: Stir Fry Sauce Recipe
Recommended Products for This Recipe
These are products I recommend based on quality and performance, specifically chosen to help you get the best results with this chicken teriyaki recipe.
1. Kikkoman Soy Sauce
Kikkoman is the gold standard Japanese soy sauce and the brand most often used in authentic Japanese home cooking. Its balanced fermentation gives you that clean, rich umami flavor that inexpensive soy sauces simply can’t match, and it won’t make your teriyaki sauce overly salty. A little goes a long way, so one bottle will last through many batches.
2. Hon Mirin (Genuine Mirin)
Genuine mirin, labeled “hon mirin,” is fermented from sweet glutinous rice and contains natural sugars that caramelize beautifully in the pan. This is what gives teriyaki its signature glossy finish. Cheap mirin substitutes made from glucose syrup and salt won’t produce the same depth of flavor or that gorgeous glaze.
3. All-Clad Stainless Steel Skillet
A quality stainless steel skillet conducts heat evenly and builds that flavorful fond (browned bits) that adds depth to the sauce. It can also go straight from stovetop to oven if needed. Once you get comfortable with the technique, stainless gives you a more golden, restaurant-quality sear than non-stick.
4. Japanese Sake for Cooking
While you can substitute dry sherry in a pinch, having genuine sake on hand makes a real difference. Sake adds a subtle sweetness and a clean flavor that complements the soy and mirin without overpowering them. It also helps tenderize the chicken slightly as the sauce cooks down.
5. Instant Read Meat Thermometer
Taking the guesswork out of chicken doneness is the single biggest thing beginners can do to improve their cooking. An instant-read thermometer tells you exactly when your chicken hits 165°F (74°C), so you never have to worry about undercooking or drying it out.
The same glossy sauce technique works wonderfully in a Chicken and Broccoli Recipe as well.
Step-by-Step Instructions
Step 1: Make the Teriyaki Sauce
- In a small bowl, combine the soy sauce, mirin, sake, and granulated sugar.
- Whisk or stir the mixture until the sugar is fully dissolved. It may take 30 to 60 seconds of stirring.
- Set the bowl aside near the stovetop so it’s ready to add to the pan at the right moment. The sauce should look thin and glossy at this stage. It will thicken and darken once it hits the hot pan.
Step 2: Prepare the Chicken
- Place the chicken thighs on a clean cutting board.
- Pat each piece completely dry with paper towels. This step is critical. Moisture on the surface of the chicken creates steam in the pan, which prevents the golden sear you’re after. Dry chicken = golden crust.
- If any thighs are much thicker than others, use a sharp knife to make a horizontal cut through the thick part, butterflying it slightly so the piece is an even thickness throughout. This ensures all pieces cook at the same rate.
- Season both sides of each chicken thigh very lightly with a pinch of salt. Don’t oversalt because the soy sauce in the teriyaki sauce is already quite salty.
Step 3: Heat the Pan
- Place your large skillet over medium-high heat.
- Add 1 tablespoon of neutral oil to the pan.
- Let the pan heat for about 1 to 2 minutes. The oil should shimmer and move easily around the pan when tilted. If the oil starts to smoke, reduce the heat slightly before adding the chicken.
- A properly preheated pan is the foundation of a good sear. Adding chicken to a cold pan causes it to stick and steam instead of browning.
Step 4: Sear the Chicken
- Add the chicken thighs to the pan in a single layer, smooth side down (the presentation side that will face up on the plate).
- Do not move the chicken for at least 4 to 5 minutes. Resist the urge to check or shift it. The chicken will naturally release from the pan when it has developed a proper sear.
- You should hear a steady, confident sizzle from the moment the chicken hits the pan. If the sizzle dies down, your pan isn’t hot enough.
- After 4 to 5 minutes, use tongs to carefully lift one piece to check. The bottom should be deep golden brown. If it’s pale or sticking, give it another minute.
- Flip each piece with tongs and cook the second side for another 3 to 4 minutes, until the chicken is cooked through. At this point, the internal temperature should read 165°F (74°C) on a meat thermometer.
Step 5: Add the Teriyaki Sauce
- Once the chicken is cooked through, reduce the heat to medium.
- If there’s excessive oil in the pan from the chicken fat, blot it up gently with a folded paper towel held with tongs. Leave a thin film of oil in the pan, but remove any pooling fat. This step helps the sauce adhere directly to the chicken instead of diluting in grease.
- Pour the teriyaki sauce mixture over the chicken in the pan.
- The sauce will immediately begin to sizzle and bubble. Use tongs to turn the chicken so that all sides get coated.
- Let the sauce cook for 2 to 3 minutes, turning the chicken occasionally. The sauce will reduce, thicken, and turn a deep, shiny mahogany color. Watch it carefully at this stage because the sugars can burn quickly.
- The sauce is ready when it coats the back of a spoon and clings to the chicken pieces. It should look glossy and lacquered, not watery.
Step 6: Slice and Serve
- Transfer the glazed chicken thighs to a cutting board and let them rest for 2 minutes. This allows the juices to redistribute throughout the meat.
- Slice each thigh against the grain into strips roughly 1 inch (2.5cm) wide. Slicing against the grain shortens the muscle fibers, making every bite more tender.
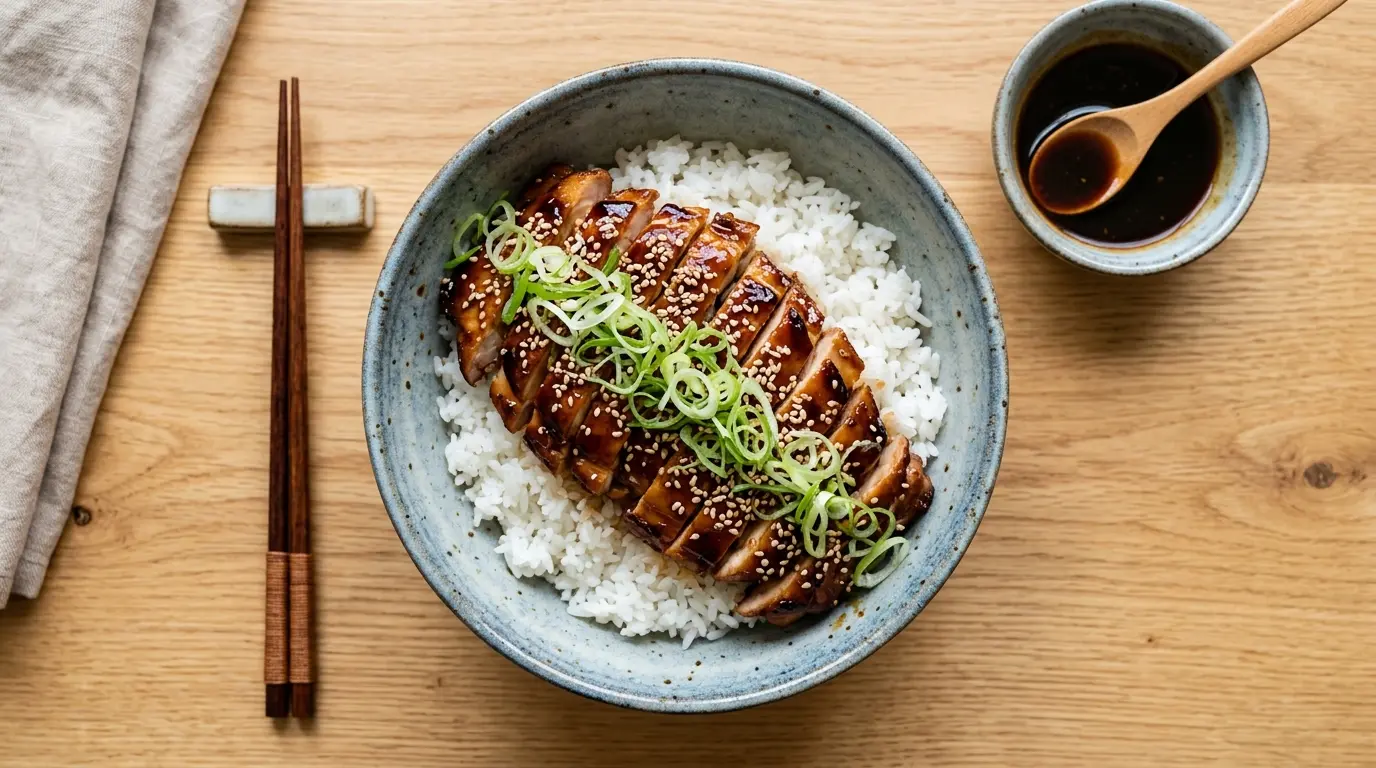
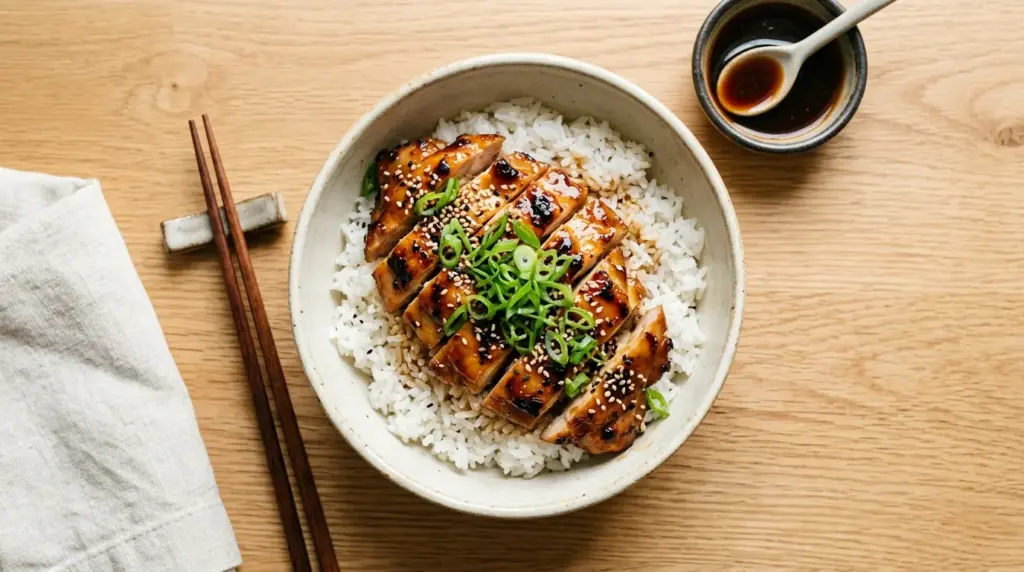
- Arrange the sliced chicken over a bed of steamed white rice.
- Spoon any remaining sauce from the pan over the top of the chicken.
- Garnish with sesame seeds and thinly sliced green onions if desired.
- Serve immediately for the best texture and flavor.
For more delicious weeknight Asian-inspired dinners, try this Easy Fried Rice Recipe.
Tips for Success
Getting your chicken teriyaki right every time comes down to a few key details that make a big difference in the final result.
- Always dry the chicken thoroughly. Moisture on the surface of the meat prevents browning. Use multiple sheets of paper towels and press firmly to remove as much surface moisture as possible before the chicken goes into the pan.
- Don’t crowd the pan. If you’re making a larger batch, cook the chicken in two separate batches. Crowding drops the pan temperature dramatically and causes steaming instead of searing.
- Watch the sauce closely once it goes in. The sugars in mirin and regular sugar can go from perfectly caramelized to burnt in seconds. As soon as the sauce looks glossy and thick, remove the pan from the heat.
- Blot excess fat before adding the sauce. If there’s a lot of rendered chicken fat in the pan, the sauce won’t adhere properly and will taste greasy. A quick blot with a paper towel solves this.
- Rest the chicken before slicing. Two minutes is all it takes for the juices to settle back into the meat. Cut too soon and the juices run right out onto the cutting board.
You might also enjoy: Bourbon Chicken Recipe
Serving Suggestions
This chicken teriyaki recipe is incredibly versatile and pairs well with a wide range of sides. Here are some of the best ways to serve it for a complete, satisfying meal.
The most classic and traditional pairing is steamed Japanese short-grain rice. The slightly sticky texture of short-grain rice is perfect for soaking up that glossy teriyaki glaze, and it’s how the dish is most commonly served in Japan.
- Steamed white rice – short-grain or medium-grain rice is ideal; jasmine works well too
- Chicken Fried Rice – a fun and filling way to use leftover rice
- Stir-fried or steamed broccoli – the slight bitterness of broccoli balances the sweet glaze beautifully
- Bok Choy – lightly sauteed with garlic and a drizzle of sesame oil for a traditional Japanese side
- Miso Soup – a classic Japanese accompaniment that rounds out the meal
- Shredded cabbage salad – simple, fresh, and often served alongside teriyaki chicken in Japanese restaurants
- Soba or udon noodles – toss with a little sesame oil and serve the teriyaki chicken on top for a noodle bowl
Variations to Try
Once you’ve mastered the base recipe, there are some great variations worth exploring. The core sauce ratio stays the same; it’s the format or add-ins that change.
- Ginger and garlic teriyaki: Grate 1 teaspoon of fresh ginger and mince 1 garlic clove, then stir both into the sauce before adding it to the pan. This is more of a Japanese-American style and adds a warm, aromatic depth.
- Spicy teriyaki: Add 1 to 2 teaspoons of sriracha or a pinch of red chili flakes to the sauce for a subtle heat that plays nicely against the sweetness.
- Honey teriyaki: Replace the granulated sugar with an equal amount of honey. It adds a slightly floral sweetness and makes the glaze even stickier and shinier.
- Teriyaki chicken bowl: Slice the cooked chicken and serve it over rice with shredded carrots, cucumber ribbons, avocado, and a drizzle of extra sauce for a teriyaki donburi-style bowl.
- Teriyaki chicken skewers: Cut the chicken into chunks before cooking, thread onto skewers, and grill or broil instead of pan-frying. Brush with the sauce during the final minutes of cooking.
- Baked teriyaki chicken: Bake the seasoned chicken thighs at 400°F (200°C) for 25 minutes, then pour the sauce over, broil for 2 to 3 minutes until glazed. Not the most traditional method, but a hands-off option.
Read Also: Easy Orange Chicken Recipe
Storage and Reheating
Leftover chicken teriyaki keeps beautifully and may actually taste even better the next day once the sauce has had time to settle into the meat.
- Refrigerator: Store cooled leftover chicken in an airtight container in the refrigerator for up to 3 to 4 days.
- Freezer: Freeze in a sealed freezer-safe container or zip-lock bag for up to 2 months. Let it thaw overnight in the refrigerator before reheating.
- Stovetop reheating: Place the chicken pieces in a small skillet over medium-low heat with a splash of water or chicken broth. Cover and heat for 3 to 4 minutes until warmed through. This method keeps the chicken moist.
- Microwave reheating: Place chicken on a microwave-safe plate, cover loosely with a damp paper towel, and heat in 30-second increments until warmed through. The damp towel helps retain moisture.
- Avoid overheating: Whether on the stovetop or in the microwave, don’t overheat leftover teriyaki chicken. Chicken thighs are more forgiving than breast meat, but prolonged high heat will still dry them out.
For another easy chicken recipe that stores and reheats just as well, try this Chipotle Chicken Recipe.
Nutritional Facts
The following estimates are based on one serving using boneless, skinless chicken thighs and the full sauce recipe, divided into four servings. Actual values will vary depending on the exact size of the chicken pieces and the brand of soy sauce used.
| Nutrient | Amount Per Serving (approx.) |
|---|---|
| Calories | 295 kcal |
| Protein | 28g |
| Total Fat | 13g |
| Saturated Fat | 3g |
| Carbohydrates | 12g |
| Sugar | 9g |
| Sodium | 780mg |
| Fiber | 0g |
| Cholesterol | 135mg |
Note: These values are for the chicken and sauce only and do not include rice or any side dishes. Using tamari instead of soy sauce will not significantly change the nutritional profile but will make the recipe gluten-free.
You might also enjoy: Bibimbap Recipe
Health Benefits of Key Ingredients
While chicken teriyaki is known for its flavor, the main ingredients also bring some genuine nutritional value to the table.
This is a protein-forward dish that supports muscle maintenance and satiety without excessive calories, especially when served over vegetables or a moderate portion of rice.
- Chicken thighs – an excellent source of complete protein, B vitamins (especially B6 and B12), zinc, and selenium. The slightly higher fat content compared to breast meat includes beneficial monounsaturated fats.
- Soy sauce – contributes a small amount of protein and contains antioxidants from the fermentation process; use low-sodium soy sauce to keep the sodium content in check
- Mirin – contains trace amounts of amino acids from the fermentation process; the natural sugars caramelize in cooking rather than remaining as added sugar in the final dish
- Sake – most of the alcohol cooks off during the cooking process; it contributes minimal residual calories to the finished dish
- Sesame seeds (garnish) – a small but meaningful source of calcium, magnesium, and healthy fats, including sesame lignans which have antioxidant properties
- Green onions (garnish) – low-calorie but rich in vitamin K, vitamin C, and folate; also contain quercetin, a flavonoid with anti-inflammatory properties
Read Also: Easy Mongolian Beef Recipe
Frequently Asked Questions
1. Can I use chicken breast instead of chicken thighs?
Yes, you can use boneless, skinless chicken breast if you prefer. However, chicken breast is leaner and has less fat, which means it dries out more quickly in high heat.
If using breast meat, butterfly or pound the pieces to an even thickness of about 3/4 inch (2cm) before cooking. Reduce the cooking time by about 1 to 2 minutes per side and check early with a thermometer to avoid overcooking.
2. What can I use instead of sake?
If you don’t have sake, dry sherry is the closest substitute in terms of flavor profile. You can also use dry white wine or, in a pinch, apple juice diluted with a little water.
Avoid using regular cooking wine or rice vinegar as substitutes. They are quite different in flavor and acidity and will not produce the same result.
3. Can I make the teriyaki sauce thicker?
The sauce in this recipe will naturally thicken as it reduces in the pan and coats the chicken. If you want a thicker consistency for dipping or drizzling, you have two options.
First, you can simply simmer the sauce in a small saucepan over medium heat for a few extra minutes after removing the chicken. Second, you can dissolve 1 teaspoon of cornstarch in 1 tablespoon of cold water and stir this slurry into the sauce while it simmers. It will thicken quickly.
4. Is this recipe gluten-free?
Standard soy sauce contains wheat, which means the recipe as written is not gluten-free. The good news is that this is an easy swap.
Simply replace the regular soy sauce with an equal amount of tamari, which is a Japanese soy sauce brewed with little to no wheat. The flavor is very similar and the recipe works identically. Always check the tamari label to confirm it’s certified gluten-free if this is a concern.
5. How do I know when the teriyaki sauce is done?
The sauce is ready when it has darkened to a deep, glossy mahogany color and coats the back of a spoon. It should be thick enough to cling to the chicken without running off immediately.
If you tilt the pan and the sauce moves like water, it needs another minute or two. If it’s sticking to the pan or starting to smoke, take it off the heat immediately. The process happens quickly once the sauce begins to caramelize, so stay close to the stove during this final step.
This recipe pairs beautifully with a side of Hoisin Sauce for an extra layer of flavor at the table.
Final Thoughts
This chicken teriyaki recipe is proof that the best food doesn’t have to be complicated. Four simple sauce ingredients, one pan, and about 20 minutes are all it takes to produce something that tastes genuinely restaurant-worthy.
The key is really just the technique: dry the chicken, get a proper sear, blot the excess fat, and let that sauce reduce into a glossy, clinging glaze. Once you’ve done it once, you’ll have the rhythm down for every time after.
Give this recipe a try this week and see how it compares to your usual takeout order. If you make it, I’d love to hear how it turned out in the comments below. And if you’ve got your own teriyaki tips or twists, share them. That’s what makes cooking more fun for everyone.
Recommended:
- Teriyaki Sauce Recipe
- Chicken Lo Mein Recipe
- Chicken Pad Thai Recipe
- Easy Pad Thai Recipe
- Chicken Fried Rice Recipe
- Basmati Rice Recipe
- Peanut Sauce Recipe
- Mango Chutney Recipe
- Easy Pepper Steak Recipe
- Tom Yum Soup Recipe


