If you have never made a cookie skillet recipe before, you are in for an absolute treat. This is the dessert that shows up at birthday dinners, movie nights, and lazy Sunday evenings when you want something indulgent but do not want to stand over the kitchen counter for hours.
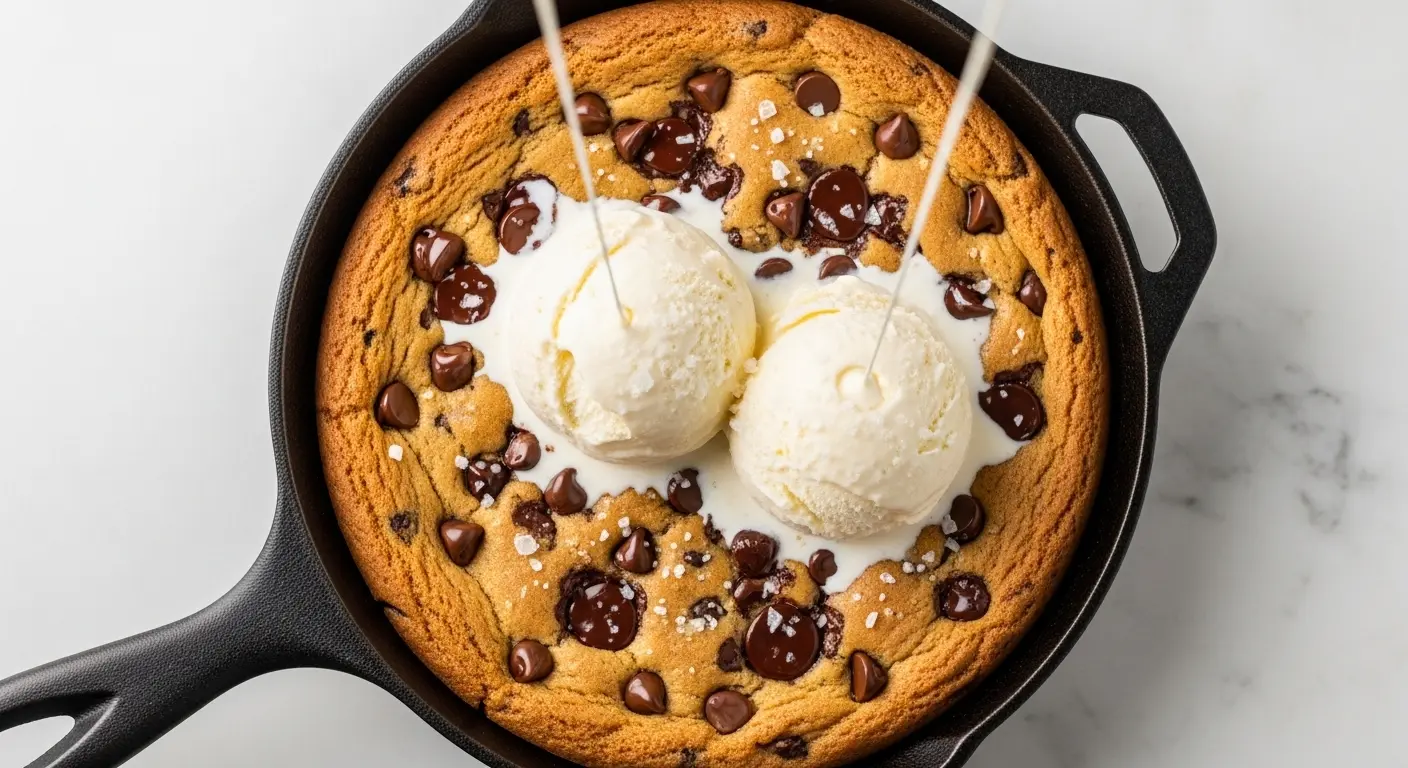
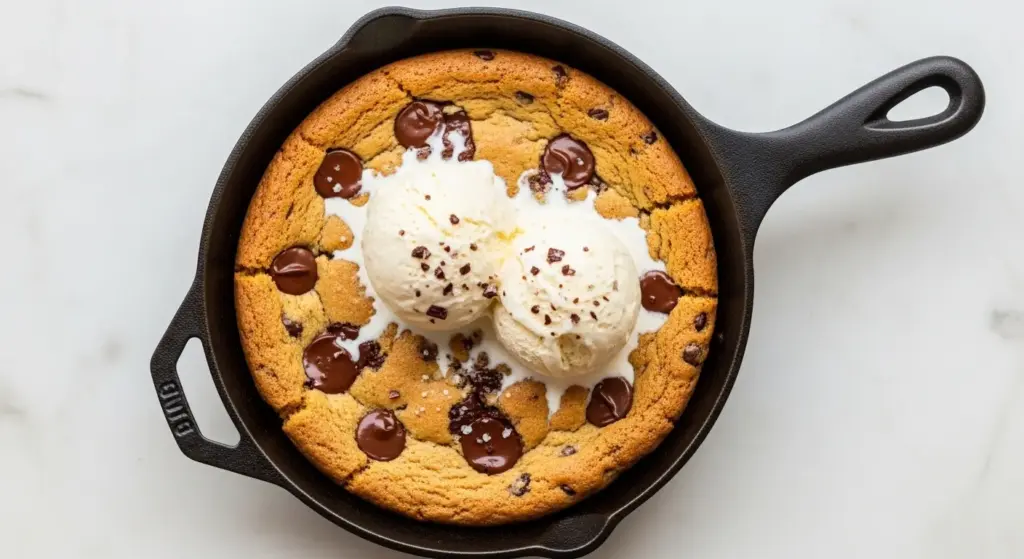
It is one giant, gloriously gooey chocolate chip cookie baked right in a cast iron skillet, with crispy caramelized edges, a soft and fudgy center, and a warm pool of melted chocolate in every single bite.
The best part? You need just one bowl, basic pantry staples, and about 40 minutes from start to finish.
No scooping dough into individual balls, no waiting for multiple batches to finish, and no disappointing thin cookies. Just one enormous, crowd-pleasing cookie that you serve straight from the pan with a generous scoop of vanilla ice cream on top.
This recipe uses browned butter, which takes only a few extra minutes and adds a nutty, caramel-like depth that makes the whole thing taste far more impressive than the effort involved.
You also get both a chewy, gooey center and lightly crisp edges in the same dessert, which is the kind of textural magic that only a cast iron skillet can deliver.
For anyone new to the skillet dessert world, the cast iron pan retains heat beautifully, so the cookie stays warm long after it comes out of the oven. That means you have plenty of time to serve it, top it, and enjoy every last bite.
You might also enjoy: Chicken Skillet Recipe
Why You’ll Love This Cookie Skillet Recipe
This dessert checks every single box for a truly satisfying sweet treat.
It is endlessly impressive despite being incredibly simple, which makes it perfect for hosting without the stress.
The cookie has that ideal texture combination of slightly crispy caramelized edges and a warm, gooey, almost underbaked center that melts the moment it hits your tongue.
Because everything bakes in one single pan, cleanup is an absolute breeze.
It is endlessly versatile, meaning you can swap in different mix-ins, toppings, and flavors to keep things fresh every single time you make it.
- It is fast: From mixing bowl to table in about 40 minutes, this is one of the quickest impressive desserts you can make.
- Beginner-friendly: No mixer, no chilling, no cookie-scooping technique required. If you can stir a bowl, you can make this.
- Crowd-pleasing format: Serving dessert straight from the skillet is casual, fun, and always gets a reaction.
- Uses pantry staples: Butter, sugar, flour, eggs, vanilla, and chocolate chips are likely already in your kitchen right now.
- The browned butter factor: This one small step adds layers of nutty, butterscotch-like flavor that elevate this far beyond a standard cookie.
- Perfect warm dessert: The cast iron retains heat so well that the cookie stays warm and gooey while you scoop and serve.
This same cast iron technique works beautifully for the Cowboy Skillet Recipe when you are craving something savory.
Ingredients
The ingredients for this cookie skillet recipe are simple and classic. The key is using quality chocolate chips and taking the time to brown the butter, as both of those steps make a noticeable difference in the final flavor.
- 1/2 cup (113g) unsalted butter, cubed
- 3/4 cup (165g) light brown sugar, packed
- 1/4 cup (50g) granulated white sugar
- 1 large egg
- 1 large egg yolk
- 2 teaspoons pure vanilla extract
- 1 1/4 cups (150g) all-purpose flour
- 1 tablespoon cornstarch
- 1/2 teaspoon baking soda
- 1/2 teaspoon fine sea salt
- 1 1/2 cups (255g) semi-sweet chocolate chips, divided
- Flaky sea salt, for topping (optional but highly recommended)
- Vanilla ice cream, for serving
Read Also: Best Chocolate Chip Cookies Recipe
Kitchen Equipment Needed
You do not need much to make this recipe, but a quality cast iron skillet is the one piece of equipment that truly makes a difference here. The heavy, even heat distribution of cast iron is what gives you those perfectly caramelized edges and that warm, gooey center.
- 10-inch cast iron skillet (this is the most important tool)
- Medium mixing bowl
- Small bowl for dry ingredients
- Whisk
- Rubber spatula or wooden spoon
- Measuring cups and spoons
- Oven mitts (cast iron handles get very hot)
- Wire cooling rack
- Ice cream scoop, for serving
Another favorite: Skillet Cornbread Recipe
Recommended Products for This Recipe
These are products I personally recommend based on quality and performance. Each one can genuinely improve your cookie skillet experience and make the process smoother.
1. Lodge 10-Inch Cast Iron Skillet
A well-seasoned Lodge cast iron skillet is the gold standard for this recipe. The even heat distribution gives you those perfectly caramelized, crispy edges while keeping the center soft and gooey. It is also a workhorse pan that you will use for everything from stovetop meals to oven desserts for years to come.
2. Ghirardelli Semi-Sweet Chocolate Chips
The quality of your chocolate chips matters more than you might expect. Ghirardelli semi-sweet chips melt smoothly, have a rich chocolate flavor, and hold their shape just enough to create those beautiful, glossy pools of chocolate in the finished cookie. Using a premium chip takes this from good to outstanding.
3. Maldon Sea Salt Flakes
A pinch of flaky sea salt sprinkled over the warm cookie just before serving is the finishing touch that makes the chocolate pop and balances the sweetness. Maldon is the classic choice, with large, light flakes that dissolve slowly on the tongue and add a subtle crunch.
4. OXO Good Grips Kitchen Scale
Measuring flour by weight (rather than cups) is the single most effective way to ensure your skillet cookie turns out perfectly every time. Too much flour leads to a dry, crumbly result, while too little makes it collapse. An OXO kitchen scale is accurate, easy to use, and affordable.
5. Nielsen-Massey Pure Vanilla Extract
Vanilla extract is not a place to cut corners in a recipe where it is a primary flavor. Nielsen-Massey is made from real vanilla beans and has a rich, complex, floral flavor that standard imitation vanilla simply cannot match. In a simple recipe like this one, the difference is noticeable.
For more inspiration, check out the Egg Skillet Recipe for a savory skillet option any time of day.
Step-by-Step Instructions
Step 1: Preheat the Oven and Prepare Your Dry Ingredients
- Preheat your oven to 350°F (175°C) and position the rack in the center of the oven.
- In a small bowl, combine the all-purpose flour, cornstarch, baking soda, and fine sea salt.
- Whisk the dry ingredients together thoroughly until evenly blended, then set the bowl aside. Mixing the dry ingredients separately ensures there are no pockets of baking soda or salt in the finished cookie.
Step 2: Brown the Butter
- Place the 10-inch cast iron skillet on the stovetop over medium-low heat.
- Add the cubed unsalted butter to the skillet and let it melt, stirring occasionally with a rubber spatula.
- Continue cooking, stirring frequently, as the butter begins to foam. This is the water in the butter evaporating.
- After the foam subsides, you will see golden brown specks forming at the bottom of the pan. This is the milk solids toasting, and it is what gives browned butter its signature nutty flavor.
- The entire process takes about 4 to 6 minutes. The butter is ready when it turns a deep amber color and smells like toasted nuts.
- Remove the skillet from the heat and pour the browned butter into a large mixing bowl immediately to stop the cooking. Allow it to cool for 8 to 10 minutes before proceeding. Using the butter while it is still too hot will partially scramble the eggs in the next step.
Step 3: Mix the Wet Ingredients
- Once the browned butter has cooled slightly (it should feel warm but not hot when you hold your hand near the bowl), add the packed light brown sugar and the granulated white sugar to the bowl.
- Stir vigorously with a whisk or rubber spatula until the sugars are fully dissolved into the butter. The mixture will look like wet sand at this stage, and that is completely normal.
- Add the whole egg, the additional egg yolk, and the pure vanilla extract. The extra egg yolk adds richness and chewiness that makes a significant difference in the final texture.
- Whisk everything together for about 60 seconds until the mixture is completely smooth, slightly thickened, and pale in color. This step incorporates air and helps dissolve any remaining sugar crystals.
Step 4: Combine Wet and Dry Ingredients
- Pour the dry ingredient mixture (flour, cornstarch, baking soda, and salt) into the bowl with the butter-sugar mixture.
- Using a rubber spatula, gently fold the dry ingredients into the wet ingredients. Do not overmix. Stir just until there are no visible streaks of flour remaining.
- Overmixing at this stage develops gluten in the flour, which can make the cookie tough rather than tender and chewy.
Step 5: Fold in the Chocolate Chips
- Reserve about 2 tablespoons of the chocolate chips to press on top of the dough before baking. These reserved chips will sit on the surface of the cookie and melt into beautiful, glossy pools as the cookie bakes.
- Add the remaining chocolate chips to the dough and fold them in evenly with the rubber spatula.
- Make sure the chocolate chips are distributed throughout the dough so that every bite gets chocolate.
Step 6: Press the Dough into the Skillet and Bake
- Lightly coat the same cast iron skillet (now clean and dry after pouring out the browned butter) with a thin layer of butter or nonstick cooking spray. Even a well-seasoned cast iron can benefit from a light greasing for this recipe to ensure easy serving.
- Transfer the cookie dough into the skillet and use the rubber spatula or the back of a spoon to press it into an even, flat layer across the bottom of the pan.
- Scatter the reserved chocolate chips over the surface of the dough and press them in lightly so they stay in place during baking.
- Place the skillet in the preheated oven and bake for 22 to 25 minutes, until the edges are golden brown and set, but the center still looks slightly underdone. This is intentional. The residual heat from the cast iron will continue cooking the center after you remove it from the oven, setting it to that perfect gooey-but-not-raw texture.
- Do not overbake. If you wait until the center looks fully set in the oven, the cookie will be overdone once it cools. When in doubt, pull it out a minute or two early.
Step 7: Cool, Top, and Serve
- Remove the skillet from the oven using oven mitts. The handle of a cast iron skillet gets extremely hot in the oven, so be very careful.
- Place the skillet on a wire cooling rack and allow the cookie to rest for 15 to 20 minutes before serving. This resting time is important, as the cookie continues to set during this period and will be easier to scoop or slice.
- Just before serving, sprinkle flaky sea salt over the top of the warm cookie if desired. The salt enhances the chocolate flavor and creates a beautiful contrast with the sweetness.
- Add one or two generous scoops of vanilla ice cream directly on top of the warm cookie and serve immediately, straight from the skillet with spoons or sliced into wedges with a pie server.
Read Also: Chewy Chocolate Chip Cookies Recipe
Tips for Success
A few small techniques make a big difference when it comes to this cookie skillet recipe. Following these tips will help ensure that your cookie turns out perfectly gooey and delicious every single time.
- Brown the butter: This step is optional in theory but transformative in practice. Browned butter adds a warm, nutty, caramel-like flavor that you simply cannot replicate with plain melted butter. It takes less than 10 minutes and is well worth the effort.
- Use both an egg and an egg yolk: The whole egg provides structure, while the extra yolk adds fat and richness that creates that chewy, fudgy center. Do not skip the yolk.
- Cool the butter before adding eggs: Adding the eggs to butter that is still too hot will cook them prematurely. Always allow the browned butter to cool for at least 8 minutes first.
- Do not overmix the dough: Once the flour goes in, fold gently and stop as soon as the streaks disappear. Overmixing leads to a tough cookie.
- Pull it out early: The center of the cookie should look underdone when you remove it from the oven. Cast iron holds heat so well that the cookie will continue to bake for several minutes after you take it out.
- Rest before serving: Give the skillet at least 15 minutes of resting time. This allows the center to set slightly so you get gooey rather than completely liquid in the center.
- Use a kitchen scale: Measuring flour by weight (150g) rather than volume ensures accuracy and prevents a dry, dense cookie caused by accidentally packing in too much flour.
This same attention to ingredient ratios is what makes the Old Fashioned Chocolate Chip Cookie Recipe so reliable every time.
Serving Suggestions
A warm cookie skillet is already spectacular on its own, but the right toppings take it from great to unforgettable.
The most classic and beloved way to serve this is with a big scoop of vanilla ice cream placed directly on the warm cookie. The contrast of warm and cold, gooey and creamy, is truly one of the best dessert experiences out there.
- Vanilla ice cream: The classic pairing. The ice cream melts slowly into the warm cookie, creating pools of creamy vanilla throughout.
- Hot Fudge Sauce: A drizzle of warm homemade hot fudge adds extra chocolate intensity and a glossy, indulgent finish.
- Caramel Sauce: Salted caramel drizzled over the top adds a gorgeous buttery sweetness and a beautiful color contrast.
- Whipped cream: A lighter alternative to ice cream that works well when you want something a little less rich.
- Chopped toasted walnuts or pecans: Adds crunch and a slightly earthy, roasted flavor that pairs beautifully with the chocolate.
- Fresh berries: Sliced strawberries or raspberries offer brightness and acidity that cuts through the richness of the cookie perfectly.
- Sprinkles: For a birthday or celebration, press colorful sprinkles into the dough before baking for a festive touch.
Variations to Try
Once you have mastered the classic cookie skillet recipe, experimenting with different flavors and add-ins is part of the fun. The base recipe is flexible enough to handle a wide variety of mix-ins.
- Peanut butter chips: Swap out half the chocolate chips for peanut butter chips for a rich, nutty variation that tastes like a Reese’s peanut butter cup in cookie form.
- White chocolate macadamia: Replace the semi-sweet chips with white chocolate chips and fold in 1/2 cup of roughly chopped macadamia nuts.
- S’mores skillet cookie: Mix in 1/2 cup of mini marshmallows and 1/2 cup of crushed graham crackers along with the chocolate chips. Top with additional marshmallows that will toast beautifully in the oven.
- Butterscotch and chocolate: Combine 3/4 cup semi-sweet chips with 3/4 cup butterscotch chips for a nostalgic flavor combination that is deeply satisfying.
- M&M cookie skillet: Replace some or all of the chocolate chips with M&Ms for a colorful, fun variation that kids absolutely love.
- Dark chocolate and sea salt: Use dark chocolate chips (70% cacao) instead of semi-sweet and be generous with the flaky sea salt on top for a more sophisticated, slightly bitter profile.
- Oatmeal chocolate chip skillet: Add 1/2 cup of old-fashioned rolled oats along with the flour for a heartier, chewier cookie with more texture.
For a completely different but equally satisfying cookie dessert, try the Monster Cookie Recipe.
Storage and Reheating
While this cookie skillet recipe is absolutely best eaten warm and fresh from the oven, leftovers store well and reheat beautifully, so do not worry about making too much.
- At room temperature: Cover the skillet tightly with aluminum foil or plastic wrap and store at room temperature for up to 3 days.
- In the refrigerator: For longer storage, transfer any remaining cookie to an airtight container and refrigerate for up to 5 days.
- To freeze: Allow the cookie to cool completely, slice into wedges, and store in a freezer-safe airtight container with parchment paper between the layers. Freeze for up to 3 months.
- To reheat in the oven: Place leftover cookie (still in the skillet or on an oven-safe dish) in a 300°F (150°C) oven for 5 to 8 minutes until warmed through. This is the best method for restoring the crispy edges.
- To reheat in the microwave: Place a wedge on a microwave-safe plate and heat in 20-second intervals until just warmed through. Be careful not to overheat, as this will make the cookie tough.
- Make-ahead option: You can prepare the dough, press it into the greased skillet, cover with plastic wrap, and refrigerate for up to 2 days before baking. When ready to bake, add 3 to 5 minutes to the bake time since the dough will be cold.
You might also enjoy: No Bake Cookie Recipe
Nutritional Facts
The following nutritional values are estimates based on one serving, assuming the cookie skillet is cut into 8 equal wedges and served without ice cream or additional toppings.
| Nutrient | Per Serving (1 of 8 wedges) |
|---|---|
| Calories | 390 kcal |
| Total Fat | 19g |
| Saturated Fat | 11g |
| Cholesterol | 75mg |
| Sodium | 215mg |
| Total Carbohydrates | 52g |
| Dietary Fiber | 2g |
| Total Sugars | 34g |
| Protein | 4g |
| Iron | 2mg |
| Calcium | 30mg |
Please note that these values are approximate and will vary based on the specific brands of ingredients used. Adding vanilla ice cream will increase the calorie count by approximately 130 to 200 calories per scoop depending on the brand.
Read Also: Peanut Butter Cookie Recipe
Health Benefits of Key Ingredients
While this is certainly an indulgent dessert meant to be enjoyed as a treat, a few of the key ingredients in this cookie skillet recipe do offer some genuine nutritional value.
This is not health food, and it should be savored accordingly, but understanding what goes into your baking can be a useful and interesting perspective.
- Dark chocolate chips (semi-sweet): Semi-sweet chocolate contains flavonoids, a class of plant-based compounds with antioxidant properties. Antioxidants help the body manage oxidative stress, and cocoa is one of the richest sources of these compounds in the food supply.
- Eggs: Each egg in this recipe contributes high-quality complete protein, meaning it contains all nine essential amino acids. Eggs are also an excellent source of choline, a nutrient important for brain function and cell membrane structure.
- Butter: Butter contains fat-soluble vitamins, including vitamin A, vitamin D, vitamin E, and vitamin K2. It also contains butyrate, a short-chain fatty acid that has been studied for its role in gut health.
- All-purpose flour: While refined flour is not a nutritional powerhouse, it provides carbohydrates that serve as the body’s primary fuel source, giving you energy alongside your treat.
- Vanilla extract: Real vanilla extract contains small amounts of vanillin, a compound derived from vanilla beans that has shown antioxidant properties in research settings.
Another great skillet treat to explore is the Breakfast Skillet Recipe for a morning version of one-pan cooking.
Frequently Asked Questions
1. What size skillet is best for this cookie skillet recipe?
A 10-inch cast iron skillet is the ideal size for this recipe and gives you the best ratio of crispy edges to gooey center. You can use an 8-inch skillet, but the cookie will be thicker and will require a longer baking time of about 30 to 35 minutes. A 12-inch skillet will work too, but the cookie will be thinner and will likely bake through faster, so start checking around the 18-minute mark.
2. Do I have to use a cast iron skillet?
Cast iron is strongly recommended because it heats evenly, retains heat exceptionally well, and creates those signature caramelized edges. However, you can use any oven-safe skillet or even a 9-inch round cake pan in a pinch. Just know that the results will not be exactly the same. The edges will be less caramelized and the overall texture may be slightly different without the cast iron’s heat properties.
3. How do I know when the cookie skillet is done?
The edges should be golden brown and firm, while the center should still look slightly glossy and underdone. If you press gently on the center, it should feel soft but not liquid. Remember that the cookie will continue to cook in the hot cast iron skillet for several minutes after you remove it from the oven, so what looks slightly underdone at 25 minutes will be perfectly gooey by the time you serve it after the resting period.
4. Can I make this recipe without browning the butter?
Yes, you absolutely can. Simply melt the butter instead of browning it, let it cool slightly, and proceed with the recipe as written. The cookie will still be delicious and gooey. The browned butter adds a deeper, more complex, nutty flavor, but the base recipe is excellent even without that extra step. If you are in a hurry, skip the browning and you will still have a fantastic dessert.
5. Can I make individual mini cookie skillets instead of one large one?
This recipe works beautifully in mini cast iron skillets or even oven-safe ramekins. Fill each mini skillet or ramekin only about two-thirds full to allow room for the cookie to puff and spread slightly during baking. Bake at the same temperature of 350°F (175°C) but reduce the baking time to approximately 15 to 18 minutes. Check for the same visual cues: golden edges and a slightly glossy, underdone-looking center.
For a completely different but equally easy single-serve dessert, the Mug Cake Recipe is ready in under 5 minutes.
Final Thoughts
This cookie skillet recipe is one of those rare desserts that feels completely special without demanding very much from you.
The browned butter, the gooey center, the crispy edges, and that melting scoop of vanilla ice cream on top create a combination that is honestly hard to beat.
It is the kind of dessert people talk about long after the skillet is empty, and the kind of recipe that earns you serious reputation points as a baker without requiring you to be one.
Give it a try this week, and do not be surprised if it immediately becomes your most requested dessert. Drop a comment below to let me know how yours turned out, or share a photo to show off your creation.
Recommended:
- Taco Skillet Recipe
- Salmon Skillet Recipe
- Stuffed Pepper Skillet Recipe
- Cheeseburger Skillet Recipe
- Turkey Skillet Recipe
- Enchilada Skillet Recipe
- Mexican Skillet Recipe
- Oatmeal Cookie Recipe
- Snickerdoodle Cookie Recipe
- Dutch Baby Recipe


