If you have been searching for the ultimate chocolate dessert that looks impressive but comes together with minimal effort, this brownie pudding recipe is exactly what you need.
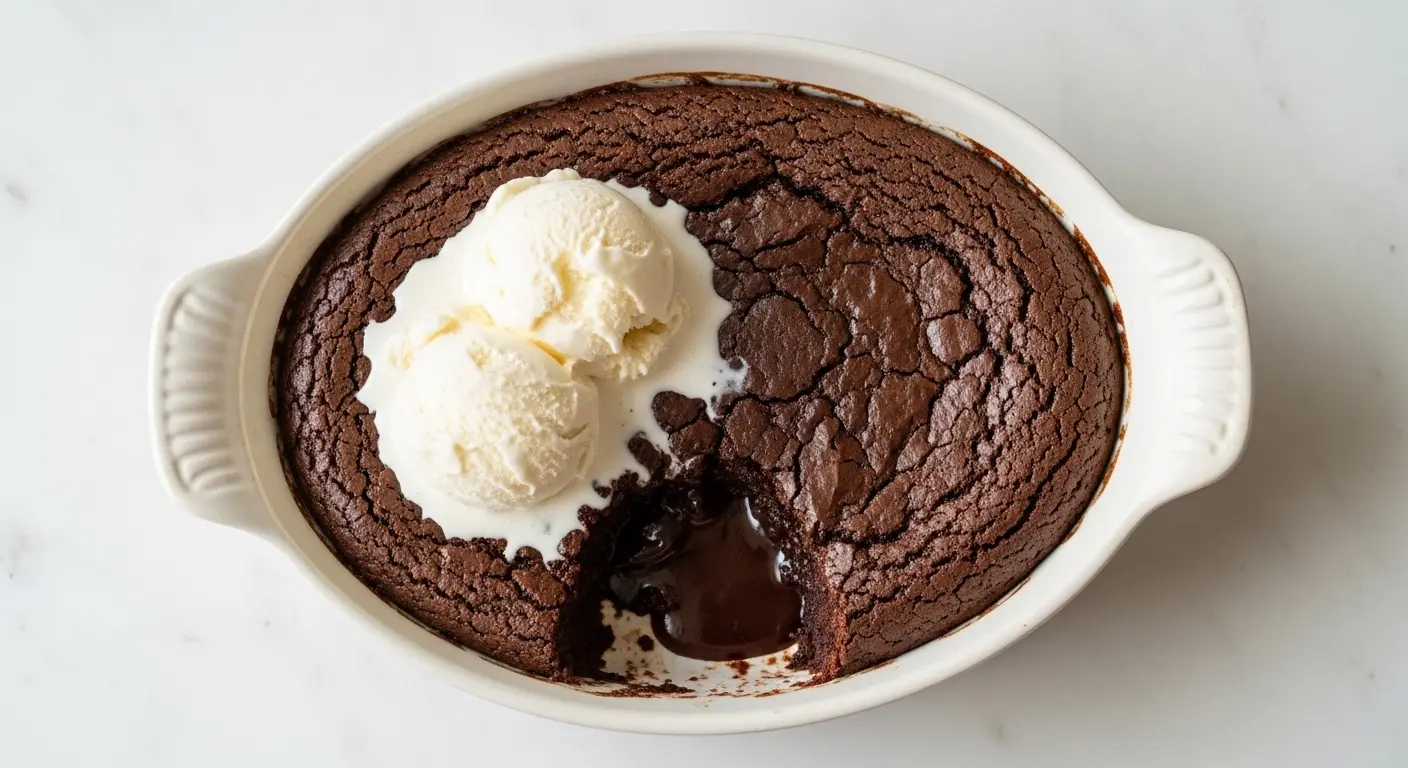
It sits somewhere between a fudgy brownie and a warm molten lava cake, with a crackly, paper-thin crust on top and a soft, custardy, spoonable center underneath. The magic happens in a water bath, which keeps the edges gently baked and the middle gloriously underdone.
This recipe is rooted in the now-iconic version popularized by Ina Garten, which has been going viral across social media for good reason.
With just six core ingredients, no fancy techniques, and a result that genuinely looks like it came from a high-end restaurant, it is the kind of dessert that makes people ask, “You made this?”
The key is whipping the eggs and sugar together for a full five to ten minutes. That step is non-negotiable. It builds the volume and aeration that gives the brownie pudding its signature crackly top and layered texture.
Serve it warm with a generous scoop of vanilla ice cream, and you have yourself a showstopper dessert for any occasion.
Why You’ll Love This Brownie Pudding Recipe
This dessert punches well above its weight for how little work it asks of you.
The ingredient list is short and the prep is simple, but the finished result looks and tastes like something you would order at a nice restaurant.
- Crackly top with a gooey center: The water bath creates two distinct textures in one dish, which makes every scoop feel like an experience.
- Only six ingredients: Butter, eggs, sugar, cocoa powder, flour, and vanilla are all you need. Most of these are probably already in your pantry.
- No special skills required: The stand mixer does the heavy lifting. If you can melt butter and run a mixer, you can make this.
- Scales beautifully for a crowd: Bake it in a large oval dish and let everyone scoop their own portion straight from the pan. It is perfect for dinner parties or family gatherings.
- Forgiving and flexible: The water bath acts as a buffer against overbaking, so even if you leave it in a couple of extra minutes, it still comes out wonderfully.
- Pairs perfectly with ice cream: The warm, intensely chocolate pudding and cold, creamy vanilla ice cream together are one of the most satisfying combinations in the dessert world.
You might also enjoy: Chocolate Pudding Recipe
Ingredients
To make this brownie pudding recipe, you only need a handful of high-quality staples. Using good-quality cocoa powder is the single most important ingredient decision you can make here, since it is the backbone of the entire flavor.
- 1/2 lb (225g) unsalted butter, plus extra for greasing the dish
- 4 extra-large eggs (or 5 large eggs)
- 2 cups (400g) granulated sugar
- 1/2 cup (50g) Dutch-process cocoa powder, sifted (plus extra for dusting if desired)
- 1/2 cup (60g) all-purpose flour
- 1 tablespoon pure vanilla extract
- 1/4 teaspoon kosher salt
- Hot tap water, for the water bath
Read Also: Dirt Pudding Recipe
Kitchen Equipment Needed
You do not need any specialty gadgets for this brownie pudding recipe, but a few key tools will make the process much easier and produce a better result.
- Stand mixer with paddle attachment (or a hand mixer)
- Oval or rectangular baking dish, approximately 9×12 inches or 2-quart capacity
- Large roasting pan or deep baking pan (for the water bath)
- Fine mesh sieve or sifter
- Medium saucepan or microwave-safe bowl (for melting butter)
- Rubber spatula
- Measuring cups and spoons
- Oven mitts
The roasting pan for the water bath needs to be large enough to comfortably hold your baking dish with room around the sides. A half-sheet pan with high sides works well here.
For a lighter option, try: Vanilla Pudding Recipe
Recommended Products for This Recipe
These are products recommended based on quality and performance, chosen to help you get the best possible result from this recipe.
1. Dutch-Process Cocoa Powder
Since this recipe has almost no other flavoring agents, the cocoa powder is everything. Dutch-process cocoa is alkalized, giving it a deeper, smoother, more intensely chocolate flavor than natural cocoa. It is the reason brownie pudding tastes so rich and complex.
2. Le Creuset Enameled Stoneware Oval Baking Dish
This baking dish distributes heat evenly and is the perfect size for brownie pudding. The elegant shape makes it beautiful enough to bring straight to the table, and the enamel surface releases the baked edges cleanly for easy scooping.
3. KitchenAid Stand Mixer
Whipping the eggs and sugar to the right consistency is the most critical step in this recipe, and a stand mixer makes it effortless. It frees up your hands to prepare the other components while the mixer works.
4. Fine Mesh Sifter
Sifting the cocoa and flour together is a step you do not want to skip here. A fine mesh sifter breaks up clumps in the cocoa and ensures even distribution throughout the batter, which directly affects the texture of the finished pudding.
5. Vanilla Bean Paste
Vanilla bean paste gives you the warm, aromatic depth of actual vanilla beans without the cost. It is a step up from plain extract and adds a subtle complexity to the chocolate that you will notice.
The same rich chocolate flavor works beautifully in a Fudge Brownie Recipe too.
Step-by-Step Instructions
Step 1: Preheat the Oven and Prepare Your Baking Dish
- Set your oven to 325°F (160°C) and allow it to fully preheat before placing anything inside. The lower temperature is intentional and creates the gentle heat needed for the pudding-like center.
- Lightly grease your 2-quart oval or rectangular baking dish with softened butter, making sure to coat the bottom and all sides evenly.
- Set the prepared baking dish aside while you prepare the batter.
Step 2: Melt the Butter
- Cut the 1/2 lb (225g) of unsalted butter into chunks and place it in a medium saucepan over low heat. Alternatively, melt it in a microwave-safe bowl in 30-second increments, stirring between each, until fully melted.
- Once melted, pour the butter into a heat-safe bowl and set it aside to cool to room temperature. This step is crucial. If the butter is too hot when added to the eggs, it will scramble them and ruin the batter.
- The butter should feel warm to the touch, not hot, before you use it. This typically takes about 10 to 15 minutes at room temperature.
Step 3: Sift Together the Cocoa Powder, Flour, and Salt
- Measure 1/2 cup (50g) of Dutch-process cocoa powder, 1/2 cup (60g) of all-purpose flour, and 1/4 teaspoon of kosher salt into a fine mesh sieve set over a medium bowl.
- Sift everything together, using a spoon to press any clumps through the mesh if needed.
- Set the sifted dry mixture aside. Sifting removes lumps and ensures the cocoa and flour are evenly distributed, which gives the batter a smooth, uniform texture.
Step 4: Whip the Eggs and Sugar
- Crack 4 extra-large eggs (or 5 large eggs) directly into the bowl of your stand mixer. If using a hand mixer, add them to a large bowl.
- Add 2 cups (400g) of granulated sugar to the eggs.
- Attach the paddle attachment and beat the egg and sugar mixture on medium-high speed for 5 to 10 minutes. Do not rush this step.
- After 5 minutes, the mixture should look noticeably thicker and paler. By 7 to 10 minutes, it should be very thick, pale yellow to nearly white, and ribbon-like when the beater is lifted. This volume and aeration is what creates the signature crackly crust on top of the finished brownie pudding.
- If you are using a hand mixer, it may take a minute or two longer to reach the same consistency.
Step 5: Add the Vanilla and Dry Ingredients
- Once the egg and sugar mixture is ready, reduce the mixer speed to low.
- Add 1 tablespoon of pure vanilla extract (or vanilla bean paste) directly to the mixer bowl.
- Slowly pour in the sifted cocoa, flour, and salt mixture while the mixer runs on low.
- Mix only until the dry ingredients are just combined, about 15 to 20 seconds. Overmixing at this stage can deflate the air you just built into the eggs, so stop as soon as no dry streaks remain.
Step 6: Add the Cooled Melted Butter
- With the mixer still running on low speed, slowly pour the cooled melted butter into the batter in a thin, steady stream.
- Take your time here. Adding the butter slowly ensures it incorporates evenly without deflating the batter or scrambling the eggs.
- Once all the butter is added, mix for just another 5 to 10 seconds until fully combined.
- Use a rubber spatula to scrape down the sides and bottom of the bowl and give the batter one final gentle fold to make sure everything is incorporated.
Step 7: Set Up the Water Bath
- Pull out your large roasting pan or deep baking pan. It should be large enough that your filled baking dish can sit inside it with at least an inch of space on the sides.
- Place the roasting pan on your oven rack while the oven is already preheated. It is easier and safer to add the water once the pan is already on the rack.
- Pour the brownie pudding batter into your prepared greased baking dish.
- Carefully place the filled baking dish inside the roasting pan on the oven rack.
- Using a kettle or a pitcher, pour the hottest tap water (or boiling water that has cooled for 1 minute) into the roasting pan around the outside of the baking dish. Fill it until the water comes halfway up the sides of the baking dish.
- The water bath, also known as a bain-marie, regulates the baking temperature so the edges do not overbake and the center stays soft and custard-like.
Step 8: Bake for Exactly One Hour
- Close the oven door carefully and bake for exactly 1 hour. Try not to open the oven during this time.
- At the 1-hour mark, the edges of the brownie pudding should look set and firm, and the top should have formed a thin, crackly crust.
- The center will look noticeably underbaked and may even jiggle slightly when the dish is moved. This is correct. The underbaked center is the “pudding” part of the brownie pudding, and it will continue to set slightly as it cools.
- If a toothpick is inserted about 2 inches from the edge, it should come out mostly clean. The very center should still look soft.
- Do not overbake. Baking longer than an hour will eliminate the pudding center and leave you with a regular, fully set brownie.
Step 9: Remove from the Water Bath and Rest
- Using oven mitts, carefully lift the baking dish out of the roasting pan and set it on a wire rack or folded kitchen towel.
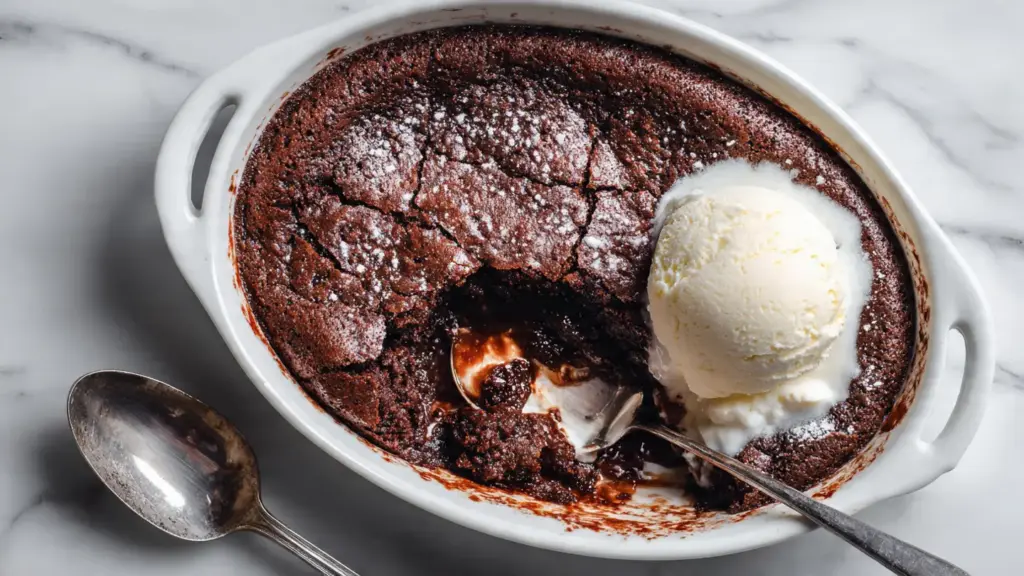
- Allow the brownie pudding to rest for at least 10 to 15 minutes before serving. This rest time lets the edges firm up just slightly and makes scooping cleaner.
- The brownie pudding is best served warm, when the center is still soft and molten. It can also be served at room temperature, where the texture will be denser and fudgier.
Step 10: Scoop and Serve
- Use a large spoon or serving spoon to scoop generous portions of the brownie pudding directly from the baking dish into individual bowls.
- Make sure each scoop catches some of the crispy top layer as well as the gooey center underneath.
- Top each serving with a scoop of vanilla ice cream and serve immediately.
Read Also: Hot Fudge Cake Recipe
Tips for Success
Getting this brownie pudding recipe right comes down to a few non-negotiable techniques that make all the difference.
- Do not skip the 5-10 minute whipping time: The crackly crust only forms when the eggs and sugar are properly aerated. Set a timer and let the mixer run.
- Cool your butter before adding it: Hot butter will cook the eggs and create a greasy, curdled batter. Always let melted butter come to a warm, not hot, temperature before incorporating it.
- Sift the cocoa and flour together: Cocoa powder clumps easily. Sifting it with the flour ensures even distribution and a smooth batter with no dense pockets.
- Use Dutch-process cocoa powder: It has a more intense, rounded chocolate flavor than natural cocoa and makes a noticeable difference in the final taste.
- The center should look underdone: Trust the process. If the center looks fully set when it comes out of the oven, it is overbaked. The jiggly center is the goal.
- Add a pinch of salt: Even though the recipe does not traditionally call for salt, adding 1/4 teaspoon of kosher salt sifted in with the dry ingredients balances the sweetness and amplifies the chocolate flavor.
- Use the hottest possible tap water for the bath: Hotter water means the water bath temperature recovers faster after you open the oven door, which helps the baking stay consistent.
This also pairs wonderfully alongside a warm bowl of Sticky Toffee Pudding for a full dessert spread.
Serving Suggestions
Brownie pudding is rich enough to serve as the solo star of the dessert table, but a few thoughtful accompaniments take it from great to unforgettable.
The most classic and beloved pairing is a scoop of good-quality vanilla ice cream. The cold, creamy ice cream melts into the warm gooey pudding to create a sauce right in the bowl.
- Vanilla ice cream or a scoop of homemade whipped cream for a rich, classic pairing
- A drizzle of Hot Fudge Sauce for extra chocolate intensity
- Fresh raspberries or strawberries for a fruity, tart contrast that cuts through the richness
- A dusting of powdered sugar over the crackly top for a simple but elegant presentation
- A drizzle of caramel sauce for a sweet, buttery complement to the deep chocolate flavor
- A sprinkle of flaky sea salt over the top just before serving, which highlights the chocolate and adds a satisfying crunch
For a complete chocolate-themed dessert table, this pairs beautifully with Chocolate Chip Bread.
Variations to Try
Once you have mastered the classic version of this brownie pudding recipe, there are some fun ways to make it your own.
- Mocha Brownie Pudding: Add 1 teaspoon of instant espresso powder or finely ground coffee to the sifted dry ingredients. It deepens the chocolate flavor without making the dessert taste like coffee.
- Hazelnut Brownie Pudding: Stir 2 tablespoons of hazelnut butter or Nutella into the cooled melted butter before adding it to the batter for a rich, nutty dimension.
- Mexican Chocolate Brownie Pudding: Add 1/2 teaspoon of ground cinnamon and a small pinch of cayenne pepper to the dry ingredients for a warm, spiced variation.
- Salted Caramel Brownie Pudding: Drizzle 3 tablespoons of prepared caramel sauce over the top of the batter before baking, then sprinkle with flaky salt. The caramel bakes into the top layer.
- Raspberry Brownie Pudding: Drop 1/2 cup of fresh or frozen raspberries into the batter after pouring it into the dish. They sink slightly and create pockets of jammy fruit throughout the gooey center.
- Gluten-Free Version: Replace the all-purpose flour with the same amount of almond flour or fine almond meal. The texture will be slightly denser but still delicious.
Another indulgent chocolate dessert worth exploring is the Chocolate Souffle Recipe.
Storage and Reheating
Brownie pudding keeps well and actually develops a fudgier, more brownie-like texture as it cools completely.
- Room temperature: Covered with plastic wrap or foil, brownie pudding can sit at room temperature for up to 8 hours after baking. This is ideal if you bake it earlier in the day for a dinner party.
- Refrigerator: Store any leftovers covered tightly with plastic wrap or in an airtight container in the refrigerator for up to 4 days.
- Freezer: You can freeze individual portions in airtight containers for up to 2 months. Thaw overnight in the refrigerator before reheating.
- Reheating: To reheat a single portion, place it in a microwave-safe bowl and heat in 20 to 30-second increments until just warmed through. Be careful not to overheat or it will dry out. Alternatively, rewarm the entire dish, covered loosely with foil, in a 300°F (150°C) oven for about 15 minutes.
- Note on texture: The pudding center firms up significantly once refrigerated. Reheating restores the gooey texture, though it may not be quite as liquid as when it first comes out of the oven.
You might also like: Bread Pudding Recipe
Nutritional Facts
The following nutritional values are approximate and based on one serving, assuming the recipe yields 8 servings.
| Nutrient | Amount Per Serving |
|---|---|
| Calories | 470-490 kcal |
| Total Fat | 26g |
| Saturated Fat | 16g |
| Cholesterol | 145mg |
| Sodium | 80mg |
| Total Carbohydrates | 60g |
| Dietary Fiber | 3g |
| Total Sugars | 50g |
| Protein | 5g |
Nutritional values will vary based on specific brands and ingredient sizes used.
This dessert is rich and indulgent by nature. A smaller serving paired with vanilla ice cream is typically how most people enjoy it, which means the calorie count per portion can vary based on how generous you are with each scoop.
Another favorite: Banana Pudding Recipe
Health Benefits of Key Ingredients
While brownie pudding is undeniably a treat, a few of its core ingredients do carry some genuine nutritional value worth noting.
Enjoying indulgent desserts made with real, whole ingredients is always a better choice than highly processed alternatives loaded with preservatives and artificial flavors.
- Cocoa powder: Unsweetened cocoa powder is rich in flavanols, a type of antioxidant associated with improved heart health and reduced inflammation. Dutch-process cocoa is slightly lower in flavanols due to the alkalizing process, but still contributes beneficial compounds.
- Eggs: A rich source of complete protein, choline, and fat-soluble vitamins including A, D, E, and K2. The eggs in this recipe also provide lecithin, which acts as a natural emulsifier and contributes to the pudding’s smooth, velvety texture.
- Butter: Grass-fed butter in particular is a source of fat-soluble vitamins and butyrate, a short-chain fatty acid linked to gut health. It also adds richness and helps give the brownie pudding its glossy, fudgy interior.
- Vanilla extract: Pure vanilla extract contains vanillin, which has been studied for its antioxidant and anti-inflammatory properties. It also enhances the perceived sweetness of a dish, meaning you can enjoy full flavor with relatively modest sugar.
Read Also: Chia Seed Pudding Recipe
Frequently Asked Questions
1. Why does my brownie pudding look underbaked in the center?
This is completely intentional and exactly what you want. The center of brownie pudding should be soft, custardy, and spoonable when it comes out of the oven. This is the “pudding” component of the dish. If you bake it until the center is fully set, you will have a regular brownie rather than the gooey, layered dessert the recipe is designed to produce.
2. Can I make brownie pudding without a stand mixer?
Yes, a hand mixer will work for this recipe. The process is the same, but it may take a minute or two longer to reach the thick, pale, ribbon-like consistency during the egg-and-sugar whipping stage. Make sure not to skip the full whipping time, as this step is what creates the crackly crust.
3. Do I really need the water bath?
The water bath is strongly recommended and should not be skipped. It regulates the temperature around the baking dish, preventing the edges from overbaking while the center remains soft. Without the water bath, the edges will likely become too firm and dry before the center has a chance to develop its custardy texture.
4. Can I use natural (non-Dutch-process) cocoa powder instead?
You can substitute regular unsweetened cocoa powder, and the recipe will still turn out well. Dutch-process cocoa gives a deeper, smoother, less acidic chocolate flavor, which is why it is the preferred choice. If using natural cocoa, the flavor will be slightly sharper and less rich, but the texture and technique remain exactly the same.
5. Can I make this ahead of time for a dinner party?
Absolutely. You can bake the brownie pudding earlier in the day and either serve it at room temperature or gently reheat the entire dish, covered loosely with foil, in a 300°F (150°C) oven for about 15 minutes before serving. The gooey center will be a bit less liquid after it has sat for a few hours, but reheating brings back much of that warm, soft texture. Serve immediately after reheating with vanilla ice cream for best results.
This technique also works well when making a warm Malva Pudding Recipe ahead for guests.
Final Thoughts
This brownie pudding recipe is one of those rare desserts that is both effortless to make and genuinely impressive to serve.
The combination of a crackly, thin crust and a warm, gooey chocolate center is unlike anything a standard brownie or chocolate cake can deliver.
If you love chocolate desserts, this one deserves a spot at the top of your list.
Give it a try the next time you want to wow your family or guests, and do not be surprised when they scrape the dish clean and ask for the recipe.
Drop a comment below to let me know how it went, and share a photo if you make it. Nothing makes my day more than seeing your beautiful brownie pudding creations.
Recommended:
- Chocolate Pudding Recipe
- Rice Pudding Recipe
- Vanilla Pudding Recipe
- Corn Pudding Recipe
- Figgy Pudding Recipe
- Yorkshire Pudding Recipe
- Best Chocolate Chip Cookies Recipe
- Moist Chocolate Cake Recipe
- Hot Fudge Sundae
- Easy Creme Brulee Recipe


