If you’ve been searching for a weeknight dinner that delivers big, bold flavor with barely any effort, this picadillo recipe is exactly what you need. Picadillo is a classic Latin American dish made from seasoned ground beef, tender potatoes, and a rich tomato-based sauce that comes together in one skillet. It’s the kind of meal that gets passed down through generations, and once you taste it, you’ll completely understand why.
This recipe follows the beloved Mexican-style version, which keeps things beautifully simple: savory ground beef, diced potatoes, a bright tomato sauce, and a handful of aromatics like garlic, onion, and bell pepper. No fancy equipment, no hard-to-find ingredients.
It’s pure, unpretentious comfort food that’s on the table in about 30 minutes.
What makes this dish so special is how the potatoes absorb all the flavors of the tomato sauce and spices as they simmer. The cumin brings warmth, the bay leaf adds subtle depth, and the fresh garlic ties everything together. Every bite is hearty, satisfying, and just deeply, wonderfully delicious.
You might also enjoy this Taco Skillet Recipe for another quick Mexican-inspired weeknight dinner.
Why You’ll Love This Picadillo Recipe
This dish checks every single box for a weeknight dinner win.
It’s budget-friendly, uses pantry staples, and takes less than 30 minutes from start to finish. Ground beef and potatoes are two of the most affordable proteins and produce you can buy, making this a meal the whole family can enjoy without breaking the bank.
It’s also incredibly versatile. Serve it over rice, stuff it into tacos, scoop it into warm tortillas, or pile it into burritos.
The leftovers might honestly be even better than the fresh batch. The flavors deepen overnight as everything melds together in the fridge.
It’s also a total crowd-pleaser. Kids love the mild, familiar flavors, and adults appreciate the warm complexity of the spiced tomato sauce.
- Budget-friendly and made with common pantry ingredients
- Ready in about 30 minutes with minimal prep
- One-skillet recipe for easy cleanup
- Incredibly versatile as a taco filling, rice topper, or standalone entree
- Wonderful for meal prep and tastes even better the next day
- Easily customizable with different vegetables or proteins
- Family-approved and beginner-friendly
Read Also: Mexican Beef and Rice Skillet Recipe
Ingredients
This recipe uses simple, accessible ingredients that you likely already have on hand. The 80/20 ground beef provides the best flavor and texture because the fat content keeps the meat moist during simmering. Yukon Gold or russet potatoes hold their shape well and absorb the sauce without turning mushy.
- 1.5 lbs (680g) ground beef (80/20 recommended)
- 2 medium Yukon Gold or russet potatoes, peeled and cut into ½-inch (1.25 cm) cubes
- 1 medium white onion, finely diced
- 1 medium green bell pepper, finely diced
- 4 cloves garlic, minced
- 1 can (15 oz / 425g) tomato sauce
- ½ cup (120ml) low-sodium beef broth
- 1 tsp ground cumin
- 1 tsp ground coriander
- ½ tsp dried oregano
- 1 bay leaf
- 1 tsp salt (or to taste)
- ½ tsp black pepper
- 1 tbsp olive oil
- Fresh cilantro, for garnish (optional)
- Lime wedges, for serving (optional)
For the “Serving Suggestions” section:
- Cooked white rice, for serving
- Warm corn tortillas or flour tortillas, for serving
Read Also: Enchilada Skillet Recipe
Kitchen Equipment Needed
You don’t need any specialty equipment for this recipe, but having the right tools makes the process smoother and more enjoyable. A large, wide skillet is essential because it gives the ground beef room to brown properly instead of steaming.
- Large skillet or sauté pan (12-inch / 30cm recommended)
- Sharp chef’s knife
- Cutting board
- Wooden spoon or silicone spatula
- Measuring spoons
- Can opener
- Colander (for draining beef grease)
- Ladle or large serving spoon
This pairs wonderfully with a side of the Chicken Tortilla Soup for a full Mexican-inspired spread.
Recommended Products for This Recipe
These are products chosen based on quality and performance that will genuinely improve your picadillo-making experience.
1. Cast Iron Skillet
A cast iron skillet distributes heat more evenly than a standard nonstick pan, which means your ground beef browns properly rather than steaming. Better browning equals deeper, more complex flavor in the final dish. It’s a long-term kitchen investment that pays off every single time you use it.
2. San Marzano Canned Tomatoes
Using high-quality San Marzano crushed tomatoes instead of generic tomato sauce adds a naturally sweeter, less acidic depth to the sauce. They’re less watery and pack a concentrated tomato flavor that makes a noticeable difference. Many experienced home cooks swear by them for any tomato-based Latin dish.
3. Mexican Spice Blend
A quality Mexican seasoning blend can simplify your spice rack and ensure a well-balanced flavor profile every time. Look for a blend that includes cumin, coriander, and oregano as primary spices. It’s a convenient option that still delivers authentic, layered flavor.
4. Airtight Glass Food Storage Containers
Since picadillo is ideal for meal prep, a set of airtight glass containers keeps leftovers fresh and makes reheating a breeze. Glass containers don’t absorb odors or stains from the tomato sauce the way plastic ones often do. Individual portion sizes also make weekday lunches incredibly easy to grab and go.
You might also enjoy: Stuffed Pepper Skillet Recipe
Step-by-Step Instructions
1. Prep Your Ingredients
- Peel and cube the potatoes into small, even ½-inch (1.25 cm) pieces. Uniformity is key here so that all the potato pieces finish cooking at the same time.
- Finely dice the white onion and green bell pepper into small, roughly equal pieces, about ¼ inch (0.6 cm). Smaller pieces cook faster and meld into the sauce more seamlessly.
- Mince the garlic cloves as finely as possible. You can also use a garlic press if you have one. Fresh garlic is much preferred over pre-minced jarred garlic for flavor.
- Open the can of tomato sauce and measure out the beef broth. Have all your spices pre-measured and ready to go. This is called “mise en place” and it makes the cooking process much smoother, especially since things move quickly in the skillet.
2. Brown the Ground Beef
- Heat 1 tablespoon of olive oil in a large skillet over medium heat until the oil is shimmering and hot, about 1 to 2 minutes.
- Add the ground beef to the skillet in one layer. Do not stir it immediately. Letting it sit undisturbed for 2 to 3 minutes allows a proper brown crust to form on the bottom, which adds significant flavor to the dish.
- After a few minutes, begin breaking up the beef with a wooden spoon or spatula into small crumbles as it continues to cook.
- Cook the beef until it is mostly browned all the way through, about 7 to 8 minutes total. You don’t need it to be fully cooked through at this stage since it will continue simmering later.
- Carefully tilt the skillet slightly and use a spoon to remove excess grease from the pan, or drain the beef through a colander. Return the beef to the skillet. Draining the excess fat keeps the final dish from being greasy and heavy.
3. Sauté the Aromatics
- Return the skillet with the drained beef to medium heat.
- Add the diced onion and green bell pepper directly to the skillet with the beef.
- Cook, stirring occasionally, for 4 to 5 minutes until the onion is softened and translucent and the bell pepper is tender. The vegetables should smell fragrant and sweet at this point.
- Add the minced garlic to the skillet and stir it in with the beef and vegetables.
- Cook for an additional 30 to 60 seconds, stirring constantly, until the garlic is fragrant. Be careful not to let the garlic burn, as it becomes bitter very quickly. The moment you smell that nutty, sweet garlic aroma, move on to the next step.
4. Add the Potatoes and Liquid
- Add the diced potatoes to the skillet and stir to combine them with the beef, onion, bell pepper, and garlic mixture.
- Pour in the tomato sauce and beef broth over everything. Stir well to combine so that all the ingredients are evenly coated and submerged in the liquid.
- Add the ground cumin, ground coriander, dried oregano, salt, and black pepper. Stir again to distribute the spices evenly throughout the mixture.
- Tuck the bay leaf down into the mixture so it is partially submerged. The bay leaf releases its subtle, aromatic flavor throughout the simmering process.
5. Simmer Until Potatoes Are Tender
- Bring the mixture to a gentle simmer over medium heat. You should see small bubbles breaking the surface steadily but not a rapid, rolling boil.
- Once simmering, place a lid on the skillet and reduce the heat slightly to medium-low.
- Cook covered for 10 minutes. During this time, the potatoes will begin to soften and absorb the flavors of the sauce.
- After 10 minutes, remove the lid and stir the mixture gently from the bottom up to prevent anything from sticking.
- Continue cooking uncovered for another 8 to 10 minutes, until the potatoes are completely fork-tender (a fork or knife should slide through with no resistance) and most of the liquid has reduced into a saucy, thick consistency that clings to the meat and potatoes.
- Taste the picadillo and adjust seasoning if needed. Add more salt, pepper, or cumin to your preference.
6. Final Touches and Serve
- Remove the bay leaf from the skillet and discard it before serving.
- Give the picadillo one final stir to make sure everything is well combined.
- Taste once more and squeeze in a little fresh lime juice if you’d like a bright, citrusy finish. This is optional but highly recommended as it lifts all the flavors.
- Garnish with freshly chopped cilantro if desired. Serve immediately over white rice, in warm tortillas, or as a filling for tacos or burritos.
Read Also: Mexican Skillet Recipe
Tips for Success
A few simple techniques make a big difference between a good picadillo and a truly great one. Understanding why these tips work helps you apply them to other similar recipes, too.
- Don’t skip draining the beef. Excess grease makes the sauce oily and heavy instead of rich and saucy. Draining it is a 30-second step that significantly improves the final texture.
- Cut potatoes uniformly. Inconsistent potato sizes mean some will be mushy while others are still firm. Aim for ½-inch cubes every time for even cooking.
- Don’t rush the browning step. Letting the beef develop a sear before breaking it up creates depth of flavor through the Maillard reaction. It’s the difference between beige meat and flavorful, browned meat.
- Let the garlic cook briefly, not long. 30 to 60 seconds is all garlic needs. Any longer and it burns, turning the entire dish bitter.
- Taste and adjust at the end. Spice levels vary by brand, so always taste before serving. A little extra salt or a squeeze of lime can transform a good dish into a great one.
- Use 80/20 ground beef for best results. The fat content keeps the meat moist and flavorful throughout the simmering process. Leaner beef can dry out and become grainy.
This technique is similar to what makes the Caldo de Res so deeply flavorful.
Serving Suggestions

Picadillo is one of those wonderfully versatile dishes that can be served so many different ways, and each one feels like its own complete meal.
The most classic way to enjoy it is over a bed of fluffy white rice with a side of warm tortillas. The rice soaks up all the extra tomato sauce, making every bite incredibly satisfying.
- Serve it over white rice for the most traditional presentation
- Use it as a filling for tacos with a dollop of sour cream and a squeeze of lime
- Pile it into warm Corn Tortillas or flour tortillas for quick and easy wraps
- Spoon it over crispy tortilla chips with shredded cheese for a quick picadillo nacho situation
- Stuff it into bell peppers and bake for a hearty stuffed peppers dinner
- Use as a filling for empanadas or burritos for a portable, satisfying meal
- Top with avocado slices, Pico de Gallo, queso fresco, or fresh cilantro
- Pair with a side of refried beans for a complete Mexican-inspired plate
Variations to Try
Once you’ve mastered the base picadillo recipe, there are so many fun and delicious directions you can take it. These variations are all rooted in regional traditions and are equally delicious in their own right.
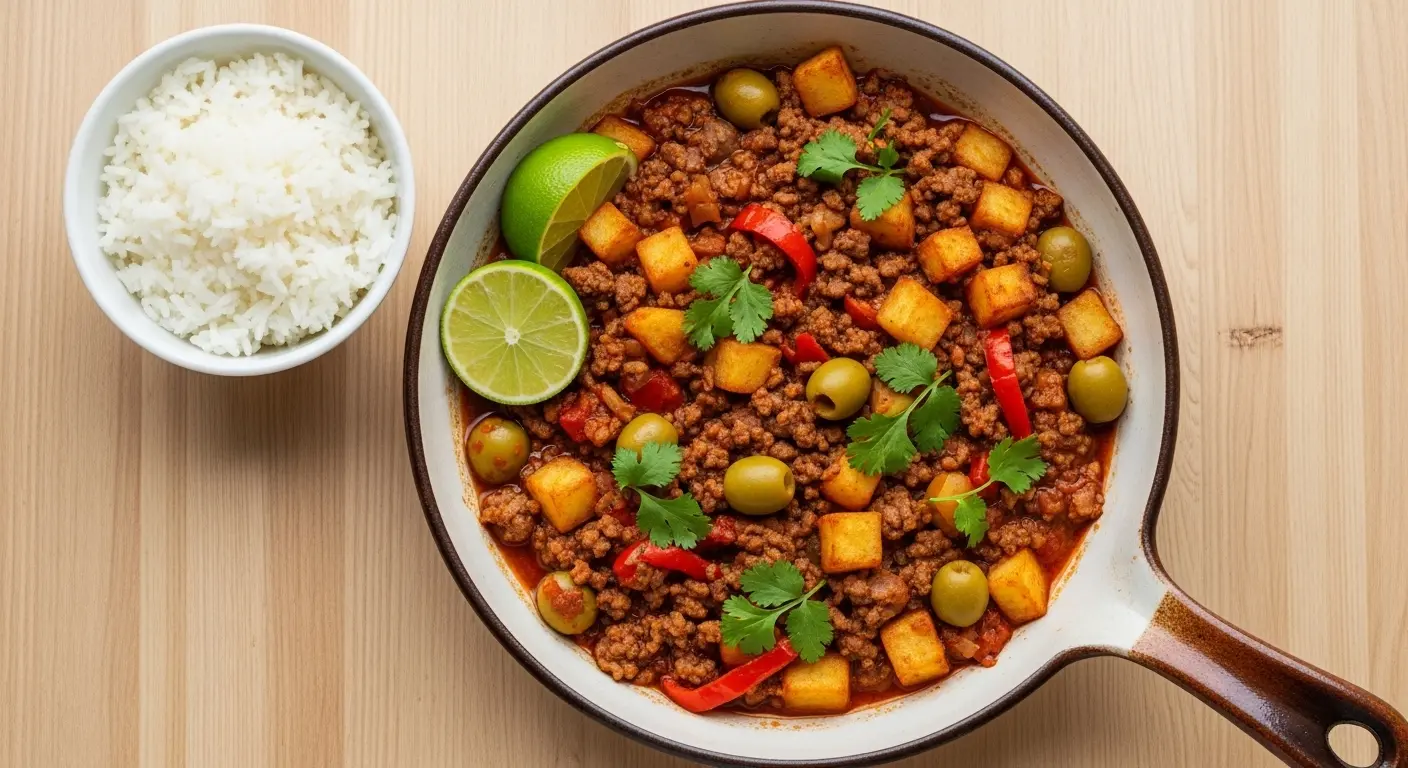
- Cuban Picadillo: Swap the potatoes for ¼ cup of green olives and ¼ cup of raisins for a sweet-savory, briny version that’s equally beloved across Latin America.
- Picadillo with Carrots and Peas: Add ½ cup of diced carrots and ½ cup of frozen peas along with the potatoes for a more vegetable-forward version popular in central Mexico.
- Spicy Picadillo: Add 1 diced jalapeño or serrano pepper with the onion and bell pepper for extra heat. You can also stir in a tablespoon of chipotle peppers in adobo sauce.
- Turkey Picadillo: Replace the ground beef with ground turkey for a lighter, leaner version. Use a bit more seasoning since turkey is milder than beef.
- Picadillo with Sweet Potatoes: Swap the white potatoes for diced sweet potatoes for a subtle sweetness that pairs beautifully with the cumin and tomato sauce.
- Slow Cooker Picadillo: Brown the beef and sauté the aromatics first, then transfer everything to a slow cooker and cook on low for 4 to 6 hours.
You might also enjoy: Classic Stuffed Bell Peppers as a creative way to use picadillo as a filling.
Storage and Reheating
Picadillo stores beautifully and is one of the best recipes to make ahead for the week. The flavors actually improve as the dish sits, making it ideal for meal prep.
- Refrigerator: Store leftover picadillo in an airtight container in the refrigerator for up to 5 days.
- Freezer: Picadillo freezes exceptionally well. Transfer cooled picadillo to a freezer-safe airtight container or zip-lock bag and freeze for up to 3 months. Label with the date for easy tracking.
- Thawing: Thaw frozen picadillo overnight in the refrigerator before reheating. Do not thaw on the counter at room temperature.
- Reheating on the stovetop: Transfer to a skillet over medium-low heat and add a splash of beef broth or water to loosen the sauce. Stir occasionally and heat until warmed through, about 5 minutes.
- Reheating in the microwave: Place in a microwave-safe dish, add a small splash of water or broth, cover loosely, and heat in 60-second intervals, stirring between each, until hot all the way through.
The same storage tips work well for the Hamburger Soup Recipe if you’re cooking similar ground beef dishes for the week.
Nutritional Facts
The nutritional information below is based on one serving (approximately 1/6 of the total recipe, without rice or tortillas). Values are approximate and will vary based on exact ingredients used.
| Nutrient | Per Serving |
|---|---|
| Calories | ~350 kcal |
| Total Fat | 18g |
| Saturated Fat | 7g |
| Cholesterol | 75mg |
| Sodium | 620mg |
| Total Carbohydrates | 22g |
| Dietary Fiber | 3g |
| Sugars | 5g |
| Protein | 25g |
| Vitamin A | 15% DV |
| Vitamin C | 20% DV |
| Iron | 20% DV |
| Potassium | 580mg |
For a lighter version, use 93% lean ground beef or substitute ground turkey, which can reduce calories and total fat by approximately 20%.
Read Also: Caldo de Pollo Recipe
Health Benefits of Key Ingredients
This picadillo recipe isn’t just delicious, it’s also packed with nutritional value thanks to its wholesome, whole-food ingredients.
Each key ingredient plays a meaningful role in both flavor and nutrition, making this dish a genuinely nourishing choice for the whole family.
- Ground Beef: An excellent source of complete protein, zinc, iron, and B vitamins including B12. These nutrients support muscle health, immune function, and energy production.
- Potatoes: Often underestimated nutritionally, potatoes are rich in potassium, vitamin C, and resistant starch (especially after cooling), which supports gut health and blood sugar regulation.
- Garlic: One of the most well-studied functional foods, garlic contains allicin, a compound associated with immune-boosting and anti-inflammatory properties. It also contributes to cardiovascular health.
- Tomatoes (tomato sauce): Rich in lycopene, a powerful antioxidant linked to reduced risk of heart disease and certain cancers. Cooking tomatoes actually increases the bioavailability of lycopene, making picadillo’s simmered tomato sauce especially beneficial.
- Bell Peppers: Among the most vitamin C-dense vegetables available, one medium bell pepper provides more than 100% of the daily recommended intake of vitamin C, which supports collagen production and immune function.
- Onion: Contains quercetin and other flavonoids with antioxidant and anti-inflammatory properties. Regular consumption of onions has been linked to improved bone density and heart health.
- Cumin: More than just a spice, cumin is associated with improved digestion, blood sugar regulation, and has demonstrated antimicrobial properties in research studies.
- Olive Oil: A source of heart-healthy monounsaturated fats and powerful polyphenols that support cardiovascular and cognitive health.
This dish is a wonderful choice alongside recipes like Chicken and Broccoli when building a nutritious weekly meal plan.
Frequently Asked Questions
1. What is picadillo made of?
Picadillo is a Latin American dish typically made with seasoned ground beef, diced potatoes, tomatoes, onion, garlic, and bell pepper simmered together in a seasoned tomato-based sauce. The exact ingredients vary by country and region, with Cuban picadillo famously including green olives and raisins, while Mexican versions tend to focus on potatoes, tomatoes, and warm spices like cumin and coriander.
2. What does picadillo taste like?
Picadillo has a warm, savory, slightly tangy flavor from the tomato sauce with deep umami notes from the browned beef. The cumin and coriander bring earthy warmth, and the garlic and onion provide aromatic sweetness. The overall profile is comforting and familiar, similar to a hearty beef and potato stew with a Latin flair.
3. Can I make picadillo ahead of time?
Yes, picadillo is an excellent make-ahead recipe. In fact, many people find that it tastes even better the next day once the flavors have had more time to meld together. Simply store it in an airtight container in the refrigerator for up to 5 days and reheat on the stovetop or in the microwave with a splash of broth as needed.
4. Can I freeze picadillo?
Absolutely. Picadillo freezes very well. Allow it to cool completely before transferring it to a freezer-safe container or heavy-duty zip-lock bag. It keeps well in the freezer for up to 3 months. Thaw overnight in the refrigerator before reheating, and add a small splash of beef broth during reheating to restore the sauce’s consistency.
5. What is the difference between Mexican and Cuban picadillo?
The two versions share the same base (ground beef, tomatoes, onion, garlic) but diverge in notable ways. Mexican picadillo, especially the northern-style version featured here, focuses on diced potatoes and simple spices like cumin and coriander. Cuban picadillo incorporates Spanish-influenced ingredients like green olives, capers, and sometimes raisins, giving it a distinctly briny and sweet-savory flavor profile. Both are equally delicious and worth trying.
This dish is a beautiful complement to a big bowl of Chicken Tortilla Soup for a full Mexican feast.
Final Thoughts
This picadillo recipe proves that you don’t need a long ingredient list or hours in the kitchen to make something truly special.
It’s the kind of dish that feels like a hug on a plate: warm, filling, and full of flavor that tastes like it was made with care.
Once you try it, it will absolutely earn a permanent spot in your weeknight dinner rotation.
Give this recipe a try and let me know in the comments how it turned out! Did you serve it over rice, stuff it into tacos, or find a creative new way to enjoy it? I’d love to hear from you, and don’t forget to share this recipe with someone who needs a great new dinner idea.
Recommended:
- Taco Seasoning Recipe
- Birria Tacos Recipe
- Mexican Street Corn Recipe
- Easy Guacamole Recipe
- Red Pozole Recipe
- Fresh Salsa Recipe
- Flour Tortilla Recipe
- Enchilada Sauce Recipe
- Easy Salsa Recipe
- Beef Stroganoff Recipe


