If you’ve never made an oyster stew recipe at home, you are truly in for a treat. This dish is one of those old-fashioned American classics that never goes out of style. It’s a silky, butter-rich broth loaded with tender, briny oysters and seasoned just enough to let the seafood shine.
Oyster stew has deep roots along the East Coast and in the Midwest, where it’s been a cherished Christmas Eve and holiday table tradition for generations. And honestly? Once you taste how easy and satisfying it is, you’ll understand exactly why families have been making it for over a century.
The magic of a great oyster stew comes down to a few key principles. You need good oysters, real butter, a creamy milk-and-half-and-half base, and a gentle hand with the heat. The biggest rookie mistake is letting the milk boil, which causes it to curdle and ruins the whole texture. Keep things low and slow, and you’ll be rewarded with a velvety, luxurious bowl that tastes like something from a high-end seafood restaurant.
Don’t skip reserving the oyster liquor (the natural juices inside the jar or shell). That briny liquid is liquid gold for the base of your stew. It deepens the flavor in a way that nothing else can replicate.
This recipe uses fresh shucked oysters (though canned works in a pinch), aromatics like onion and celery, a touch of garlic, and classic seasonings like Old Bay and paprika. It comes together in about 30 minutes and serves four generously.
If you love cozy seafood dishes, this is a wonderful companion to Seafood Stew for an impressive holiday spread.
Why You’ll Love This Oyster Stew Recipe
This oyster stew recipe is one of those dishes that feels far more elegant than the effort it requires.
It comes together in under 30 minutes with just a handful of simple ingredients you can find at most grocery stores.
The flavor is rich and briny in the best way, with tender oysters that practically melt in your mouth.
You don’t need any fancy techniques or equipment. A single saucepan and a little patience are all it takes.
It’s endlessly versatile, working just as well as a cozy weeknight supper as it does as a showstopping Christmas Eve appetizer.
The recipe is also naturally gluten-free, which makes it easy to serve to guests with dietary restrictions.
- Ready in 30 minutes or less
- Made with just a handful of wholesome ingredients
- Rich, creamy, and deeply satisfying
- Naturally gluten-free
- A beloved American tradition with centuries of history
- Scales easily to feed a crowd
- Minimal cleanup with a one-pot method
You might also enjoy: Lobster Bisque
Ingredients
Here’s everything you’ll need to make this classic creamy oyster stew. Fresh oysters are always the best choice, but high-quality shucked oysters from the seafood counter work beautifully too. Don’t skip reserving the oyster liquor because it’s a key flavor component.
- 1 pint (about 450g) fresh shucked oysters, oyster liquor reserved
- 4 tablespoons (57g) unsalted butter, plus more for garnish
- 1 small yellow onion, finely diced (about ¾ cup / 90g)
- 2 stalks celery, finely diced (about ½ cup / 60g)
- 2 cloves garlic, minced
- 1½ cups (360ml) whole milk
- 1½ cups (360ml) half-and-half
- ½ teaspoon Old Bay seasoning (or more to taste)
- ½ teaspoon sweet paprika
- ¼ teaspoon celery salt
- ¼ teaspoon ground white pepper (or black pepper)
- Pinch of cayenne pepper (optional, for heat)
- Salt, to taste
- 1 tablespoon fresh flat-leaf parsley, chopped (for garnish)
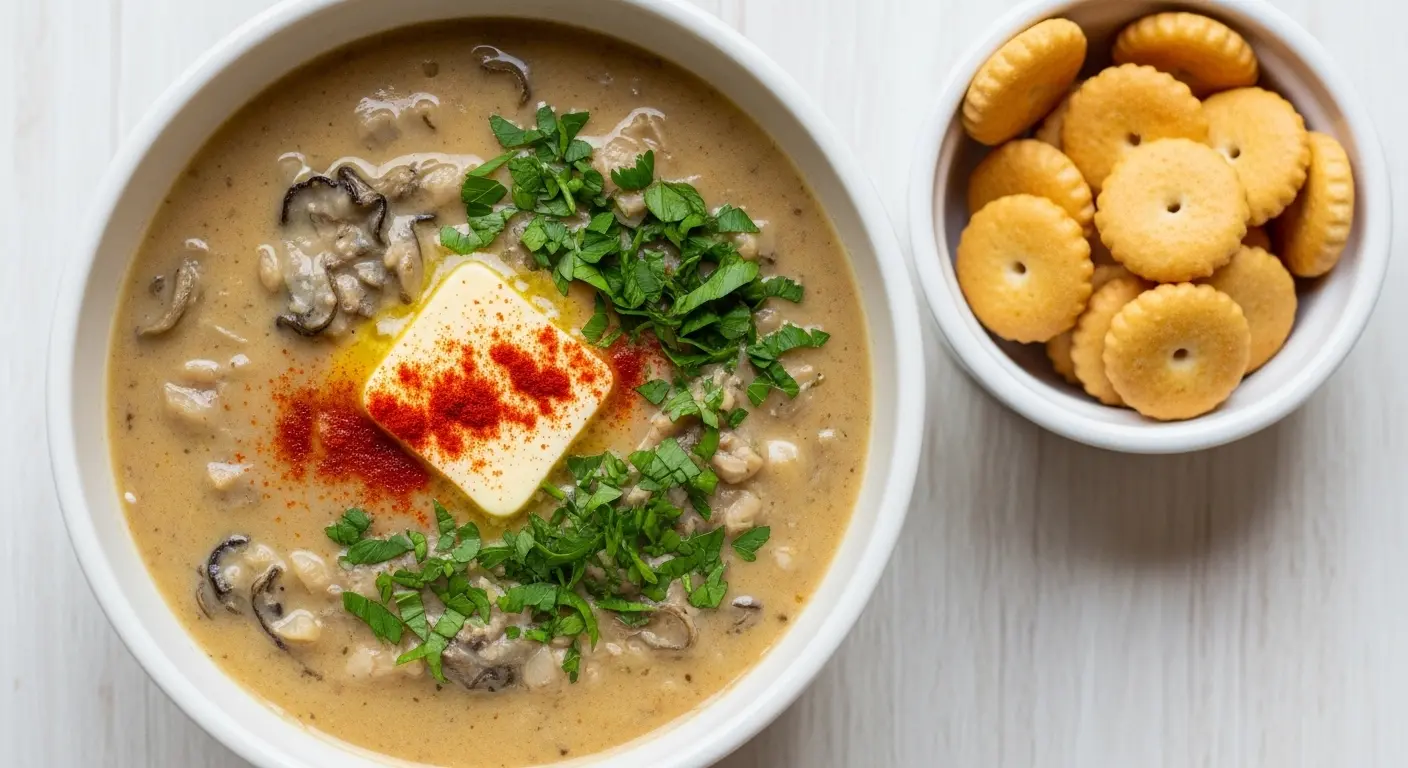
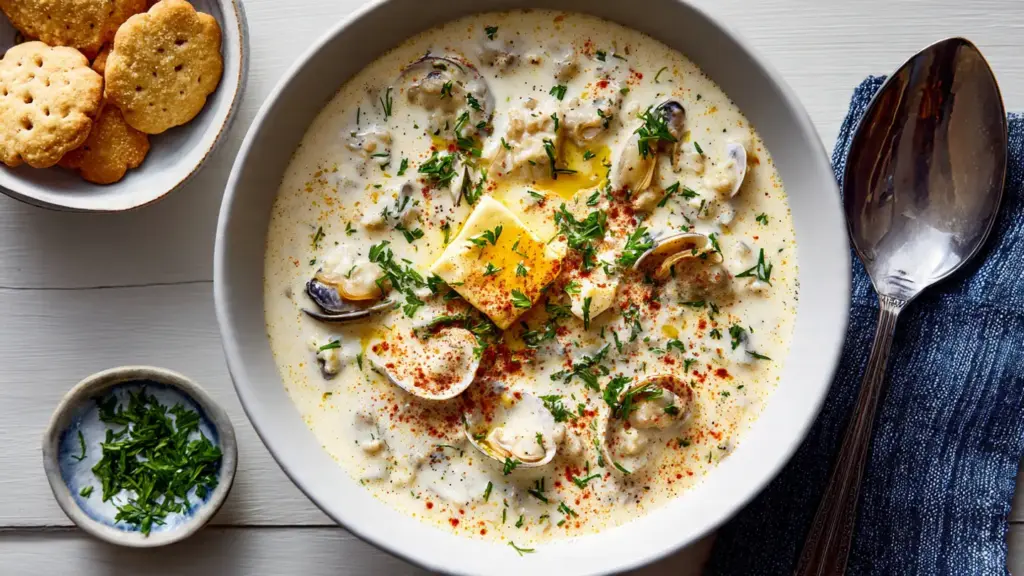
- Oyster crackers or oyster saltines, for serving
Read Also: New England Clam Chowder Recipe
Kitchen Equipment Needed
You won’t need much to make this oyster stew recipe, and that’s part of its charm. A heavy-bottomed saucepan is especially important here because it distributes heat evenly and reduces the risk of scorching the milk base.
- Large heavy-bottomed saucepan or Dutch oven (3 to 4-quart capacity)
- Fine mesh strainer (for straining oyster liquor)
- Cutting board
- Chef’s knife
- Wooden spoon or heat-safe silicone spatula
- Ladle
- Measuring cups and spoons
- Small bowl (for reserving oyster liquor)
This stew pairs wonderfully with a side from our Clam Chowder Recipe post for inspo on chowder-style accompaniments.
Recommended Products for This Recipe
These are products I genuinely recommend based on quality and performance. They can make a real difference in how your oyster stew turns out.
1. Fresh Shucked Oysters (Wild-Caught)
Starting with high-quality, fresh shucked oysters makes an enormous difference in the final flavor of this stew. Wild-caught oysters have a more complex, briny depth compared to farmed varieties, and their natural liquor is incredibly flavorful. Look for oysters packed in their own juices with no added water for the best results.
2. Old Bay Seasoning
Old Bay is the quintessential seasoning for East Coast seafood, and it absolutely belongs in oyster stew. Its blend of celery salt, paprika, and spices enhances the natural brininess of the oysters without overpowering them. A small amount goes a long way, and it’s one of those pantry staples that will serve you well in dozens of other dishes.
3. Enameled Cast Iron Dutch Oven
A good enameled cast iron Dutch oven is ideal for making oyster stew because it distributes heat slowly and evenly, dramatically reducing the risk of scorching your milk base. The heavy walls maintain a consistent gentle simmer, which is exactly what this recipe requires. It also makes cleanup remarkably easy.
4. Fine Mesh Strainer
Straining the oyster liquor through a fine mesh strainer before adding it to your stew removes any sand, grit, or shell fragments that can make the final dish unpleasant. This is a step you really shouldn’t skip, and having a quality fine mesh strainer in your kitchen makes it quick and easy.
5. Oyster Crackers
No bowl of oyster stew is truly complete without a handful of classic oyster crackers floated on top. They add a satisfying crunch and a little salt that contrasts beautifully with the creamy broth. Keep a bag in your pantry year-round for soup and stew season.
For more creamy coastal inspiration, check out this Seafood Chowder Recipe.
Step-by-Step Instructions
Step 1: Drain and Reserve the Oyster Liquor
- Open your pint of fresh shucked oysters over a fine mesh strainer set on top of a small bowl.
- Allow all of the natural juices (called oyster liquor) to drain through the strainer into the bowl below.
- Inspect the drained oysters gently and check for any stray shell fragments. Remove and discard them.
- Set the bowl of strained oyster liquor aside. You should have roughly ¼ to ½ cup (60 to 120ml) of liquid.
- Keep the drained oysters in a separate bowl and set them aside at room temperature while you prepare the base. Do not refrigerate them at this point, as bringing them closer to room temperature will help them cook evenly and quickly.
Step 2: Sauté the Aromatics
- Place your large heavy-bottomed saucepan or Dutch oven on the stovetop and set the heat to medium-low.
- Add the 4 tablespoons (57g) of unsalted butter and allow it to melt slowly until completely liquid. Do not let it brown.
- Once the butter is melted and just beginning to foam lightly, add the finely diced yellow onion and celery to the pot.
- Stir gently to coat the vegetables in the butter, then cook for 5 to 7 minutes, stirring occasionally, until the onion is translucent and the celery has softened. They should look glossy and smell fragrant.
- Add the minced garlic to the pot and stir continuously for about 1 minute, until it smells fragrant. Be very careful not to let the garlic brown or burn, as this will create a bitter flavor in the stew.
Step 3: Add the Oyster Liquor and Seasoning
- Pour the reserved oyster liquor into the pot with the sautéed aromatics.
- Stir to combine, then add the Old Bay seasoning, sweet paprika, celery salt, white pepper, and cayenne pepper (if using).
- Stir all the seasonings into the liquid and let the mixture cook for about 2 minutes, allowing the flavors to bloom and meld together.
- Taste the mixture at this stage. It should smell briny and seasoned. Adjust salt carefully at this point, keeping in mind that the oysters themselves will add more saltiness.
Step 4: Warm the Milk and Half-and-Half
- Reduce the heat to low. This is a critical step. The milk base must never come to a full boil, as boiling will cause the milk proteins to curdle and break the stew.
- Pour the 1½ cups (360ml) of whole milk and 1½ cups (360ml) of half-and-half into the pot with the aromatics.
- Stir gently and continuously as you bring the liquid up to temperature. You are looking for the mixture to become hot and just barely steaming, with tiny bubbles beginning to form around the edges of the pot. This typically takes 8 to 12 minutes on low heat.
- Do not walk away from the stove at this stage. Keep the heat on low and stir frequently.
Step 5: Add the Oysters
- Once the milk base is hot and steaming (but not boiling), gently slide the reserved drained oysters into the pot.
- Stir gently to distribute the oysters throughout the stew.
- Continue cooking on low heat for 4 to 6 minutes, stirring gently every minute or so, until the edges of the oysters just begin to curl. This curling of the edges is your visual cue that the oysters are perfectly cooked.
- As soon as you see the oyster edges curl, immediately remove the pot from the heat. Overcooked oysters become rubbery and chewy, so timing is important.
Step 6: Taste and Adjust
- With the pot off the heat, taste the stew carefully and adjust salt and pepper as needed.
- If you’d like a touch more brininess, you can add a splash of clam juice or a small pinch of additional Old Bay.
- If the stew feels a little thick for your preference, stir in a splash of whole milk to loosen it to your desired consistency.
Step 7: Garnish and Serve
- Ladle the hot oyster stew into warm bowls.
- Top each bowl with a small pat of butter, a sprinkle of sweet paprika, and a generous pinch of freshly chopped flat-leaf parsley.
- Serve immediately alongside a bowl of oyster crackers or mini saltines on the side.
- For an extra touch of heat, set a bottle of hot sauce on the table so guests can add their own.
Read Also: Manhattan Clam Chowder Recipe
Tips for Success
Getting oyster stew right is all about paying attention to heat and timing. Follow these tips and you’ll have a perfectly silky, creamy bowl every single time.
- Never let the milk boil. This is the single most important rule. Boiling will cause the milk to curdle and leave you with a grainy, broken stew. Keep heat on low and watch closely.
- Strain the oyster liquor. Always pass the oyster liquor through a fine mesh strainer before using it. Oysters often contain sand and small shell pieces that will make your stew gritty.
- Don’t overcook the oysters. Oysters only need a few minutes in the hot stew. Cook just until the edges curl. After that, they become tough and rubbery.
- Use the freshest oysters you can find. Fresh oysters have a more complex, vibrant brininess that elevates the whole dish. Ask your fishmonger when their oyster delivery arrives and plan to shop on that day.
- Warm your bowls before serving. Oyster stew cools quickly because of the cream base. Warm your serving bowls with hot water and dry them before ladling the stew in. This keeps it hot longer.
- Season gradually. Oysters are naturally salty, and the oyster liquor adds more. Season the base lightly and do a final taste adjustment at the end.
For a hearty variation on creamy seafood dishes, this Shrimp Chowder Recipe is well worth bookmarking.
Serving Suggestions
Oyster stew is a rich, elegant dish that pairs best with simple, complementary sides. You want to complement, not compete with, that beautiful briny creaminess.
Keep accompaniments light and mostly bread-based so the stew remains the star of the meal.
- Oyster crackers or mini saltines are the classic choice. Float them directly in the bowl right before serving.
- A warm slice of Sweet Cornbread makes a wonderful, slightly sweet counterpoint to the savory stew.
- Buttermilk Biscuits are a Southern classic alongside oyster stew and are perfect for soaking up every drop of the creamy broth.
- Crusty garlic bread gives a little crunch and garlicky richness that works well with the delicate oyster flavor.
- Classic Deviled Eggs make an elegant, easy-to-prepare appetizer if you’re serving this as a holiday starter.
- A simple green salad with lemon vinaigrette cleanses the palate beautifully between bites of rich, creamy stew.
- Warm Dinner Rolls are always a hit at the table and are especially comforting alongside a bowl of stew.
Another favorite: Fish Chowder Recipe
Variations to Try
The classic version of this stew is hard to beat, but there are some wonderful ways to put your own spin on it once you’re comfortable with the base recipe.
- Bacon oyster stew: Render 3 to 4 slices of diced bacon in the pot before adding the butter. Use some of the rendered bacon fat in place of some butter for a smokier, more robust flavor.
- Spiced oyster stew: Add a teaspoon of Worcestershire sauce and a few dashes of your favorite hot sauce along with the seasonings for a bolder, tangier profile.
- Sherry oyster stew: Stir in 2 to 3 tablespoons of dry sherry after sautéing the aromatics and before adding the milk. This is a Virginia tradition and adds a lovely nuttiness.
- Thicker stew: Whisk a tablespoon of cornstarch into the cold milk before adding it to the pot. This creates a slightly thicker, more chowder-like consistency.
- Herb-forward version: Add a sprig of fresh thyme and a bay leaf along with the aromatics. Remove before serving for a more fragrant, herb-scented broth.
- Potato oyster stew: Add ½ cup (75g) of finely diced Yukon Gold potato to the aromatics. Cook until tender before adding the milk base. This is more of a chowder style but is deeply satisfying.
Read Also: Corn Chowder Recipe
Storage and Reheating
Oyster stew is best enjoyed the day it is made, and ideally right off the stove. Like most milk-based soups, it doesn’t hold up especially well to long storage or freezing. That said, here’s what you need to know if you have leftovers.
- Store leftover stew in an airtight container in the refrigerator for no longer than 2 days. Any longer than that and the oysters deteriorate in quality and texture.
- Do not freeze oyster stew. The milk and cream base will separate and become grainy and watery when thawed, and the texture of the oysters suffers significantly.
- To reheat, transfer the stew to a saucepan and warm over low heat, stirring constantly. Do not microwave, as the uneven heat can cause the milk to scorch and the oysters to overcook instantly.
- Reheat gently and slowly. The stew only needs to be warmed through, not brought back to a boil. Stop heating as soon as it is steaming and just barely hot.
- Add a splash of whole milk when reheating if the stew has thickened significantly in the refrigerator. This will help restore the original consistency.
This stew pairs beautifully with a warming bowl of Salmon Chowder for a full seafood dinner.
Nutritional Facts
The following is an approximate nutritional breakdown per serving, based on 4 servings. Actual values may vary depending on the specific products and quantities used.
| Nutrient | Per Serving |
|---|---|
| Calories | ~340 kcal |
| Total Fat | 22g |
| Saturated Fat | 13g |
| Cholesterol | 110mg |
| Sodium | 640mg |
| Total Carbohydrates | 14g |
| Dietary Fiber | 0.5g |
| Total Sugars | 8g |
| Protein | 18g |
| Calcium | 280mg |
| Iron | 7mg |
| Vitamin C | 3mg |
Note: Nutritional values are estimates and should be used as a general guide only.
For another lighter seafood option, check out this Baked Cod Recipe.
Health Benefits of Key Ingredients
Oyster stew isn’t just comfort food. Its star ingredients come with some genuinely impressive nutritional credentials that make it a surprisingly wholesome meal choice.
The dish is built on a foundation of ingredients that work together to nourish your body as much as they satisfy your taste buds.
- Oysters are one of the most nutrient-dense foods on the planet. They are exceptionally high in zinc (critical for immune function), vitamin B12, iron, and omega-3 fatty acids. A single serving of oysters provides well over the daily recommended value of zinc.
- Butter provides fat-soluble vitamins including vitamins A, D, E, and K2. When used in moderation, high-quality butter contributes to nutrient absorption and adds richness that makes the dish deeply satisfying.
- Celery is a low-calorie vegetable rich in vitamins K and C, as well as antioxidants that support inflammation reduction. Its natural sodium content contributes subtle seasoning as well.
- Garlic contains allicin, a compound with well-documented antimicrobial and heart-health benefits. It supports immune health and contributes depth of flavor without added calories.
- Whole milk and half-and-half supply calcium, vitamin D, and high-quality protein. The fat in dairy helps the body absorb the fat-soluble vitamins from other ingredients in the dish.
- Onion contains quercetin, a flavonoid with antioxidant and anti-inflammatory properties. It also provides prebiotic fiber that supports healthy gut bacteria.
- Paprika contributes capsaicin and carotenoids, both of which have antioxidant activity and may support cardiovascular health.
Another nourishing seafood option you’ll love: Baked Salmon Recipe
Frequently Asked Questions
1. Can I use canned oysters instead of fresh?
Yes, you can use canned oysters in this recipe. Look for canned oysters packed in water (not smoked or in oil) from a reputable brand.
Drain them and reserve the liquid in the can just as you would with fresh oyster liquor, straining it through a fine mesh strainer before use. The flavor will be slightly less vibrant than fresh, but the stew will still be delicious.
2. Why did my oyster stew curdle?
Curdling almost always happens when the milk base gets too hot too quickly. If you see the milk beginning to look grainy or broken, it has likely been allowed to boil.
To prevent this, always use low heat once you add the dairy, stir constantly, and watch the pot closely. If curdling occurs, you can try whisking vigorously or blending briefly, but prevention is by far the better approach.
3. How do I know when the oysters are done cooking?
Oysters are ready when their edges have just begun to curl inward. This typically takes only 4 to 6 minutes in a hot (but not boiling) milk base.
Once the edges curl, remove the pot from the heat immediately. The residual warmth of the stew will finish cooking the oysters perfectly without making them tough.
4. Can I make oyster stew ahead of time?
Oyster stew is really best made fresh and served immediately. If you need to prep ahead, you can sauté the aromatics and prepare the oyster liquor in advance, then store them separately in the refrigerator.
When you’re ready to serve, simply warm the aromatics, add the dairy and liquor, heat gently, and add the oysters right before serving. This keeps everything as fresh as possible.
5. What is oyster liquor and why is it important?
Oyster liquor is the natural brine that comes inside the jar or shell of fresh shucked oysters. It’s a combination of seawater and the oyster’s own juices, and it has an intensely briny, savory flavor.
Using it in the stew base adds a depth of seafood flavor that you simply can’t achieve with any substitute. Always reserve it and strain it before using to remove any grit.
For more cozy stew recipes, take a look at this Chicken Stew Recipe.
Final Thoughts
Oyster stew is one of those timeless, unpretentious dishes that reminds you why simple cooking is so often the most satisfying kind.
With just a handful of ingredients and about 30 minutes, you can make something that tastes truly special.
The key is respecting the oysters, keeping the heat low, and letting those briny flavors speak for themselves.
This recipe is a wonderful tradition to start with your own family, on a cold winter night or as a Christmas Eve centerpiece.
Give this oyster stew recipe a try and let me know how it goes in the comments below! I’d love to hear how yours turned out, what variations you tried, or if it became a new tradition in your home.
Recommended:
- Seafood Stew Recipe
- Clam Chowder Recipe
- New England Clam Chowder Recipe
- Lobster Bisque Recipe
- Shrimp and Grits Recipe
- Crab Cake Recipe
- Crockpot Beef Stew Recipe
- Brunswick Stew Recipe
- Irish Stew Recipe
- Lamb Stew Recipe


