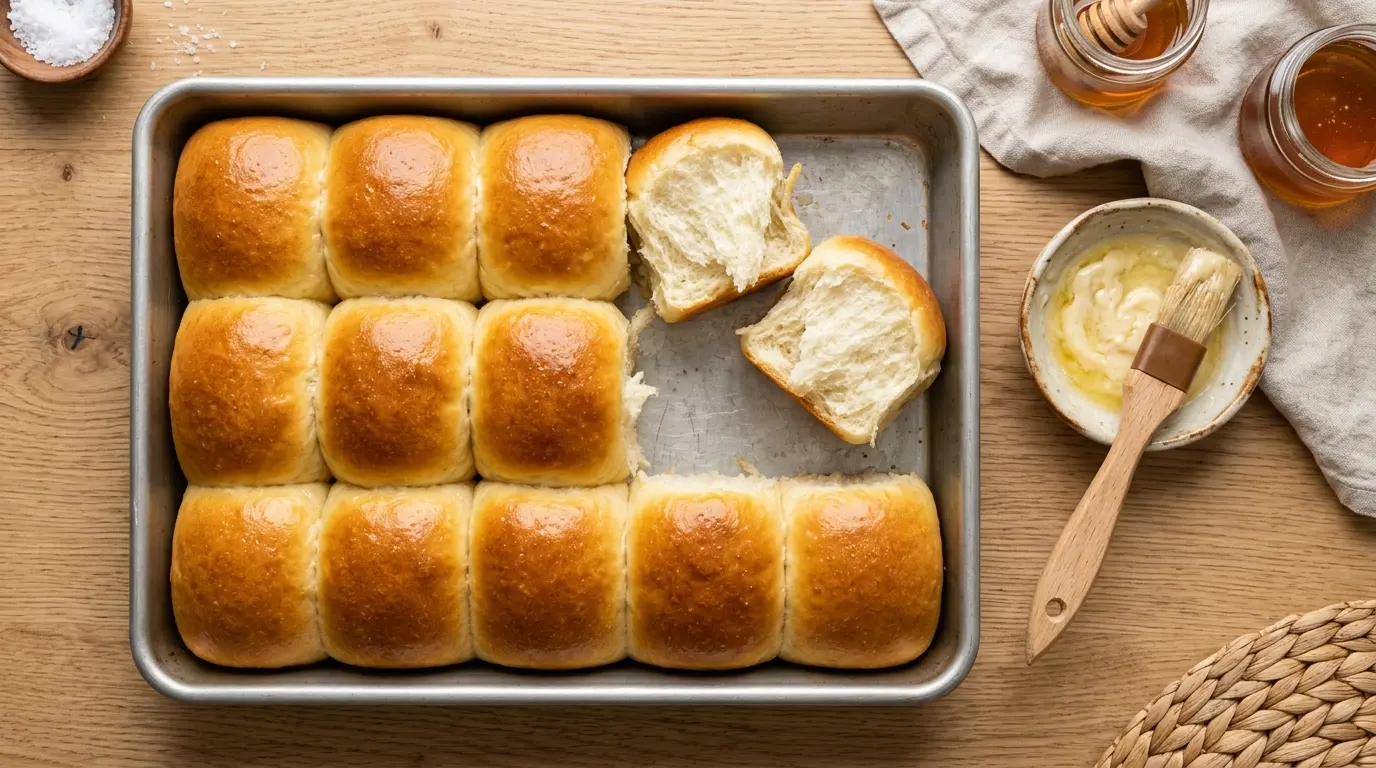
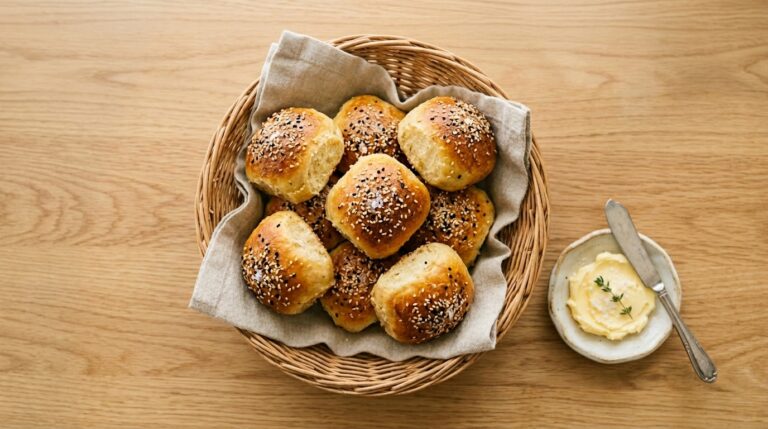
Few things make a meal feel more complete than a basket of freshly baked sweet dinner rolls sitting on the table. This sweet dinner rolls recipe delivers the kind of pillowy, golden-brown rolls you’d find at your favorite steakhouse or holiday spread, made entirely from scratch in your own kitchen.
The secret to rolls this soft? It’s a combination of enriched dough technique and patience. Using warm milk, real butter, eggs, and just enough sugar creates a tender crumb that practically melts the moment you bite in.
They’re the kind of bake that makes your whole house smell incredible. And once people try one straight from the oven with a smear of honey butter, you’ll be making a double batch every single time.
This recipe is approachable for beginners and satisfying for experienced bakers alike. You’ll learn exactly when and how to handle the dough so that your rolls come out consistent, soft, and beautifully golden every time.
For a close cousin to this recipe, check out these Soft Dinner Rolls for another tender, classic option.

Why You’ll Love This Sweet Dinner Rolls Recipe
These rolls are genuinely hard to stop eating. They strike that perfect balance between sweet and savory, making them work alongside everything from a Sunday roast to a simple bowl of soup.
They come together with pantry staples you likely already have on hand. No special flours or equipment required.
The dough is forgiving and beginner-friendly, even if you’ve never worked with yeast before. The instructions below walk you through each stage so nothing catches you off guard.
They also reheat beautifully, meaning leftovers (if you have any) taste almost as good the next day. A few seconds in the microwave or a quick wrap in foil and back into the oven brings them right back to life.
You can also make the dough ahead of time and refrigerate it overnight for a slower, cold rise that deepens flavor. That option makes them especially practical during the holiday season.
Whether you’re planning a big Thanksgiving feast or a casual weeknight dinner, these rolls fit perfectly. They’re equally at home next to Thanksgiving Turkey or a simple weeknight roast.
Ingredients
You’ll need a handful of common baking ingredients here. The enriched dough relies on dairy and fat to create that signature softness, so don’t skip or substitute the butter and eggs.
- 4 cups (500g) all-purpose flour, plus more for dusting
- 2 1/4 teaspoons (7g / 1 packet) active dry yeast
- 1/2 cup (120ml) whole milk, warmed to 110°F (43°C)
- 1/2 cup (120ml) warm water, about 110°F (43°C)
- 1/4 cup (50g) granulated sugar
- 1 teaspoon fine salt
- 2 large eggs, at room temperature
- 1/4 cup (57g) unsalted butter, softened, cut into small pieces
- 2 tablespoons (30g) unsalted butter, melted, for brushing
You might also enjoy making Sourdough Discard Dinner Rolls if you keep a sourdough starter going.
Kitchen Equipment Needed
You don’t need a long list of gadgets to make these rolls. A stand mixer makes the process easier, but the dough can absolutely be kneaded by hand if you prefer.
- Stand mixer with dough hook (or large mixing bowl for hand kneading)
- 9×13 inch baking pan or two 9-inch round cake pans
- Small saucepan or microwave-safe cup (for warming milk)
- Instant-read kitchen thermometer
- Pastry brush (for buttering)
- Large mixing bowl
- Plastic wrap or a clean kitchen towel (for covering the dough)
- Kitchen scale (recommended for accuracy)
- Bench scraper
Read Also: Pull Apart Garlic Bread Recipe
Recommended Products for This Recipe
These are a few products I genuinely recommend based on performance and quality. Using the right tools makes a real difference in how your rolls turn out.
1. KitchenAid Stand Mixer
A stand mixer with a dough hook kneads the dough evenly without overworking it, which is one of the most common mistakes beginners make. It frees up your hands and produces a much smoother, more elastic dough than hand kneading for most people. It’s one of those kitchen investments that pays off across dozens of recipes.
2. USA Pan Bakeware 9×13 Inch Baking Pan
This pan distributes heat evenly, which is critical for rolls that brown uniformly without burning on the bottom. The non-stick coating also helps the rolls release cleanly after baking. The heavy-gauge construction means it won’t warp at high temperatures.
3. Thermapen Instant-Read Thermometer
Getting your liquid temperature right is one of the most important steps in yeast baking. Too hot and you’ll kill the yeast; too cold and it won’t activate. A reliable instant-read thermometer takes all the guesswork out of it and is helpful for everything from bread to meat.
4. OXO Good Grips Bench Scraper
A bench scraper is incredibly useful for dividing the dough into equal portions cleanly and quickly. It also helps you fold and work the dough without tearing it. This tool gets used constantly in any baking project involving dough.
This recipe also pairs wonderfully with a classic Cranberry Sauce during holiday meals.

Step-by-Step Instructions
1. Proof the Yeast
- Combine the warm milk and warm water in a small bowl or measuring cup. Use your thermometer to confirm both liquids are between 105°F and 115°F (40°C to 46°C). If the liquid is too hot, it will kill the yeast; if too cold, the yeast won’t activate properly.
- Add the 2 1/4 teaspoons of active dry yeast and 1 teaspoon of the granulated sugar (taken from your measured 1/4 cup) into the warm liquid.
- Stir gently and let it sit for 5 to 10 minutes. The mixture should become foamy and smell slightly yeasty. If nothing happens after 10 minutes, your yeast may be expired or your liquid was too hot or cold. Start over with fresh yeast before continuing.
2. Mix the Dough
- Add the flour, remaining sugar, and salt to the bowl of your stand mixer. Whisk them together briefly with a fork or spatula to distribute the salt evenly. Salt can inhibit yeast if they come into direct contact, so this step matters.
- Make a well in the center of the dry ingredients. Pour in the foamy yeast mixture.
- Add both eggs to the bowl.
- Attach the dough hook to your stand mixer. Mix on low speed (speed 2) for about 2 minutes, just until the ingredients start to come together into a shaggy dough.
- If mixing by hand, stir with a wooden spoon until a rough dough forms.
3. Add the Butter and Knead
- With the mixer running on low, add the softened butter one or two small pieces at a time. Wait until each piece is mostly incorporated before adding the next. This process takes about 3 to 4 minutes total.
- Once all the butter is added, increase the speed to medium (speed 4) and knead the dough for 6 to 8 minutes. The dough should become smooth, elastic, and slightly tacky but not sticky. It should pull cleanly away from the sides of the bowl.
- If kneading by hand, turn the dough out onto a lightly floured surface and knead for 10 to 12 minutes, pushing the dough away from you with the heel of your hand, folding it back, rotating, and repeating.
- To test if the dough is ready, stretch a small piece between your fingers. If it stretches thin enough to see light through it without tearing (the “windowpane test”), the gluten is well developed and the dough is ready.
4. First Rise (Bulk Fermentation)
- Shape the dough into a smooth ball and place it into a lightly greased large bowl. Turn the dough once to coat all sides with the oil.
- Cover the bowl tightly with plastic wrap or a clean, damp kitchen towel.
- Place it in a warm, draft-free spot. A good trick is to turn your oven to 200°F (93°C) for 2 minutes, then turn it off and place the bowl inside with the door slightly cracked. The residual warmth creates the perfect proofing environment.
- Let the dough rise for 1 to 1.5 hours, until it has doubled in size. The timing will vary depending on the warmth of your kitchen.
5. Divide and Shape the Rolls
- Gently punch down the risen dough to release the gas. Turn it out onto a clean, lightly floured surface.
- Use your bench scraper or a sharp knife to divide the dough into 15 equal pieces. A kitchen scale helps here; each piece should weigh about 60 to 65g (roughly 2.2 oz).
- To shape each roll, flatten one piece of dough slightly with your palm. Fold the edges toward the center, then flip it over so the smooth side faces up. Cup your hand over the dough ball and roll it against the counter in a circular motion, creating surface tension that forms a tight, smooth ball. Repeat for all pieces.
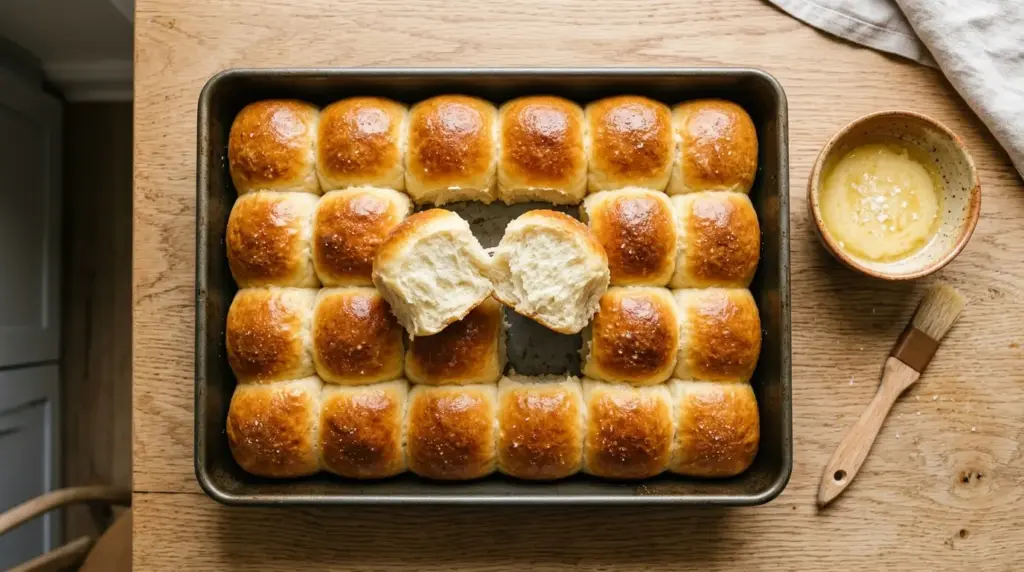
- Lightly grease your 9×13 inch baking pan with butter or cooking spray.
- Arrange the dough balls in the pan in a 3×5 grid, leaving a little space between each one. They will expand and touch during the second rise and baking, which creates that classic pull-apart shape.
6. Second Rise (Proofing)
- Cover the pan loosely with plastic wrap or a clean towel.
- Let the rolls proof at room temperature for 45 minutes to 1 hour, until they have puffed up and are visibly touching each other or nearly so. They should look soft and pillowy.
- While the rolls are proofing, preheat your oven to 375°F (190°C). Make sure your oven rack is positioned in the middle of the oven.
7. Bake the Rolls
- Once the rolls have proofed and the oven is preheated, gently remove the plastic wrap or towel.
- Place the pan in the preheated oven and bake for 18 to 22 minutes. The rolls are done when the tops are a deep golden brown and the internal temperature of a roll in the center of the pan reads 190°F to 200°F (88°C to 93°C) on an instant-read thermometer.
- If the tops are browning too quickly before the inside is fully cooked, loosely tent the pan with aluminum foil for the last 5 minutes of baking.
8. Brush with Butter and Serve
- As soon as the rolls come out of the oven, brush the tops generously with the 2 tablespoons of melted butter. This adds flavor, richness, and that beautiful shine.
- Allow the rolls to cool in the pan for 5 minutes before serving. They are at their absolute best eaten warm, fresh from the oven.
For a fun variation on enriched dough baking, these Monkey Bread rolls use a very similar dough and are just as satisfying to make.
Tips for Success
Small adjustments make a big difference when it comes to yeast baking. These tips address the most common issues home bakers run into.
- Check your yeast before you start. Yeast that is past its expiration date or has been stored improperly may not activate. Always proof your yeast first (as described in Step 1) before committing it to the full recipe.
- Use room-temperature eggs. Cold eggs can cool down the dough and slow the yeast activity. If you forgot to take them out ahead of time, place them in a bowl of warm water for 5 minutes.
- Do not rush the rise. Letting the dough rise properly develops flavor and texture. A dough that hasn’t risen enough will produce dense, small rolls.
- Weigh your dough portions. Using a kitchen scale to divide the dough ensures all rolls bake at the same rate. Uneven rolls will have some undercooked and some overdone.
- Don’t over-flour the surface. Adding too much extra flour while shaping makes the rolls dense and dry. The dough should be slightly tacky, not sticky.
- Let the rolls touch in the pan. Placing them close together encourages the soft, pull-apart texture. If you space them too far apart, you get crusty individual rolls instead.
Another great bread to try alongside this one is this Challah Recipe, which also uses an enriched dough technique.
Serving Suggestions
These rolls are incredibly versatile. They work just as well at a casual weeknight dinner as they do at a holiday table spread.
- Serve warm with Honey Butter or Cinnamon Butter for a classic pairing that never gets old.
- Use them to mop up Turkey Gravy during holiday meals, especially alongside a classic Thanksgiving spread.
- Pair them with a hearty bowl of soup like a creamy potato or chicken noodle for a complete, comforting dinner.
- Split them open and fill them with leftover pulled pork or sliced turkey for easy next-day sandwiches.
- Serve a basket alongside a big holiday roast with Creamy Mashed Potatoes for the ultimate comfort food table.
For your holiday spread, also try making Sausage Stuffing to serve alongside these rolls.
Variations to Try
The base dough is a wonderful canvas for different flavors. Here are some easy modifications to keep things interesting.
- Garlic herb rolls: After brushing with melted butter, sprinkle with garlic powder, dried parsley, and a pinch of flaky salt. You can also mix minced roasted garlic directly into the dough.
- Honey glazed rolls: Swap the plain butter brush for a mixture of 1 tablespoon melted butter and 1 tablespoon warm honey. The glaze caramelizes slightly on top for a deeper golden finish.
- Cinnamon sugar rolls: Before shaping, roll each piece of dough in a cinnamon-sugar mixture. These taste like a cross between a dinner roll and a cinnamon bun.
- Overnight cold-rise rolls: After shaping and placing in the pan, cover tightly and refrigerate overnight instead of doing a second room-temperature rise. The next morning, let them sit at room temperature for 45 minutes to 1 hour before baking as normal. This slow rise builds more complex flavor.
- Cheesy pull-apart rolls: Press a small cube of mozzarella or cheddar into the center of each dough ball before shaping. The cheese melts inside during baking for a gooey surprise.
You might also enjoy making this Brioche Recipe if you love enriched, buttery bread doughs.
Storage and Reheating
These rolls are best fresh, but they store well and reheat beautifully with a little care.
- At room temperature: Store cooled rolls in an airtight container or resealable bag at room temperature for up to 3 days. Avoid the refrigerator, which dries bread out faster than leaving it at room temp.
- Freezing: Arrange cooled rolls on a baking sheet and freeze until solid, then transfer them to a freezer bag. They’ll keep for up to 3 months. Thaw at room temperature for a couple of hours before reheating.
- Reheating individual rolls: Wrap a roll in a damp paper towel and microwave for 15 to 20 seconds. This steams the roll gently and restores softness.
- Reheating a full pan: Wrap the pan in foil and place in a 300°F (150°C) oven for 10 to 12 minutes until warmed through. Brush with a little fresh melted butter before serving.
Read Also: Dinner Rolls Recipe
Nutritional Facts
The following values are approximate and based on one roll from a batch of 15.
| Nutrient | Per Roll (approx.) |
|---|---|
| Calories | 190 kcal |
| Total Fat | 6g |
| Saturated Fat | 3.5g |
| Cholesterol | 38mg |
| Sodium | 170mg |
| Total Carbohydrates | 28g |
| Dietary Fiber | 1g |
| Sugars | 4g |
| Protein | 5g |
Note: Nutritional values will vary based on exact ingredient brands and portion sizes used.
Another comforting baked good worth trying is this Homemade Biscuit Recipe, which is a similarly satisfying bake.
Health Benefits of Key Ingredients
These rolls aren’t a health food in the traditional sense, but the ingredients do offer some genuine nutritional value.
All-purpose flour is a good source of carbohydrates for sustained energy, and when combined with protein from eggs and fat from butter, the meal becomes more balanced and satisfying. Eggs contribute high-quality protein and essential vitamins including B12, D, and choline, which supports brain function. Whole milk adds calcium, phosphorus, and vitamin D, all of which support bone health. Butter, when used in moderate amounts as in this recipe, provides fat-soluble vitamins A and E along with butyric acid, a short-chain fatty acid that has been studied for its role in gut health. The small amount of sugar in this recipe primarily aids yeast activation and adds tenderness to the crumb rather than making these a high-sugar food.
- Eggs: Rich in protein, B vitamins, and choline for brain and cell health
- Whole milk: Provides calcium, vitamin D, and phosphorus for strong bones
- Butter: Contributes fat-soluble vitamins A, D, E, and K in moderate amounts
- All-purpose flour: Delivers complex carbohydrates for energy alongside small amounts of iron and B vitamins
- Yeast: A natural source of B vitamins and some protein; active cultures may also support gut flora
For another enriched dough recipe with great nutritional depth, check out this Brioche French Toast Recipe.
Frequently Asked Questions
1. Can I use instant yeast instead of active dry yeast?
Yes, you can substitute instant yeast (also called rapid-rise yeast) in a 1:1 ratio. The main difference is that instant yeast does not need to be proofed first. You can add it directly to the dry ingredients and skip the activation step. Your rise times will also be slightly shorter, so keep an eye on the dough.
2. Why didn’t my dough rise?
There are a few common reasons for this. The most likely culprit is yeast that was no longer active, either because it expired or because the liquid used to activate it was too hot (above 120°F / 49°C). The kitchen may also be too cold for yeast to work efficiently. Try placing the covered bowl in a slightly warmer spot, like on top of the refrigerator or near a warm oven. If the dough still hasn’t moved after 2 hours, start fresh with new yeast.
3. Can I make the dough ahead of time?
Absolutely. After shaping the rolls and placing them in the pan, cover tightly with plastic wrap and refrigerate for up to 16 hours. The cold environment slows the yeast activity, allowing for a long, slow rise that actually improves the flavor. When you’re ready to bake, remove the pan from the refrigerator and let the rolls come to room temperature and finish rising for 45 minutes to 1 hour before baking.
4. My rolls came out dense. What went wrong?
Dense rolls are almost always the result of one of three things: under-proofed dough (didn’t rise long enough), over-floured dough (too much flour was added during kneading or shaping), or old/inactive yeast. Make sure you’re giving the dough a full, proper rise both times, and trust the windowpane test to confirm the gluten is well developed before the first rise.
5. Can I make these rolls dairy-free?
Yes, with some adjustments. Replace the whole milk with an unsweetened, full-fat plant-based milk like oat or soy milk. Replace the butter with vegan butter (such as Earth Balance or Miyoko’s). The texture will be slightly different since dairy fat contributes significantly to the richness and softness, but the rolls will still be very good.
You might also enjoy these Sourdough Discard Rolls as another beginner-friendly scratch bread project.
Final Thoughts
This sweet dinner rolls recipe is one of those bakes that rewards patience and delivers every single time. The dough is forgiving, the steps are clear, and the result is a batch of warm, pillowy rolls that make any meal feel a little more special.
Give this recipe a try the next time you’re planning a big family dinner or just want to treat yourself to something homemade and wonderful.
If you make these, I’d love to hear how they turned out! Drop a comment below and let me know, or share a photo on social media and tag me. Happy baking!
Recommended:
- Air Fryer Garlic Bread Recipe
- Rosemary Focaccia Recipe
- Cornbread Stuffing Recipe
- Buttermilk Biscuit Recipe
- Slow Cooker Stuffing Recipe
- Garlic Mashed Potatoes Recipe
- Cornish Hen Recipe
- Sweet Cornbread Recipe
- Slow Cooker Pot Roast Recipe
- Prime Rib Recipe