Now I have a thorough understanding of the sitemap. Let me research the pumpkin cheesecake recipe and then write the blog post.I now have thorough research on the classic pumpkin cheesecake recipe. Let me now write the full blog post
A rich, creamy fall dessert that’s the ultimate mashup of two beloved classics, all in one showstopping slice
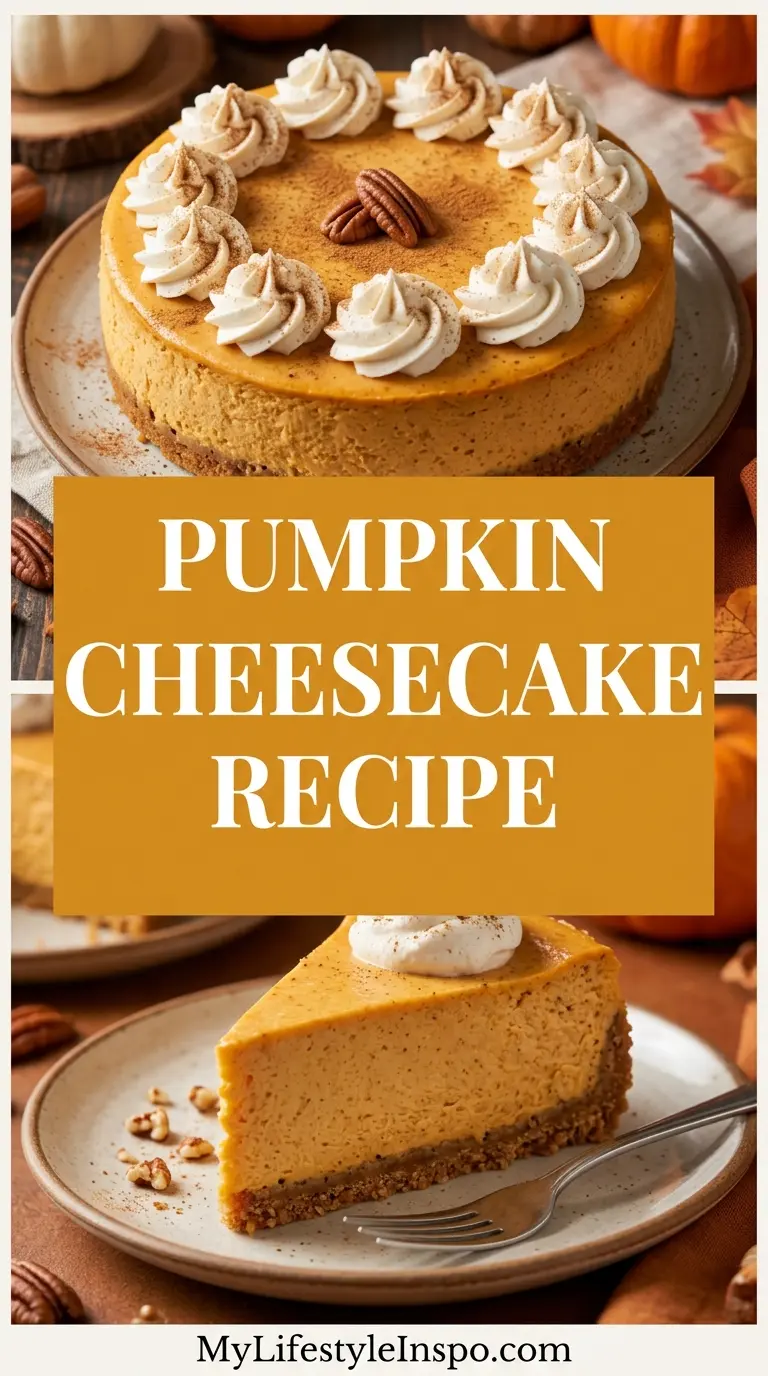
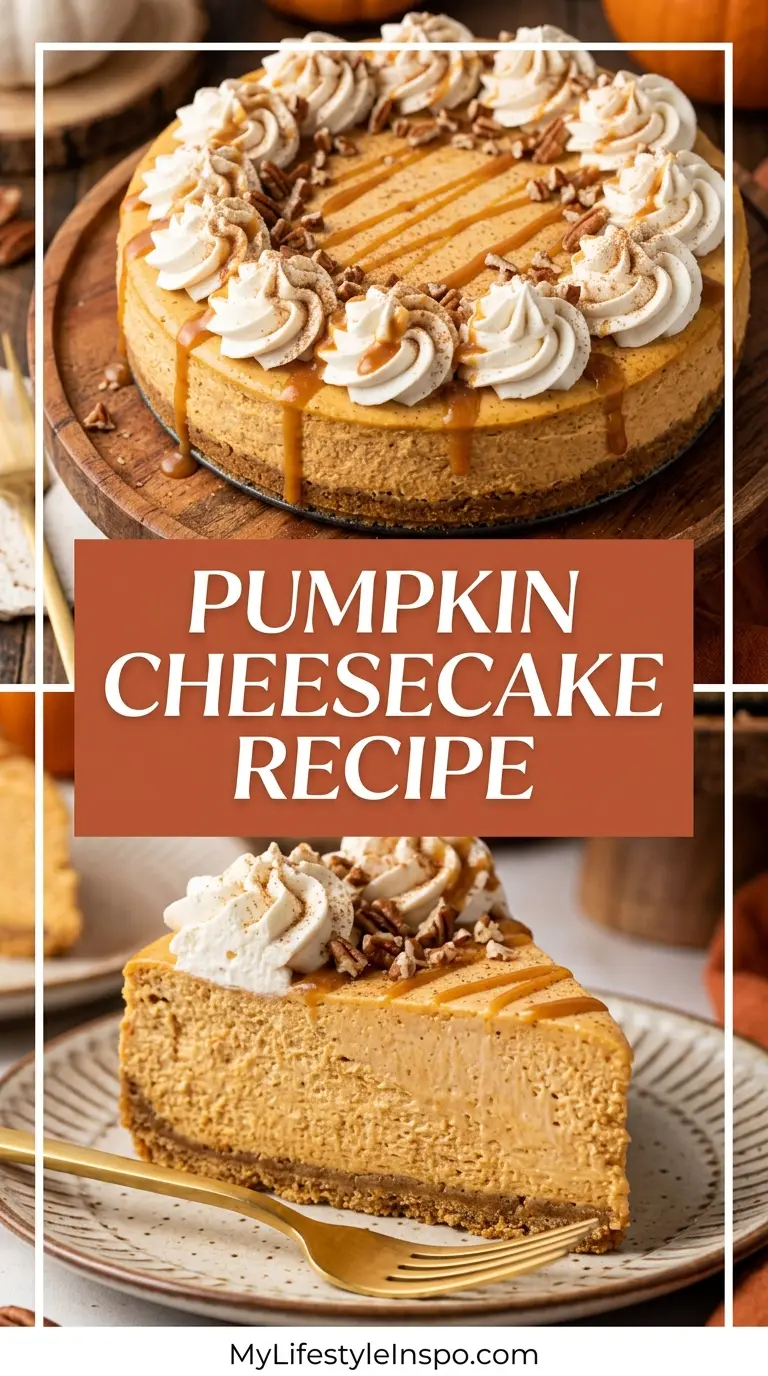
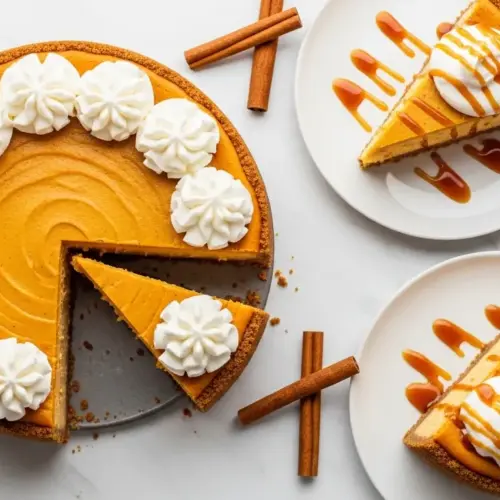
Fall wouldn’t be complete without a truly great pumpkin cheesecake recipe on the table. This dessert is everything you love about pumpkin pie and New York-style cheesecake rolled into one: a buttery, spiced graham cracker crust, a velvety-smooth filling loaded with real pumpkin puree and warm autumn spices, and that signature creamy density that cheesecake is known for.
What makes this recipe work so well is the combination of full-fat cream cheese and sour cream in the filling. The cream cheese provides that rich, tangy backbone, while the sour cream lightens the texture just enough to keep every bite silky rather than heavy.
The pumpkin puree does double duty here. It adds flavor, yes, but it also contributes moisture, which means you have to be a little more careful not to overbake. The goal is a cheesecake that jiggles like Jell-O in the center when it comes out of the oven. It will firm up beautifully as it chills overnight in the fridge.
This is a wonderful make-ahead dessert for Thanksgiving, Christmas, or any fall gathering. Once it’s chilling in the fridge, all the hard work is done.
For another crowd-pleasing fall bake, check out this Pumpkin Roll Recipe next.
Why You’ll Love This Pumpkin Cheesecake Recipe
This dessert earns a spot on the holiday table every single year because it genuinely delivers.
It combines the best elements of two iconic desserts. Pumpkin pie fans love the warm spice, while cheesecake lovers appreciate the creamy, rich texture.
It’s a make-ahead dream. You can bake it a day or two ahead and keep it in the fridge, which makes holiday hosting so much more manageable.
The recipe is beginner-friendly. Even if you have never made a cheesecake before, the detailed steps below will walk you through every stage with confidence.
It holds its shape beautifully when sliced. Because the cheesecake chills overnight, you get those clean, professional-looking slices that look as impressive as they taste.
Here is what makes it such a hit:
- The graham cracker crust is buttery, slightly crunchy, and perfectly complementary to the creamy filling
- The spice blend of cinnamon, ginger, nutmeg, and cloves is warm and balanced, not overwhelming
- The filling is dense, smooth, and deeply flavored thanks to a full can of pumpkin puree
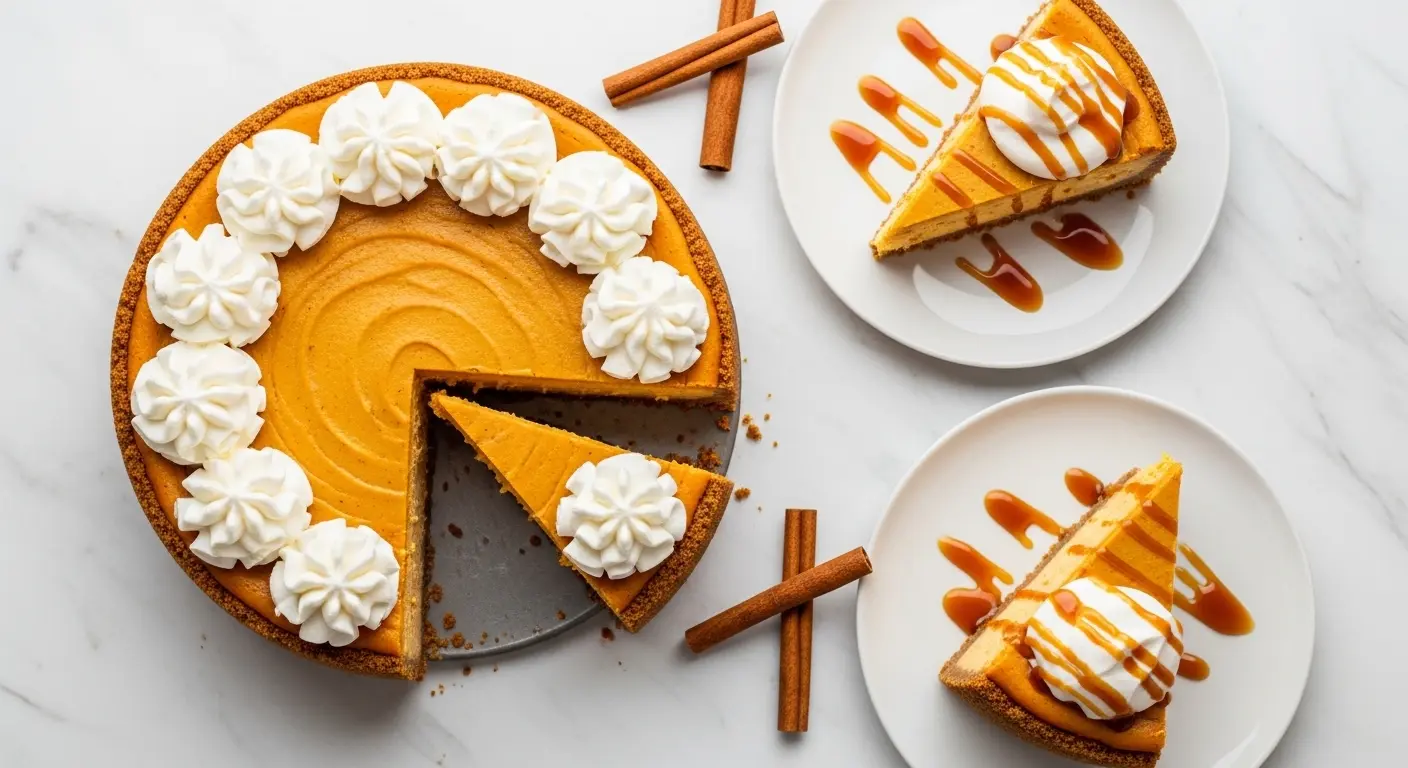
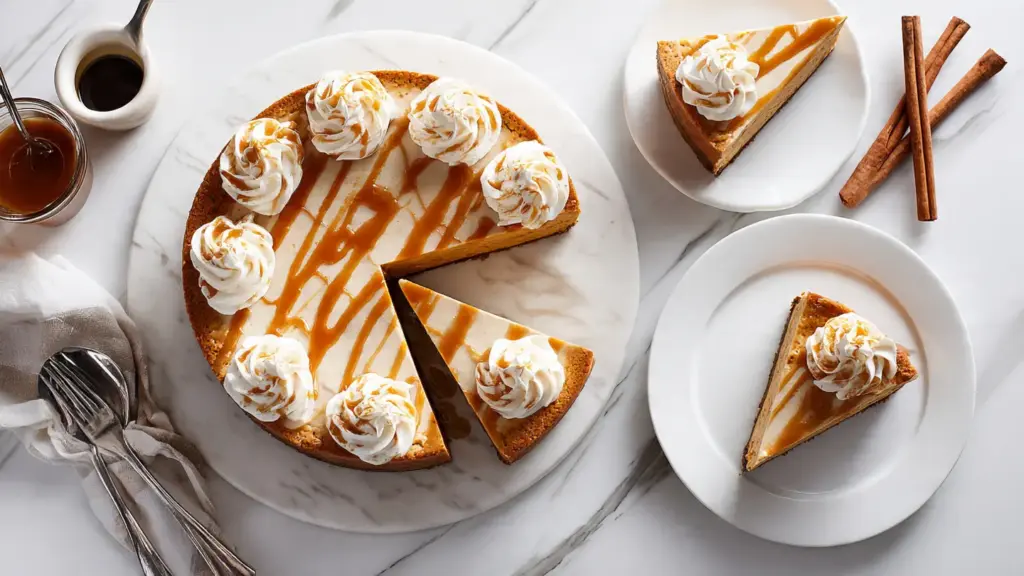
- A dollop of whipped cream and a drizzle of caramel sauce on top takes it to another level entirely
- The texture stays consistent even after a few days in the fridge
You might also enjoy: Classic Pumpkin Pie
Ingredients
You will need simple, accessible ingredients for this recipe. The most important thing to keep in mind is to use pure pumpkin puree, not pumpkin pie filling. Pie filling contains added sugar, eggs, and spices that will throw off the ratios in this recipe. Stick with a reputable brand like Libby’s for consistent color and flavor.
For the Graham Cracker Crust:
- 1 1/2 cups (150g) graham cracker crumbs (about 10-12 full sheets, crushed)
- 3 tablespoons (37g) granulated sugar
- 1/2 teaspoon ground cinnamon
- 6 tablespoons (85g) unsalted butter, melted
For the Pumpkin Cheesecake Filling:
- 3 blocks (24 oz / 680g) full-fat cream cheese, softened to room temperature
- 1 cup (200g) granulated sugar
- 1/4 cup (50g) packed light brown sugar
- 1 can (15 oz / 425g) 100% pure pumpkin puree (not pie filling)
- 3 large eggs, at room temperature
- 1/2 cup (120g) full-fat sour cream, at room temperature
- 2 teaspoons vanilla extract
- 1 1/2 teaspoons ground cinnamon
- 1/2 teaspoon ground ginger
- 1/4 teaspoon ground nutmeg
- 1/4 teaspoon ground cloves
- 2 tablespoons (15g) all-purpose flour
For Serving (Optional):
- Freshly whipped cream
- Caramel sauce for drizzling
Read Also: Pumpkin Bar Recipe
Kitchen Equipment Needed
Having the right tools on hand will make this recipe much smoother. A springform pan is non-negotiable here. The sides release cleanly, so you can unmold the cheesecake without any cracking or tearing along the edges.
- 9-inch springform pan
- Stand mixer or electric hand mixer
- Large mixing bowl
- Medium mixing bowl
- Food processor or zip-top bag and rolling pin (for crushing graham crackers)
- Rubber spatula
- Roasting pan (for the water bath)
- Aluminum foil (heavy-duty)
- Instant-read thermometer
- Wire cooling rack
- Parchment paper
Read Also: Best Cheesecake Recipe
Recommended Products for This Recipe
These are products chosen for their quality and consistent performance in making this pumpkin cheesecake as successful as possible.
1. Libby’s 100% Pure Pumpkin Puree
Libby’s is widely considered the gold standard for canned pumpkin. It has a consistent moisture content, deep orange color, and rich pumpkin flavor that other brands often can’t match. Using a reliable pumpkin puree helps ensure your cheesecake filling sets properly and doesn’t crack.
2. Fat Daddio’s 9-Inch Springform Pan
This professional-grade springform pan has a tight seal that prevents leaks during the water bath, which is one of the most common beginner frustrations. The anodized aluminum distributes heat evenly, helping the cheesecake bake consistently from edge to center.
3. Thermapen One Instant-Read Thermometer
Knowing exactly when your cheesecake is done is key to preventing cracks. A quality instant-read thermometer takes the guesswork out, because you are looking for an internal temperature of 145-150°F (63-66°C) at the center before turning off the oven.
4. KitchenAid 5-Speed Hand Mixer
Beating the cream cheese until completely smooth before adding any other ingredients is critical to a lump-free cheesecake. A powerful, reliable hand mixer makes this step quick and thorough, especially when working with cold or partially softened cream cheese.
5. Bonne Maman Salted Caramel Sauce
Drizzled over each slice of pumpkin cheesecake, a high-quality caramel sauce elevates the whole dessert. This particular sauce has a buttery, complex flavor that pairs beautifully with the warm spices in the filling.
Another great fall dessert to try: Pumpkin Muffin Recipe
Step-by-Step Instructions
1. Bring Ingredients to Room Temperature
- Remove the cream cheese, eggs, and sour cream from the fridge at least 1 to 2 hours before you plan to start baking.
- Room temperature ingredients blend together more smoothly and prevent lumps in the filling. Cold cream cheese can seize up and leave streaks that are very hard to smooth out later.
- Set the ingredients out on the counter and leave them undisturbed while you prepare your other equipment.
2. Prepare Your Springform Pan
- Preheat your oven to 350°F (175°C).
- Line the bottom of your 9-inch springform pan with a circle of parchment paper. This makes unmolding cleaner.
- Lightly grease the sides of the pan with non-stick spray or a thin layer of softened butter.
- Wrap the outside of the pan with at least two layers of heavy-duty aluminum foil. Make sure the foil comes up well past the sides of the pan to prevent water from seeping in during the water bath. Set the pan aside.
3. Make the Graham Cracker Crust
- If using whole graham cracker sheets, break them into pieces and add them to a food processor. Pulse until you get fine, even crumbs. Alternatively, place them in a large zip-top bag and crush them with a rolling pin.
- In a medium bowl, combine the 1 1/2 cups (150g) graham cracker crumbs, 3 tablespoons (37g) granulated sugar, and 1/2 teaspoon cinnamon. Stir together with a fork.
- Pour in the 6 tablespoons (85g) melted butter and stir until the mixture resembles wet sand. Every crumb should be evenly moistened; dry patches will make the crust crumbly rather than firm.
- Pour the crumb mixture into the prepared springform pan. Using the bottom of a flat measuring cup or a straight-sided glass, press the crumbs firmly and evenly across the bottom. You can press a thin layer about 1 inch up the sides if you prefer, but a flat-bottom crust works perfectly here.
- Bake the crust at 350°F (175°C) for 8 to 10 minutes, until it looks slightly golden and smells toasted. Remove it from the oven and let it cool completely on a wire rack before adding the filling.
- Reduce the oven temperature to 325°F (165°C).
4. Beat the Cream Cheese
- Add the 3 blocks (24 oz / 680g) of softened cream cheese to the bowl of your stand mixer or a large mixing bowl if using a hand mixer. Fit the mixer with the paddle attachment.
- Beat on medium speed for about 3 to 4 minutes, scraping down the sides and bottom of the bowl every minute. The cream cheese should be completely smooth, fluffy, and pale with no visible lumps before you proceed. Lumps at this stage are nearly impossible to fix later.
- With the mixer running on low, add the 1 cup (200g) granulated sugar and 1/4 cup (50g) brown sugar. Continue mixing for another 2 minutes until fully incorporated and the mixture looks almost frosting-like.
5. Add the Pumpkin and Spices
- In a separate medium bowl, whisk together the 15 oz (425g) can of pumpkin puree, 1 1/2 teaspoons cinnamon, 1/2 teaspoon ground ginger, 1/4 teaspoon nutmeg, 1/4 teaspoon ground cloves, 2 tablespoons (15g) flour, and 2 teaspoons vanilla extract until everything is well combined. Mixing the pumpkin mixture separately first helps prevent overmixing when you combine it with the cream cheese.
- Add the pumpkin mixture to the cream cheese mixture and mix on low speed until just combined. Do not overmix at this stage; excess air whipped into the filling increases the chance of cracking during baking.
6. Add the Eggs and Sour Cream
- Add the 3 room-temperature eggs one at a time, mixing on low speed after each addition until the yolk just disappears. The key here is to mix as little as possible once the eggs go in; eggs introduce air, and too much air causes cheesecakes to puff up and then crack as they cool.
- Add the 1/2 cup (120g) sour cream and mix on low until just incorporated. Scrape down the sides and bottom of the bowl one final time with a rubber spatula and give it one last gentle stir by hand.
7. Pour the Filling and Set Up the Water Bath
- Pour the finished cheesecake filling over the cooled crust. Use a rubber spatula to spread it into an even layer and smooth the top.
- Gently tap the pan on the counter a few times to release any large air bubbles trapped near the surface.
- Place the foil-wrapped springform pan inside a large roasting pan.
- Carefully pour hot water into the roasting pan until it reaches about 1 inch (2.5 cm) up the outside of the springform pan. Use very hot water from the tap or water you have brought to a simmer. The water bath creates a humid, gentle environment that helps the cheesecake bake evenly and prevents cracks.
- Carefully transfer the whole setup to the preheated 325°F (165°C) oven.
8. Bake the Cheesecake
- Bake for 60 to 75 minutes. At around the 60-minute mark, check the cheesecake. The edges should look set and matte, while the center 2 to 3 inches should still have a gentle jiggle, similar to Jell-O rather than a liquid wobble.
- For precision, use an instant-read thermometer to check the center. You are looking for an internal temperature of 145 to 150°F (63 to 66°C).
- Do not overbake. Even if the center looks underdone, the cheesecake will continue to set as it cools.
9. Cool Gradually
- Once the cheesecake reaches the right temperature, turn off the oven but leave the cheesecake inside with the oven door cracked open about 1 inch.
- Let the cheesecake rest in the cooling oven for 1 hour. This gradual cooling is one of the most important steps for avoiding cracks. Sudden temperature changes cause the filling to contract rapidly, which leads to cracks on the surface.
- After an hour, remove the cheesecake from the water bath and transfer it to a wire rack. Run a thin knife around the inside edge of the springform pan to loosen the cheesecake from the sides. This also helps prevent cracking as the cheesecake continues to cool and contract.
- Let the cheesecake cool completely at room temperature, about another hour.
10. Chill Overnight
- Once fully cooled to room temperature, cover the top of the pan loosely with plastic wrap or foil and transfer to the refrigerator.
- Chill for a minimum of 6 hours, but ideally overnight (8 to 12 hours). This step is essential: the cheesecake needs this time to firm up completely and allow the flavors to deepen and meld together.
- When you are ready to serve, release the springform pan sides by unlatching them and lifting them away. Slide the cheesecake onto a serving plate. Slice with a sharp knife wiped clean between each cut for the cleanest results.
Read Also: New York Cheesecake Recipe
Tips for Success
Getting a pumpkin cheesecake right comes down to a handful of key techniques. Follow these and you will be rewarded with a smooth, crack-free result every single time.
- Always use room temperature ingredients. Cold cream cheese is the number one cause of lumpy cheesecake batter. Give everything at least 1 to 2 hours out of the fridge.
- Do not skip the water bath. It sounds fussy, but it takes less than 5 minutes to set up and makes a dramatic difference in the texture and appearance of the finished cheesecake.
- Mix low and slow once the eggs go in. Overbeating after the eggs are added incorporates too much air, which causes puffing and cracking.
- Let the cheesecake cool gradually. Never move a freshly baked cheesecake directly from the oven to the fridge. The sudden temperature shock is a reliable way to create cracks.
- Use pure pumpkin puree, not pumpkin pie filling. Pie filling has added sugars, spices, and other ingredients that will throw off the balance of flavors and may affect how the cheesecake sets.
- Chill overnight for the best texture. A 6-hour minimum is the floor, but overnight is always better. The filling becomes noticeably creamier and more sliceable.
- Wipe your knife between slices. This gives you clean, presentable slices instead of messy smeared edges.
This technique also works beautifully in a No Bake Cheesecake variation if you want a simpler version.
Serving Suggestions
Pumpkin cheesecake is delicious all on its own, but a few simple additions can really make each slice shine.
A generous dollop of freshly whipped cream is the most classic and complementary topping, adding a light, airy contrast to the dense, creamy filling. A slow drizzle of salted caramel sauce takes every single bite up a notch by adding sweetness and a slightly smoky depth that pairs perfectly with the pumpkin spice profile.
Here are some great ways to serve and enjoy this cheesecake:
- A dusting of ground cinnamon or pumpkin pie spice over whipped cream for a pretty and aromatic finish
- Served alongside a hot mug of Pumpkin Spice Latte for the ultimate fall experience
- Paired with a scoop of vanilla bean ice cream for an indulgent dessert plate
- Topped with a handful of candied pecans for added crunch and a nutty sweetness
- Drizzled with a warm butterscotch sauce for a richer, caramel-adjacent topping
- Served at Thanksgiving alongside Classic Pecan Pie and Apple Pie for a full holiday dessert spread
Variations to Try
Once you have mastered the classic version, there are plenty of fun ways to put your own spin on this dessert.
Each variation listed below starts with the same foundational recipe, so you are building on a solid base every time you experiment.
- Gingersnap Crust: Swap the graham crackers for crushed gingersnap cookies. The spice and molasses in gingersnaps amplify the warm, autumnal flavors of the pumpkin filling in the most wonderful way.
- Streusel Topping: Add a simple streusel made from butter, flour, brown sugar, and cinnamon over the top of the filling before baking for an added crunch.
- Mini Pumpkin Cheesecakes: Press the crust mixture into a lined muffin tin and divide the filling among the cups. Bake for 20 to 25 minutes for individual-sized portions that are great for parties.
- Chocolate Swirl Pumpkin Cheesecake: Melt a small amount of dark chocolate and swirl it through the top of the filling just before baking for a stunning marbled effect.
- Maple Pumpkin Cheesecake: Replace the granulated sugar in the filling with pure maple syrup (reduce by about 1/4 cup and adjust to taste) for a richer, deeper sweetness.
- Gluten-Free Version: Use certified gluten-free graham crackers or gluten-free gingersnap cookies for the crust. Replace the all-purpose flour in the filling with an equal amount of cornstarch.
For another delicious pumpkin treat, check out this Pumpkin Pancake Recipe.
Storage and Reheating
Pumpkin cheesecake stores well and actually tastes even better on day two, once the flavors have had extra time to deepen in the fridge.
Keep these storage guidelines in mind to get the most out of your cheesecake:
- Refrigerator: Cover leftover cheesecake tightly with plastic wrap or store slices in an airtight container. It will keep well in the fridge for up to 4 to 5 days.
- Freezer: For longer storage, wrap individual slices tightly in plastic wrap, then place them in a zip-top freezer bag. Frozen pumpkin cheesecake keeps well for up to 2 to 3 months.
- Thawing: Move frozen slices to the refrigerator and let them thaw overnight before serving. Do not thaw cheesecake at room temperature, as this can affect the texture.
- Serving from cold: Pumpkin cheesecake is best served chilled or at a cool room temperature. There is no need to reheat it; simply pull slices from the fridge about 15 to 20 minutes before serving for the best flavor and texture.
- Avoid toppings before storing: If you have added whipped cream to the top, store slices separately and add fresh whipped cream just before serving.
Read Also: Cheesecake Ice Cream Cake Recipe
Nutritional Facts
The values below are approximate and based on one slice, assuming the cheesecake is cut into 12 equal portions. Toppings like whipped cream and caramel sauce are not included.
| Nutrient | Per Serving (1 Slice) |
|---|---|
| Calories | 395 kcal |
| Total Fat | 26g |
| Saturated Fat | 15g |
| Cholesterol | 120mg |
| Sodium | 310mg |
| Total Carbohydrates | 34g |
| Dietary Fiber | 1g |
| Total Sugars | 27g |
| Protein | 6g |
| Vitamin A | 75% DV |
| Calcium | 8% DV |
| Iron | 6% DV |
Nutritional values are estimates only and will vary based on specific brands and exact measurements used.
Another baked treat to try: Best Carrot Cake Recipe
Health Benefits of Key Ingredients
While this is undeniably an indulgent dessert, a few of the key ingredients bring genuine nutritional value to the table alongside the flavor.
Pumpkin is one of the most nutrient-dense ingredients in this entire recipe. It is exceptionally rich in beta-carotene, the compound that gives it that deep orange color, which the body converts to vitamin A. Vitamin A supports eye health, immune function, and skin health.
Here is a closer look at what the key ingredients contribute:
- Pumpkin puree is rich in fiber, potassium, and vitamins A and C. A single cup of pumpkin provides more than 200% of the recommended daily intake of vitamin A.
- Eggs provide high-quality complete protein, along with B vitamins, choline, and fat-soluble vitamins including D and E, which support brain and cellular health.
- Cinnamon has been studied for its potential to support healthy blood sugar levels and contains antioxidants that help reduce inflammation in the body.
- Ginger is well-known for its anti-nausea properties and also contains gingerol, a bioactive compound with antioxidant and anti-inflammatory effects.
- Nutmeg contains small amounts of antioxidants and has traditionally been associated with supporting digestive comfort.
- Cream cheese provides fat-soluble vitamins like vitamin A and contributes to the satiety factor of this dessert, helping you feel satisfied with a smaller portion.
This recipe pairs beautifully with a warm bowl of Pumpkin Soup as part of an autumn-themed dinner menu.
Frequently Asked Questions
1. Can I make pumpkin cheesecake without a water bath?
You can, but there is a trade-off. The water bath creates a moist, gentle baking environment that helps the cheesecake set evenly and prevents the top from drying out or cracking. Without it, the pumpkin filling is more susceptible to cracking because pumpkin puree causes the batter to puff a bit more than a standard cheesecake filling. If you skip the water bath, be especially careful not to overbake, and make sure to cool the cheesecake very gradually by leaving it in the turned-off oven with the door cracked for at least an hour.
2. Why did my pumpkin cheesecake crack?
Cracking usually comes down to one of three causes: overmixing the batter (which incorporates too much air), overbaking (taking the cheesecake out once the center is fully set rather than still slightly jiggly), or cooling too quickly (moving the cheesecake from the hot oven directly to the fridge). The good news is that any surface cracks can be covered completely with a layer of whipped cream or caramel sauce, and the taste will be completely unaffected.
3. How do I know when the pumpkin cheesecake is done baking?
The most reliable method is using an instant-read thermometer. The center of the cheesecake should read 145 to 150°F (63 to 66°C). Visually, the edges should look set and matte while the center 2 to 3 inches still has a soft, Jell-O-like jiggle when you gently nudge the pan. If the center looks liquid and loose, it needs more time; if it looks fully set and solid, it is already overbaked.
4. Can I make this cheesecake ahead of time?
Absolutely, and it is actually recommended. Pumpkin cheesecake tastes better after it has had a full night to chill in the refrigerator. You can make it up to 3 days ahead and keep it covered in the fridge. You can also freeze the fully baked and chilled cheesecake for up to 3 months; wrap it tightly in plastic wrap and then foil, and thaw it overnight in the fridge before serving.
5. What is the difference between pumpkin puree and pumpkin pie filling?
Pumpkin puree contains only cooked, pureed pumpkin with nothing else added. Pumpkin pie filling, on the other hand, contains added sugar, spices, and sometimes eggs or thickeners, and is pre-seasoned and sweetened for making a pie straight from the can. For this cheesecake recipe, you must use pure pumpkin puree. Using pie filling will result in a filling that is too sweet, incorrectly spiced, and may not set properly because the ingredient ratios are designed around plain puree.
For another creamy and delicious fall dessert, check out this Blueberry Cheesecake Recipe.
Classic Pumpkin Cheesecake
Equipment
- 9-inch springform pan - heavy-duty, leak-proof recommended
- Stand mixer or electric hand mixer
- Large mixing bowl
- Medium mixing bowl
- Food processor or zip-top bag and rolling pin - for crushing graham crackers
- Rubber spatula
- Roasting pan - large enough to fit springform pan for water bath
- Aluminum foil - heavy-duty, for wrapping pan
- Instant-read thermometer - optional but recommended for precision
- Wire cooling rack
- Parchment paper
Ingredients
- 1 1/2 cups graham cracker crumbs - 150g, about 10-12 full sheets
- 3 tablespoons granulated sugar - 37g
- 1/2 teaspoon ground cinnamon
- 6 tablespoons unsalted butter - 85g, melted
For the Pumpkin Cheesecake Filling
- 3 blocks full-fat cream cheese - 24 oz / 680g total, softened to room temperature
- 1 cup granulated sugar - 200g
- 1/4 cup light brown sugar - 50g, packed
- 1 can 100% pure pumpkin puree - 15 oz / 425g, not pumpkin pie filling
- 3 large eggs - at room temperature
- 1/2 cup full-fat sour cream - 120g, at room temperature
- 2 teaspoons vanilla extract
- 1 1/2 teaspoons ground cinnamon
- 1/2 teaspoon ground ginger
- 1/4 teaspoon ground nutmeg
- 1/4 teaspoon ground cloves
- 2 tablespoons all-purpose flour - 15g
For Serving (Optional)
- Freshly whipped cream - for topping
- Caramel sauce - for drizzling, salted caramel recommended
Instructions
- Bring cream cheese, eggs, and sour cream to room temperature for 1-2 hours before starting.
- Preheat oven to 350°F (175°C). Line springform pan bottom with parchment paper, grease sides, and wrap exterior with 2 layers of heavy-duty foil.
- Combine graham cracker crumbs, sugar, and cinnamon in a bowl. Stir in melted butter until mixture resembles wet sand. Press firmly into pan bottom.
- Bake crust at 350°F (175°C) for 8-10 minutes until golden and toasted. Cool completely on a wire rack. Reduce oven temperature to 325°F (165°C).
- Beat softened cream cheese on medium speed for 3-4 minutes until completely smooth and fluffy. Scrape down the bowl frequently.
- Add both sugars and mix for 2 minutes until incorporated and frosting-like in texture.
- Whisk together pumpkin puree, spices, flour, and vanilla in a separate bowl. Add to cream cheese mixture and mix on low until just combined.
- Add eggs one at a time, mixing on low after each addition until yolk disappears. Add sour cream and mix on low until just incorporated.
- Pour filling over cooled crust and smooth the top. Tap pan on counter to release air bubbles. Place in roasting pan and add 1 inch of hot water.
- Bake at 325°F (165°C) for 60-75 minutes until edges are set and center jiggles like Jell-O. Internal temperature should reach 145-150°F (63-66°C).
- Turn off oven and leave cheesecake inside with door cracked 1 inch for 1 hour to cool gradually.
- Remove from water bath and place on wire rack. Run a thin knife around pan edge to loosen. Cool completely at room temperature for about 1 hour.
- Cover and refrigerate for at least 6 hours, preferably overnight. Release pan sides and serve chilled with whipped cream and caramel sauce.
Notes
- Room temperature is essential: Cold cream cheese is the number one cause of lumpy cheesecake batter. Give everything at least 1-2 hours out of the fridge before starting.
- Don’t skip the water bath: It takes less than 5 minutes to set up and makes a dramatic difference in texture and prevents cracking.
- Mix low and slow after adding eggs: Overbeating incorporates too much air, which causes puffing and cracking during cooling.
- Check doneness with a thermometer: For best results, aim for an internal temperature of 145-150°F (63-66°C) at the center.
- Let it cool gradually: Never move a freshly baked cheesecake directly from oven to fridge. The sudden temperature shock causes cracks.
- Use pure pumpkin puree, not pie filling: Pie filling has added sugars and spices that will throw off the recipe ratios.
- Chill overnight for best texture: The filling becomes noticeably creamier and more sliceable after 8-12 hours in the fridge.
- Storage tips: Refrigerate leftovers tightly covered for up to 5 days. Freeze individual slices for up to 3 months.
- Clean slices: Wipe your knife clean between each cut for presentable, professional-looking slices.
- Make it your own: Try a gingersnap crust, add a streusel topping, or swirl in chocolate for delicious variations.
Final Thoughts
This pumpkin cheesecake recipe is one of those desserts that earns instant fans the very first time you make it.
It has everything you want in a holiday dessert: bold, warm flavor, a gloriously creamy texture, and a presentation that looks like it came from a bakery.
Once you nail the technique, this will be the recipe your family requests every single fall.
So go ahead and carve out an afternoon for this one. Your future self, and everyone at your table, will absolutely thank you.
If you give this pumpkin cheesecake a try, leave a comment below and let us know how it turned out. Did you add a gingersnap crust? A caramel drizzle? Share your photos and tips too.
Recommended:
- Pumpkin Soup Recipe
- Oreo Cheesecake Recipe
- Lemon Cheesecake Recipe
- Strawberry Cheesecake Recipe
- Mini Cheesecake Recipe
- Churro Cheesecake Recipe
- Japanese Cheesecake Recipe
- Basque Cheesecake Recipe
- From Scratch Pumpkin Pie Recipe
- Pumpkin Bread Recipe


