If you’ve ever sat down to a steaming bowl of pho at a Vietnamese restaurant and thought, “I could never make this at home,” think again. This pho recipe walks you through every step of building that deeply aromatic, crystal-clear beef broth from scratch, the kind that fills your kitchen with the warm scent of cinnamon, star anise, and charred ginger.
Pho (pronounced “fuh”) is Vietnam’s most beloved noodle soup, and for good reason.
The magic is in the broth. A slow simmer of beefy bones, charred aromatics, and toasted whole spices creates a bowl that’s light yet incredibly complex, savory, faintly sweet, and unlike anything a store-bought stock can deliver.
Yes, it takes a few hours. But the hands-on time is minimal, and the reward is a restaurant-quality bowl of pho that you made entirely yourself.
This recipe covers the traditional stovetop beef pho (phở bò), using the classic combination of bone broth, flat rice noodles, thinly sliced beef, and a full spread of fresh toppings.
For a quicker weeknight version, you might also enjoy the Instant Pot Pho Recipe.
Why You’ll Love This Pho Recipe
This pho recipe gives you the full experience, from a rich, layered broth to a customizable topping spread, all made with accessible ingredients.
Here is why this recipe works so well:
- The broth is built on technique. Parboiling the bones before the long simmer removes impurities and ensures a clean, clear broth rather than a murky one.
- Charring the aromatics is non-negotiable. Broiling or dry-charring the onion and ginger before adding them to the pot gives the broth its distinctive smoky depth.
- Toasting the spices wakes them up. A short toast in a dry pan intensifies the flavors of star anise, cinnamon, and cloves, making every sip more complex.
- The toppings complete the dish. Fresh bean sprouts, Thai basil, lime, hoisin, and sriracha let each person customize their bowl exactly how they like it.
- It scales beautifully. This recipe makes a generous pot, so leftovers mean effortless meals for days.
- It’s deeply satisfying. Few things are as comforting as a bowl of homemade pho on a cold day.
If you love warming noodle soups, you will also want to try this Udon Noodle Soup Recipe for another bowl of cozy comfort.
Ingredients
Making pho from scratch requires two ingredient sets: everything for the broth and the toppings for serving. The quality of the bones and spices matters most here, so try to source fresh, whole spices for the best flavor.
For the Broth:
- 4 lbs (1.8 kg) beef bones (a mix of knuckle, marrow, and leg bones)
- 1 lb (450 g) beef brisket or beef chuck, whole piece
- 2 medium yellow onions, halved
- 1 large knob fresh ginger (about 4 inches / 10 cm), halved lengthwise
- 5 whole star anise
- 2 cinnamon sticks
- 6 whole cloves
- 1 tablespoon whole coriander seeds
- 1 tablespoon fennel seeds
- 1 black cardamom pod (optional, but highly recommended)
- 3 tablespoons fish sauce, plus more to taste
- 1 tablespoon rock sugar (or 2 teaspoons granulated sugar)
- 1 tablespoon salt, or to taste
- 12-14 cups (3-3.5 liters) water
For Serving:
- 14 oz (400 g) dried flat rice noodles (banh pho), medium width
- 8 oz (225 g) beef eye of round or sirloin, very thinly sliced (for raw beef topping)
Fresh Toppings (serve on the side):
- 2 cups fresh bean sprouts
- Fresh Thai basil sprigs
- Fresh cilantro, roughly chopped
- 1 lime, cut into wedges
- 2-3 fresh Thai bird chilies or jalapeños, thinly sliced
- 4 green onions, thinly sliced
- 1 small white onion, very thinly sliced
- Hoisin sauce, for serving
- Sriracha, for serving
You might also love making this hearty Chicken Rice Soup Recipe on a cozy weeknight.
Kitchen Equipment Needed
Having the right tools makes the process much smoother. A large stockpot is the single most important piece of equipment here since you need room for all the bones and water.
- Large stockpot (12-16 quart capacity)
- Large skillet or cast iron pan (for charring onion and ginger)
- Fine mesh strainer (for straining broth)
- Cheesecloth and kitchen twine (for spice bundle)
- Large ladle
- Sharp chef’s knife (for slicing beef paper-thin)
- Cutting board
- Medium saucepan (for cooking noodles separately)
- Large mixing bowl (for ice bath)
- Serving bowls (large and deep)
- Tongs
- Slotted spoon (for skimming)
Read Also: Tom Yum Soup Recipe
Recommended Products for This Recipe
These are hand-picked recommendations based on quality and how much of a difference they make in the final bowl.
1. Red Boat Fish Sauce
Red Boat is widely regarded as one of the best fish sauces available, made from only anchovies and salt with no added water or preservatives. Using a high-quality fish sauce is one of the single biggest flavor upgrades you can make to your pho broth. The depth of umami it adds is noticeable from the very first sip.
2. Pho Spice Kit (Old Man Que Huong)
If you want convenience without sacrificing authenticity, this pre-measured pho spice kit includes all the essential whole spices in one bag. It is a staple at Vietnamese grocery stores and beloved by home cooks who make pho regularly.
3. Large Stainless Steel Stockpot (12-Quart)
A wide, tall stockpot with a heavy base allows for an even, gentle simmer without hot spots. This is the kind of pot you need to extract maximum flavor from your beef bones over several hours of low-and-slow cooking.
4. Cheesecloth and Kitchen Twine Set
Wrapping whole spices in cheesecloth before adding them to the broth keeps everything tidy and makes removal effortless. No rogue star anise turning up in your bowl mid-slurp.
5. Premium Dried Banh Pho Rice Noodles
The noodle matters more than people think. Look for flat rice noodles specifically labeled for pho, as they hold their texture in hot broth far better than generic rice noodles.
This pairs so well with a warming bowl of Miso Soup if you’re in the mood for an Asian-inspired spread.
Step-by-Step Instructions
Step 1: Char the Onion and Ginger
- Halve the onions and ginger lengthwise, keeping the skin on both.
- Set a heavy cast iron skillet or large pan over high heat with no oil.
- Place the onion halves and ginger pieces cut side down directly in the dry pan.
- Cook for 5 to 7 minutes without moving them, until the cut sides are deeply charred and blackened in spots.
- Flip and char the other side for another 2 to 3 minutes.
- Alternatively, place them cut side up on a baking sheet and broil in the oven about 8 inches from the heating element for 10 to 12 minutes, turning halfway through.
- Remove from heat and set aside. Do not peel the ginger or remove the charred onion skin — both go into the broth as-is and get strained out later.
Step 2: Toast the Whole Spices
- In a small dry skillet over medium heat, add the star anise, cinnamon sticks, cloves, coriander seeds, fennel seeds, and black cardamom pod.
- Toast, stirring frequently, for 2 to 3 minutes. You’ll know they’re ready when the kitchen begins to smell fragrant and slightly smoky.
- Watch carefully as they can burn quickly. You want them aromatic, not scorched.
- Remove from heat immediately and let them cool for a minute.
- Place the toasted spices in the center of a double-layered piece of cheesecloth and tie it closed with kitchen twine to form a spice bundle. Set aside.
Step 3: Parboil the Beef Bones and Brisket
- Place the beef bones and brisket together in your large stockpot.
- Cover completely with cold water and bring to a rapid boil over high heat.
- As the water heats, you will see grey foam and impurities rise to the surface. This is normal.
- Once boiling, let it boil vigorously for 5 to 10 minutes to draw out the remaining impurities.
- Drain the entire pot into a sink and discard the water.
- Rinse each bone and the brisket piece thoroughly under cold running water, scrubbing off any remaining grey bits that are clinging to the bones.
- Rinse the stockpot as well, then return the cleaned bones and brisket to the pot.
Step 4: Build the Broth
- Cover the cleaned bones and brisket with fresh cold water — about 12 to 14 cups (3 to 3.5 liters), or enough to cover everything by a few inches.
- Bring the pot to a boil over medium-high heat.
- Add the charred onion halves (including the charred skin), the charred ginger, and the spice bundle to the pot.
- Add the fish sauce, rock sugar, and salt.
- Stir gently to combine and dissolve the sugar.
- Once the broth comes to a boil, reduce the heat to low.
- The broth should be at a very gentle, lazy simmer with just a few bubbles breaking the surface. A hard boil will cloud the broth.
- Simmer uncovered for 3 to 4 hours, skimming any foam or fat that rises to the surface every 30 minutes or so.
Step 5: Remove and Rest the Brisket
- After about 1.5 to 2 hours of simmering, check the brisket. It is done when you can pierce it easily with a chopstick or skewer.
- Using tongs or a slotted spoon, carefully remove the brisket from the pot.
- Transfer it to a bowl of ice water for 5 minutes to stop the cooking and help it hold its shape.
- Once cooled, remove from the ice water and place in a container. Refrigerate until ready to serve.
- The bones can continue to simmer in the pot for the remaining cooking time to develop the broth further.
Step 6: Strain and Season the Broth
- After 3 to 4 hours of total simmering, turn off the heat.
- Using tongs, remove and discard the large bones, the spice bundle, the onion halves, and the ginger.
- Set a fine mesh strainer over a clean large pot or bowl and pour the broth through it to catch any remaining solids.
- The finished broth should be clear and a deep golden-amber color.
- Taste the broth and adjust seasoning. Add more fish sauce for deeper umami and saltiness, more sugar if it needs a little sweetness, or more salt to taste.
- Keep the broth at a gentle simmer over low heat until ready to serve.
Step 7: Prepare the Noodles
- Cook the dried rice noodles in a separate medium saucepan of boiling water, following the package directions. Most medium-width pho noodles take 5 to 8 minutes.
- Do not cook the noodles in the broth, as this will cloud and thicken it.
- Once the noodles are just tender, drain them and rinse with cold water to stop the cooking and prevent sticking.
- Divide the cooked noodles evenly among your serving bowls.
Step 8: Prepare the Toppings and Assemble
- Slice the refrigerated brisket very thinly across the grain. Arrange a few slices on top of the noodles in each bowl.
- Add a few slices of the raw thinly sliced sirloin or eye of round on top of the noodles as well (the boiling hot broth poured over the top will cook this meat perfectly).
- Scatter thinly sliced white onion and green onion over the meat.
- Bring the broth back to a full rolling boil. This is important to ensure the raw beef slices cook through.
- Ladle the boiling hot broth generously over each bowl — at least 2 cups per serving.
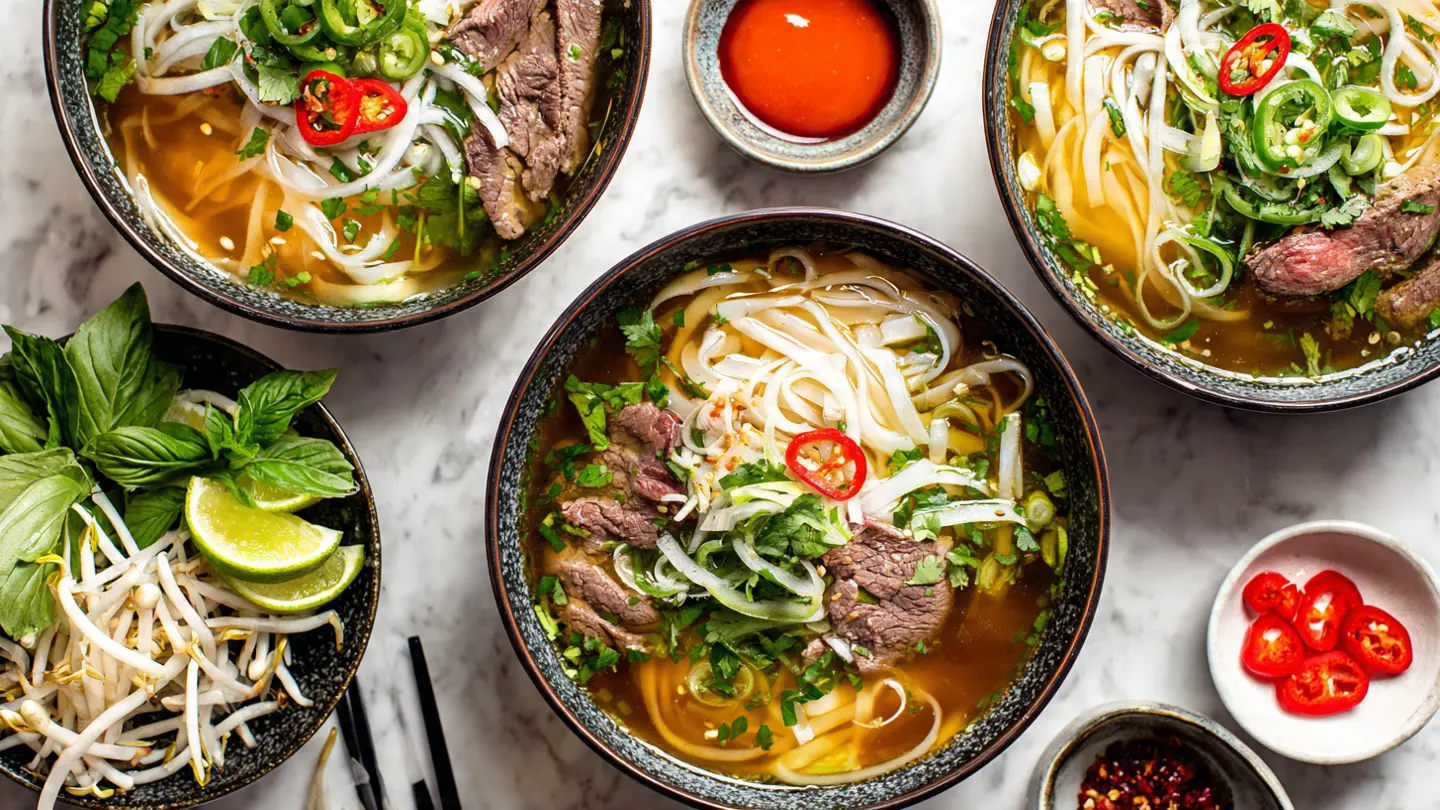
- Serve immediately with the fresh toppings arranged on a plate alongside: bean sprouts, Thai basil, cilantro, lime wedges, sliced chilies, hoisin sauce, and sriracha.
Another warming bowl you’ll want to add to your rotation: this Chicken Soup Recipe.
Tips for Success
A few small details make the difference between a decent bowl of pho and a truly outstanding one. Keep these in mind before you start.
- Don’t skip the parboil. This step is what keeps the broth clear. Bones release a lot of grey, foamy impurities in the first boil, and if you skip draining and rinsing them, that murk goes straight into your finished broth.
- Keep the simmer gentle. A hard, rolling boil will make the broth cloudy and almost impossible to clear up afterward. Low and slow wins every time.
- Use quality fish sauce. Fish sauce is the backbone of the seasoning. A good bottle (like Red Boat or Three Crabs) gives the broth a clean umami depth rather than an overpowering fishy taste.
- Slice the raw beef as thin as possible. The hot broth cooks the raw meat on contact, but only if the slices are paper-thin. Partially freeze the beef for 20 to 30 minutes before slicing for much easier cutting.
- Toast your spices until fragrant, not smoky. Over-toasted spices turn bitter and can overpower the broth.
- Taste and adjust before serving. The broth should be balanced — savory, gently sweet, and aromatic, not dominated by any one flavor. Adjust with more fish sauce, sugar, or salt until it tastes right to you.
- Serve the broth boiling hot. Pho cools quickly once it hits the bowl and noodles. The hotter the broth at the moment of ladling, the better the eating experience.
Read Also: Beef Bone Broth Soup Recipe
Serving Suggestions
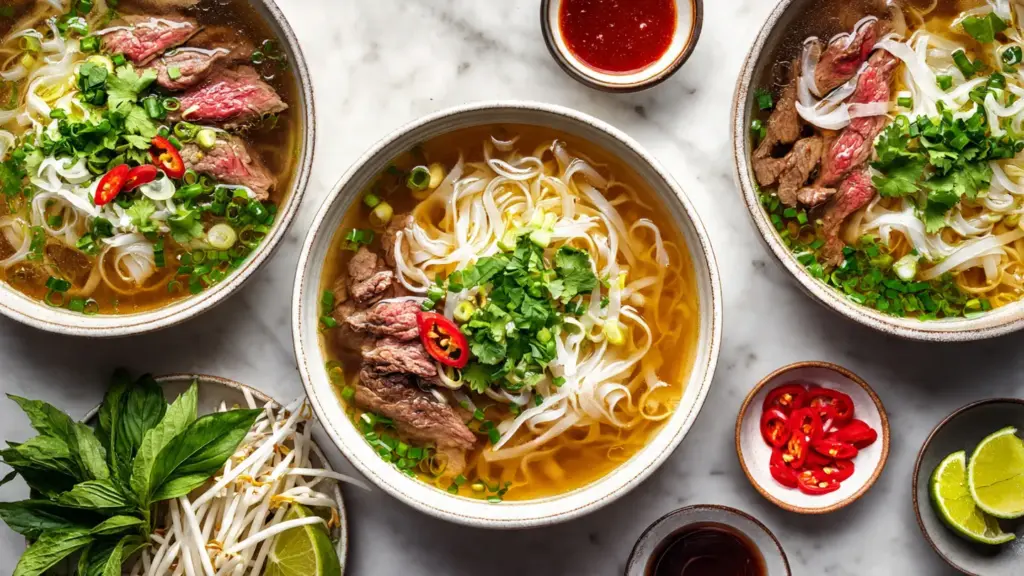
Pho is a complete meal on its own, but the way you serve and garnish it makes a huge difference. The toppings are not just decoration; they balance the richness of the broth and add freshness.
Serve each bowl with a generous platter of garnishes so everyone can customize their own. Here are the best ways to enjoy your pho:
- Bean sprouts add a satisfying crunch and cool the hot broth slightly.
- Thai basil brings an anise-like freshness that complements the spiced broth beautifully.
- Fresh lime wedges brighten everything up with a squeeze right before eating.
- Hoisin and sriracha are the classic dipping sauce combination for the beef — either stir them into the broth or use them as a dipping sauce on the side.
- Sliced fresh chilies give each bowl an adjustable hit of heat.
- Cilantro adds a fresh herbal note that lifts the whole bowl.
- A cold Vietnamese iced coffee on the side makes this a truly authentic experience.
For a lighter starter before your pho, try these Classic Deviled Eggs when entertaining a group.
Variations to Try
Traditional beef pho is the standard, but there are several well-loved variations worth exploring once you’ve mastered the base recipe.
- Chicken Pho (Phở Gà): A lighter, faster version made with whole chicken instead of beef bones. The broth is delicate and golden and comes together in about half the time.
- Vegan Pho: Made with a deeply flavored vegetable and mushroom broth using the same charred aromatics and spices. Tofu or mushrooms replace the meat toppings.
- Instant Pot Pho: Using a pressure cooker cuts the broth simmering time down dramatically while still producing a rich, complex result.
- Spicy Pho: Add a piece of dried chili or a spoonful of chili oil to the broth during the simmer for a gently spiced base.
- Pho with Beef Meatballs (Bò Viên): Vietnamese beef meatballs added alongside the sliced meat give the bowl extra heartiness and chew.
- Short Rib Pho: Replacing some of the bones with beef short ribs gives the broth an even richer, meatier flavor and provides tender rib meat as an additional topping.
You might also enjoy another beautifully spiced Asian noodle dish: this Easy Pad Thai Recipe.
Storage and Reheating
The broth is the best part about making pho ahead of time — it actually improves after a day in the fridge as the flavors continue to develop.
- Broth storage: Let the broth cool completely, then store in airtight containers in the refrigerator for up to 4 days. Freeze in portions for up to 3 months.
- Noodle storage: Store cooked noodles separately from the broth in an airtight container in the refrigerator for up to 2 days. Toss with a tiny bit of oil to prevent sticking.
- Beef storage: Store the sliced cooked brisket in an airtight container in the refrigerator for up to 3 days.
- Raw beef: Keep the thinly sliced raw beef refrigerated and use within 1 day. Do not freeze already-sliced raw beef that has been sitting out.
- Reheating: Reheat the broth in a pot until it reaches a full rolling boil before serving. Never reheat noodles in the broth — reheat them separately in a brief dip in boiling water, or simply place them in the bowl and ladle the hot broth over them.
- Topping storage: Store fresh toppings like bean sprouts, herbs, and lime separately and add them fresh at serving time. They don’t keep well once combined with hot broth.
Read Also: Congee Recipe
Nutritional Facts
The following is an approximate estimate per serving (serves 6), based on the beef broth, noodles, brisket, and raw beef toppings without garnishes.
| Nutrient | Amount Per Serving |
|---|---|
| Calories | 420 kcal |
| Protein | 38 g |
| Carbohydrates | 42 g |
| Fat | 10 g |
| Saturated Fat | 3.5 g |
| Fiber | 1 g |
| Sodium | 1,100 mg |
| Sugar | 3 g |
| Iron | 4.5 mg |
| Calcium | 45 mg |
Nutritional values are estimates and will vary based on exact ingredient quantities, bone types, and topping choices.
Another nourishing bowl worth adding to your weeknight rotation: this Lentil Soup Recipe.
Health Benefits of Key Ingredients
Pho is not just delicious — many of its core ingredients bring genuine nutritional value to every bowl.
The lengthy simmer of beef bones extracts collagen and gelatin, which support joint health and gut lining integrity.
Here is a closer look at what the key ingredients bring to the table:
- Beef bones (bone broth): Rich in collagen, gelatin, glycine, and minerals like calcium and phosphorus. Bone broth has been linked to improved gut health, joint support, and skin hydration.
- Ginger: Contains gingerols and shogaols, potent anti-inflammatory and antinausea compounds. Ginger also supports healthy digestion and circulation.
- Star anise: Contains anethole, which has documented antifungal and antimicrobial properties. It also has a long history of use in traditional medicine as a digestive aid.
- Cinnamon: One of the most studied spices for blood sugar regulation, cinnamon also contains potent antioxidants and has mild anti-inflammatory effects.
- Fish sauce: Provides sodium alongside trace minerals and amino acids. When used in the amounts typical in pho broth, it also adds B vitamins from fermented anchovies.
- Fresh herbs (Thai basil, cilantro): Both are rich in antioxidants, vitamin K, and volatile aromatic compounds that support the immune system.
- Bean sprouts: Low in calories and high in vitamin C, folate, and fiber. They also add a refreshing texture contrast to the bowl.
- Lime juice: An excellent source of vitamin C, which also helps boost the absorption of the non-heme iron found in the beef.
You might also enjoy exploring this warming Minestrone Soup Recipe for another nutrient-dense bowl.
Frequently Asked Questions
1. What kind of beef bones should I use for pho?
The best results come from a combination of knuckle bones, marrow bones, and bones with some meat still attached — like oxtail or short rib bones.
Knuckle bones are particularly high in collagen, which gives the broth a silkier mouthfeel and more body. Ask your butcher to cut larger bones in half so they fit in the pot and release more flavor.
2. Can I make pho broth ahead of time?
Absolutely, and in fact it is encouraged.
The broth actually tastes better after resting overnight in the refrigerator, as the flavors meld and deepen. Make the broth up to 4 days in advance and store it in the fridge, or freeze it in portions for up to 3 months.
3. Why is my pho broth cloudy instead of clear?
A cloudy broth is almost always caused by one of two things: skipping the parboil/rinse step, or boiling the broth too hard during the long simmer.
Make sure you rinse your bones thoroughly after the first boil, and keep the heat very low during the 3 to 4 hour simmer. A gentle simmer with just a few lazy bubbles is what produces a beautifully clear broth.
4. What noodles should I use for pho?
Use flat dried rice noodles labeled “bánh phở” or “pho noodles,” usually in medium width (around 3mm to 5mm wide).
Avoid using vermicelli noodles (those are for bún dishes) or fresh ramen noodles, as neither will give you the right texture. Dried pho noodles are widely available at Asian grocery stores and online, and they only need a short soak or boil to cook.
5. What does it mean to add raw beef to pho?
In traditional pho, very thinly sliced raw beef is placed directly on the cooked noodles in the bowl before the boiling broth is ladled over the top.
The extreme heat of the broth cooks the raw beef instantly, resulting in delicate, just-cooked slices with a silky texture. This only works if the broth is at a true, rolling boil at the moment it hits the bowl, and if the beef is sliced paper-thin. To slice it thin enough, partially freeze the beef for 20 to 30 minutes before cutting.
For more inspiration on globally influenced soups and noodle dishes, check out this Hot and Sour Soup Recipe.
Final Thoughts
Making pho from scratch is one of those cooking experiences that feels almost meditative.
The slow simmer, the fragrant steam filling the kitchen, the careful charring of onion and ginger — it’s a process that rewards patience with something truly special.
Once you sit down to a bowl you built yourself, from bones and spices and time, it tastes entirely different from any restaurant version you’ve had before.
Give this pho recipe a try this weekend, and don’t be intimidated by the steps.
Each one is straightforward, and the result is absolutely worth it.
If you make it, leave a comment below and let us know how it turned out! We love hearing your variations, tips, and topping combinations.
Recommended:
- Chicken Pho Recipe
- Vegan Pho Recipe
- Instant Pot Pho Recipe
- Tom Yum Soup Recipe
- Hoisin Sauce Recipe
- Easy Pad Thai Recipe
- Bibimbap Recipe
- Chinese Dumplings Recipe
- Vegetable Soup Recipe
- Beef and Barley Soup Recipe


