If you’ve ever sat down to a steaming bowl of chicken pho recipe (known as Pho Ga in Vietnamese) and wondered whether you could recreate that deeply fragrant, soul-warming broth at home, the answer is a resounding yes.
This is not your average soup. It’s a carefully layered experience built on charred aromatics, toasted whole spices, and a slow, gentle simmer that coaxes every bit of flavor from the chicken.
The beauty of Pho Ga is that it’s actually more approachable than its beef counterpart. You don’t need specialty bones or an all-day cook time. With the right technique and a handful of key ingredients, you can have a restaurant-worthy bowl on the table in about two hours.
Once you understand the fundamentals, such as why you char the ginger and onion and why the spices are toasted before going in, you’ll find this recipe surprisingly intuitive. It’s one of those dishes that teaches you something every time you make it.
Why You’ll Love This Chicken Pho Recipe
This chicken pho recipe earns a permanent spot in your rotation for so many reasons.
The broth is clear, delicate, and yet incredibly complex, the result of a few classic techniques that make all the difference.
It’s lighter than beef pho, making it just as satisfying without feeling heavy. That clean, fragrant quality is what makes it so good for lunch, dinner, or even breakfast in traditional Vietnamese fashion.
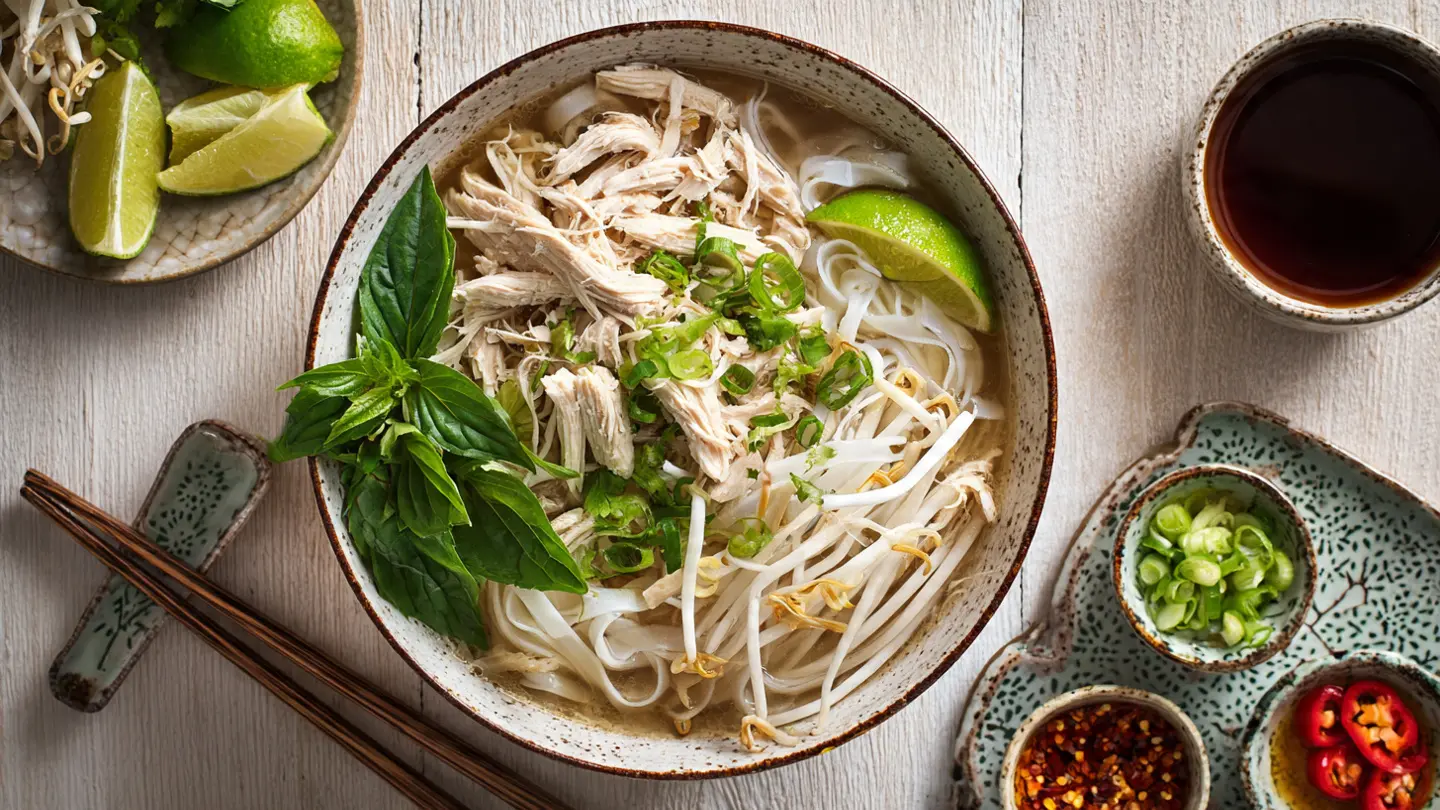
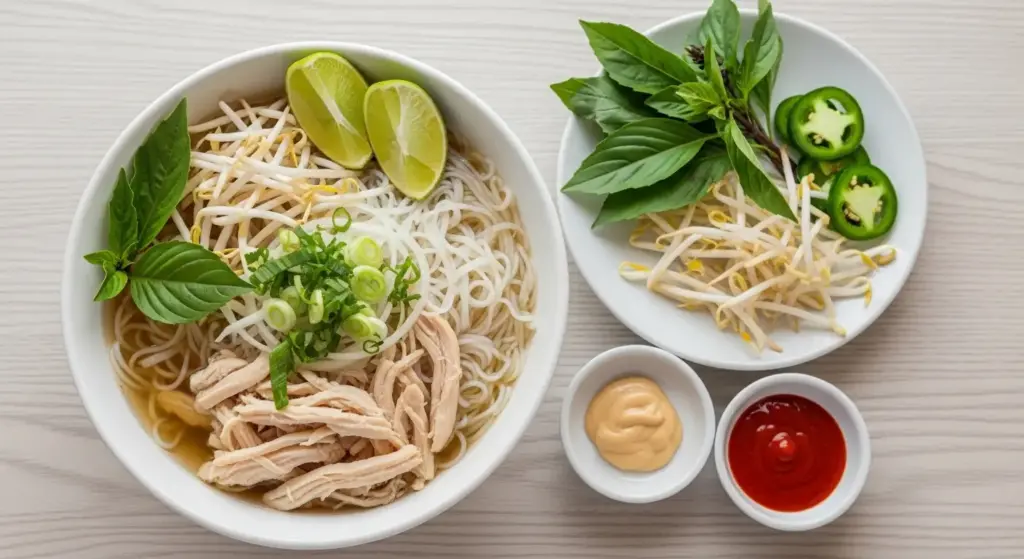
The toppings are entirely customizable. Bean sprouts, lime, Thai basil, fresh chili, and hoisin or sriracha on the side let everyone at the table make the bowl their own.
It’s also a genuinely nourishing meal. High-quality protein, collagen-rich broth, anti-inflammatory spices, and a medley of fresh herbs all come together in one bowl.
And once you have the basic method down, you’ll find yourself reaching for it any time the weather cools or someone in the house needs a pick-me-up.
- Deeply aromatic, beautifully clear broth made from scratch
- Tender shredded chicken that’s been poached right in the broth
- Traditional Vietnamese spice blend for that unmistakable pho flavor
- Completely customizable toppings for every preference
- Naturally gluten-free and dairy-free
- A truly satisfying, wholesome meal in one bowl
For another comforting chicken soup to keep in your recipe lineup, this Chicken Rice Soup is a simple, hearty favorite worth bookmarking.
Ingredients
The key to an outstanding chicken pho lies in using quality ingredients and taking the time to build flavors properly. Here’s everything you’ll need for a pot that serves 4 to 6 people.
For the Broth:
- 1 whole chicken (about 3.5 to 4 lbs / 1.6 to 1.8 kg), or equivalent bone-in, skin-on pieces
- 3 medium yellow onions, halved (skin-on)
- 1 large piece of fresh ginger (about 3 inches / 7.5 cm), halved lengthwise
- 3 star anise pods
- 1 cinnamon stick (about 3 inches / 7.5 cm)
- 1 tablespoon coriander seeds
- 1 teaspoon fennel seeds
- 4 whole cloves
- 1 black cardamom pod (optional but traditional)
- 12 cups (2.8 liters) water
- 1½ tablespoons fish sauce (plus more to taste)
- 1 tablespoon sugar (rock sugar preferred, granulated works fine)
- 1½ teaspoons salt (adjust to taste)
For Serving:
- 14 oz (400 g) dried flat rice noodles (banh pho, about 1/8 to 1/4 inch wide)
- Reserved shredded chicken from the broth
- 2 green onions, thinly sliced
- Small bunch of fresh cilantro, roughly chopped
- 1 small yellow onion, thinly sliced (optional garnish)
- Freshly ground black pepper to taste
For the Garnish Plate (serve on the side):
- 2 cups (150 g) fresh bean sprouts
- 1 small bunch Thai basil
- 2 limes, cut into wedges
- 2 to 3 fresh red or green chilies, sliced
- Hoisin sauce for serving
- Sriracha for serving
Read Also: Pho Recipe
Kitchen Equipment Needed
You don’t need any fancy tools to make a great chicken pho. A few essential pieces of equipment will carry you through the whole process.
- Large stockpot (at least 6 to 8 quarts / 5.7 to 7.5 liters) for the broth
- Sheet pan or cast iron skillet for charring the aromatics
- Fine mesh strainer for straining the broth
- Spice bags or cheesecloth to contain the whole spices
- Tongs for handling the chicken
- Large mixing bowl for the ice bath
- Medium saucepan for cooking the noodles
- Deep serving bowls (4 to 6, ideally wide and deep)
- Sharp kitchen knife and cutting board
- Ladle for serving
You might also enjoy: Instant Pot Pho Recipe
Recommended Products for This Recipe
These are products I recommend based on quality and performance. Each one can genuinely elevate your chicken pho experience.
1. Red Boat Fish Sauce
Red Boat is widely considered the gold standard of Vietnamese fish sauce, made from wild-caught black anchovies with no additives. Using a high-quality fish sauce in your pho broth makes a noticeable difference, adding depth and umami without any harsh, overpowering flavor. It’s the one pantry swap that experienced pho makers swear by.
2. Whole Pho Spice Kit
A pre-measured pho spice kit takes the guesswork out of sourcing star anise, cinnamon, cloves, coriander, and fennel separately. The spices are typically pre-toasted or of a consistent quality, which makes a real difference in your final broth. It’s especially useful if you don’t frequently cook Vietnamese food and don’t want to invest in multiple separate jars.
3. Dried Flat Rice Noodles (Banh Pho)
Using the correct noodle matters more than people realize. Banh pho noodles have a specific starch composition that gives them their signature tender-yet-slightly-chewy bite. Substituting with other noodles changes the entire eating experience. Keeping a few bags on hand means you can make pho any time the craving strikes.
4. Large Stockpot (8-Quart)
A quality large stockpot with a heavy base ensures even heat distribution, which matters during the long gentle simmer. It also gives you enough room to fit the whole chicken comfortably with plenty of water. Trying to make pho in a pot that’s too small leads to overcrowding and a less clear broth.
5. Porcelain Pho Serving Bowls
Deep, wide porcelain bowls keep the broth hot longer and give you the room you need to build a proper pho bowl with noodles, chicken, and all the garnishes. They also look beautiful on the table and make the whole meal feel like a special occasion.
This technique also works beautifully when building the broth for Chicken Vegetable Soup, so it’s a skill that pays dividends across your cooking.
Step-by-Step Instructions
Step 1: Char the Aromatics
Charring the ginger and onion is one of the most important steps in making authentic pho. It adds a subtle smokiness and depth to the broth that you simply cannot get any other way. Do not skip this.
- Preheat your oven broiler to high, or heat a dry cast iron skillet or grill pan over high heat on the stovetop.
- Halve the 3 yellow onions through the root end, keeping the skins on. The skin adds color to the broth.
- Halve the 3-inch piece of fresh ginger lengthwise to expose the flat cut surface. Halving it increases the surface area in contact with the heat.
- Place the onion halves and ginger cut-side down on a sheet pan and slide under the broiler, or place directly on the hot dry skillet.
- Cook for 8 to 12 minutes, checking occasionally, until the cut surfaces are deeply browned, even blackened in spots. You are looking for significant char, not just light browning.
- Remove from the heat. Do not peel or clean the charred parts off. That char is exactly what you want.
- Set aside while you prepare the spices.
Step 2: Toast the Whole Spices
Toasting the spices wakes them up, releasing their essential oils and dramatically amplifying their fragrance and flavor. This step takes under two minutes and makes a significant difference.
- Gather your 3 star anise pods, 1 cinnamon stick, 1 tablespoon coriander seeds, 1 teaspoon fennel seeds, 4 whole cloves, and the optional 1 black cardamom pod.
- Place them in a small dry skillet (no oil) over medium heat.
- Toast for 1 to 2 minutes, stirring or shaking the pan constantly, just until the spices become fragrant and darken slightly. You should be able to smell their aroma clearly.
- Watch them closely because spices can go from toasted to burned very quickly.
- Remove immediately from the heat and transfer to a small bowl or directly into a spice bag or piece of cheesecloth tied with kitchen twine. Using a spice bag makes straining easier and keeps the broth very clear.
Step 3: Blanch the Chicken (Optional but Recommended)
Blanching the chicken before making the broth removes impurities and blood that would otherwise make your broth cloudy and murky. It’s an easy step that gives you that restaurant-quality clarity.
- Place the whole chicken (or chicken pieces) in your large stockpot.
- Cover with cold water and bring to a rolling boil over high heat. You will see grey foam and scum rise to the surface as it heats.
- Let it boil hard for about 5 minutes.
- Drain the water completely and rinse the chicken under cold running water, scrubbing off any remaining impurities.
- Rinse the pot clean as well before continuing.
- Return the cleaned chicken to the clean pot.
Step 4: Build the Broth
Now you bring everything together to start building that magnificent pho broth. Patience here is your greatest tool.
- Add the charred onions and ginger directly into the pot with the chicken.
- Add your spice bag or tie the cheesecloth bundle with spices and nestle it into the pot.
- Pour in 12 cups (2.8 liters) of cold water. The cold start helps produce a clearer broth.
- Bring the pot to a boil over high heat. Once it reaches a boil, reduce the heat immediately to low so the broth is at a very gentle, barely-there simmer. You should see only the occasional lazy bubble breaking the surface.
- Do not let the broth boil vigorously. A hard boil will create a cloudy, murky broth instead of the clear, golden one you’re aiming for.
- Skim off any remaining foam or fat that rises to the surface in the first 10 to 15 minutes.
- Place the lid on the pot, slightly ajar to allow some steam to escape, and simmer gently for 1 to 1.5 hours.
Step 5: Remove and Shred the Chicken
After about 1 to 1.5 hours of simmering, the chicken will be fully cooked through and incredibly tender. It’s time to remove it and prep it for serving.
- Using tongs, carefully lift the whole chicken out of the broth and transfer it to a large bowl or cutting board.
- Let it cool for about 10 to 15 minutes until it’s comfortable to handle.
- While the chicken cools, keep the broth simmering gently with the aromatics still in the pot.
- Once cool enough to touch, pull the chicken meat from the bones using your fingers or two forks.
- Discard the skin and bones, or save the carcass to make additional stock later.
- Shred or slice the chicken meat into thin, bite-sized pieces. Set aside.
Step 6: Strain and Season the Broth
Straining produces that beautifully clear, golden broth. Seasoning is the final crucial step that pulls everything into perfect balance.
- Remove and discard the onion halves, ginger, and spice bag from the pot.
- Pour the broth through a fine mesh strainer into a large clean pot or bowl to remove all solids and any remaining small particles.
- Return the strained broth to the stockpot and bring it back to a gentle simmer over medium-low heat.
- Add 1½ tablespoons of fish sauce, 1 tablespoon of sugar, and 1½ teaspoons of salt.
- Stir and taste. The broth should taste a little saltier than you expect because once poured over the noodles, toppings, and bean sprouts, the flavor will mellow out.
- Adjust with additional fish sauce or salt as needed. Add a touch more sugar if the broth tastes too harsh or one-dimensional.
- Keep the broth on low heat while you prepare the noodles.
Step 7: Cook the Rice Noodles
Rice noodles for pho require careful handling. They cook quickly and can go from perfectly tender to mushy if you’re not paying attention.
- Bring a separate medium saucepan of water to a boil.
- If using dried flat rice noodles, soak them in room temperature water for 20 to 30 minutes beforehand to soften them slightly. This reduces the cooking time to just 30 to 60 seconds in boiling water.
- If using fresh pho noodles (banh pho tuoi from an Asian grocery), they only need a 5 to 10-second blanch in boiling water.
- Working in batches if needed, add the soaked or fresh noodles to the boiling water.
- Cook for 30 to 90 seconds, just until they are tender but still have a slight chew. Taste a strand to check.
- Drain immediately and divide the noodles among your deep serving bowls.
- Do not let the cooked noodles sit in the cooking water or they will become soggy and start to break apart.
Step 8: Assemble and Serve
The final assembly happens quickly, so have everything prepped and your guests ready at the table.
- Bring the strained, seasoned broth to a rolling boil right before serving. A fully boiling broth is important because it will cook the toppings slightly as it’s ladled into the bowl.
- Place a generous portion of shredded chicken on top of the noodles in each bowl, arranging it neatly.
- Add a few thin slices of raw yellow onion and a scatter of sliced green onions on top.
- Sprinkle with chopped fresh cilantro and a pinch of freshly ground black pepper.
- Ladle about 1.5 to 2 cups (350 to 475 ml) of the boiling hot broth over the noodles and toppings. The hot broth will warm everything through.
- Serve immediately with the garnish plate of bean sprouts, Thai basil, lime wedges, fresh chili slices, hoisin sauce, and sriracha on the side for guests to add as they like.
Read Also: Vegan Pho Recipe
Tips for Success
Even a fairly simple recipe like chicken pho has a few nuances worth knowing before you dive in. These tips are the difference between a good bowl and a great one.
- Always char aggressively. Many first-time pho makers are too timid about charring the ginger and onion. You want real blackened spots, not just a light tan. That deep char is what gives the broth its signature smoky-sweet dimension.
- Never let the broth boil hard. Once the chicken goes in, keep the heat at the gentlest possible simmer. A hard boil agitates the proteins and fat, turning the broth cloudy and greasy.
- Season the broth salty. The broth should taste noticeably seasoned in the pot. It will mellow significantly once it hits the noodles, bean sprouts, and lime juice in the bowl.
- Cook noodles right before serving. Pre-cooked noodles sitting in water will break apart and become waterlogged. Cook them fresh in batches for each serving.
- Toast spices fresh. Pre-ground or old whole spices that haven’t been freshly toasted will produce a dull, flat broth. Take the 2 minutes to toast them properly in a dry pan.
- Use bone-in, skin-on chicken. The collagen and fat from bones and skin are what give pho its silky, satisfying body. A boneless, skinless breast alone will not produce the same richness.
The same principle of building flavor from charred aromatics and whole spices is what makes Tom Yum Soup such an exciting and fragrant bowl as well.
Serving Suggestions
Chicken pho is a complete meal in itself, but there are several ways to round out the experience for a full spread.
Start the meal with something light and fresh to let the pho shine as the centerpiece. A few small bites before the main event builds anticipation without dulling the appetite.
- Chicken Lettuce Wraps make a wonderful appetizer with their crisp, refreshing quality
- Vietnamese fresh spring rolls with peanut sauce alongside for a light starter
- A simple cucumber and rice vinegar salad to cleanse the palate
- Steamed jasmine rice on the side for guests who want to make the meal heartier
- Easy Fried Rice to serve on the side for those who want an extra component
Variations to Try
One of the great things about this recipe is how easy it is to adapt without losing the essence of what makes pho so special.
- Instant Pot Chicken Pho: Add all broth ingredients to the Instant Pot and cook on high pressure for 30 minutes with a natural release. This dramatically cuts down the cooking time while still producing a flavorful broth.
- Slow Cooker Pho: Follow the same charring and toasting steps, then transfer everything to a slow cooker and cook on low for 6 to 8 hours. The result is incredibly mellow and deeply flavored.
- Spicy Chicken Pho: Add 2 to 3 whole dried Thai chilies or a small knob of galangal to the broth during simmering for an added kick.
- Pho Ga with Poached Chicken Breast: Instead of shredding the whole bird, use just chicken breasts and slice them thinly against the grain. Poach them directly in the hot broth for about 8 to 10 minutes for a more elegant, restaurant-style presentation.
- Gluten-Free and Low-Sodium: The recipe is naturally gluten-free. To reduce sodium, cut the fish sauce in half and season gradually with small additions until the broth suits your needs.
- Vegan Pho: Substitute the chicken with roasted vegetables and a kombu-based broth, and replace fish sauce with soy sauce or a vegan fish sauce alternative.
Read Also: Udon Noodle Soup Recipe
Storage and Reheating
Pho stores best when the components are kept separate. Combining everything and refrigerating it together leads to soggy noodles and diluted broth.
- Broth: Store the strained broth in a sealed airtight container in the refrigerator for up to 4 days. It also freezes beautifully for up to 3 months. Freeze in quart-sized portions for easy single-serve reheating.
- Chicken: Store shredded chicken in a separate sealed container in the refrigerator for up to 4 days.
- Noodles: Store cooked noodles in a container with a little drizzle of oil to prevent sticking, for up to 2 days. Better yet, cook fresh noodles each time for the best texture.
- Fresh garnishes: Bean sprouts, herbs, and lime should always be fresh. Do not store these with the other components.
- To reheat, bring the broth to a rolling boil in a saucepan. Warm the chicken briefly in the hot broth. Reheat noodles by submerging them in the boiling broth for 30 seconds or microwaving them briefly.
For another comforting bowl that stores well and reheats beautifully, this Chicken Soup Recipe is a classic to keep in your fridge rotation.
Nutritional Facts
The following is an approximate nutritional breakdown per serving (based on 4 servings, including noodles and chicken, without additional sauces or toppings).
- Calories: 420 kcal
- Protein: 38 g
- Carbohydrates: 44 g
- Fat: 9 g
- Saturated Fat: 2 g
- Fiber: 1 g
- Sodium: 850 mg
- Sugar: 5 g
Note: Nutritional values vary based on the specific products used, the size of the chicken, and how much fish sauce and additional toppings are added. Using bone-in skin-on chicken thighs versus a whole bird will also affect the fat content.
You might also enjoy: Chicken Vegetable Soup for another balanced, nourishing bowl with similarly wholesome numbers.
Health Benefits of Key Ingredients
This chicken pho recipe isn’t just delicious. Many of its core ingredients come with real nutritional and wellness advantages.
Chicken pho is one of those rare meals that manages to feel indulgent while genuinely supporting the body.
- Chicken: An excellent source of lean protein, which supports muscle repair and keeps you feeling full. Bone-in chicken also contributes collagen to the broth, which supports joint and gut health.
- Ginger: Contains powerful anti-inflammatory and antioxidant compounds. It’s been used in traditional medicine for centuries to support digestion and ease nausea.
- Garlic (in garnishes): Supports immune function and contains allicin, a compound with antimicrobial properties.
- Star anise: Contains anethole, a compound with anti-inflammatory properties. It also supports digestive comfort and has a naturally soothing quality.
- Fresh herbs (cilantro, Thai basil): Both are loaded with vitamins A, C, and K, and contain compounds that support detoxification and reduce oxidative stress.
- Bean sprouts: Low in calories and high in vitamins C and K, with a satisfying crunch that also adds a small fiber boost.
- Lime juice: Adds vitamin C, brightens the broth, and helps with the absorption of iron from the chicken.
- Fish sauce: While high in sodium, quality fish sauce is also a source of amino acids and umami-building glutamates, meaning you need less of it to achieve a deeply savory result.
Another bowl that packs a serious nutritional punch is Lemon Chicken Orzo Soup, which is bright, hearty, and deeply satisfying.
Frequently Asked Questions
1. Can I use chicken thighs instead of a whole chicken?
Yes, bone-in skin-on chicken thighs are a fantastic substitute and honestly one of the most popular choices for home cooks. They’re easier to handle than a whole bird and still provide the collagen and fat needed for a rich, flavorful broth. Use about 2.5 to 3 lbs (1.1 to 1.4 kg) of bone-in skin-on thighs and simmer for the same amount of time. The shredded meat is also slightly easier to work with than pulling apart a whole chicken.
2. What is the difference between chicken pho and beef pho?
The most obvious difference is the protein: chicken pho uses chicken to build both the broth and the toppings, while beef pho (pho bo) uses beef bones, oxtail, and thinly sliced raw beef. The spice profiles also differ slightly. Chicken pho tends to use a lighter, more restrained spice blend, while beef pho often leans more heavily on cinnamon and star anise for a bolder, more robust flavor. The resulting broths are quite different as well: chicken pho produces a clear, delicate, golden broth, while beef pho is darker, richer, and more intensely savory.
3. What type of noodles should I use for chicken pho?
Use flat rice noodles called banh pho, which come in widths ranging from about 1/8 inch to 1/4 inch (3mm to 6mm). The 1/4-inch width is the most commonly used for pho. You can find these at most Asian grocery stores, often in the refrigerated section as fresh noodles or in the pantry aisle as dried. Fresh noodles only need a very brief blanch (5 to 10 seconds), while dried noodles benefit from soaking first and then a 30 to 90-second boil. Avoid substituting with wheat-based noodles or spaghetti, as they have a very different texture and flavor.
4. Why is my broth cloudy?
A cloudy pho broth is almost always caused by one of three things: skipping the blanching step (which removes impurities from the chicken), letting the broth boil too vigorously instead of maintaining a very gentle simmer, or not straining the broth through a fine mesh strainer at the end. All three are easy to fix for your next batch. If your broth is already cloudy, you can try straining it through a strainer lined with paper towels or cheesecloth, which will catch smaller particles and help clarify it.
5. Can I make chicken pho ahead of time?
Absolutely, and many people find it tastes even better the next day after the flavors have had more time to meld. Make the broth and shred the chicken up to 4 days in advance and store them separately in the refrigerator. When you’re ready to eat, skim any solidified fat from the surface of the broth (this is easy to do after refrigerating), bring it to a boil, cook fresh noodles, and assemble your bowls. This makes it a very practical recipe for meal prepping or entertaining, since most of the work can be done ahead of time.
Read Also: Miso Soup Recipe
Final Thoughts
Making a chicken pho recipe from scratch is one of the most rewarding kitchen experiences you can have.
From the moment you char those onions and ginger and the first fragrant wisps of star anise and cinnamon fill the kitchen, to the final ladle of golden broth over a nest of silky noodles and shredded chicken, every step of this recipe is genuinely satisfying to make.
It’s also a dish that gets better as you make it more often. You start to develop an instinct for how the broth should look, smell, and taste at each stage.
If you give this recipe a try, please leave a comment below and let me know how it went! Feel free to share photos, ask questions, or tell me about any variations you tried.
Recommended:
- Chicken Tortilla Soup
- Hot and Sour Soup
- Easy Pad Thai
- Congee
- Bibimbap
- Chicken Gnocchi Soup
- Chicken Stew
- Vegetable Soup
- Chicken Sopas
- Teriyaki Sauce