I’ll never forget the first time I made this chocolate pie recipe for my family. It was supposed to be just another weeknight dessert, but the moment I sliced into that glossy, chocolate-filled pie, everyone’s eyes lit up.
The creamy chocolate filling, nestled in a buttery crust, disappeared faster than I could serve it. Since then, this recipe has become my go-to for everything from casual dinners to holiday celebrations.
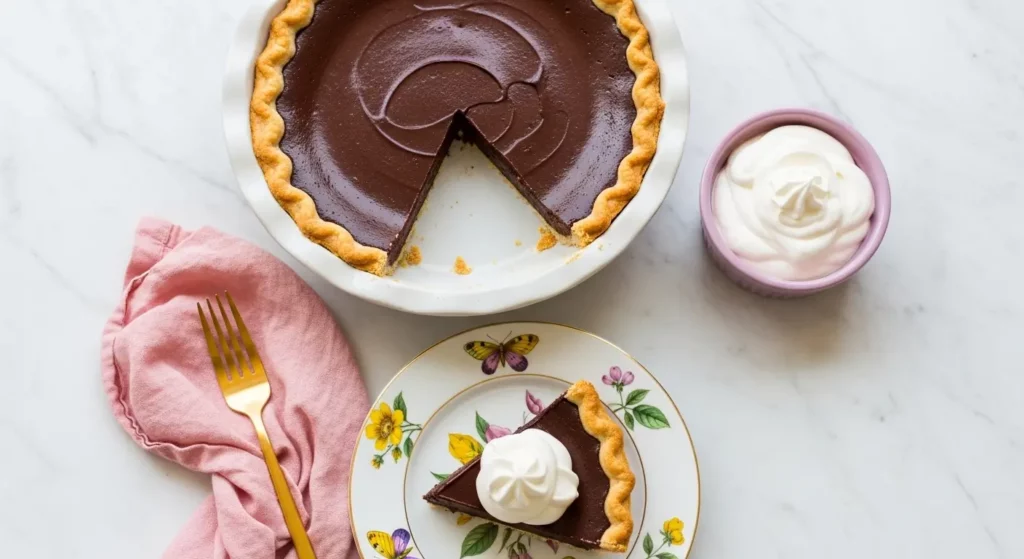
What makes this particular version special is how it balances rich chocolate flavor with a silky-smooth texture. The filling sets up perfectly without being too dense, and the crust provides just the right amount of crunch.
I’ve made countless chocolate pies over the years, tweaking and adjusting until I landed on this version. It’s foolproof enough for beginners yet impressive enough to wow dinner guests.
If you’ve been intimidated by pie making, start here. This recipe breaks down every step so clearly that you’ll feel confident from the first stir to the final slice.
Why You’ll Love This Chocolate Pie Recipe
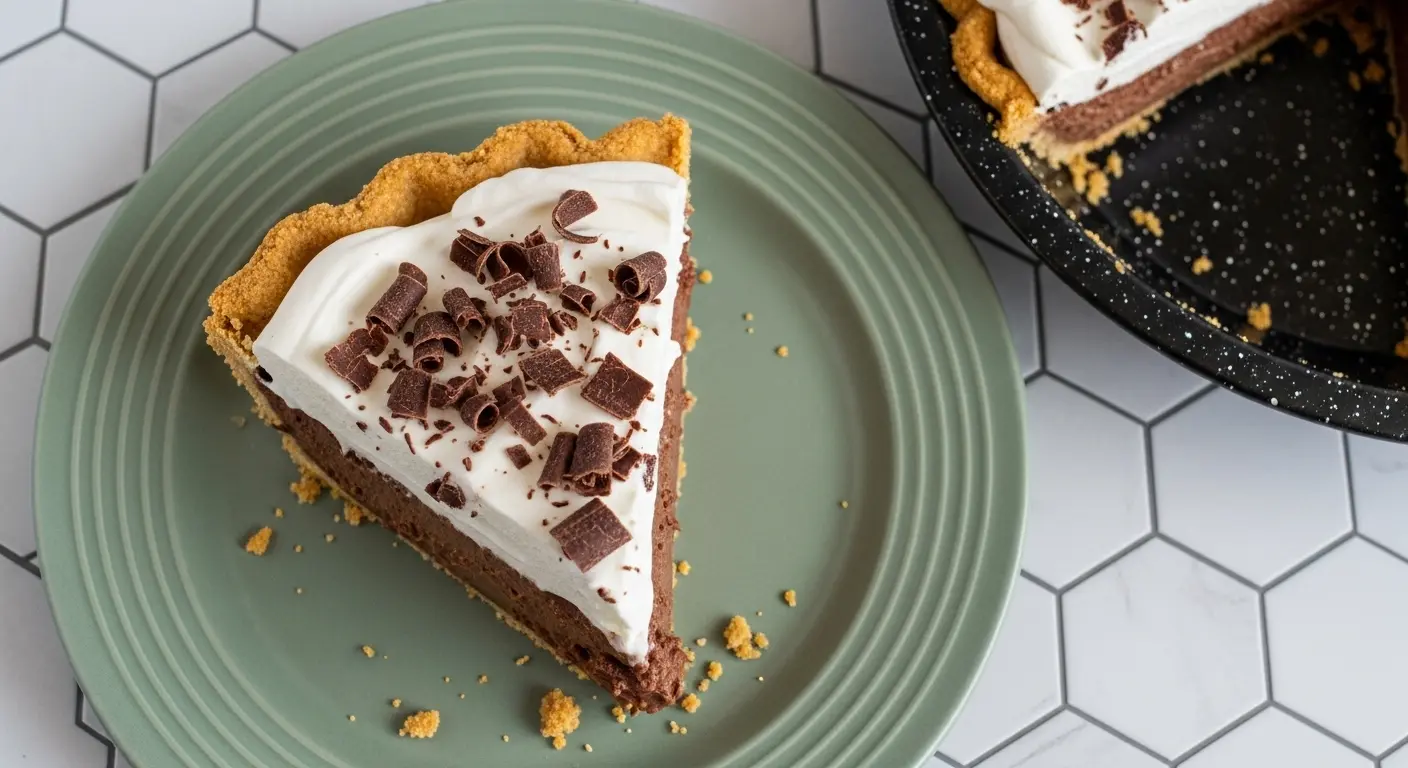
This chocolate pie delivers pure chocolate bliss in every single bite. The filling is incredibly creamy, with a deep cocoa flavor that satisfies even the most intense chocolate cravings without being overly sweet.
The beauty of this recipe lies in its versatility and reliability. It works equally well for a casual Sunday dinner or an elegant dinner party, and it never fails to impress.
Here’s what makes this pie absolutely irresistible:
- Rich, velvety texture that melts on your tongue
- Perfectly balanced sweetness with deep chocolate flavor
- Make-ahead friendly for stress-free entertaining
- Customizable toppings from whipped cream to chocolate shavings
- Simple ingredients you probably already have in your pantry
- Impressive presentation that looks bakery-quality
This peach pie is another crowd-pleaser, but when chocolate lovers are at the table, this pie always steals the show.
Ingredients
This chocolate pie comes together with straightforward ingredients that create an exceptionally decadent dessert. I’ve organized everything you need below, with both the crust and filling components clearly separated.
For the Crust:
- 1½ cups graham cracker crumbs (about 10-12 crackers)
- ⅓ cup granulated sugar
- 6 tablespoons unsalted butter, melted
- Pinch of salt
For the Chocolate Filling:
- 2 cups whole milk
- ¾ cup granulated sugar
- ⅓ cup cornstarch
- ¼ teaspoon salt
- 4 large egg yolks
- 6 ounces high-quality dark chocolate, finely chopped
- 2 tablespoons unsalted butter
- 2 teaspoons pure vanilla extract
For the Topping:
- 1½ cups heavy whipping cream
- 3 tablespoons powdered sugar
- 1 teaspoon vanilla extract
- Chocolate shavings or cocoa powder for garnish (optional)
Kitchen Equipment Needed
Having the right tools makes this chocolate pie recipe smooth and stress-free. I’ve learned through experience that quality equipment truly makes a difference in achieving that perfect texture and presentation.
Essential Equipment:
- 9-inch pie dish (glass or ceramic works best)
- Medium-sized heavy-bottom saucepan
- Whisk
- Mixing bowls (various sizes)
- Measuring cups and spoons
- Fine-mesh strainer
- Rubber spatula
- Electric hand mixer or stand mixer
- Plastic wrap
- Cutting board and sharp knife
Recommended Products for This Recipe
These are the products I personally reach for when making this chocolate pie. Each one genuinely improves the final result and makes the process more enjoyable.
1. Ghirardelli Premium Baking Bar, 60% Cacao
This chocolate melts beautifully and has a rich, complex flavor that elevates the entire pie. The 60% cacao level provides the perfect balance of sweetness and chocolate intensity without any waxy aftertaste. I’ve tried dozens of chocolates for this recipe, and this one consistently delivers the best results.
2. Pyrex Glass Pie Dish
The clear glass allows you to check the bottom crust for even browning, and the deep sides hold all that luscious filling without spillovers. This dish conducts heat evenly and goes straight from oven to table looking beautiful. After years of use, mine still looks brand new.
3. OXO Good Grips Balloon Whisk
The ergonomic handle prevents hand fatigue when whisking the custard, and the wire design incorporates air perfectly while breaking up any lumps. This whisk makes achieving that silky-smooth filling texture so much easier than standard whisks.
4. Nielsen-Massey Madagascar Bourbon Pure Vanilla Extract
Quality vanilla extract makes a noticeable difference in chocolate desserts, enhancing the chocolate flavor rather than competing with it. This extract has incredible depth and rounds out all the flavors in both the filling and whipped cream.
Step-by-Step Instructions
Follow these detailed instructions to create a chocolate pie with a perfectly crispy crust and silky smooth filling. I’ve broken down each stage so you can see exactly what to do at every point.
1. Prepare the Graham Cracker Crust
- Preheat your oven to 350°F (175°C)
- In a medium bowl, combine the graham cracker crumbs, sugar, and salt
- Pour the melted butter over the crumb mixture and stir with a fork until everything is evenly moistened and resembles wet sand
- Press the mixture firmly into the bottom and up the sides of your 9-inch pie dish, using the bottom of a measuring cup to pack it tightly and create an even layer
- Bake the crust for 10-12 minutes until it’s lightly golden and fragrant
- Remove from the oven and let it cool completely on a wire rack while you prepare the filling
2. Make the Chocolate Custard Base
- In your saucepan, whisk together the sugar, cornstarch, and salt until well combined
- Add the egg yolks and about ¼ cup of the milk, whisking until the mixture is smooth and lump-free
- Gradually whisk in the remaining milk until everything is fully incorporated
- Place the saucepan over medium heat and cook, whisking constantly, until the mixture begins to thicken and bubble
- Continue cooking and whisking for 2-3 more minutes after it starts bubbling to ensure the cornstarch is fully cooked
3. Add the Chocolate and Create the Filling
- Remove the saucepan from heat immediately once the custard is thick
- Add the chopped chocolate, butter, and vanilla extract to the hot custard
- Let it sit for 1 minute to allow the chocolate to begin melting
- Whisk vigorously until the chocolate is completely melted and the mixture is smooth and glossy
- Pour the filling through a fine-mesh strainer into a clean bowl to remove any lumps or cooked egg bits
- Pour the strained filling into your cooled graham cracker crust
4. Chill the Pie
- Gently press a piece of plastic wrap directly onto the surface of the chocolate filling to prevent a skin from forming
- Refrigerate the pie for at least 4 hours, or preferably overnight, until the filling is completely set and firm to the touch
- The pie should not jiggle in the center when fully chilled
5. Prepare the Whipped Cream Topping
- In a chilled mixing bowl, combine the heavy cream, powdered sugar, and vanilla extract
- Using an electric mixer, beat on medium-low speed for about 30 seconds, then increase to medium-high
- Continue beating until stiff peaks form and the cream holds its shape, about 2-3 minutes total
- Be careful not to overbeat, or the cream will become grainy
6. Assemble and Serve
- Remove the plastic wrap from the chilled pie
- Spread the whipped cream over the chocolate filling, or pipe it decoratively using a pastry bag with a star tip
- Garnish with chocolate shavings, cocoa powder, or mini chocolate chips if desired
- Slice the pie with a sharp knife, wiping the blade clean between cuts for neat slices
- Serve immediately and enjoy the perfect combination of textures
You might also enjoy: Cherry Pie Recipe
Tips for Success
These tried-and-true tips will help you achieve chocolate pie perfection every single time. I’ve learned most of these through trial and error, so you don’t have to.
Temperature Matters:
- Always use cold heavy cream straight from the refrigerator when making whipped cream
- Allow the crust to cool completely before adding the filling to prevent it from becoming soggy
- Temper your egg yolks by adding hot liquid gradually to prevent them from scrambling
Texture Perfections:
- Whisk constantly while cooking the custard to prevent lumps and ensure even cooking
- Strain the filling even if it looks smooth—this step guarantees a silky texture
- Press plastic wrap directly onto the filling surface to prevent a skin from forming
Chocolate Selection:
- Choose chocolate with 60-70% cacao for the best flavor balance in the filling
- Chop chocolate finely and uniformly so it melts evenly into the hot custard
- Avoid chocolate chips as they contain stabilizers that prevent smooth melting
Make-Ahead Strategy:
- The pie actually tastes better when made a day ahead, allowing flavors to meld
- Add whipped cream topping just before serving to keep it fresh and fluffy
- Store leftover pie covered in the refrigerator for up to 3 days
Common Pitfalls to Avoid:
- Don’t rush the chilling time—the filling needs at least 4 hours to set properly
- Avoid overbeating the whipped cream, which can cause it to separate or become grainy
- Never let the custard boil vigorously, as high heat can cause the eggs to curdle
Another favorite: Banana Cream Pie Recipe
Serving Suggestions
This chocolate pie shines brightest when paired with complementary flavors and textures. I love serving it in ways that enhance the rich chocolate without overwhelming it.
Perfect Pairings:
Serve slices alongside fresh raspberries or strawberries for a pop of tartness that cuts through the richness. A small scoop of vanilla ice cream creates a temperature contrast that’s absolutely divine.
For an elegant presentation, drizzle each plate with raspberry or caramel sauce before placing the pie slice. Add a sprig of fresh mint for color and a hint of freshness.
Hot coffee or espresso makes an excellent beverage pairing, as the bitter notes complement the sweet chocolate. For non-coffee drinkers, cold milk remains the classic choice.
- Pair with Boston Cream Pie for a chocolate-themed dessert spread
- Serve with Fruit Salad to balance the richness
- Top with Caramel Sauce for extra decadence
- Accompany with Strawberry Sauce for a fruity contrast
- Offer alongside Pumpkin Spice Latte during fall gatherings
Read Also: Blueberry Pie Recipe
Variations to Try
Once you’ve mastered the classic version, these variations add exciting new dimensions to your chocolate pie repertoire. Each one transforms the pie while maintaining that signature creamy chocolate base.
Flavor Twists:
- Mint Chocolate Pie: Add ½ teaspoon peppermint extract to the filling and garnish with crushed candy canes or Andes mints
- Mexican Chocolate Pie: Stir in ½ teaspoon cinnamon and ¼ teaspoon cayenne pepper to the custard for a spicy kick
- Mocha Pie: Dissolve 2 tablespoons instant espresso powder in the milk before making the custard
- Peanut Butter Chocolate Pie: Add ½ cup creamy peanut butter to the hot custard along with the chocolate
- White Chocolate Pie: Replace dark chocolate with high-quality white chocolate for a sweeter, creamier version
- Orange Chocolate Pie: Add 2 teaspoons orange zest to the filling and garnish with candied orange peel
- Cookies and Cream Pie: Fold in crushed Oreo cookies just before pouring the filling into the crust
Crust Alternatives:
- Use crushed Oreos instead of graham crackers for an extra chocolatey base
- Try pretzel crust for a sweet-salty combination that’s absolutely addictive
- Make a traditional pastry crust for a more classic pie experience
Storage and Reheating
Proper storage keeps your chocolate pie fresh and delicious for several days. The good news is that this pie actually benefits from time in the refrigerator.
Refrigerator Storage:
- Cover the pie loosely with plastic wrap or aluminum foil, being careful not to disturb the whipped cream topping
- Store in the refrigerator for up to 4 days
- The filling will continue to set and the flavors will deepen over time
- For best results, add whipped cream topping just before serving if making the pie more than a day ahead
- Individual slices can be stored in airtight containers for easier access
Freezing Instructions:
- Freeze the pie without the whipped cream topping for up to 2 months
- Wrap tightly in plastic wrap, then aluminum foil to prevent freezer burn
- Thaw overnight in the refrigerator before serving
- Add fresh whipped cream topping after thawing
Serving Temperature:
- This pie is best served cold directly from the refrigerator
- Let it sit at room temperature for 5-10 minutes before slicing for easier cutting
- Never reheate this pie, as it’s meant to be enjoyed chilled
Read Also: Sweet Potato Pie Recipe
Nutritional Facts
Here’s the approximate nutritional breakdown per slice (based on 8 servings):
- Calories: 445
- Total Fat: 26g
- Saturated Fat: 16g
- Cholesterol: 145mg
- Sodium: 215mg
- Total Carbohydrates: 48g
- Dietary Fiber: 2g
- Sugars: 35g
- Protein: 6g
These values are estimates and will vary based on specific ingredients used and portion sizes. The pie is indulgent and meant to be enjoyed as an occasional treat rather than an everyday dessert.
Health Benefits of Key Ingredients
While this chocolate pie is definitely an indulgent dessert, some ingredients do offer nutritional benefits. Understanding what these components bring to the table makes enjoying this treat even more satisfying.
Dark Chocolate:
Dark chocolate contains flavonoids, powerful antioxidants that support heart health and may improve blood flow. The higher the cacao percentage, the more beneficial compounds it contains.
Quality dark chocolate also provides minerals like iron, magnesium, and zinc. In moderation, it can even boost mood through the release of endorphins.
Eggs:
The egg yolks in this recipe provide high-quality protein and essential nutrients like vitamin D, vitamin B12, and choline. They also contain lutein and zeaxanthin, antioxidants important for eye health.
Milk:
Whole milk supplies calcium for strong bones and teeth, along with vitamin D, potassium, and protein. These nutrients work together to support overall health and well-being.
- Provides complete proteins with all essential amino acids
- Supports bone density through calcium content
- Delivers vitamins A and B12 for immune function
I also love making Key Lime Pie when I want something lighter but equally satisfying.
Frequently Asked Questions
1. Can I make this chocolate pie without eggs?
Yes, you can create an egg-free version by using 2 tablespoons of cornstarch for every egg yolk called for in the recipe. This will require a total of about ½ cup cornstarch instead of the original amount plus the eggs, though the texture will be slightly less creamy but still delicious.
2. Why did my chocolate filling turn out grainy?
Grainy filling usually results from overheating the custard or using chocolate chips instead of chopped chocolate bars. Chocolate chips contain stabilizers that prevent smooth melting, while overheating can cause the proteins to separate and create a grainy texture.
3. Can I use a store-bought pie crust instead of making graham cracker crust?
Absolutely, a pre-made pastry crust works wonderfully with this filling. Just blind bake it according to package directions before adding the chocolate custard to ensure a crispy bottom that doesn’t get soggy.
4. How do I know when the filling is thick enough?
The custard is ready when it coats the back of a spoon and holds a clear line when you run your finger through it. It should register about 170-180°F on an instant-read thermometer and will continue to thicken as it cools.
5. Can I make this pie dairy-free?
Yes, substitute full-fat coconut milk for regular milk, use vegan butter, and choose dairy-free chocolate. The texture will be slightly different but still delicious, and you’ll want to refrigerate it a bit longer to ensure proper setting.
Final Thoughts
This chocolate pie recipe has earned its place as one of my most treasured desserts, and I hope it becomes a favorite in your kitchen too. The combination of buttery crust, silky chocolate filling, and billowy whipped cream creates pure magic in every bite.
What I love most about this recipe is how it feels both nostalgic and special at the same time. It’s the kind of dessert that makes ordinary days feel like celebrations and brings smiles to everyone around the table.
I’d love to hear about your experience making this chocolate pie. Did you try any of the variations, or do you have your own twist to add?
Drop a comment below with your thoughts, and don’t forget to share photos of your beautiful creation on social media!
Recommended:
- Apple Pie Biscuits Recipe
- Cottage Cheese Chips Recipe
- No Bake Cookie Recipe
- Oatmeal Raisin Cookie Recipe
- Oatmeal Cookie Recipe
- Peanut Butter Cookie Recipe
- Snickerdoodle Cookie Recipe
- Gingerbread Cookie Recipe
- Tres Leches Cake Recipe
- Baklava Recipe


