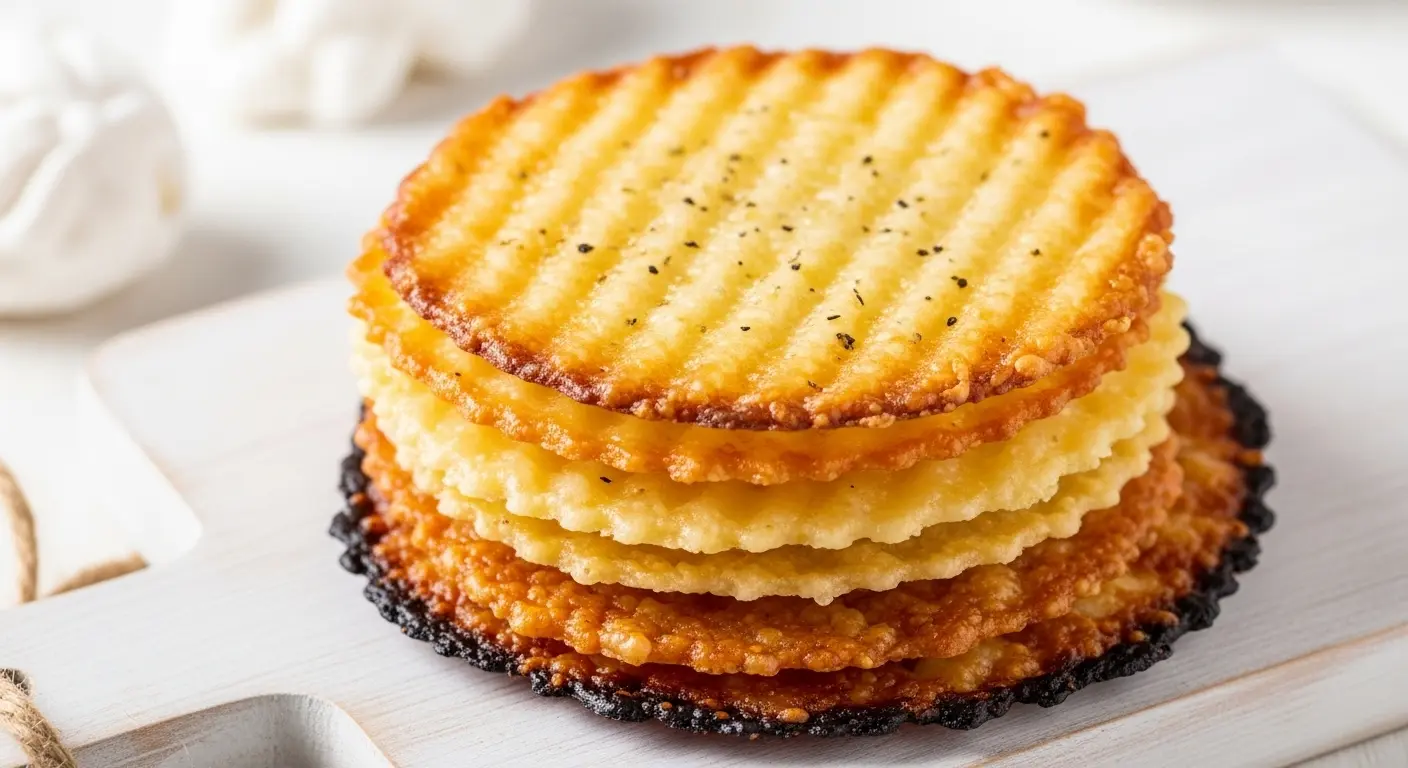
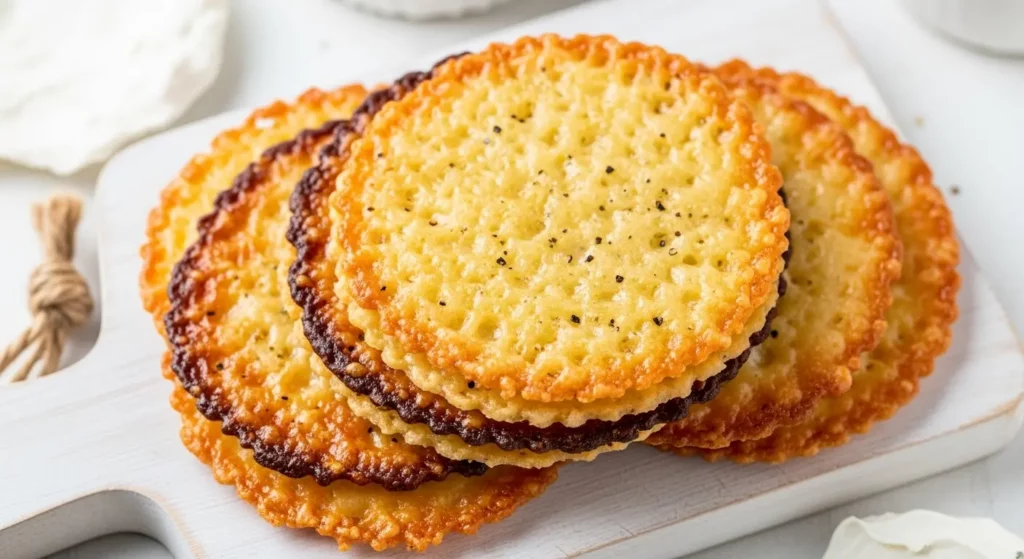
I first stumbled upon cottage cheese chips during one of those late-night scrolling sessions on social media, and honestly, I thought it was another one of those viral food hacks that looked better than it tasted. Boy, was I wrong.
Fast enough, I was in my kitchen at 11 PM, whipping up a batch because I couldn’t stop thinking about them. The result? Crispy, savory, protein-packed chips that have since become my go-to snack for literally everything.
This cottage cheese chips recipe is ridiculously simple yet completely addictive. You’re basically taking humble cottage cheese, mixing it with seasonings and cheese, then baking it until it transforms into crispy, crunchy perfection. It sounds too good to be true, but trust me on this one.
The best part? You can customize these chips to match whatever craving hits you. Craving something spicy? Add some cayenne and paprika. Want a ranch vibe? Load them up with herbs. The possibilities are genuinely endless, and I’ve been experimenting with different flavors ever since that first batch.
Why You’ll Love This Cottage Cheese Chips Recipe
These chips have completely changed my snacking routine, and I think they’ll do the same for you.
First off, they’re incredibly high in protein compared to regular chips. We’re talking about a snack that actually keeps you satisfied instead of leaving you raiding the pantry 20 minutes later. Each serving packs a serious protein punch thanks to the cottage cheese base, making them perfect for post-workout munchies or afternoon slumps.
Here’s what makes these chips absolutely brilliant:
- Simple ingredients – You probably have most of what you need in your fridge right now
- Highly customizable – Sweet, savory, spicy, or herby, these adapt to any flavor profile you’re craving
- Actually crispy – None of that soggy, disappointing texture you sometimes get with healthy snacks
- Budget-friendly – Cottage cheese is relatively inexpensive, and you don’t need much else
- Prep takes minutes – Seriously, the active time is maybe 10 minutes max
- Crowd-pleaser – Even my picky eaters devour these without realizing they’re eating cottage cheese
Another favorite: Cheese Ball Recipe
Ingredients
The ingredient list here is refreshingly short, which is exactly how I like my recipes. You’ll need items that are easy to find at any grocery store, and chances are you’ve already got some of them sitting in your kitchen.
- 1 cup cottage cheese (full-fat works best for crispiness)
- 1/2 cup shredded cheddar cheese (or any cheese you prefer)
- 1/4 cup grated Parmesan cheese
- 1/4 cup almond flour or regular flour
- 1 large egg
- 1 teaspoon garlic powder
- 1 teaspoon onion powder
- 1/2 teaspoon smoked paprika
- 1/2 teaspoon salt
- 1/4 teaspoon black pepper
- Optional: red pepper flakes, dried herbs, or everything bagel seasoning
Kitchen Equipment Needed
You don’t need any fancy gadgets for this recipe, which is another reason I love it so much. Just grab these basics from your kitchen and you’re ready to roll.
- Large mixing bowl
- Silicone baking mat or parchment paper
- Baking sheet
- Whisk or fork
- Measuring cups and spoons
- Spatula
- Small spoon or piping bag (for portioning)
This pairs beautifully with my Avocado Toast Recipe for a complete savory snack spread.
Recommended Products for This Recipe
After making these chips more times than I can count, I’ve found a few products that genuinely make the process easier and the results better.
1. Silpat Premium Non-Stick Silicone Baking Mat
I cannot stress enough how much easier these mats make cleanup, and they prevent any sticking issues that can happen with parchment paper. The chips come off effortlessly every single time, and the mat ensures even heat distribution for perfectly crispy edges. I’ve had mine for years and it still works like new.
2. Good Culture Cottage Cheese
Not all cottage cheeses are created equal, and Good Culture’s version has the perfect texture and moisture content for these chips. It’s creamy without being watery, which means your chips will crisp up beautifully instead of staying soggy. The flavor is also incredibly clean and fresh.
3. Tillamook Sharp Cheddar Cheese
This cheese melts beautifully and adds incredible flavor depth to your chips. The sharp cheddar gives you that satisfying cheesy taste without being overwhelming, and it crisps up perfectly in the oven. I always keep a block of this in my fridge specifically for these chips.
4. OXO Good Grips Cookie Scoop
This makes portioning the cottage cheese mixture so much faster and more consistent. Each chip comes out the same size, which means they all cook evenly and you don’t end up with some burnt while others are undercooked. The small size scoop is perfect for chip-sized portions.
Step-by-Step Instructions
I’m going to walk you through this process in detail because getting the technique right makes all the difference between soggy disappointments and crispy perfection.
1. Preheat Your Oven and Prep Your Baking Sheet
- Set your oven to 350°F (175°C) and let it fully preheat for at least 10 minutes
- Line your baking sheet with a silicone baking mat or parchment paper, making sure it lies completely flat
- If using parchment paper, lightly spray it with cooking oil to prevent any potential sticking
- Position your oven rack in the center position for the most even heat distribution
2. Drain the Cottage Cheese
- Place your cottage cheese in a fine-mesh strainer over a bowl
- Let it sit for about 5 minutes to drain excess liquid
- Gently press down with a spoon to remove more moisture without completely mashing the curds
- The drier your cottage cheese, the crispier your chips will be, so don’t skip this step
3. Mix the Base Ingredients
- In your large mixing bowl, add the drained cottage cheese, cheddar cheese, and Parmesan
- Crack in the egg and whisk everything together until well combined
- The mixture should look slightly lumpy from the cottage cheese curds, and that’s perfectly fine
- Make sure the egg is fully incorporated with no streaks of yolk visible
4. Add the Dry Ingredients and Seasonings
- Sprinkle in the almond flour, garlic powder, onion powder, smoked paprika, salt, and black pepper
- Stir everything together with a spatula until you have a thick, cohesive mixture
- The batter should be scoopable but not runny; if it seems too wet, add another tablespoon of flour
- Taste the mixture and adjust seasonings if needed (remember, flavors will concentrate as they bake)
5. Portion the Chips
- Using a small cookie scoop or spoon, drop tablespoon-sized dollops of the mixture onto your prepared baking sheet
- Space them about 2 inches apart because they’ll spread slightly as they bake
- Aim for about 20-24 chips per batch, depending on the size you make them
- Use the back of your spoon to gently flatten each dollop into a thin disc, about 1/4 inch thick
6. Bake the First Round
- Place the baking sheet in your preheated oven on the center rack
- Bake for 15 minutes without opening the oven door
- After 15 minutes, check if the edges are starting to turn golden brown
- The chips should look set but might still be slightly soft in the center at this point
7. Flip and Continue Baking
- Carefully flip each chip using a thin spatula (they should be firm enough to flip without breaking)
- Return the baking sheet to the oven and bake for another 10-15 minutes
- Watch them closely during the last 5 minutes to prevent burning
- The chips are done when both sides are golden brown and they feel crispy to the touch
8. Cool Completely
- Remove the baking sheet from the oven and let the chips sit for 2-3 minutes on the hot pan
- Transfer the chips to a wire cooling rack using your spatula
- Let them cool completely for at least 15 minutes; they’ll continue to crisp up as they cool
- Resist the urge to eat them while they’re still warm (I know it’s hard!) because they won’t be fully crispy yet
Read Also: Sausage Balls Recipe
Tips for Success
I’ve learned these tricks through trial and error, and they’ve made a huge difference in the quality of my cottage cheese chips.
Make sure your cottage cheese isn’t too wet. The drainage step is crucial because excess moisture is the enemy of crispiness. If you’re short on time, you can even pat the cottage cheese dry with paper towels after draining it. I’ve found that full-fat cottage cheese tends to crisp up better than low-fat versions, so splurge a little if you can.
- Press the cottage cheese mixture thin on the baking sheet for maximum crispiness
- Don’t overcrowd the pan; better to bake in batches than have soggy chips
- Use parchment paper or a silicone mat, never bake directly on the pan
- Keep a close eye during the last 5 minutes of baking; they can go from perfect to burnt quickly
- Let them cool completely before storing; warm chips will get soggy in a container
- Experiment with different cheeses; mozzarella, gouda, and pepper jack all work wonderfully
- Add seasonings gradually and taste as you go, especially with salt
- If your chips are browning too quickly, lower the oven temperature by 25°F
You might also enjoy: Muddy Buddy Recipe
Serving Suggestions
These chips are incredibly versatile and pair well with so many different dips and spreads.
I love serving them with a simple homemade ranch dip, guacamole, or even just plain Greek yogurt mixed with herbs. They’re sturdy enough to scoop up thick dips without breaking, which is always a win in my book. For a complete appetizer spread, I’ll arrange them on a platter with cherry tomatoes, cucumber slices, and some olives.
Here are some of my favorite ways to serve these chips:
- With Tzatziki Sauce for a Mediterranean vibe
- Alongside Pico de Gallo for taco night
- Crumbled over Broccoli Salad for added crunch
- With Buffalo Sauce for a spicy kick
- Next to Avocado Toast for brunch
- As a crunchy topping for soups instead of croutons
- With salsa and sour cream for a protein-packed nacho alternative
Variations to Try
Once you’ve mastered the basic recipe, the fun really begins with experimenting with different flavors.
I’ve gone a bit wild with variations, and each one has been delicious in its own way. My current obsession is the everything bagel version, but the spicy buffalo chips are a close second. Don’t be afraid to get creative and use whatever seasonings you’re craving.
- Pizza chips: Add Italian seasoning, extra Parmesan, and a pinch of oregano
- Ranch chips: Mix in dried dill, parsley, chives, and a bit of buttermilk powder
- Spicy buffalo: Stir in hot sauce and top with crumbled blue cheese after baking
- Everything bagel: Use everything bagel seasoning instead of the garlic and onion powder
- Taco-flavored: Add taco seasoning and top with cilantro
- Sweet cinnamon: Skip savory seasonings, add cinnamon and a touch of sweetener
- Herb garden: Load up with fresh or dried basil, thyme, and rosemary
- Jalapeño popper: Add diced jalapeños and cream cheese to the mixture
Another favorite: No Bake Cookie Recipe
Storage and Reheating
Proper storage is key to keeping these chips crispy for as long as possible.
I’ve found that an airtight container works well, but adding a paper towel to absorb any moisture helps even more. These chips are best eaten within 3-4 days, though they rarely last that long in my house.
- Store completely cooled chips in an airtight container at room temperature for up to 4 days
- Place a paper towel in the container to absorb excess moisture
- Don’t refrigerate them, as this will make them soggy
- To re-crisp, place chips on a baking sheet and warm in a 300°F oven for 5-7 minutes
- You can freeze the unbaked mixture for up to 1 month; thaw in the fridge before baking
- Frozen baked chips don’t maintain their texture well, so I don’t recommend it
- If chips lose their crunch, a quick toast in the oven brings them back to life
Nutritional Facts
Per serving (approximately 5-6 chips):
- Calories: 145
- Protein: 12g
- Carbohydrates: 6g
- Fat: 8g
- Fiber: 1g
- Sugar: 2g
- Sodium: 320mg
- Calcium: 15% DV
These numbers are approximate and will vary based on the specific ingredients and brands you use. The high protein content makes these chips a much more satisfying snack compared to traditional potato chips.
Health Benefits of Key Ingredients
These chips pack way more nutritional value than you’d expect from something this crunchy and delicious.
Cottage cheese is the real star here from a health perspective. It’s loaded with casein protein, which digests slowly and keeps you feeling full for hours. Plus, you’re getting a solid dose of calcium and B vitamins with every handful of chips.
The ingredients in these chips offer some impressive benefits:
- Cottage cheese: High in protein for muscle maintenance and satiety, rich in calcium for bone health, contains probiotics for gut health, provides B vitamins for energy metabolism
- Eggs: Complete protein source with all essential amino acids, loaded with choline for brain function, contains vitamin D and selenium
- Cheddar cheese: Additional protein and calcium, provides vitamin K2 for bone health, contains conjugated linoleic acid which may support metabolism
- Almond flour: Adds healthy fats and vitamin E, provides extra fiber, lower in carbs than regular flour, contains magnesium for muscle function
- Spices: Garlic and onion powder provide anti-inflammatory compounds, paprika contains antioxidants, herbs offer various micronutrients without added calories
Read Also: Oatmeal Cookie Recipe
Frequently Asked Questions
1. Can I use low-fat cottage cheese instead of full-fat?
You can, but I honestly don’t recommend it if you want truly crispy chips. Low-fat cottage cheese has more moisture and less fat, which means your chips will take longer to crisp up and might not get as crunchy. I’ve tried it both ways, and the full-fat version consistently delivers better results with that satisfying crunch we’re all after.
2. Why are my cottage cheese chips soggy?
Soggy chips usually come down to one of three issues: not draining the cottage cheese enough, making the chips too thick, or not baking them long enough. Make sure you press out as much liquid as possible from the cottage cheese before mixing, spread each chip thin on the baking sheet, and don’t be afraid to bake them a few extra minutes until they’re golden and crispy.
3. Can I make these chips in an air fryer?
Absolutely, and they turn out fantastic. Preheat your air fryer to 350°F, place the chips in a single layer on parchment paper, and cook for about 12-15 minutes, flipping halfway through. Keep an eye on them since air fryer temperatures can vary wildly between models.
4. What’s the best way to get perfectly round chips?
I use a small cookie scoop to portion the mixture, which gives you consistent sizes and shapes. After scooping, dip the back of a spoon in water and use it to gently spread and shape each portion into a thin, even circle. The water prevents sticking and helps you smooth out the edges.
5. Can I make these chips ahead for a party?
Yes, but with a caveat. You can make them up to 2 days ahead and store them in an airtight container with a paper towel. Before serving, pop them in a 300°F oven for about 5 minutes to re-crisp them. I actually prefer making them the day of or the night before for maximum crunchiness.
Final Thoughts
Honestly, these cottage cheese chips have become one of my favorite kitchen discoveries in recent years. They hit that perfect sweet spot of being genuinely healthy while still feeling like a proper snack.
I hope you give this cottage cheese chips recipe a try and love them as much as I do. Grab your ingredients, fire up that oven, and prepare to be amazed at how something so simple can be so addictively good. Let me know in the comments what flavor variations you try first!
Recommended:
- Scrambled Eggs Recipe
- Breakfast Burrito Recipe
- Pumpkin Pancake Recipe
- Baked Oatmeal Recipe
- Homemade Biscuit Recipe
- Shakshuka Recipe
- Avocado Smoothie Recipe
- Green Smoothie Recipe
- Yogurt Smoothie Recipe
- Quiche Lorraine Recipe


