
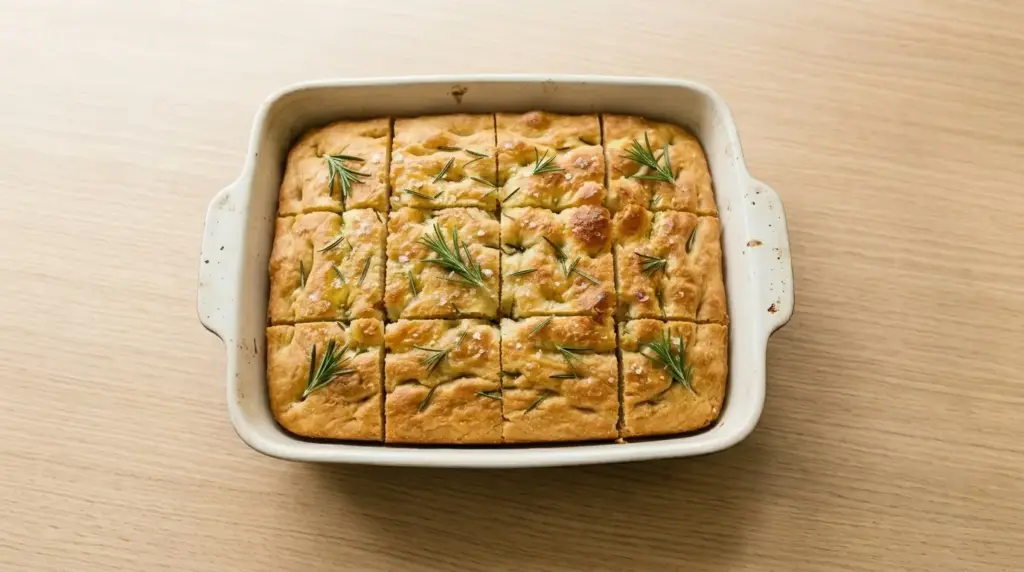
If you’ve never made homemade rosemary focaccia recipe before, you’re in for a real treat.
This Italian classic produces a bread that’s soft and pillowy on the inside, golden and crispy on the bottom, and loaded with the fragrant flavor of fresh rosemary and flaky sea salt.
What makes focaccia so special compared to other yeast breads is the generous amount of olive oil baked right into the dough. That oil is what creates the signature crispy crust on the outside while keeping the inside incredibly tender and moist.
The dimples you press into the top aren’t just for looks, either. They create little pockets that trap the olive oil, rosemary, and salt, making every bite deeply savory and satisfying.
Best of all, this bread is genuinely beginner-friendly. You don’t need any special shaping skills, and the dough is forgiving enough to handle if you’ve never worked with yeast before.
Serve it as an appetizer with olive oil for dipping, alongside a cozy bowl of soup, or sliced into thick pieces for sandwiches the next day. This focaccia is one of those recipes you’ll come back to again and again.
If you love baking with sourdough, you might also enjoy this Sourdough Discard Focaccia, which uses leftover starter for an extra layer of tangy flavor.

Why You’ll Love This Rosemary Focaccia Recipe
This focaccia is one of those rare breads that looks impressive but doesn’t require any advanced baking skills to pull off.
The ingredients are completely pantry-friendly, with nothing fancy or hard to find.
The active hands-on time is surprisingly short. Most of the process is just letting the dough rise, which does all the hard work for you.
Fresh rosemary is the hero here. It perfumes the entire bread with an earthy, piney fragrance that pairs beautifully with the richness of the olive oil.
The texture is truly unbeatable. You get that satisfying chew in every bite without the bread being dense or heavy.
It’s also incredibly versatile. Serve it warm from the oven, slice it for sandwiches, cube it for croutons, or use it as a base for bruschetta.
Here’s a quick summary of why you’ll love it:
- Soft, fluffy, and chewy interior with a crispy, golden bottom
- Simple pantry ingredients with big, bold flavor
- Naturally vegan with no eggs or dairy needed
- Beginner-friendly with clear, step-by-step instructions
- Incredibly flexible, great for sandwiches, dipping, or snacking
- Ready in under 3 hours, including rise time
- Freezer-friendly so you can make a batch ahead of time
You might also enjoy this Sourdough Focaccia for a slow-fermented version with a slightly tangier flavor profile.
Ingredients
This focaccia uses a short, simple list of ingredients that work together beautifully. The star players here are the olive oil and fresh rosemary, so try to use the best quality you can find for both.
- 4 cups (480g) all-purpose flour or bread flour (bread flour gives a slightly chewier texture; all-purpose works perfectly well)
- 2 teaspoons (7g) instant yeast (also labeled rapid-rise or bread machine yeast)
- 2 teaspoons (12g) kosher salt, divided
- 1 teaspoon (4g) granulated sugar (helps feed the yeast and promotes browning)
- 1 3/4 cups (420ml) warm water (aim for around 100-110°F / 38-43°C, warm to the touch but not hot)
- 6 tablespoons (90ml) extra-virgin olive oil, divided, plus more for drizzling
- 2-3 tablespoons fresh rosemary leaves, roughly chopped or left as whole needles
- 1 teaspoon flaky sea salt (for topping; fleur de sel or Maldon work beautifully)
- Freshly cracked black pepper, to taste (optional but recommended)
This recipe pairs wonderfully with a dollop of easy pesto on the side for dipping.
Kitchen Equipment Needed
You don’t need anything fancy to make this focaccia come together. Most of what you need is already in a well-stocked kitchen.
- Large mixing bowl (for mixing and proofing the dough)
- 9×13-inch baking pan (a rimmed sheet pan or metal baking dish works best for even heat distribution and a crispy bottom)
- Stand mixer with dough hook (optional but helpful; this dough can easily be made by hand)
- Plastic wrap or damp kitchen towel (for covering the dough during rising)
- Pastry brush (for brushing olive oil over the dough)
- Wire cooling rack (to cool the bread slightly before slicing)
- Sharp knife or bench scraper (for slicing the finished focaccia)
- Measuring cups and spoons
Read Also: Easy Pizza Dough Recipe
Recommended Products for This Recipe
These products were selected based on quality and performance, and can genuinely make a difference in your final result.
1. Emile Henry Rectangular Baking Dish
This ceramic baking dish distributes heat evenly from the bottom up, which helps give focaccia its signature crispy, golden crust without hot spots or uneven browning. The smooth interior makes it easy to release the bread cleanly after baking. It’s durable, beautiful enough to serve from, and easy to clean.
2. Premium Extra Virgin Olive Oil
Olive oil is arguably the most important ingredient in focaccia. A high-quality extra-virgin olive oil with a fruity, peppery flavor will make the bread taste exponentially better than a basic cooking oil. Look for cold-pressed options from Italy or Greece for authentic flavor.
3. Maldon Sea Salt Flakes
The finishing salt on top of focaccia makes a huge difference in both flavor and texture. Maldon’s large, pyramid-shaped flakes give you that satisfying crunch and briny burst with every bite that ordinary table salt simply cannot replicate. A small tin lasts a very long time.
4. KitchenAid Stand Mixer
While this dough comes together easily by hand, a stand mixer with a dough hook makes the kneading process effortless and ensures a smooth, well-developed gluten structure. If you bake yeast breads regularly, this is one of the best investments you can make for your kitchen.
Another bread worth trying while you’re in a baking mood: Sourdough Discard Breadsticks are a great way to use up extra starter.

Step-by-Step Instructions
Step 1: Mix the Dough
- In a large mixing bowl (or the bowl of your stand mixer), whisk together the flour, instant yeast, 1 teaspoon of the kosher salt, and the granulated sugar until evenly combined.
- Add the warm water and 3 tablespoons of the olive oil to the dry ingredients.
- If using a stand mixer, attach the dough hook and mix on low speed for 1 minute to bring everything together, then increase to medium speed and knead for 5-6 minutes until the dough is smooth and slightly sticky.
- If mixing by hand, stir with a wooden spoon or rubber spatula until a shaggy dough forms, then turn the dough out onto a lightly floured surface and knead for 8-10 minutes until smooth and elastic. The dough should be soft, slightly tacky, and spring back slowly when poked.
- Do not add too much extra flour. Focaccia dough is meant to be wetter and stickier than typical bread dough, which is what creates that soft, airy texture after baking.
Step 2: First Rise
- Drizzle about 1 tablespoon of olive oil into a clean large bowl and use your hand or a pastry brush to coat the sides.
- Transfer the dough into the oiled bowl and turn it once so the dough is coated all over with oil. This prevents a dry skin from forming on the surface.
- Cover the bowl tightly with plastic wrap or a damp kitchen towel.
- Place the bowl somewhere warm and draft-free. Options include the top of a warm oven (with just the oven light on), near a warm window, or on the counter if your kitchen is at least 70°F (21°C).
- Let the dough rise for 1 to 1.5 hours, or until it has doubled in size.
Step 3: Prepare the Pan
- While the dough is rising, prepare your 9×13-inch baking pan by pouring 2 tablespoons of olive oil directly onto the bottom of the pan.
- Use your hands or a brush to spread the oil evenly across the entire bottom and about an inch up the sides. This generous coating of oil is what creates the signature crispy, golden bottom of focaccia.
- Set the pan aside until the dough is ready.
Step 4: Transfer and Stretch the Dough
- Once the dough has doubled, gently punch it down in the bowl to release the gas.
- Use a rubber spatula to transfer the dough from the bowl onto the prepared oiled pan.
- Use your fingertips to gently press and stretch the dough toward the edges of the pan. It will be soft and slightly elastic.
- If the dough keeps springing back and resisting, don’t force it. Cover it loosely with plastic wrap and let it rest for 10-15 minutes. The gluten will relax, and the dough will stretch much more easily.
- Once the dough fills or nearly fills the pan, move on to the second rise.
Step 5: Second Rise
- Drizzle another 1 tablespoon of olive oil evenly over the top surface of the stretched dough.
- Cover the pan loosely with plastic wrap or a clean kitchen towel.
- Let the dough rise again for 45 minutes to 1 hour, until it looks puffy and pillowy. It won’t necessarily double in size, but it should look noticeably fuller and airy.
- During the last 15 minutes of this rise, preheat your oven to 425°F (220°C) so it’s fully hot when the dough is ready to bake.
Step 6: Dimple the Dough and Add Toppings
- Once the dough has completed its second rise and the oven is preheated, uncover the pan.
- With well-oiled fingertips, firmly press your fingers straight down into the dough at regular intervals across the entire surface to create deep dimples. Press all the way down nearly to the bottom of the pan, but don’t tear through the dough.
- These dimples are important, not just decorative. They prevent large air bubbles from forming during baking and create the characteristic look of focaccia.
- Scatter the fresh rosemary leaves or chopped rosemary evenly over the top of the dimpled dough.
- Sprinkle the flaky sea salt generously across the surface, getting it into the dimples as much as possible.
- Add freshly cracked black pepper, if using.
- Drizzle the remaining olive oil over the entire top of the dough one final time. Don’t be shy here, this extra drizzle is what soaks into those dimples and makes the bread incredibly flavorful.
Step 7: Bake the Focaccia
- Place the pan in the center rack of your fully preheated oven.
- Bake for 20-25 minutes, rotating the pan once halfway through baking to ensure even browning.
- The focaccia is done when the top is golden brown, the edges are pulling away from the sides of the pan, and the bottom is a deep, crispy golden color when you tilt the pan and peek underneath.
- If the top is browning too quickly before the inside is fully cooked, tent the pan loosely with a piece of aluminum foil for the last 5 minutes.
Step 8: Rest and Serve
- Remove the pan from the oven and let the focaccia rest in the pan for 5 minutes.
- Use a spatula to lift the focaccia out of the pan and transfer it to a wire cooling rack. Allowing air to circulate underneath prevents the bottom from becoming soggy.
- Let it cool for at least 10-15 minutes before slicing. Cutting into it too soon releases the steam and can make the interior gummy.
- Slice into squares or rectangles and serve warm. A final drizzle of good olive oil right before serving takes it to the next level.
For another flat bread option you’ll love, try this Sourdough Discard Flatbread for a crispier, thinner variation.
Tips for Success
Getting focaccia right is mostly about understanding the dough and not rushing the rise times. Here are the key things to keep in mind.
- Use warm, not hot water. Water that’s too hot will kill the yeast before it even has a chance to activate. Aim for 100-110°F (38-43°C), which should feel comfortably warm on your wrist, not hot.
- Don’t skimp on the olive oil. This bread is supposed to be rich and deeply flavored. The olive oil in and on the dough is essential, not optional.
- Let the dough rest before stretching. If it keeps bouncing back, cover and wait 10-15 minutes. Forcing it will tear the gluten structure.
- Make the dimples deep. Shallow dimples will just smooth out during baking. Press firmly and go nearly to the bottom of the pan.
- Use fresh rosemary, not dried. Dried rosemary becomes scratchy and bitter when baked at high heat. Fresh rosemary turns slightly crispy and fragrant in the oven.
- Don’t overbake. Pull the bread out once the top is golden. Overbaking dries out that lovely soft interior.
- Invest in a quality olive oil. Since olive oil is the primary flavor here, using a fruity, well-flavored extra-virgin olive oil makes a noticeable difference compared to a generic cooking oil.
Another olive oil-forward bread recipe worth bookmarking: Cunetto’s Garlic Cheese Bread is a rich, indulgent option for garlic bread lovers.
Serving Suggestions
Focaccia is one of the most versatile breads you can have on your table, working equally well as a starter, side dish, or even a light meal.
Slice it into squares and serve warm alongside a big bowl of Zuppa Toscana for a cozy Italian-inspired dinner that feels like something you’d get at a restaurant.
Here are some of the best ways to serve this focaccia:
- Tear it into pieces and serve with a small bowl of high-quality olive oil and balsamic vinegar for dipping
- Slice it horizontally and use as the base for a focaccia sandwich with fresh mozzarella, tomato, and basil
- Top warm slices with classic bruschetta toppings for an elegant appetizer
- Serve alongside any pasta dish or hearty Italian soup
- Cube leftover focaccia and toast it in the oven for homemade croutons
- Use thick slices as a base for avocado toast with a drizzle of extra olive oil
Variations to Try
The base focaccia dough is wonderfully neutral and takes on toppings beautifully. Once you’ve mastered the classic version, it’s fun to experiment with different flavor combinations.
- Garlic and herb: Infuse your olive oil with 2-3 minced garlic cloves and add thyme or oregano alongside the rosemary
- Caramelized onion: Spread a layer of slow-cooked, golden caramelized onions over the dimpled dough before baking
- Cherry tomato and basil: Press halved cherry tomatoes into the dimples and scatter fresh basil leaves on after baking
- Olive and sea salt: Press a mixture of kalamata and green olives into the dough before the second rise for a briny, Mediterranean flavor
- Parmesan and cracked pepper: Sprinkle freshly grated Parmesan cheese generously over the top alongside extra black pepper
- Potato and rosemary: Arrange thin slices of par-cooked potato over the dough before baking for a heartier, more filling focaccia
- Fig and goat cheese: A sweet and savory combination that works beautifully for an appetizer spread
You might also enjoy: Sourdough Discard Pizza Dough
Storage and Reheating
Focaccia is undeniably best fresh and warm from the oven, but it holds up reasonably well for a couple of days if stored properly.
- Room temperature: Wrap cooled focaccia tightly in aluminum foil or store it in an airtight container at room temperature for up to 2 days. Avoid plastic bags, which can make the exterior soft and soggy.
- Freezing: Let the focaccia cool completely, then slice it and wrap individual pieces tightly in plastic wrap followed by a layer of foil. Freeze for up to 2 months. Thaw at room temperature before reheating.
- Reheating in the oven: Place focaccia pieces directly on the oven rack or on a baking sheet and heat at 350°F (175°C) for 5-8 minutes. This method restores the crispiness of the crust beautifully.
- Reheating in an air fryer: Air fry at 325°F (165°C) for 3-4 minutes for a quick, crispy reheat.
- Avoid the microwave: Microwaving focaccia makes it chewy and soft in all the wrong ways. The oven method is always worth the extra few minutes.
Read Also: Dinner Rolls Recipe
Nutritional Facts
The following values are approximate, based on 12 servings per batch (one 9×13-inch pan). Actual values may vary depending on exact ingredients and portion sizes.
| Nutrient | Per Serving |
|---|---|
| Calories | ~220 kcal |
| Total Fat | 9g |
| Saturated Fat | 1.3g |
| Carbohydrates | 30g |
| Dietary Fiber | 1.2g |
| Sugars | 0.5g |
| Protein | 5g |
| Sodium | 380mg |
This focaccia is naturally vegan and dairy-free, making it suitable for a wide range of dietary preferences.
For a lighter snack alongside your focaccia, try pairing it with this easy hummus for a satisfying combination.
Health Benefits of Key Ingredients
Beyond great taste, this focaccia is made with some genuinely nourishing ingredients that bring real benefits to the table.
Extra-virgin olive oil is rich in monounsaturated fatty acids, particularly oleic acid, which is associated with reduced inflammation and improved heart health. It also contains powerful antioxidants, including vitamin E and polyphenols, that help protect cells from oxidative stress.
Here are the health highlights of the key ingredients in this recipe:
- Olive oil: High in heart-healthy monounsaturated fats and antioxidants. Regular consumption is linked to improved cholesterol levels and reduced cardiovascular risk.
- Fresh rosemary: Contains rosmarinic acid and carnosic acid, two potent antioxidants with anti-inflammatory properties. Rosemary has also been studied for its potential to support memory and cognitive function.
- Flour: Provides complex carbohydrates for sustained energy. If you use bread flour, you also get a slightly higher protein content per serving, which helps with satiety.
- Sea salt: Used in moderation, quality sea salt provides trace minerals including magnesium, calcium, and potassium that refined table salt lacks.
- Yeast: A natural source of B vitamins, including folate and B12, as well as minerals like selenium and zinc, which play important roles in immune function.
The rosemary in this recipe is actually doing a lot more than adding flavor. You might be surprised to know the same herb stars in these Rosemary Shortbread Cookies, proving just how versatile it is in baking.
Frequently Asked Questions
1. Can I use active dry yeast instead of instant yeast?
Yes, absolutely. The main difference is that active dry yeast needs to be “proofed” first, meaning dissolved in warm water for 5-10 minutes before mixing it into the dough. If it foams and bubbles during this step, it’s active and ready to use. If it doesn’t react, the yeast may be expired and you’ll need a fresh packet. Add the sugar to the water along with the yeast during proofing to help it activate.
2. Can I make the dough the night before?
This is actually a great way to develop even more flavor. After mixing the dough, cover the bowl tightly with plastic wrap and place it in the refrigerator to rise slowly overnight, for anywhere between 8 and 24 hours. When ready to bake, remove the dough from the fridge, let it come to room temperature for about 30 minutes, then transfer it to the oiled pan and continue from the stretching step.
3. Why is my focaccia dense instead of light and fluffy?
The most common culprit is water that was too hot and killed the yeast, or yeast that was expired and didn’t activate properly. Another common issue is not giving the dough enough time to rise. Always let it fully double before moving on to the next step. If your kitchen is cold, the rise will simply take longer, and that’s perfectly fine.
4. Can I make this recipe gluten-free?
You can try using a high-quality 1:1 gluten-free baking flour blend in place of all-purpose flour. The texture will be slightly different because gluten-free doughs don’t develop the same elasticity, but the result can still be quite good. Avoid gluten-free flours that contain a lot of rice flour alone, as these tend to produce a gritty texture. Look for blends that include xanthan gum, which mimics some of the binding properties of gluten.
5. What size pan should I use?
A 9×13-inch (23x33cm) baking pan is the standard for this recipe and gives you the right thickness of focaccia. If you use a smaller pan, the bread will be thicker and may need a few extra minutes of baking time. If you use a larger sheet pan, the bread will spread thinner and bake faster, so watch it closely and start checking at the 18-minute mark. The key is that the dough should be about 3/4 to 1 inch thick after the second rise.
Read Also: Sourdough Discard Naan
Final Thoughts
If you’ve been looking for a homemade bread recipe that delivers maximum reward with minimal fuss, this rosemary focaccia is exactly that.
It’s the kind of bread that makes the whole house smell incredible while it bakes, and the kind that disappears within minutes of hitting the table.
Give it a try this weekend and see how quickly it becomes a household staple. If you make it, leave a comment below to share how it went or tag a photo so others can see your gorgeous focaccia. Sharing is half the fun.
Recommended:
- Sourdough Discard Bread
- Whole Wheat Sourdough Bread
- Macaroni Grill Bread
- Chicken Bruschetta
- Classic Bruschetta
- Pasta Fagioli
- Hummus Pizza
- Gluten Free Sourdough Bread
- Marinara Sauce
- Minestrone Soup