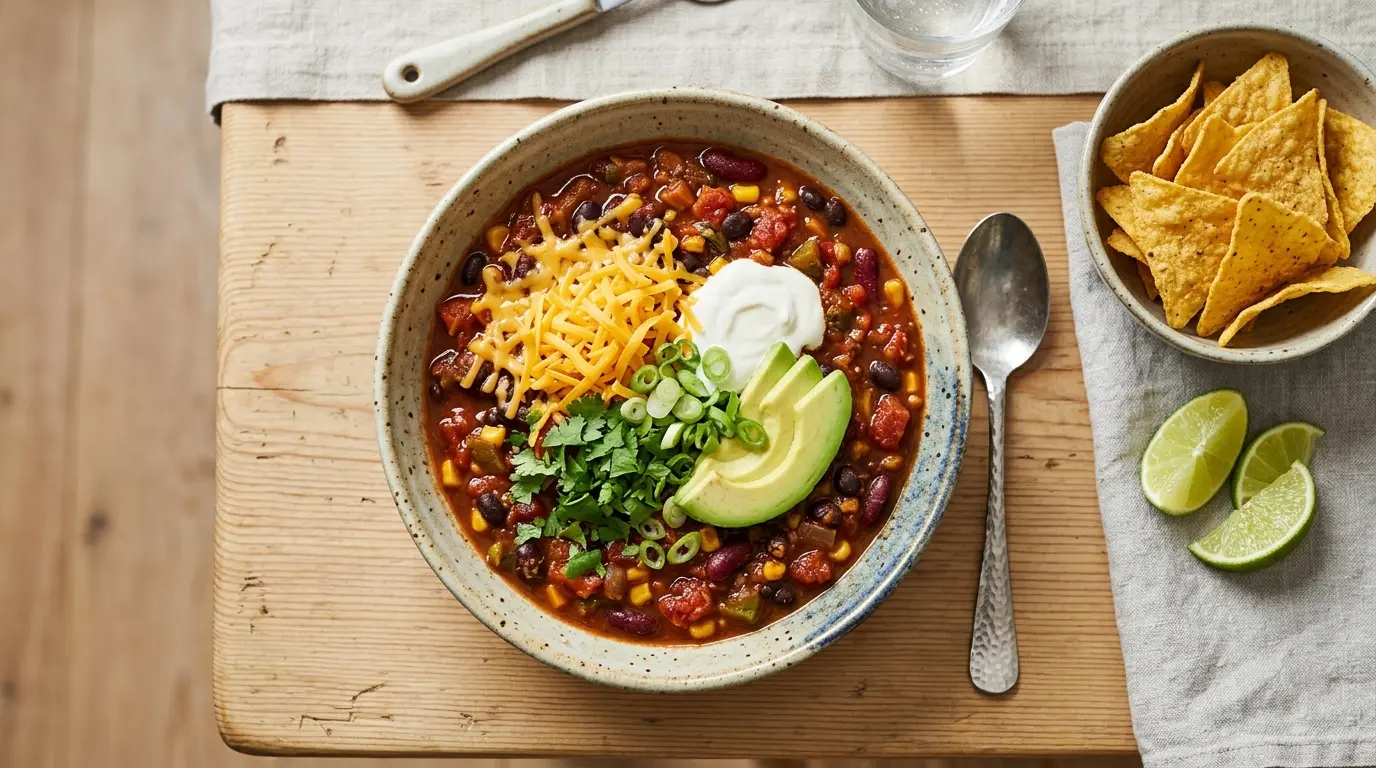
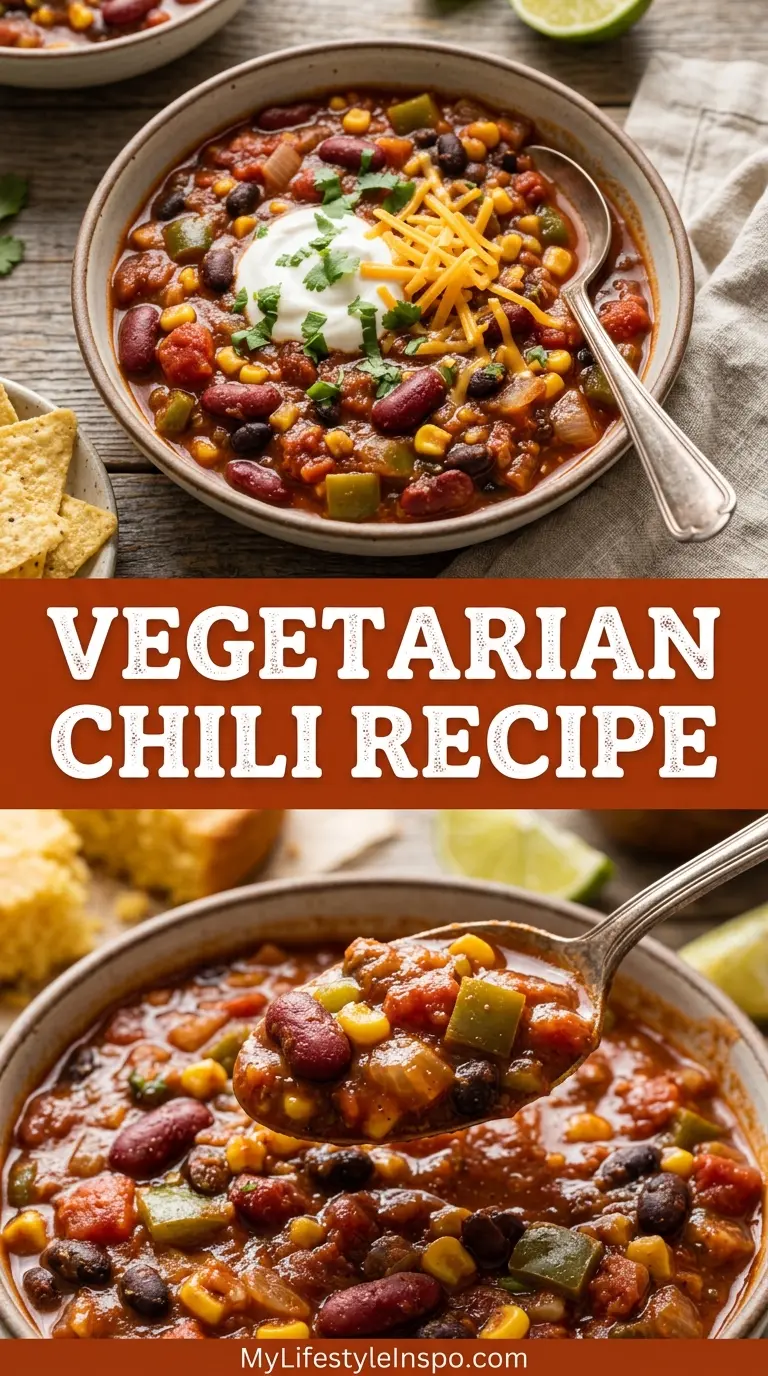
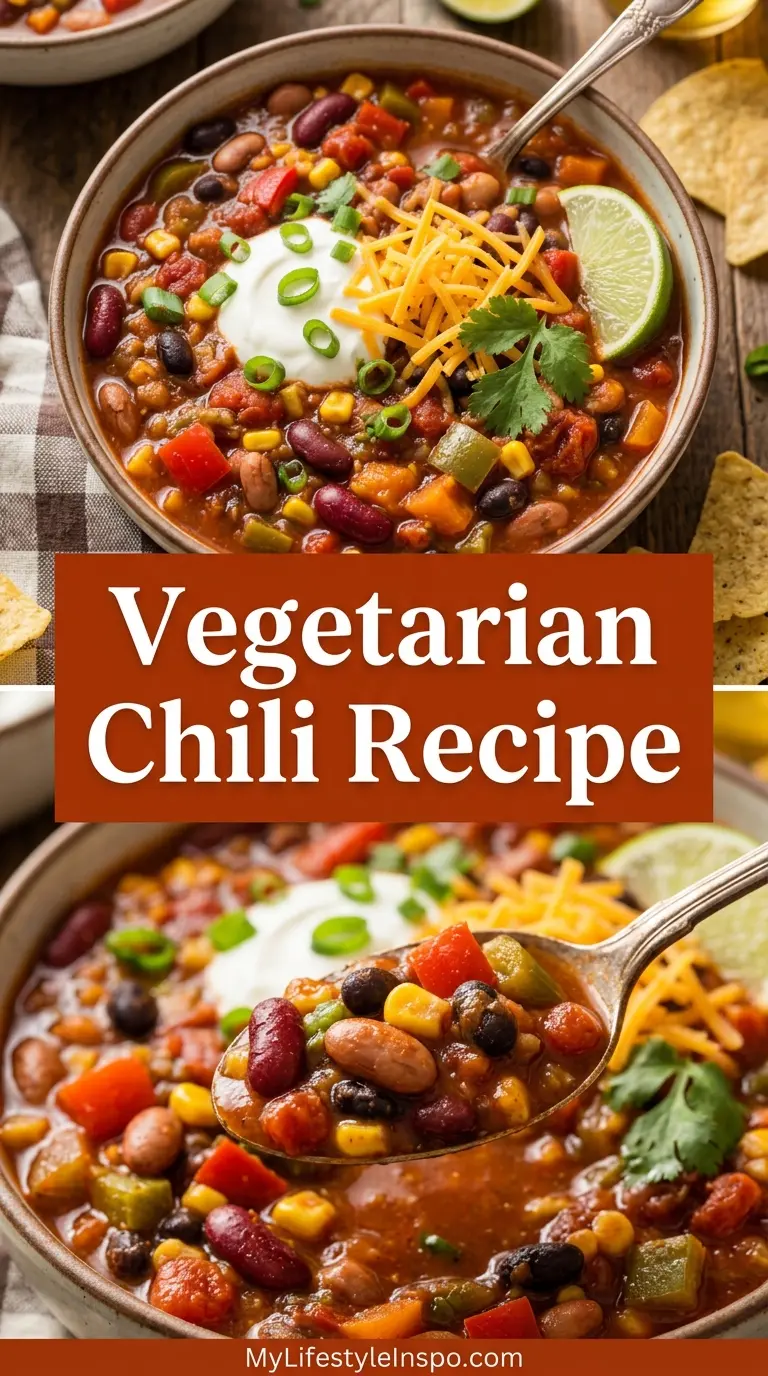
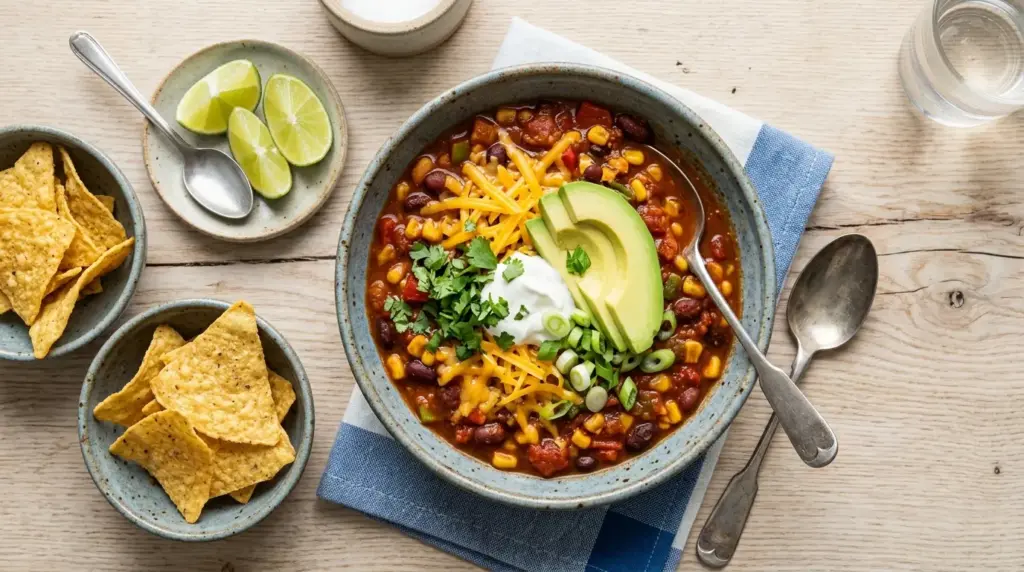
This vegetarian chili recipe is proof that you don’t need meat to make a truly bold, comforting pot of chili.
Packed with three types of beans, fire-roasted tomatoes, and a carefully layered spice blend, this chili delivers that same deep, smoky richness you’d expect from a classic meat-based version. The secret is building flavor at every step: blooming your spices in oil, using chipotle peppers for heat and smokiness, and letting everything simmer low and slow until the flavors meld together.
This is the kind of meal that gets better the next day, freezes beautifully, and feeds a crowd without much effort.
If you’ve ever been disappointed by watery or bland vegetarian chili, this one is going to change your mind completely.
If you love a good bowl of chili, check out our classic Chili Recipe for the traditional meat version.
Why You’ll Love This Vegetarian Chili Recipe
This chili earns a permanent spot in your rotation for so many reasons.
It’s a one-pot meal that comes together with pantry staples, which makes it perfect for weeknights when you want something hearty without a pile of dishes.
The combination of kidney beans, black beans, and pinto beans creates an incredibly satisfying texture, while the fire-roasted tomatoes and chipotle peppers add layers of smoky complexity you simply can’t get from plain tomatoes or basic chili powder.
It’s naturally vegan, gluten-free, and high in plant-based protein, so it fits a wide range of dietary needs without sacrificing flavor.
And because this recipe makes a big batch, you’ll have leftovers that taste even better the next day as the spices continue to develop.
- Completely meatless, yet rich and deeply savory
- Loaded with protein and fiber from three types of beans
- Uses budget-friendly pantry and fresh ingredients
- Ready in about an hour from start to finish
- Freezer-friendly and perfect for meal prep
- Naturally vegan and gluten-free
- Endlessly customizable with toppings and variations
Read Also: White Chili Recipe
Ingredients
This chili uses a carefully balanced mix of aromatics, spices, and beans to build the kind of depth that makes you go back for seconds. The chipotle pepper in adobo sauce is a key player here: just one or two peppers add a smoky, slightly spicy quality that’s completely different from plain chili powder. Don’t skip it.
- 2 tablespoons (30 ml) olive oil
- 1 large yellow onion, diced (about 1.5 cups / 210 g)
- 1 large red bell pepper, diced
- 1 large green bell pepper, diced
- 4 cloves garlic, minced
- 2 medium jalapeños, seeded and finely diced (leave seeds in for more heat)
- 2 tablespoons (16 g) chili powder
- 1 tablespoon (8 g) ground cumin
- 1 teaspoon smoked paprika
- 1 teaspoon dried oregano
- 0.5 teaspoon garlic powder
- 0.5 teaspoon onion powder
- 0.25 teaspoon cayenne pepper (adjust to taste)
- 1–2 chipotle peppers in adobo sauce, finely minced, plus 1 tablespoon adobo sauce from the can
- 1 can (28 oz / 794 g) fire-roasted crushed tomatoes
- 1 can (14.5 oz / 411 g) fire-roasted diced tomatoes
- 1 can (15 oz / 425 g) kidney beans, drained and rinsed
- 1 can (15 oz / 425 g) black beans, drained and rinsed
- 1 can (15 oz / 425 g) pinto beans, drained and rinsed
- 1.5 cups (355 ml) vegetable broth
- 1 tablespoon (15 ml) soy sauce or tamari (for umami depth)
- 1 tablespoon (15 ml) apple cider vinegar
- 1 teaspoon brown sugar
- Salt and black pepper to taste
- Fresh cilantro, shredded cheese, sour cream, sliced avocado, green onions, tortilla chips for topping (optional)
You might also enjoy: Slow Cooker Chili Recipe
Kitchen Equipment Needed
You don’t need any specialized tools for this recipe, but a heavy-bottomed pot makes a real difference. A Dutch oven is ideal because it distributes heat evenly, prevents scorching, and retains heat beautifully through a long simmer.
- Dutch oven or large, heavy-bottomed pot (at least 6-quart / 5.7-liter capacity)
- Wooden spoon or heat-resistant silicone spatula
- Sharp chef’s knife
- Cutting board
- Can opener
- Measuring spoons and measuring cups
- Ladle for serving
- Colander or fine-mesh strainer for draining and rinsing beans
- Immersion blender (optional, for partially blending the chili for a thicker consistency)
Read Also: Texas Chili Recipe
Recommended Products for This Recipe
These are products that genuinely make a difference when it comes to flavor and ease of preparation. Each recommendation is based on quality and real-world performance in recipes like this one.
1. Le Creuset Enameled Cast Iron Dutch Oven
A high-quality Dutch oven is the single best investment you can make for chili. It distributes heat evenly across the bottom and sides, which means your chili simmers gently without hot spots that cause scorching. The enameled interior also makes cleanup simple even after a long cook.
2. San Marcos Chipotle Peppers in Adobo Sauce
The chipotle pepper is what separates a good vegetarian chili from a great one. A quality brand like San Marcos gives you that deep, smoky heat without being overwhelming, and the adobo sauce itself adds richness to the base.
3. Fire-Roasted Crushed Tomatoes (Muir Glen Organic)
Fire-roasted tomatoes have a subtle caramelized depth that regular canned tomatoes simply don’t have. Muir Glen’s organic fire-roasted variety is consistently excellent and makes a noticeable difference in the final flavor of the chili.
4. OXO Good Grips Immersion Blender
Partially blending your chili is the easiest trick to getting a thicker, creamier consistency without any added fat or flour. An immersion blender lets you do this right in the pot in seconds.
5. Redmond Real Salt (Fine Grain)
The quality of your finishing salt matters more than you’d think, especially in a dish where seasoning is everything. A clean, mineral-rich salt like Redmond Real Salt brings out the flavors in a way that iodized table salt doesn’t.
For a delicious pasta dish that also uses pantry staples, try this Minestrone Soup Recipe.
Step-by-Step Instructions
1. Prep All Your Vegetables
- Dice the yellow onion into roughly 0.5-inch (1.3 cm) pieces. Uniform pieces help them cook evenly.
- Dice both bell peppers into similar-sized pieces, removing the seeds and white pith.
- Finely mince the garlic cloves. The finer the mince, the more evenly the garlic will distribute its flavor throughout the chili.
- Seed and finely dice the jalapeños. If you like more heat, leave some seeds in. If you’re sensitive to spice, remove them entirely.
- Finely mince 1–2 chipotle peppers from the can and measure out 1 tablespoon of the adobo sauce from the can. Set aside together.
- Drain and rinse all three cans of beans in a colander under cold running water. This removes excess sodium and starch.
- Open and have all canned tomatoes ready before you start cooking, because the cooking process moves quickly once the heat is on.
2. Build the Flavor Base
- Set your Dutch oven or large pot over medium-high heat.
- Once the pot is hot, add 2 tablespoons (30 ml) of olive oil and let it heat until it shimmers, about 30 seconds.
- Add the diced onion and a pinch of salt. Stir to coat in the oil and cook for 5 to 6 minutes, stirring occasionally, until the onion is softened and starting to turn translucent around the edges.
- Add the diced red and green bell peppers. Stir well and cook for another 4 to 5 minutes, until the peppers have softened slightly but still have a little bite.
- Add the minced jalapeño and cook for 1 to 2 more minutes, stirring frequently.
3. Add the Garlic and Toast the Spices
- Push the vegetables to the edges of the pot to clear the center. Add the minced garlic to the cleared center.
- Let the garlic cook undisturbed for about 30 seconds, then stir it into the vegetables. Cook for another 30 seconds until fragrant. Do not let it brown; burnt garlic will make the whole chili bitter.
- Reduce the heat to medium. Add the chili powder, ground cumin, smoked paprika, dried oregano, garlic powder, onion powder, and cayenne pepper directly to the pot.
- Stir everything constantly for 60 to 90 seconds. You’re toasting the spices in the residual oil, which activates their fat-soluble flavor compounds and dramatically deepens the chili’s overall flavor.
- Add the minced chipotle peppers and the tablespoon of adobo sauce. Stir to combine with the spices and vegetables.
4. Add the Tomatoes and Liquid
- Pour in the can of fire-roasted crushed tomatoes and the can of fire-roasted diced tomatoes. Stir well, scraping up any browned bits from the bottom of the pot. Those browned bits are concentrated flavor.
- Add the vegetable broth and stir to combine.
- Add the soy sauce (or tamari) and the tablespoon of brown sugar. The soy sauce adds savory umami depth that mimics the richness you’d get from meat, while the brown sugar balances the acidity of the tomatoes.
- Stir everything thoroughly and bring the mixture to a boil over medium-high heat.
5. Add the Beans and Simmer
- Once the chili reaches a boil, add all three types of beans: kidney beans, black beans, and pinto beans.
- Stir to combine everything evenly. The beans will release some starch as they cook, which naturally thickens the chili.
- Reduce the heat to low or medium-low so the chili maintains a gentle, steady simmer with small bubbles occasionally breaking the surface.
- Partially cover the pot with a lid, leaving a small gap for steam to escape.
- Simmer for at least 30 minutes, and up to 45 minutes for a thicker, more developed flavor. Stir every 10 minutes or so to prevent sticking.
6. Adjust Texture and Seasoning
- After 30 to 45 minutes of simmering, taste the chili. This is the most important step.
- If you want a thicker chili, use an immersion blender to blend a portion of the chili directly in the pot. Blend about one-quarter to one-third of the mixture, then stir to combine. Alternatively, use a potato masher to roughly mash some of the beans for a chunkier but thicker consistency.
- Add the tablespoon of apple cider vinegar and stir well. The acid brightens and lifts all the flavors, making the chili taste more vibrant and less flat.
- Taste again and season with salt and black pepper as needed. Start with 0.5 teaspoon of salt and adjust from there.
- If the chili tastes flat, add more salt. If it tastes too spicy, add a small drizzle of honey or a bit more brown sugar. If it’s too thick, add a splash more vegetable broth.
7. Rest and Serve
- Remove the pot from the heat and let the chili rest for 5 minutes before serving. This allows the flavors to settle and the texture to firm up slightly.
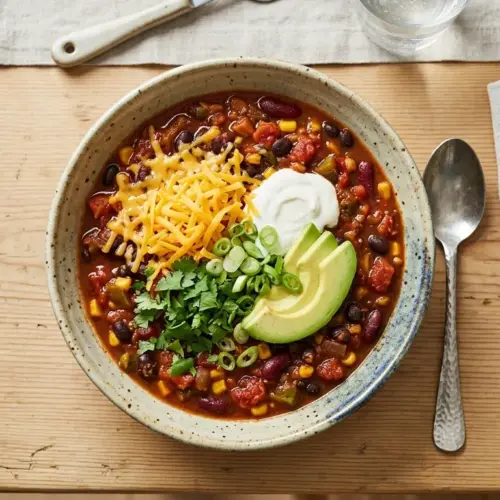
- Ladle into bowls and top with your choice of garnishes: shredded cheddar or Monterey Jack cheese, a dollop of sour cream or vegan sour cream, diced avocado or guacamole, sliced green onions, fresh cilantro, a squeeze of lime juice, or crushed tortilla chips.
This technique works wonderfully in dishes like Stuffed Pepper Soup too, if you enjoy similar layered flavors.
Tips for Success
Getting a vegetarian chili just right comes down to a few key techniques that most recipes skip over. Follow these and you’ll end up with a noticeably better bowl every single time.
- Toast your spices. Never add dry spices to liquid. Always bloom them in oil or in the dry pot for at least 60 seconds. This is non-negotiable for maximum flavor.
- Use fire-roasted tomatoes. Regular diced tomatoes work, but fire-roasted versions have a caramelized depth that regular tomatoes lack. It’s the most impactful single swap you can make.
- Don’t skip the chipotle pepper. Even one chipotle pepper transforms the flavor profile from “vegetable soup with chili powder” to genuinely bold chili.
- Add acid at the end. Apple cider vinegar or fresh lime juice added in the final minutes brightens everything up. Add it too early and the brightness cooks off.
- Let it simmer long enough. A minimum of 30 minutes is needed for flavors to meld. Forty-five minutes is even better. Rushing a chili always shows.
- Season in layers. Add a pinch of salt when you cook the onions, taste after adding the tomatoes, and adjust again at the very end. Layered seasoning builds more complex flavor than salting all at once.
- Use three types of beans. Using a single type of bean creates a monotone texture. The mix of kidney, black, and pinto beans gives you varied textures and flavors in every bite.
Another great veggie-forward recipe to try is this Lentil Soup Recipe.
Serving Suggestions
This chili is hearty enough to stand completely on its own, but the right sides and toppings take it from a simple weeknight dinner to something people genuinely get excited about.
Load your bowls generously and set out a topping bar when feeding a group, so everyone can customize to their own taste.
- A wedge of Skillet Cornbread or Sweet Cornbread alongside the bowl is a classic pairing
- Serve over Cilantro Lime Rice for a more filling, burrito bowl-style meal
- Top with shredded Monterey Jack or sharp cheddar cheese
- Add a dollop of sour cream or plain Greek yogurt to cool the heat
- Sliced or mashed avocado adds creaminess and healthy fats
- Easy Guacamole makes a perfect topping or side
- Serve with Homemade Tortilla Chips for scooping
- A spoonful of Fresh Salsa or Pico de Gallo adds brightness and freshness
Variations to Try
This recipe is a strong base that works beautifully in many different directions. Once you’ve made it once, feel free to experiment with whatever you have on hand.
- Add sweet potato or butternut squash. Dice one medium sweet potato or squash into 0.5-inch (1.3 cm) cubes and add with the tomatoes. It creates natural sweetness and a heartier texture.
- Stir in frozen or fresh corn. Add 1 cup (150 g) of corn kernels in the last 10 minutes of simmering for a pop of sweetness and color.
- Make it Tex-Mex style. Add 1 tablespoon of taco seasoning (in addition to or instead of some of the individual spices), plus a can of green chiles.
- Use lentils for extra protein. Replace one can of beans with 0.75 cup (144 g) of dried green or brown lentils. Add them with the tomatoes and broth, and simmer for at least 40 minutes until tender.
- Make it slow cooker style. Follow steps 2 and 3 in a skillet to build the flavor base, then transfer everything to a slow cooker and cook on low for 6 to 8 hours or on high for 3 to 4 hours.
- Make it spicier. Double the chipotle peppers, add an extra jalapeño, or stir in a teaspoon of hot sauce at the end.
- Add zucchini or mushrooms. These both absorb the chili flavors beautifully and add an almost meaty texture. Add them with the bell peppers.
Read Also: Turkey Chili Recipe
Storage and Reheating
This chili is genuinely one of the best make-ahead meals you can keep in your fridge or freezer, and the flavor improves significantly after an overnight rest.
- Refrigerator: Store cooled chili in an airtight container for up to 5 days. The flavor deepens considerably after the first day.
- Freezer: Freeze in individual or family-sized portions in airtight freezer-safe containers or zip-top freezer bags for up to 3 months. Leave a little headspace in containers as the chili expands when frozen.
- Thawing: Transfer frozen chili to the refrigerator the night before you plan to eat it. It will thaw overnight and be ready to reheat the next day.
- Stovetop reheating: Reheat in a saucepan over medium-low heat, stirring occasionally. Add a splash of vegetable broth or water if the chili has thickened too much during storage.
- Microwave reheating: Reheat in a microwave-safe bowl, covered loosely, in 90-second intervals, stirring between each interval until heated through.
- Do not freeze with toppings. Always add fresh toppings after reheating, not before storing or freezing.
You might also enjoy: Chicken Chili Recipe
Nutritional Facts
The following values are approximate and based on one serving (about 1.5 cups / 360 ml) with no toppings, assuming the recipe makes 6 servings.
| Nutrient | Amount Per Serving |
|---|---|
| Calories | 290 kcal |
| Total Fat | 6 g |
| Saturated Fat | 1 g |
| Sodium | 680 mg |
| Total Carbohydrates | 47 g |
| Dietary Fiber | 14 g |
| Total Sugars | 8 g |
| Protein | 15 g |
| Iron | 5 mg |
| Potassium | 850 mg |
Note: Nutritional values will vary based on specific brands used and any additions or toppings. Using low-sodium canned beans and tomatoes will significantly reduce the sodium content.
For another satisfying and hearty vegetarian option, check out this Vegetable Soup Recipe.
Health Benefits of Key Ingredients
This chili isn’t just delicious. It’s built on ingredients that genuinely support your health, making it one of the most nutritious comfort foods you can eat.
The combination of fiber, plant-based protein, and antioxidant-rich vegetables means this bowl is doing real work for your body, not just filling you up.
- Kidney beans are an excellent source of plant-based protein and iron, and their resistant starch helps support healthy blood sugar levels.
- Black beans are rich in anthocyanins (the pigments that give them their dark color), which are powerful antioxidants linked to reduced inflammation.
- Pinto beans provide a significant amount of folate, which supports cell function and is especially important during pregnancy.
- Bell peppers are one of the most vitamin C-rich vegetables available, with a single red bell pepper containing more vitamin C than an orange.
- Cumin has been studied for its potential digestive benefits and its role in supporting healthy cholesterol levels.
- Chipotle peppers (like all chile peppers) contain capsaicin, which may support metabolism and has well-documented anti-inflammatory properties.
- Garlic contains allicin, an active compound with antimicrobial and heart-protective properties that become available when garlic is chopped or crushed.
- Tomatoes are a rich source of lycopene, an antioxidant that has been associated with reduced risk of certain chronic diseases, and the lycopene in cooked tomatoes is actually more bioavailable than in raw ones.
For another bean-forward recipe, this Black Bean Quesadilla Recipe is a quick and satisfying option.
Frequently Asked Questions
1. Can I make this vegetarian chili recipe in a slow cooker?
Absolutely. The best approach is to complete steps 2 and 3 (building the vegetable base and toasting the spices) in a skillet on the stove first. This is important because slow cookers don’t get hot enough to properly sauté aromatics or bloom spices, and skipping this step produces a noticeably flatter-tasting chili.
Once the base is ready, transfer it to your slow cooker along with all remaining ingredients. Cook on low for 6 to 8 hours or on high for 3 to 4 hours.
2. How do I make this chili less spicy?
The main sources of heat in this recipe are the jalapeño, the cayenne pepper, and the chipotle pepper. To reduce spice, seed and remove all membranes from the jalapeño, reduce or omit the cayenne entirely, and use just half a chipotle pepper rather than a full one.
You can also stir a spoonful of sour cream or a small drizzle of honey directly into the pot after cooking to dial back the heat.
3. My chili turned out too thin. How do I fix it?
The easiest fix is to use an immersion blender to partially blend the chili directly in the pot. Blend about one-quarter of the chili, then stir it back in. This creates a thick, creamy consistency without any added starch or flour.
You can also simply simmer the chili uncovered for an additional 10 to 15 minutes to allow more liquid to evaporate.
4. Can I use dried beans instead of canned?
Yes, but you’ll need to soak and cook them ahead of time. For this recipe, you’d need about 0.5 cup (90 g) of dried beans per can, which will yield roughly the equivalent volume once cooked. Soak dried beans overnight in cold water, then drain and simmer in fresh water until tender before using.
Pre-cooked dried beans tend to have slightly better texture and lower sodium than canned, but the canned version is perfectly fine and much more convenient.
5. Is this vegetarian chili recipe also vegan?
The chili base itself is completely vegan. All ingredients are plant-based, from the olive oil to the beans and spices.
To keep the entire bowl vegan, simply use plant-based toppings: skip the dairy cheese and sour cream in favor of vegan cheese shreds, cashew cream, or a simple drizzle of lime juice and fresh avocado.
Read Also: White Chicken Chili Recipe
Vegetarian Chili
Equipment
- Dutch oven or large heavy-bottomed pot - at least 6-quart / 5.7-liter capacity
- Wooden spoon or heat-resistant silicone spatula
- Sharp chef's knife
- Cutting board
- Can opener
- Measuring spoons
- Measuring cups
- Ladle
- Colander or fine-mesh strainer
- Immersion Blender - optional, for thicker consistency
Ingredients
- 2 tablespoons olive oil - 30 ml
- 1 large yellow onion - about 1.5 cups or 210g, diced
- 1 large red bell pepper - diced
- 1 large green bell pepper - diced
- 4 cloves garlic - minced
- 2 medium jalapeños - seeded and finely diced, leave seeds in for more heat
- 2 tablespoons chili powder - 16 g
- 1 tablespoon ground cumin - 8 g
- 1 teaspoon smoked paprika
- 1 teaspoon dried oregano
- 0.5 teaspoon garlic powder
- 0.5 teaspoon onion powder
- 0.25 teaspoon cayenne pepper - adjust to taste
- 1-2 peppers chipotle peppers in adobo sauce - finely minced, plus 1 tablespoon adobo sauce from the can
- 28 ounces fire-roasted crushed tomatoes - 794 g, 1 can
- 14.5 ounces fire-roasted diced tomatoes - 411 g, 1 can
- 15 ounces kidney beans - 425 g, 1 can, drained and rinsed
- 15 ounces black beans - 425 g, 1 can, drained and rinsed
- 15 ounces pinto beans - 425 g, 1 can, drained and rinsed
- 1.5 cups vegetable broth - 355 ml
- 1 tablespoon soy sauce or tamari - 15 ml, for umami depth
- 1 tablespoon apple cider vinegar - 15 ml
- 1 teaspoon brown sugar
- salt and black pepper - to taste
For Serving (Optional)
- fresh cilantro - chopped
- shredded cheddar or Monterey Jack cheese
- sour cream - or vegan sour cream
- avocado - sliced or mashed
- green onions - sliced
- tortilla chips - crushed, for scooping
- lime wedges - for squeezing
Instructions
- Prep all your vegetables and drain and rinse the canned beans.
- Heat olive oil in a Dutch oven over medium-high heat. Add the onion with a pinch of salt and cook for 5-6 minutes until softened and translucent. Add the bell peppers and cook for 4-5 minutes, then add the jalapeño and cook 1-2 minutes more.
- Push vegetables to the sides, add garlic to the center, cook 30 seconds undisturbed then stir in. Reduce heat to medium, add all dry spices and toast for 60-90 seconds while stirring constantly. Add chipotle peppers and adobo sauce and stir to combine.
- Add crushed and diced tomatoes, vegetable broth, soy sauce, and brown sugar. Stir well, scraping up any browned bits from the bottom. Bring the mixture to a boil over medium-high heat.
- Add kidney beans, black beans, and pinto beans. Stir to combine. Reduce heat to low, partially cover, and simmer for at least 30 minutes, stirring every 10 minutes.
- After simmering, taste and adjust consistency with an immersion blender if desired. Stir in apple cider vinegar and season with salt and pepper to taste.
- Rest for 5 minutes, then serve hot with your favorite toppings like shredded cheese, sour cream, avocado, green onions, cilantro, tortilla chips, and a squeeze of lime.
Notes
- Toast your spices: Never add dry spices to liquid. Always bloom them in oil or in the dry pot for at least 60 seconds. This is non-negotiable for maximum flavor.
- Use fire-roasted tomatoes: Regular diced tomatoes work, but fire-roasted versions have a caramelized depth that regular tomatoes lack. It’s the most impactful single swap you can make.
- Don’t skip the chipotle pepper: Even one chipotle pepper transforms the flavor profile from “vegetable soup with chili powder” to genuinely bold chili.
- Add acid at the end: Apple cider vinegar or fresh lime juice added in the final minutes brightens everything up. Add it too early and the brightness cooks off.
- Let it simmer long enough: A minimum of 30 minutes is needed for flavors to meld. Forty-five minutes is even better. Rushing a chili always shows.
- Season in layers: Add a pinch of salt when you cook the onions, taste after adding the tomatoes, and adjust again at the very end. Layered seasoning builds more complex flavor than salting all at once.
- Storage: Refrigerate in an airtight container for up to 5 days. Freeze for up to 3 months. The flavor improves after the first day.
- Reheating: Reheat on the stovetop over medium-low heat, adding a splash of broth if needed, or microwave in 90-second intervals until hot.
- Make it less spicy: Seed the jalapeños, reduce or omit the cayenne, and use just half a chipotle pepper. Stir in sour cream or a drizzle of honey to dial back heat.
- Make it thicker: Use an immersion blender to blend about one-quarter of the chili right in the pot, or use a potato masher to roughly mash some of the beans.
Final Thoughts
This vegetarian chili recipe is one of those recipes that earns a permanent spot in your meal rotation after you make it just once.
It’s bold enough to satisfy meat eaters, nourishing enough to feel good about eating regularly, and flexible enough to adapt to whatever you have in the pantry.
The key is patience: take the time to build the flavor base properly, toast those spices, and let the chili simmer until everything is deeply melded together.
Give it a try this week, and don’t forget to customize your toppings to your liking. Drop a comment below to share how it turned out or tell us your favorite variation.
Recommended:
- Wendy’s Chili Recipe
- Taco Soup Recipe
- Stuffed Bell Peppers
- Black Bean Soup Recipe
- Seven Layer Dip
- Baked Beans Recipe
- Taco Seasoning Recipe
- Refried Beans Recipe
- Easy Ratatouille Recipe
- Vegetarian Split Pea Soup


