If you are looking for a crowd-pleasing appetizer that disappears within minutes, this Seven Layer Dip Recipe is exactly what you need.
It is the kind of dip that earns requests every single time you bring it to a party. Seven bold, Tex-Mex-inspired layers stacked in one beautiful dish, ready to scoop with crispy tortilla chips, it is hearty, colorful, and endlessly satisfying.
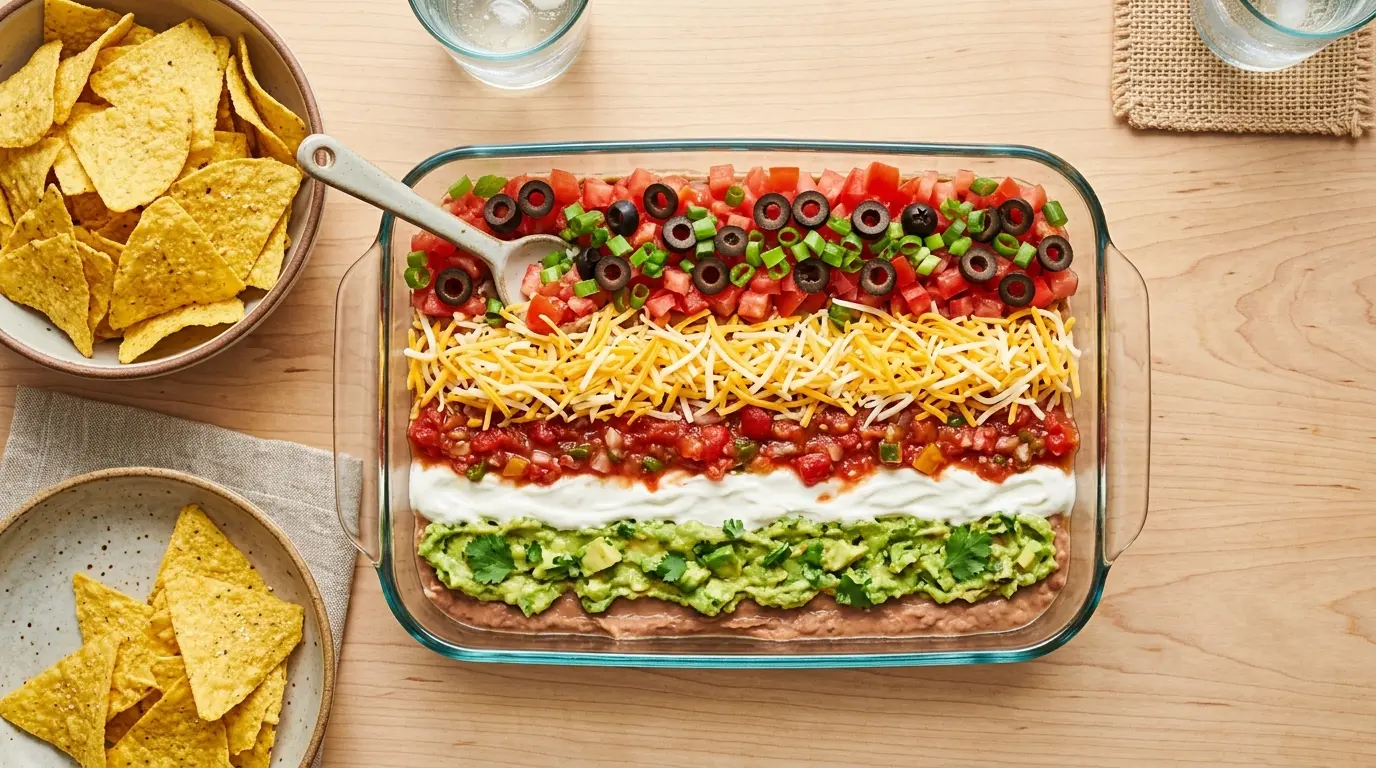
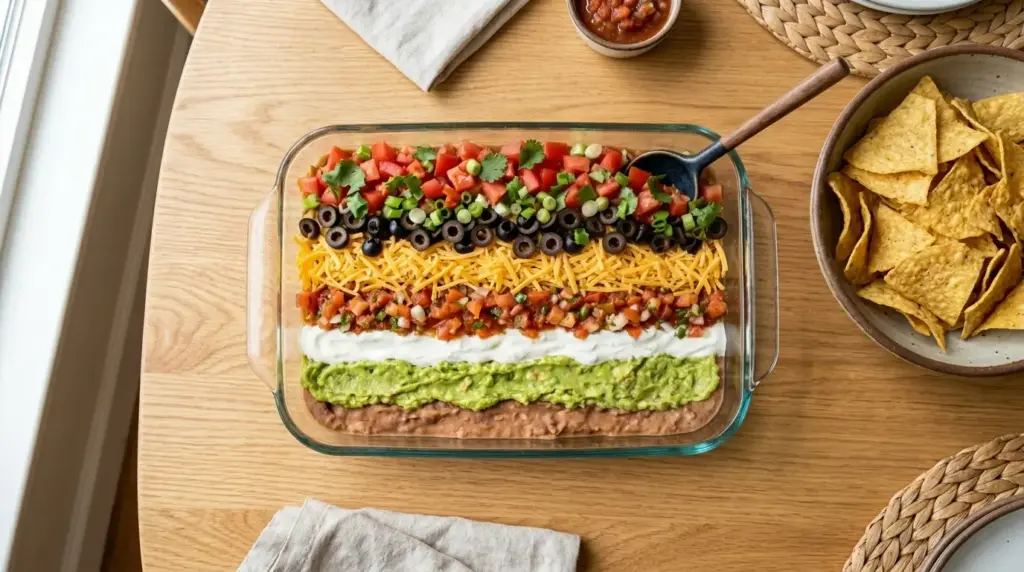
What makes this recipe work so well is that each layer brings something different to the table. Creamy refried beans form a hearty base, seasoned sour cream adds tangy richness, fresh guacamole delivers that bright avocado flavor, and a shower of cheese, tomatoes, olives, and green onions ties it all together with color and texture.
It comes together in about 20 minutes with no cooking required, which makes it one of the easiest party dishes you can make.
You might also enjoy this recipe alongside Homemade Tortilla Chips for the ultimate snack spread.
Why You’ll Love This Seven Layer Dip Recipe
This dip has been a staple at game days, potlucks, and holiday gatherings for decades, and for good reason.
Every single layer adds something meaningful, so you get a different flavor and texture with every chip scoop.
It requires zero cooking, just layering, which means you can put it together quickly even on a busy day.
You can make it ahead of time, which takes the stress out of party prep.
The vibrant layers look stunning in a glass dish, making it as beautiful as it is delicious.
- No cooking required – just mix, layer, and chill
- Ready in 20 minutes – perfect for last-minute gatherings
- Customizable – swap layers to match your preferences or dietary needs
- Make-ahead friendly – assemble hours in advance and refrigerate until serving
- Universally loved – vegetarian-friendly and crowd-approved every single time
For another Mexican-inspired crowd-pleaser, check out this Easy Nachos Recipe.
Ingredients
Each layer in this dip has a specific job. The taco seasoning in the refried beans adds depth, the lime juice in the guacamole keeps it bright and green, and layering the sour cream directly over the guacamole helps seal it from air exposure and slow browning. Use the freshest tomatoes and greenest onions you can find for the best visual impact.
- 1 can (16 oz / 450g) refried beans
- 1 packet (1 oz / 28g) taco seasoning (or 2 tablespoons homemade)
- 3 ripe avocados
- 2 tablespoons (30ml) fresh lime juice (about 1 lime)
- 1/2 teaspoon garlic salt
- 1/4 cup (15g) fresh cilantro, finely chopped
- 1 cup (240ml) sour cream
- 1/2 cup (120ml) thick, chunky salsa (mild, medium, or hot)
- 2 cups (225g) shredded Mexican cheese blend (Cheddar, Monterey Jack, Colby)
- 2 medium Roma tomatoes, diced and seeds removed
- 1 can (2.25 oz / 64g) sliced black olives, drained
- 4 green onions (scallions), thinly sliced
- Salt and black pepper to taste
Make your own taco seasoning from scratch with this Taco Seasoning Recipe for even more flavor control.
Kitchen Equipment Needed
The right equipment makes assembly much cleaner and easier. A clear glass baking dish is highly recommended because it lets guests see all seven beautiful layers from the side. A flat spatula or offset spatula gives you the most control when spreading delicate layers without disturbing the ones below.
- 9×13-inch glass baking dish (or a 7×11-inch dish for a thicker dip)
- 2-3 medium mixing bowls
- Potato masher or fork (for mashing avocados)
- Rubber spatula or offset spatula (for spreading layers evenly)
- Sharp knife and cutting board
- Citrus juicer or fork (for juicing the lime)
- Plastic wrap (for covering and storing)
Read Also: Loaded Nachos Recipe
Recommended Products for This Recipe
These are products worth having for making the best possible seven layer dip, chosen for quality and performance.
1. Pyrex 9×13-Inch Glass Baking Dish
A clear glass dish is essential for showing off those gorgeous layers. Pyrex is durable, non-reactive, and comes with a tight-fitting lid that makes storing leftovers effortless. The see-through sides let your guests admire the layers before digging in.
2. OXO Good Grips Potato Masher
A sturdy masher makes quick work of mashing avocados to the perfect creamy consistency. The OXO model has a comfortable grip and a wide stainless steel head that mashes evenly without turning your guacamole into baby food.
3. Siete Grain-Free Taco Seasoning
This taco seasoning is made with cleaner ingredients and no artificial fillers, delivering a bold, authentic Tex-Mex flavor to your bean layer. It is slightly spicier and more complex than standard packets, and it makes a noticeable difference in the overall taste of the dip.
4. Good Foods Classic Guacamole
On days when you need a shortcut, this refrigerated guacamole uses clean, simple ingredients and tastes remarkably close to homemade. It is a great backup if your avocados are not quite ripe in time for your party.
Another favorite: Easy Guacamole Recipe
Step-by-Step Instructions
Step 1: Season the Refried Beans
- Open the can of refried beans and scoop them into a medium mixing bowl.
- Add the full packet of taco seasoning (about 2 tablespoons / 28g) to the beans.
- Stir vigorously with a spoon or spatula until the seasoning is fully incorporated and the beans are smooth and creamy.
- Taste the beans and adjust seasoning if needed. The beans should taste bold and savory on their own since they are the base of the whole dip.
- Set the bowl aside while you prepare the other layers.
Step 2: Spread the Refried Bean Layer
- Take your 9×13-inch (23x33cm) glass baking dish and set it on a flat surface.
- Spoon all of the seasoned refried beans into the center of the dish.
- Using a rubber or offset spatula, spread the beans in a smooth, even layer across the entire bottom of the dish, reaching all the edges.
- The layer should be about 1/4 inch (6mm) thick and even throughout so every scoop gets the same amount.
- Set the dish aside while you make the guacamole.
Step 3: Make the Guacamole Layer
- Cut the 3 ripe avocados in half lengthwise, remove the pits, and scoop the flesh into a clean medium bowl.
- Add 2 tablespoons (30ml) of fresh lime juice directly over the avocado flesh to prevent browning.
- Add 1/2 teaspoon of garlic salt and the finely chopped cilantro.
- Use a fork or potato masher to mash the mixture to your preferred consistency. Chunky guacamole holds up better in layers, while smooth guacamole spreads more easily. Aim for somewhere in between.
- Taste and adjust with a pinch of salt or extra lime juice as needed. The guacamole should be bright, creamy, and zesty.
Step 4: Spread the Guacamole Layer
- Spoon the guacamole in dollops over the entire bean layer.
- Gently spread it into an even layer using the back of a spoon or offset spatula, working carefully so you do not drag up the bean layer beneath.
- Cover the beans completely, getting into the corners and edges.
- The guacamole layer should be about the same thickness as the bean layer for balanced proportions.
Step 5: Add the Seasoned Sour Cream Layer
- Spoon the 1 cup (240ml) of sour cream into a small bowl and stir it until smooth.
- Spread the sour cream in an even layer directly over the guacamole.
- This step is important: the sour cream acts as a seal over the guacamole, blocking air contact and slowing the browning process significantly.
- Use a gentle spreading motion to avoid mixing the sour cream and guacamole together.
Step 6: Add the Salsa Layer
- Pour the 1/2 cup (120ml) of chunky salsa over the sour cream.
- Spread gently in an even layer. Use a thick, chunky salsa here rather than a thin, watery one. Watery salsa will seep into the other layers and make the dip runny.
- If your salsa has excess liquid, drain it briefly through a fine mesh strainer before adding.
Step 7: Add the Shredded Cheese Layer
- Take the 2 cups (225g) of shredded Mexican cheese blend and sprinkle it evenly over the salsa layer.
- Cover the entire surface of the dip generously, going edge to edge.
- Finely shredded cheese works better here than thickly shredded, as it distributes more evenly and adheres to the layer below without clumping.
Step 8: Add the Fresh Toppings
- Dice the 2 Roma tomatoes into small, even pieces, removing the seeds and excess moisture first. This prevents the tomato liquid from making the dip watery. Scatter them evenly across the top of the cheese layer.
- Open and drain the can of sliced black olives. Spread the olives evenly over the diced tomatoes.
- Slice the 4 green onions thinly and scatter them across the entire top of the dip as the final layer.
- Step back and admire those seven gorgeous layers.
Step 9: Chill and Serve
- Cover the finished dip tightly with plastic wrap, pressing it gently against the surface to minimize air exposure.
- Refrigerate for at least 30 minutes before serving. This gives the flavors time to meld and makes the dip easier to scoop cleanly.
- Serve cold or at room temperature with a big pile of tortilla chips for dipping.
Read Also: Classic Guacamole Recipe
Tips for Success
A few simple techniques separate a good seven layer dip from a truly great one. Draining excess moisture from tomatoes and olives is probably the single most important step since a wet top layer ruins the entire dish. Using thick, chunky salsa instead of watery jarred salsa is equally critical for structural integrity.
- Use ripe avocados – Press gently on the avocado skin; it should yield slightly. An underripe avocado will be bitter and hard to mash smoothly.
- Drain everything well – Drain olives and remove seeds from tomatoes before adding. Excess moisture makes the dip watery and causes layers to blend together.
- Choose thick salsa – Thin, liquidy salsa will seep down into the layers. Chunky restaurant-style salsa or well-drained fresh salsa works best.
- Seal the guacamole layer – The sour cream layer directly over guacamole acts as an air barrier. Spread it all the way to the edges to slow browning.
- Make it ahead strategically – The bean, guacamole, and sour cream layers can be assembled the night before. Add the salsa, cheese, tomatoes, olives, and green onions within a few hours of serving for maximum freshness.
- Use a clear dish – A glass or clear acrylic dish lets guests see all seven layers from the side, which makes for an impressive presentation.
- Serve with sturdy chips – Thin tortilla chips can break under the weight of thick layers. Use sturdy restaurant-style chips for easier scooping.
For another vibrant Mexican salsa to serve alongside, try this Corn Salsa Recipe.
Serving Suggestions
Seven layer dip shines as a centerpiece appetizer surrounded by a variety of dippers and Mexican-inspired sides that complement its bold flavors.
It is perfect for game days, Cinco de Mayo parties, summer cookouts, holiday gatherings, and casual get-togethers of any kind.
- Serve with a generous bowl of crispy Homemade Tortilla Chips for scooping
- Pair with Street Tacos for a full Tex-Mex spread
- Offer alongside Classic Deviled Eggs as part of a party appetizer table
- Serve next to Cheese Ball for a crowd-pleasing dip and spread pairing
- Complement the spread with a side of Mexican Rice if serving as a full meal
- Set out alongside Birria Tacos for a festive, restaurant-quality taco night
Read Also: Pico De Gallo Recipe
Variations to Try
One of the best things about this dip is how easily it adapts to different tastes and dietary preferences. You can swap individual layers, add extra layers, or make substitutions without disrupting the core structure of the dish.
- Add a taco meat layer – Cook and season ground beef or shredded chicken with taco seasoning and layer it between the beans and guacamole for a heartier, protein-packed version.
- Swap black beans for refried beans – Whole, seasoned black beans give the base a different texture and a slightly earthier flavor that many people love.
- Use Greek yogurt instead of sour cream – Plain full-fat Greek yogurt has a similar tangy creaminess and works as a lighter substitute.
- Add a shredded lettuce layer – Some traditional versions include shredded iceberg lettuce between the sour cream and cheese layers for extra crunch.
- Make it spicy – Stir diced jalapeños into the guacamole or refried beans, or use a hot salsa for extra heat throughout.
- Go vegan – Use dairy-free sour cream, vegan shredded cheese, and make sure your refried beans are prepared without lard.
- Individual cups – Assemble the seven layers in individual plastic cups for no-mess, no-double-dipping portions at parties.
For another fun party snack, the Buffalo Chicken Dip Recipe is always a huge hit alongside this classic.
Storage and Reheating
Seven layer dip stores well in the refrigerator and can be enjoyed for several days after making, though the guacamole will gradually darken over time. The taste remains excellent even if the color changes slightly.
- Refrigerator storage – Cover tightly with plastic wrap or transfer to an airtight container. Store for up to 3 to 4 days in the refrigerator.
- Guacamole browning – The guacamole layer will begin to brown after 1 to 2 days due to air exposure. Add a squeeze of fresh lime juice over the guacamole before covering to slow this process. It is still safe to eat, just less visually appealing.
- Do not freeze – The dairy layers (sour cream and cheese) and the guacamole do not freeze well. Freezing will cause them to separate, become watery, and lose their texture entirely.
- Reheating – This dip is designed to be served cold or at room temperature and does not need to be reheated. If you prefer a warm version, you can warm just the bean layer in the microwave before assembling the rest cold.
- Make-ahead tip – Assemble the bottom three layers (beans, guacamole, sour cream) up to 24 hours in advance. Add the salsa, cheese, tomatoes, olives, and green onions within 2 to 4 hours of serving.
For more Tex-Mex inspiration, check out this Enchilada Casserole Recipe.
Nutritional Facts
The values below are estimated per serving based on a recipe that serves 10 people using standard ingredient amounts.
| Nutrient | Per Serving |
|---|---|
| Calories | 280 kcal |
| Total Fat | 18g |
| Saturated Fat | 7g |
| Cholesterol | 30mg |
| Sodium | 620mg |
| Total Carbohydrates | 18g |
| Dietary Fiber | 6g |
| Sugars | 2g |
| Protein | 10g |
| Vitamin A | 15% DV |
| Vitamin C | 12% DV |
| Calcium | 18% DV |
| Iron | 8% DV |
Nutritional values are estimates and will vary based on specific brands and ingredient quantities used.
This dip is naturally gluten-free when made with certified gluten-free taco seasoning. Always check individual product labels if you are preparing it for guests with gluten sensitivity.
Read Also: Easy Salsa Recipe
Health Benefits of Key Ingredients
Despite being a party dip, the core ingredients in seven layer dip are surprisingly nutrient-rich, especially when compared to other popular party snacks.
It delivers healthy fats, fiber, plant-based protein, and a solid range of vitamins from whole, minimally processed ingredients.
- Avocados – Rich in heart-healthy monounsaturated fats, potassium, folate, and vitamins K, C, and B6. The healthy fats also help your body absorb fat-soluble nutrients from the other ingredients.
- Refried beans – An excellent source of plant-based protein, dietary fiber, iron, and folate. The high fiber content supports digestive health and helps you feel full.
- Tomatoes – Packed with lycopene, a powerful antioxidant linked to reduced risk of heart disease and certain cancers. They also provide vitamin C and potassium.
- Green onions (scallions) – Contain quercetin and kaempferol, anti-inflammatory compounds, along with vitamins K, C, and folate.
- Shredded cheese – Delivers calcium, phosphorus, and protein, all of which support bone health and muscle function.
- Sour cream – Provides small amounts of calcium, vitamin A, and probiotics (in full-fat versions), which support gut health.
You might also enjoy this Avocado Toast Recipe for another avocado-forward dish loaded with nutritional goodness.
Frequently Asked Questions
1. Can I make seven layer dip the night before?
Yes, and it is actually a great idea.
Assembling the dip ahead of time gives the flavors time to meld and takes the prep stress off the day of the party. Assemble the bottom three layers (seasoned refried beans, guacamole, and sour cream) the night before and cover tightly with plastic wrap. Add the salsa, cheese, tomatoes, olives, and green onions within a few hours of serving to keep the top layers fresh and colorful.
2. How do I prevent the guacamole from turning brown?
The best way is to seal it off from air as soon as possible.
Spread the sour cream layer directly over the guacamole and press it all the way to the edges of the dish to minimize air contact. Adding extra lime juice to the guacamole also helps significantly. Keep the dish covered with plastic wrap pressed against the surface until serving time.
3. What is the best dish size to use?
A 9×13-inch (23x33cm) baking dish creates thinner, more spreadable layers that are easy to scoop.
A 7×11-inch (18x28cm) dish produces thicker, more dramatic layers and is ideal if you want that impressive visual effect when guests look at the side of the dish. Either size works well; choose based on your preference for layer thickness and how many people you are serving.
4. Can I use homemade refried beans instead of canned?
Absolutely, and homemade refried beans tend to have a richer, more complex flavor.
If you have the time, making your own refried beans from scratch adds a wonderful depth to the base layer. Check out this Refried Beans Recipe for a from-scratch version that works perfectly in this dip.
5. What can I use instead of tortilla chips for dipping?
Tortilla chips are the classic choice, but there are plenty of other great options.
Sturdy pita chips hold up well against the thick layers. Bell pepper strips, cucumber rounds, and celery sticks make great low-carb alternatives. Corn tortilla chips in different flavors like lime or chile also add a nice twist. Avoid thin or delicate chips that tend to break under the weight of the layers.
Read Also: Fresh Salsa Recipe
Final Thoughts
This Seven Layer Dip Recipe is one of those recipes that never gets old.
It is fast, flexible, and always the first thing to go at a party. The combination of creamy, crunchy, tangy, and savory layers stacked in one dish is endlessly satisfying, and the visual impact of those beautiful stripes never fails to impress.
Give it a try at your next gathering and watch it disappear within minutes.
If you make this recipe, drop a comment below and let me know how it turned out! Share your photos, your variations, and your crowd’s reactions. Your feedback makes this little corner of the internet the best place on the web for recipe inspiration.
Recommended:
- Homemade Tortilla Chips Recipe
- Monster Cookie Dough Dip
- The Best Cheese Quesadilla
- Chicken Tortilla Soup Recipe
- Mexican Street Corn Recipe
- Taco Casserole Recipe
- Black Bean Soup Recipe
- Chicken Enchiladas Recipe
- Enchilada Sauce Recipe
- Mexican Chicken Salad Recipe


