
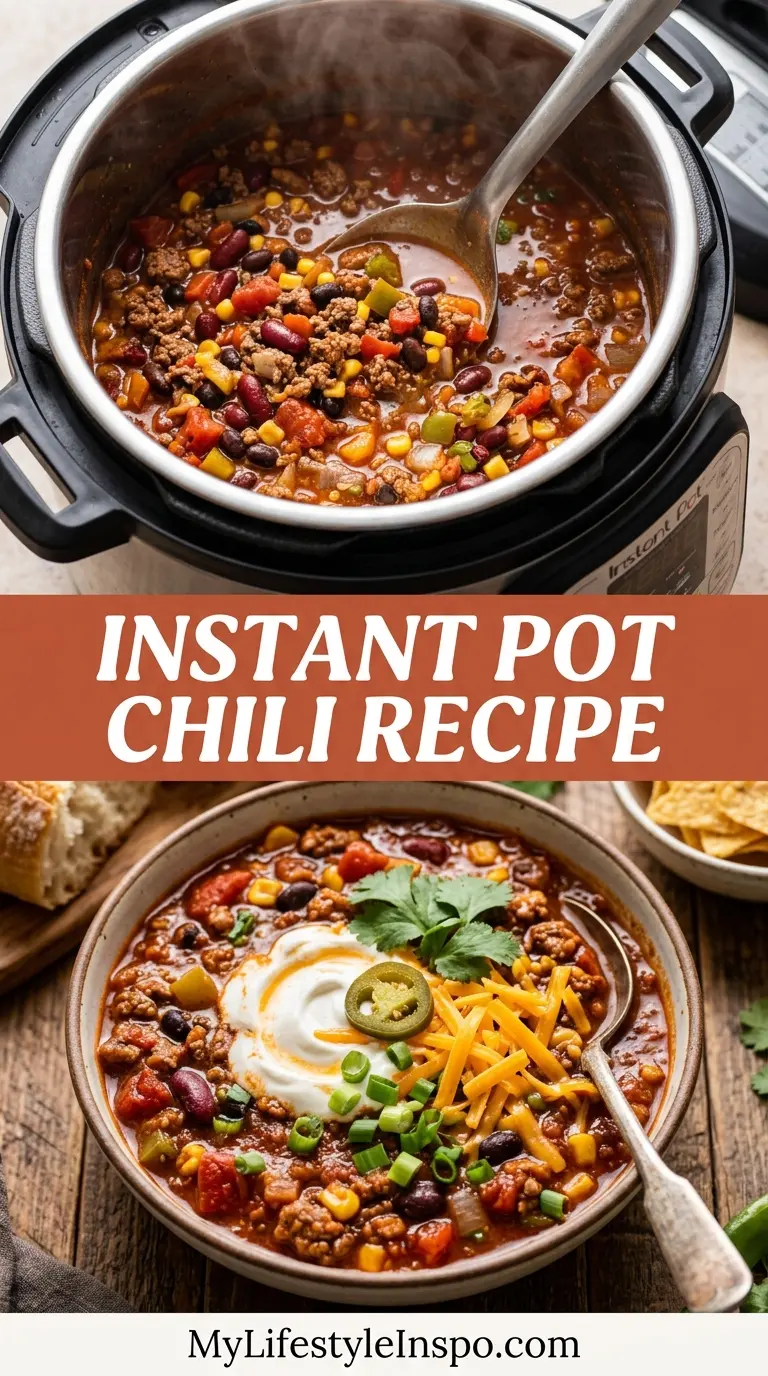
When a craving for a deeply flavored, stick-to-your-ribs bowl of chili hits, the last thing you want is to wait three hours for the stovetop to work its magic. This Instant Pot Chili Recipe solves that problem completely.
Using a pressure cooker, you get that rich, slow-simmered flavor in a fraction of the time. We’re talking ground beef cooked until beautifully browned, two kinds of beans, fire-roasted tomatoes, and a bold spice blend that layers deep, smoky heat in every single spoonful.
The Instant Pot is ideal for chili because the pressurized environment forces all those flavors into the meat and beans quickly. There’s no babysitting a pot, no stirring every 20 minutes. You brown the beef, dump everything in, seal it, and walk away.
This recipe is based on the most classic, widely loved version you’ll find: ground beef, kidney beans, pinto beans, tomato base, aromatics, and a well-rounded spice mix that includes chili powder, cumin, smoked paprika, and a touch of cocoa powder for depth. It’s hearty enough for a crowd, easy enough for a weeknight, and it reheats beautifully for days after.
Let’s get into it.
If you love a traditional chili, be sure to also check out our Classic Chili Recipe for the stovetop version.
Why You’ll Love This Instant Pot Chili Recipe
This chili delivers huge flavor with minimal effort. The pressure cooker does the heavy lifting so you can focus on toppings and sides.
It’s a one-pot meal, which means fewer dishes at the end of the night. That alone is reason enough to love it.
The flavor is genuinely deep and complex despite the short cook time. The combination of fire-roasted tomatoes and cocoa powder creates a richness that makes the chili taste like it simmered for half a day.
It feeds a crowd with ease. This recipe makes about 6 generous servings, and it scales up beautifully in an 8-quart Instant Pot.
It’s also incredibly flexible. You can dial the heat up or down, swap proteins, go meatless, or make it ahead and refrigerate it for the week.
- One pot, minimal cleanup
- Ready in under an hour from start to finish
- Deep, smoky flavor thanks to fire-roasted tomatoes and smoked paprika
- Hearty enough to serve as a complete meal
- Stores and freezes exceptionally well
- Easily customized for spice level, protein, and toppings
You might also enjoy: Slow Cooker Chili Recipe
Ingredients
You’ll need simple, pantry-friendly ingredients for this recipe. The fire-roasted tomatoes and cocoa powder are the two unexpected additions that make a real difference in flavor, so don’t skip them.
- 1 lb (450g) lean ground beef (85% to 90% lean works best)
- 1 tbsp olive oil
- 1 medium yellow onion, diced
- 1 red bell pepper, diced
- 4 cloves garlic, minced
- 2 tbsp tomato paste
- 1 can (14.5 oz / 411g) fire-roasted diced tomatoes, undrained
- 1 can (15 oz / 425g) crushed tomatoes
- 1 cup (240ml) beef broth
- 1 can (15 oz / 425g) kidney beans, drained and rinsed
- 1 can (15 oz / 425g) pinto beans, drained and rinsed
- 2.5 tbsp chili powder
- 1.5 tsp ground cumin
- 1 tsp smoked paprika
- 1 tsp dried oregano
- 1/2 tsp garlic powder
- 1/2 tsp onion powder
- 1 tbsp unsweetened cocoa powder
- 1 tsp brown sugar
- 1 tsp salt, plus more to taste
- 1/2 tsp black pepper
- 1 tbsp Worcestershire sauce
- Optional: 1/4 tsp cayenne pepper for extra heat
For serving (optional toppings):
- Shredded cheddar cheese
- Sour cream
- Sliced green onions
- Diced avocado or guacamole
- Tortilla chips or strips
- Fresh cilantro
- Lime wedges
Read Also: Taco Seasoning Recipe
Kitchen Equipment Needed
You don’t need a lot of gear for this recipe. The Instant Pot does most of the work, but a few additional tools will make the process smoother.
- 6-quart Instant Pot (or 8-quart for a double batch)
- Wooden spoon or heat-safe silicone spatula (for breaking up the beef and scraping the bottom)
- Sharp chef’s knife and cutting board
- Can opener
- Measuring spoons and measuring cups
- Ladle for serving
- Large mixing bowl (optional, for draining grease)
Read Also: Vegetarian Chili Recipe
Recommended Products for This Recipe
These are products I genuinely recommend based on quality and how much they improve the cooking experience for this particular recipe.
1. Instant Pot Duo 6-Quart Pressure Cooker
The standard 6-quart Duo is the most popular Instant Pot model for a reason. It has a dedicated Chili/Bean setting that takes all the guesswork out of pressure cooking, and the stainless steel inner pot makes cleanup easy. For chili specifically, the saute function and pressure cooking happen in the same pot, meaning no extra dishes.
2. Fire-Roasted Diced Tomatoes
Muir Glen Organic Fire-Roasted Diced Tomatoes are a step above standard canned tomatoes. The roasting process adds a subtle smokiness that enhances the chili’s depth without any extra effort. You’ll taste the difference immediately.
3. High-Quality Chili Powder Blend
A fresh, high-quality chili powder makes a huge difference in the final flavor. Pre-ground spices from discount brands can go stale quickly. Investing in a good chili powder blend with complex flavor pays off in every bowl.
4. Silicone Ladle Set
A good silicone ladle is essential for serving chili without scratching the Instant Pot insert. This set is heat-resistant, easy to clean, and works perfectly for scooping thick, chunky chili into bowls.
Another Instant Pot favorite to try next: Instant Pot Mac and Cheese Recipe
Step-by-Step Instructions
Step 1: Prep Your Ingredients
- Dice the onion into small, even pieces about 1/4 inch in size so they soften evenly during sauteing.
- Dice the red bell pepper to roughly the same size as the onion for uniform cooking.
- Mince the garlic cloves finely, or use a garlic press if you prefer.
- Drain and rinse the kidney beans and pinto beans in a colander under cold water. This removes excess starch and sodium from the canning liquid.
- Open all canned tomatoes and have the beef broth, tomato paste, and spices measured out and ready to go. Cooking moves quickly once the saute function starts.
Step 2: Brown the Ground Beef
- Turn the Instant Pot to the Saute function and select More (or High) for higher heat.
- Once the display reads HOT, add 1 tablespoon of olive oil and let it heat for about 30 seconds.
- Add the ground beef and break it up immediately with a wooden spoon or spatula.
- Cook the beef for 4 to 5 minutes, continuing to break it into small crumbles, until it is mostly browned with no large pink sections remaining.
- If there is excess grease in the pot (more than 1 to 2 tablespoons), carefully tilt the pot or use a spoon to remove the excess before proceeding. For 90% lean ground beef, this usually isn’t necessary.
Step 3: Saute the Aromatics
- With the Instant Pot still on Saute mode, add the diced onion and diced red bell pepper directly to the pot with the browned beef.
- Stir everything together and cook for 3 to 4 minutes, until the onion becomes translucent and the bell pepper has softened slightly.
- Add the minced garlic and cook for 1 more minute, stirring constantly to prevent the garlic from burning on the bottom of the pot.
- Add the tomato paste and stir it into the beef and vegetable mixture. Cook for 1 minute. This step caramelizes the tomato paste slightly, adding extra richness to the chili.
Step 4: Add the Liquid First (Critical Step to Prevent the Burn Notice)
- Pour in the 1 cup (240ml) of beef broth first and use your wooden spoon or spatula to scrape up any browned bits stuck to the bottom of the pot. This step is essential. If there are browned bits left on the bottom when pressure builds, the Instant Pot will trigger a burn notice.
- Stir the Worcestershire sauce into the broth as well.
- Once the bottom of the pot is clean, you are ready to add the remaining ingredients.
Step 5: Add the Remaining Ingredients
- Pour in the fire-roasted diced tomatoes (with their juices) and the crushed tomatoes.
- Add the drained kidney beans and pinto beans.
- Sprinkle the chili powder, ground cumin, smoked paprika, dried oregano, garlic powder, onion powder, cocoa powder, brown sugar, salt, and black pepper over the top.
- If using cayenne pepper, add it now.
- Stir gently to distribute the spices throughout the chili. Do not stir vigorously to avoid unsettling the bottom layer that you just cleaned.
Step 6: Pressure Cook
- Place the lid on the Instant Pot and ensure the pressure release valve is set to Sealing.
- Cancel the Saute function, then press Chili/Bean (or Manual/Pressure Cook on High) and set the time to 20 minutes at high pressure.
- The Instant Pot will take about 10 to 15 minutes to come to full pressure before the 20-minute countdown begins. This is completely normal.
Step 7: Release Pressure and Finish
- Once the 20-minute cook time is complete, allow the Instant Pot to do a natural pressure release for 10 minutes. This means leaving the pot alone after the beep. The pressure will naturally decrease.
- After 10 minutes, carefully switch the pressure release valve to Venting to release any remaining pressure. Use a long spoon or tongs to do this to avoid the steam on your hand.
- Once all pressure is released and the float valve has dropped, carefully remove the lid.
- Stir the chili and taste it. Adjust salt, chili powder, or cayenne as needed.
- Let the chili sit for 5 minutes on Keep Warm before serving. It will thicken slightly as it sits.
Read Also: Texas Chili Recipe
Tips for Success
A few key practices will take this chili from good to genuinely outstanding every single time.
- Deglaze thoroughly. Scraping the bottom of the pot after adding the broth is the single most important step to prevent the burn notice. Do not skip this.
- Add your liquid before your solids. After deglazing, always add liquid first and solid or thick ingredients (like beans and tomatoes) on top. This keeps the bottom of the pot clean as pressure builds.
- Use fire-roasted tomatoes over regular. The smokiness in fire-roasted tomatoes adds a layer of complexity that regular diced tomatoes can’t match.
- Don’t skip the cocoa powder. It sounds unusual, but 1 tablespoon of unsweetened cocoa deepens the color and adds a subtle richness that makes the chili taste slow-cooked.
- Taste before serving. Pressure cooking can mellow spices slightly. Taste your chili after opening the lid and add more salt or chili powder if needed.
- Let it rest. Even 5 minutes of resting time allows the chili to thicken and the flavors to settle beautifully.
Another cozy bowl recipe to try: Crockpot Taco Soup Recipe
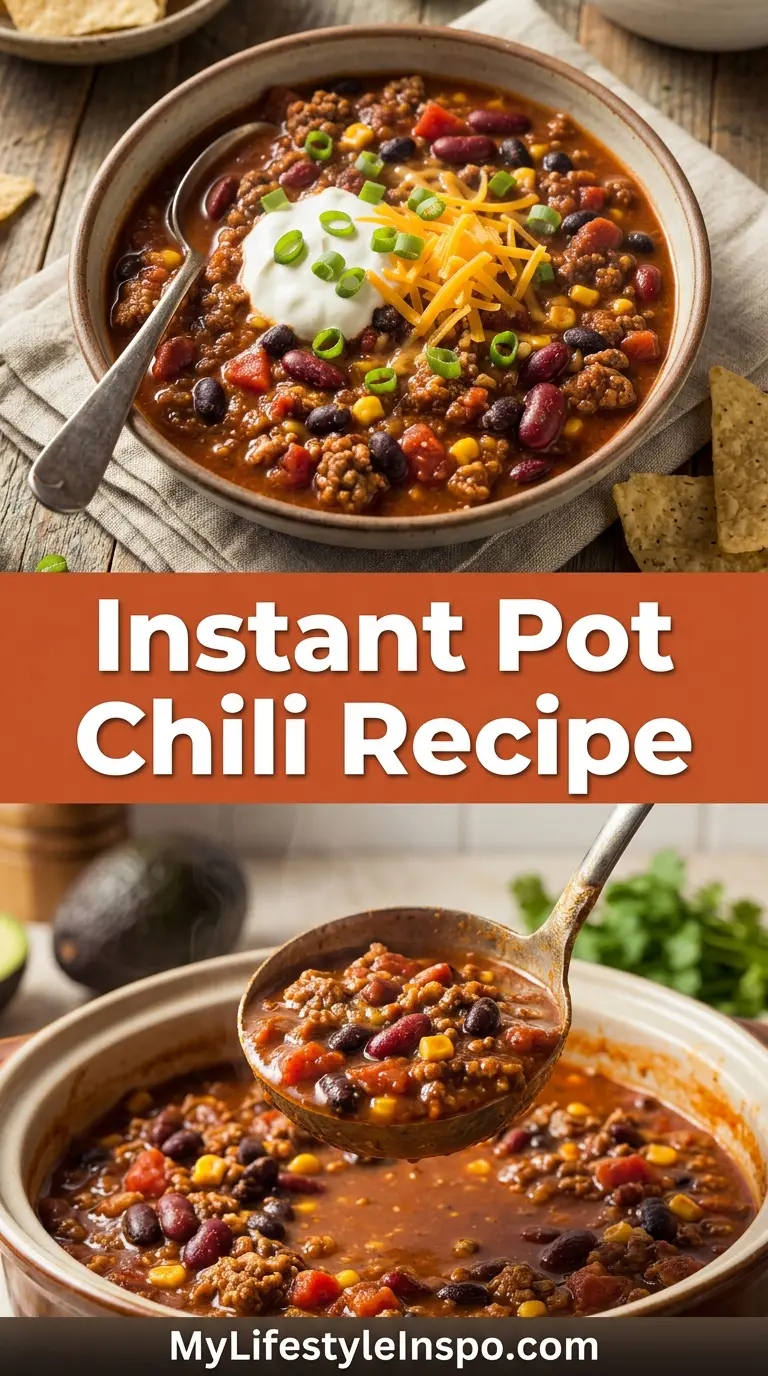
Serving Suggestions
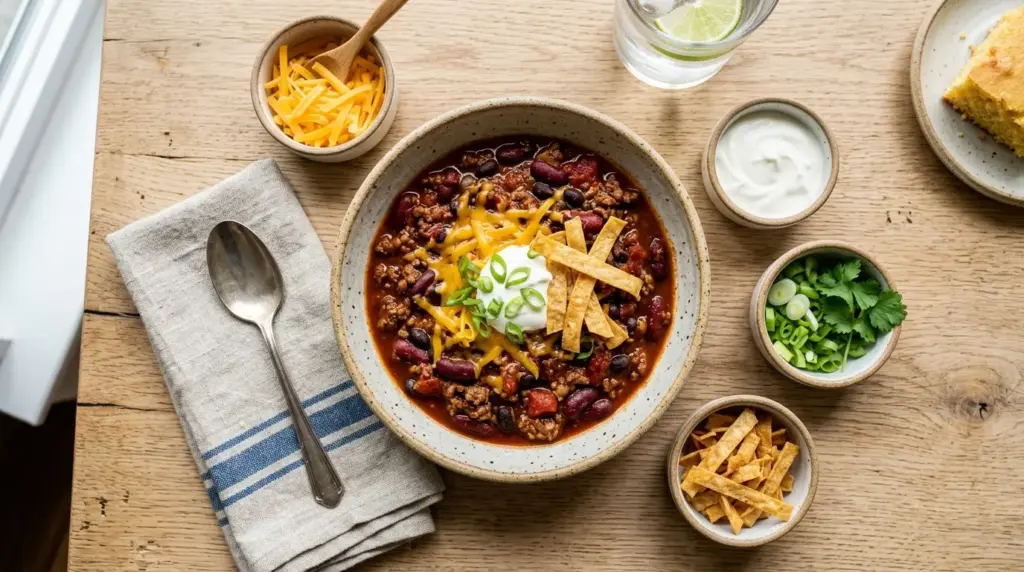
A bowl of Instant Pot Chili is fantastic on its own, but pairing it with the right sides and toppings takes the whole meal to another level.
Classic toppings like shredded cheddar, sour cream, sliced green onions, and a squeeze of lime brighten and balance the richness of the chili. Diced avocado or guacamole adds creamy contrast.
For sides, you really can’t go wrong with a warm, golden piece of cornbread. Crusty bread, dinner rolls, or homemade tortilla chips also work beautifully for scooping.
- Sweet Cornbread or Skillet Cornbread baked fresh to serve alongside
- Cilantro Lime Rice for a burrito-bowl-style presentation
- Homemade Tortilla Chips for scooping
- Baked Beans as a hearty side dish
- A simple green salad with avocado and lime dressing to balance the richness
- Cold sour cream, shredded sharp cheddar, and pickled jalapeños as topping options
Creamy Coleslaw also makes a surprisingly refreshing side alongside a bowl of bold, spicy chili.
Variations to Try
This base recipe is endlessly adaptable. Once you have the technique down, it’s easy to make it your own.
- Turkey Chili: Swap the ground beef for ground turkey for a leaner version. Check out our full Turkey Chili Recipe for tips specific to that swap.
- Vegan Chili: Skip the meat entirely and double the beans, or add diced sweet potato and extra bell peppers. Our Vegan Chili Recipe covers this fully.
- White Chicken Chili: Use shredded chicken, white beans, green chiles, and cumin for a completely different flavor profile.
- Spicy Chili: Double the cayenne pepper and add a diced fresh jalapeño with the aromatics.
- No-Bean Chili: Omit the beans and add an extra pound of ground beef for a Texas-style chili.
- Smoky Chipotle Chili: Add 1 to 2 chipotles in adobo sauce, minced, along with a teaspoon of the adobo sauce for incredible smoky heat.
- Three-Bean Chili: Add a can of black beans along with the kidney and pinto beans for even more protein and heartiness.
You might also enjoy: White Chicken Chili Recipe
Storage and Reheating
This chili stores beautifully and may honestly taste even better the next day as the flavors continue to develop overnight.
- Refrigerator: Store cooled chili in an airtight container for up to 5 days. Let it come to room temperature before refrigerating.
- Freezer: Transfer to freezer-safe containers or zip-lock bags (lay flat for efficient storage) and freeze for up to 3 months. Leave a little space in the container for expansion.
- Reheating from the fridge: Warm on the stovetop over medium heat, stirring occasionally. Add a splash of beef broth or water if the chili has thickened too much. Alternatively, microwave in 60-second intervals, stirring between each.
- Reheating from frozen: Thaw overnight in the refrigerator, then reheat as above. For a quicker option, place the frozen container in a bowl of cold water for 30 to 60 minutes to loosen, then reheat on the stovetop.
- Meal prep tip: This chili is ideal for batch cooking. Make a double batch on Sunday and use it throughout the week in burritos, over baked potatoes, or as a topping for nachos.
Chicken Chili Recipe is another great make-ahead option for your weekly meal prep rotation.
Nutritional Facts
The following values are approximate and based on one serving (approximately 1.5 cups or 360g) of chili without toppings. This recipe yields 6 servings.
| Nutrient | Amount per Serving |
|---|---|
| Calories | 360 kcal |
| Total Fat | 12g |
| Saturated Fat | 4g |
| Cholesterol | 55mg |
| Sodium | 820mg |
| Total Carbohydrates | 38g |
| Dietary Fiber | 13g |
| Sugar | 8g |
| Protein | 28g |
| Iron | 6mg |
| Potassium | 1,100mg |
Nutritional values are estimates and will vary based on specific brands and ingredients used.
Read Also: Wendy’s Chili Recipe
Health Benefits of Key Ingredients
This chili isn’t just delicious. It’s genuinely nutritious, built on a foundation of ingredients that support energy, gut health, and long-term wellness.
The combination of lean ground beef, legumes, and vegetables means every bowl delivers serious protein alongside fiber, vitamins, and minerals.
- Kidney beans and pinto beans are outstanding sources of plant-based protein and soluble fiber. Soluble fiber supports healthy cholesterol levels and keeps you feeling full longer.
- Ground beef (lean) provides complete protein, iron, zinc, and B12. Iron from red meat is highly bioavailable, meaning the body absorbs it more efficiently than iron from plant sources.
- Bell pepper is surprisingly high in vitamin C, which helps the body absorb the non-heme iron in the beans. It also adds antioxidants that support immune health.
- Garlic contains allicin, a sulfur compound with natural antibacterial and anti-inflammatory properties. Regular garlic consumption is associated with heart health benefits.
- Tomatoes (both fire-roasted and crushed) are rich in lycopene, a powerful antioxidant linked to reduced inflammation and improved cardiovascular health. Cooking tomatoes actually increases lycopene bioavailability.
- Cumin and chili powder contain antioxidants and have been studied for anti-inflammatory effects. Cumin specifically supports digestion and metabolism.
- Cocoa powder (unsweetened) adds flavanols, plant compounds associated with heart health and cognitive function.
Vegan Chili Recipe is an excellent option if you want a plant-based version that’s equally high in fiber and nutrients.
Frequently Asked Questions
1. Can I use frozen ground beef in the Instant Pot?
You can, but the results won’t be as good. Browning and breaking up frozen beef is difficult, and you’ll miss the fond (the browned bits at the bottom) that adds flavor. It’s best to thaw ground beef fully before making this recipe. If you’re in a pinch, you can add frozen ground beef and pressure cook it first for 10 minutes, then open the pot, break it up, switch to saute to brown it, and then proceed with the recipe.
2. Why did I get a burn notice on my Instant Pot?
The burn notice almost always comes from food stuck to the bottom of the pot before pressure builds. The most common causes are not deglazing after browning the beef, or tomato paste being left in contact with the hot bottom. Always add broth and scrape the bottom thoroughly before adding the remaining ingredients.
3. How can I thicken the chili if it’s too thin?
After opening the lid, switch to the Saute function on Low and cook the chili uncovered for 5 to 10 minutes, stirring occasionally. This will reduce the liquid and thicken the chili naturally. Alternatively, mix 1 tablespoon of cornstarch with 2 tablespoons of cold water to form a slurry, stir it into the chili, and use the Saute function for a few minutes until it thickens.
4. Can I make this recipe in a slow cooker instead?
Absolutely. Brown the beef and saute the aromatics on the stovetop first, then transfer everything to a slow cooker. Cook on Low for 6 to 8 hours or High for 3 to 4 hours. The flavor will be slightly different but equally delicious.
5. Can I double this recipe in my 6-quart Instant Pot?
It’s not recommended to double in a 6-quart because filling the pot beyond the two-thirds line can interfere with pressure cooking and increase the risk of a burn notice. For a double batch, use an 8-quart Instant Pot instead.
White Chili Recipe is a great change of pace if you’re looking to switch things up after mastering this classic version.

Instant Pot Chili
Equipment
- 6-quart Instant Pot or larger - Stainless steel inner pot recommended; 8-quart for double batches
- Wooden spoon or silicone spatula - Heat-safe for sautéing and deglazing
- Chef’s knife
- Cutting board
- Can opener
- Measuring spoons and cups
- Ladle - Silicone recommended to avoid scratching insert
- Colander - For rinsing beans
- Garlic press - Optional but convenient
- Large mixing bowl - Optional, for draining grease
Ingredients
- 1 lb lean ground beef - 450g, 85-90% lean
- 1 tbsp olive oil - 15ml
- 1 medium yellow onion - about 1 cup or 150g, diced
- 1 red bell pepper - about 1 cup or 150g, diced
- 4 cloves garlic - minced
- 2 tbsp tomato paste - 30ml
- 1 can fire-roasted diced tomatoes - 14.5oz / 411g, undrained
- 1 can crushed tomatoes - 15oz / 425g
- 1 cup beef broth - 240ml
- 1 can kidney beans - 15oz / 425g, drained and rinsed
- 1 can pinto beans - 15oz / 425g, drained and rinsed
- 1 tbsp Worcestershire sauce - 15ml
Spice Blend
- 2.5 tbsp chili powder - 37.5ml
- 1.5 tsp ground cumin - 7.5ml
- 1 tsp smoked paprika - 5ml
- 1 tsp dried oregano - 5ml
- 0.5 tsp garlic powder - 2.5ml
- 0.5 tsp onion powder - 2.5ml
- 1 tbsp unsweetened cocoa powder - 15ml
- 1 tsp brown sugar - 5ml
- 1 tsp salt - 5ml, plus more to taste
- 0.5 tsp black pepper - 2.5ml
- 0.25 tsp cayenne pepper - 1.25ml, optional for extra heat
For Serving
- Shredded cheddar cheese - to taste
- Sour cream - to taste
- Green onions - sliced
- Avocado - diced or guacamole
- Tortilla chips - or strips
- Fresh cilantro - chopped
- Lime wedges - for squeezing
Instructions
- Prep all ingredients: dice onion and bell pepper, mince garlic, drain and rinse beans, measure spices and liquids.
- Set Instant Pot to Sauté mode on High. Add olive oil and ground beef. Cook 4-5 minutes, breaking into crumbles, until browned. Drain excess grease if needed.
- Add onion and bell pepper to pot. Sauté 3-4 minutes until onion is translucent. Add garlic and cook 1 minute more, stirring constantly. Stir in tomato paste and cook 1 minute to caramelize.
- Pour in beef broth and Worcestershire sauce. Scrape the bottom of the pot thoroughly with a wooden spoon to deglaze and prevent burn notice.
- Add fire-roasted diced tomatoes, crushed tomatoes, kidney beans, pinto beans, and all spices including chili powder, cumin, smoked paprika, oregano, garlic powder, onion powder, cocoa powder, brown sugar, salt, pepper, and cayenne if using. Gently stir to combine without disturbing bottom layer.
- Secure lid and set valve to Sealing. Cancel Sauté, press Chili/Bean or Manual/Pressure Cook on High, and set timer for 20 minutes. Allow 10-15 minutes for pressure to build.
- After cooking, allow natural pressure release for 10 minutes. Then carefully quick-release remaining pressure by turning valve to Venting. Remove lid once float valve drops.
- Stir chili and season to taste with additional salt or chili powder. Let rest on Keep Warm for 5 minutes to thicken before serving with your favorite toppings.
Notes
- Deglaze thoroughly: Scraping the bottom of the pot after adding broth is critical to prevent the burn notice. Use a wooden spoon to get all browned bits off the bottom before pressure cooking.
- Liquid first: Always add liquid before solids. The broth deglazes the pot, then add tomatoes and beans on top to keep the bottom clean as pressure builds.
- Fire-roasted tomatoes: Their smoky flavor is essential for depth. Regular diced tomatoes work in a pinch but won’t deliver the same complexity.
- Don’t skip cocoa powder: Just 1 tablespoon of unsweetened cocoa deepens the color and adds subtle richness that mimics slow-simmered chili.
- Adjust heat: Start with 1/4 teaspoon cayenne for mild heat, or double it plus add a diced jalapeño with the aromatics for serious spice.
- Make it ahead: Chili tastes even better the next day as flavors meld. Stores in the refrigerator for up to 5 days and freezes well for 3 months.
- Thicken if needed: For thicker chili, switch to Sauté on Low and cook uncovered 5-10 minutes. Or make a cornstarch slurry (1 tbsp cornstarch + 2 tbsp cold water) and stir in.
- Meat variations: Substitute ground turkey for a leaner option, or skip meat entirely and double the beans with extra veggies for a vegan version.
- Slow cooker option: Brown beef and sauté aromatics on the stovetop, then transfer everything to a slow cooker. Cook on Low 6-8 hours or High 3-4 hours.
- Meal prep: This chili is ideal for batch cooking. Use leftovers in burritos, over baked potatoes, or as a topping for loaded nachos.
Final Thoughts
This Instant Pot Chili Recipe is one of those dishes that earns a permanent spot in your weeknight rotation. It’s fast, satisfying, bold in flavor, and practically effortless once you’ve made it once.
The pressure cooker truly delivers on its promise here. What normally takes two to three hours of stovetop simmering comes together in well under an hour, without any compromise on depth or richness.
Give this recipe a try the next time a chili craving hits. I’d love to hear how it turned out for you. Drop a comment below, share your favorite topping combinations, or tag us if you make it!
Recommended:
- Classic Chili Recipe
- Texas Chili Recipe
- Chicken Chili Recipe
- Turkey Chili Recipe
- White Chicken Chili Recipe
- Hamburger Soup Recipe
- Easy Taco Soup Recipe
- Seven Layer Dip Recipe
- Skillet Cornbread Recipe
- Black Bean Soup Recipe


