If you’ve been searching for a dessert that combines two of the most beloved treats on the planet, this churro cheesecake recipe is exactly what you need. It brings together the warm, cinnamon-sugar crunch of a classic churro and the cool, tangy creaminess of cheesecake, all layered together in one simple, baked bar that disappears from the pan every single time.
What makes this recipe so special is that it skips all the intimidating steps of traditional cheesecake. No water bath. No springform pan. No hours of anxious watching through the oven window.
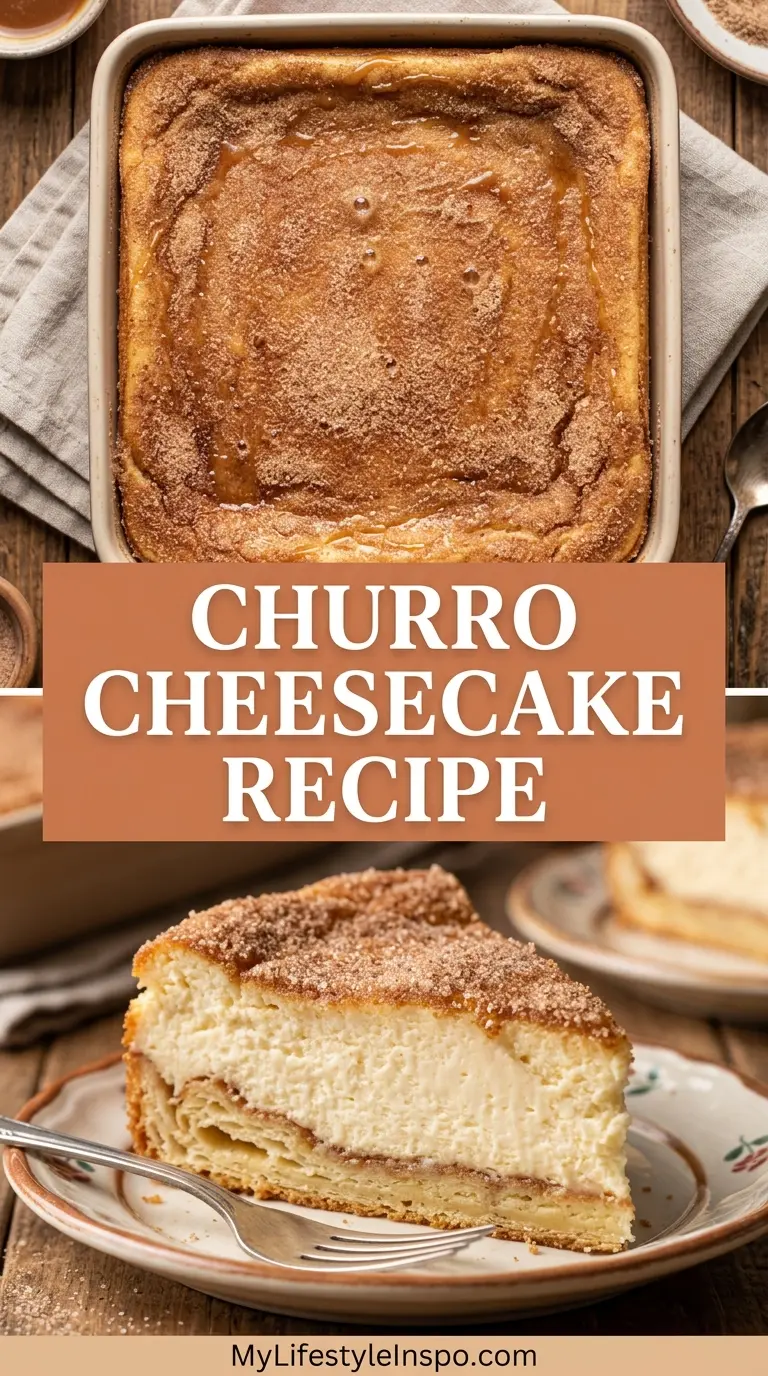
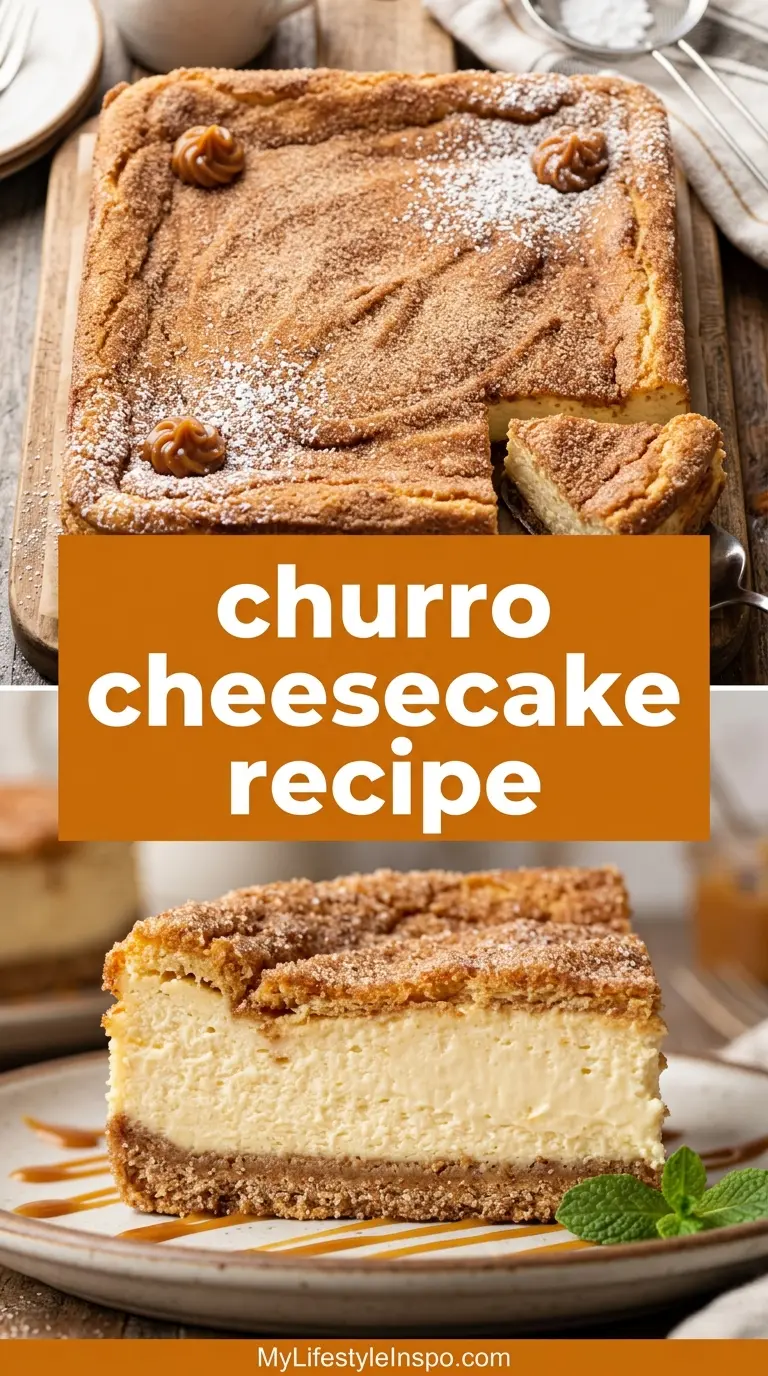
Instead, you get a flaky, buttery crescent roll dough on the top and bottom, hugging a silky-smooth cream cheese filling that bakes up perfectly every time. The cinnamon sugar gets sprinkled generously on both the bottom of the pan and over the top crust, so every single bite has that warm, caramelized churro flavor you’re craving.
It uses just 7 basic ingredients and comes together in under an hour, which makes it ideal for holidays, potlucks, Cinco de Mayo celebrations, or honestly any weeknight when you want something special.
The crescent dough is a brilliant shortcut here. It mimics the light, slightly crispy exterior of a fried churro without any of the deep-frying mess. Once baked, it puffs up slightly and turns golden, creating a satisfying crunch that pairs beautifully with the creamy filling beneath.
You might also love making Homemade Churros if you want to serve the classic version alongside these bars at a party.
Why You’ll Love This Churro Cheesecake Recipe
This recipe has something for everyone, from beginner bakers to seasoned dessert makers who just want something quick without sacrificing flavor.
Here’s why it keeps showing up on dessert tables everywhere:
- Only 7 ingredients and most of them are pantry staples
- Ready in about 45 minutes from start to finish, including prep
- No special equipment needed beyond a 9×13 inch baking pan and a hand mixer
- Feeds a crowd easily, making it perfect for parties and gatherings
- Crispy, flaky, creamy, and cinnamon-spiced all at once, which is truly unbeatable
- Customizable with optional toppings like caramel drizzle, dulce de leche, or fresh fruit
- Kid-friendly and adult-approved because who doesn’t love cinnamon and cheesecake?
The bars also refrigerate beautifully, which means you can make them a day ahead and just pull them out when guests arrive.
Another favorite for a crowd: Easy Churro Recipe
Ingredients
These churro cheesecake bars use minimal, accessible ingredients that you can find at any grocery store. The key is using full-fat, block-style cream cheese for the richest, smoothest filling. Tub cream cheese contains more moisture and will give you a looser filling that doesn’t set up as well.
- 2 cans (8 oz / 226g each) refrigerated crescent roll dough sheets (or regular crescent rolls with seams pressed together)
- 16 oz (453g) full-fat block cream cheese, softened to room temperature
- 1 cup (200g) granulated sugar, divided (¾ cup for filling, ¼ cup for cinnamon sugar)
- 1 large egg, at room temperature
- 2 teaspoons pure vanilla extract
- 2 tablespoons ground cinnamon
- 4 tablespoons (57g) unsalted butter, melted
For the cinnamon sugar topping:
- ¼ cup (50g) granulated sugar (from the total above)
- 2 tablespoons ground cinnamon (from the total above)
Read Also: Blueberry Cheesecake Recipe
Kitchen Equipment Needed
You don’t need anything fancy to pull this recipe off. Most of these items are already in a standard home kitchen.
- 9×13 inch (23×33 cm) baking pan
- Hand mixer or stand mixer for beating the cream cheese filling smooth
- Large mixing bowl
- Small mixing bowl for the cinnamon sugar
- Non-stick cooking spray or butter for greasing the pan
- Parchment paper (optional, but helpful for lifting bars out cleanly)
- Rubber spatula for spreading the filling
- Sharp knife for slicing bars
Read Also: Oreo Cheesecake Recipe
Recommended Products for This Recipe
These are products I recommend based on their quality and how much they can improve your results with this recipe.
1. Pillsbury Crescent Roll Dough Sheets
Crescent roll sheets (rather than the perforated triangle rolls) are the easiest to use here because they don’t have seams to press together. They lay flat and even, giving you a more uniform crust that bakes up golden all the way across. They also tend to hold the filling better at the edges.
2. KitchenAid Hand Mixer
A powerful hand mixer makes the cream cheese filling silky smooth without any lumps. Cold or partially softened cream cheese can seize up, and a good mixer will work through it easily to give you that perfectly creamy texture. It’s a kitchen staple that you’ll reach for again and again.
3. USA Pan Nonstick 9×13 Baking Pan
Even baking is everything with this recipe, and a quality aluminized steel pan delivers consistent heat distribution so the bottom crust bakes through without burning. The nonstick coating makes cleanup effortless, even with the caramelized cinnamon sugar on the bottom.
4. Nielsen-Massey Pure Vanilla Extract
Vanilla plays a more important role in a cheesecake filling than most people realize. High-quality pure vanilla extract adds a depth and warmth to the cream cheese mixture that imitation vanilla simply can’t match. It rounds out the cinnamon flavor and makes the filling taste bakery-quality.
5. Dulce de Leche (for serving)
A drizzle of dulce de leche over the finished bars takes this dessert to a whole new level. Its rich, caramelized sweetness pairs perfectly with the cinnamon and tangy cream cheese. Keep a can on hand for serving and watch how quickly the bars disappear.
You might also enjoy: Lemon Cheesecake Recipe
Step-by-Step Instructions
Step 1: Preheat the Oven and Prepare Your Pan
- Preheat your oven to 350°F (175°C) and position the rack in the center of the oven. This ensures even heat distribution so the bottom crust bakes through without the top over-browning.
- Spray your 9×13 inch (23×33 cm) baking pan generously with non-stick cooking spray, making sure to coat the sides as well.
- If you want to lift the bars out cleanly after baking, lay a strip of parchment paper across the pan lengthwise, leaving some overhang on both long sides to act as handles.
Step 2: Mix the Cinnamon Sugar
- In a small bowl, combine ¼ cup (50g) of granulated sugar with 2 tablespoons of ground cinnamon. Stir together thoroughly until the cinnamon is evenly distributed through the sugar with no clumps.
- Sprinkle 1 to 2 tablespoons of this cinnamon sugar mixture evenly across the bottom of your greased baking pan. This creates a lightly caramelized, flavorful base under the bottom crust.
- Set the remaining cinnamon sugar aside for the top.
Step 3: Prepare the Bottom Crust
- Open the first can of crescent roll dough and carefully unroll it onto a clean work surface.
- If you’re using regular crescent rolls (with perforations), press all the seams firmly together with your fingers to form one solid, seamless rectangular sheet. If you’re using crescent roll dough sheets, they’re already seamless and ready to use.
- Gently lift the flattened dough and lay it into the bottom of the prepared pan. Press it out to the edges so it covers the entire base of the pan evenly.
- If the dough tears, just press it back together with your fingertips. It doesn’t need to be perfect.
Step 4: Make the Cream Cheese Filling
- Place 16 oz (453g) of softened block cream cheese into a large mixing bowl. It’s important that the cream cheese is truly at room temperature, which means leaving it out for at least 30 to 60 minutes before you start. Cold cream cheese will leave lumps in the filling that won’t smooth out.
- Using your hand mixer or stand mixer, beat the cream cheese on medium speed for about 1 to 2 minutes until it’s completely smooth and fluffy with no lumps at all.
- Add ¾ cup (150g) of granulated sugar, 1 large room-temperature egg, and 2 teaspoons of pure vanilla extract to the beaten cream cheese.
- Continue beating on medium speed for another 1 to 2 minutes, scraping down the sides of the bowl with a rubber spatula as needed, until the mixture is completely smooth, creamy, and uniform with no streaks.
Step 5: Spread the Filling
- Pour the cream cheese mixture over the bottom layer of crescent roll dough in the pan.
- Using your rubber spatula, gently spread it into an even layer all the way to the edges. Take your time here, as an even layer of filling ensures every bar has the same creamy-to-crust ratio.
- Avoid pressing down too hard on the crescent dough beneath while spreading.
Step 6: Add the Top Crust
- Open the second can of crescent roll dough and unroll it on your work surface, pressing the seams together just like you did with the first can.
- Carefully lift the dough and lay it directly on top of the cream cheese filling, pressing it gently to the edges. It’s okay if it doesn’t line up perfectly. Just do your best to cover the filling as completely as possible.
- If the dough is slightly too large, you can trim the edges with a knife or tuck them under at the sides.
Step 7: Add the Butter and Cinnamon Sugar Topping
- Pour the 4 tablespoons (57g) of melted unsalted butter evenly over the top layer of crescent dough.
- Use your spatula or a pastry brush to spread the melted butter all the way to the edges so the entire top surface is coated.
- Sprinkle the remaining cinnamon sugar mixture generously and evenly over the buttered top crust. Don’t skimp here, as this is what creates that signature churro crust on top.
Step 8: Bake Until Golden
- Slide the pan into the center of the preheated oven and bake for 30 to 35 minutes, until the top crust is deep golden brown and the cinnamon sugar has slightly caramelized.
- You’ll notice the filling may bubble up around the edges during baking. This is completely normal and the filling will settle back down as the bars cool.
- To test for doneness, gently shake the pan. The center should have just a very slight jiggle and should not look liquid. If it still looks very liquid, give it another 3 to 5 minutes.
Step 9: Cool and Refrigerate
- Remove the pan from the oven and place it on a wire cooling rack. Allow the bars to cool at room temperature for at least 30 minutes.
- Once cooled to room temperature, cover the pan with plastic wrap or foil and transfer it to the refrigerator. Chill for at least 2 hours before cutting, though overnight is even better.
- Refrigerating the bars allows the filling to firm up fully, making them much easier to slice cleanly and giving you that distinct, defined layering.
Step 10: Slice and Serve
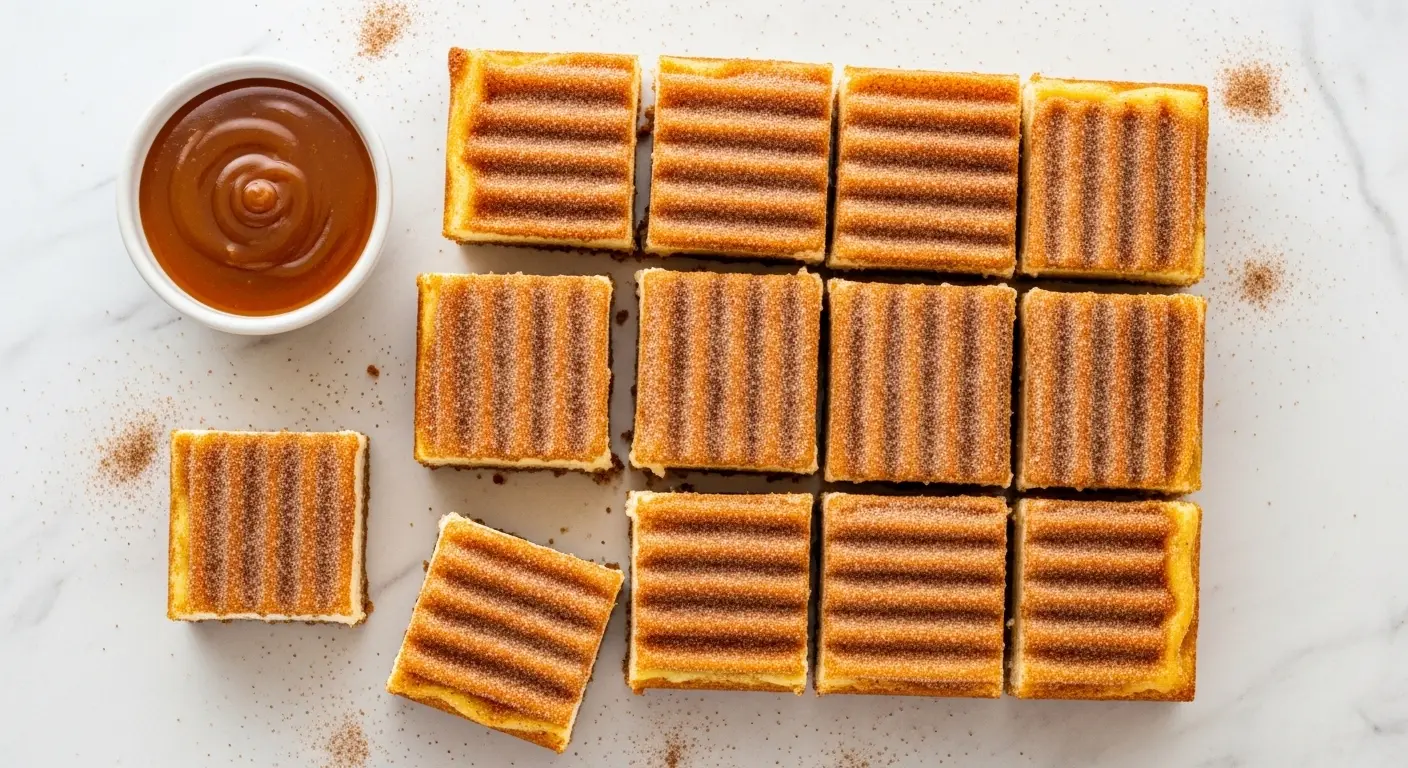
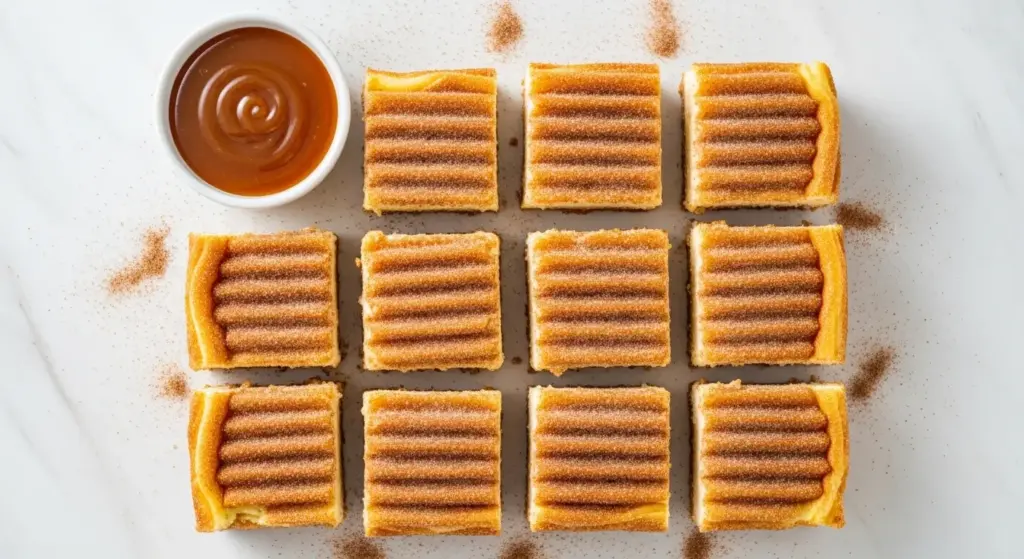
- Once chilled, use a sharp knife to cut the churro cheesecake into bars or squares. A 4×6 grid will give you 24 standard-sized pieces.
- If you lined the pan with parchment paper, lift the entire slab out using the overhang and transfer it to a cutting board for cleaner, easier slicing.
- Wipe the knife clean between cuts for the neatest edges.
- Serve as is, or drizzle with caramel sauce, dulce de leche, or top with a dollop of whipped cream for extra indulgence.
For another fun dessert bar idea, this Cannoli Poke Cake Recipe uses a similar layer-and-bake approach.
Tips for Success
A few small adjustments can make the difference between good bars and absolutely perfect ones.
- Soften your cream cheese fully. This is the number one tip. Even slightly cold cream cheese will leave small lumps in your filling that won’t bake out. Set it on the counter at least 1 hour before you begin.
- Press those seams tightly. If you’re using perforated crescent rolls rather than the sheet version, take extra time to press every seam firmly. Any gaps will allow filling to seep through, which affects the texture of your crust.
- Don’t skip the bottom cinnamon sugar. Sprinkling cinnamon sugar in the pan before laying down the dough creates a wonderfully crispy, flavorful bottom crust that truly mimics the outside of a real churro.
- Chill before slicing. Cutting into the bars while they’re still warm will result in a messy, falling-apart slice. Two hours minimum in the fridge is the sweet spot.
- Use a sharp knife and wipe it between cuts. This keeps your slices clean and prevents cream cheese smearing across the cinnamon sugar top.
- Don’t overbake. The filling should have just a slight jiggle when the pan is gently shaken at the 30-minute mark. Overbaking results in a dry, crumbly filling.
Read Also: Strawberry Cheesecake Recipe
Serving Suggestions
These bars are delicious on their own, but a few simple serving ideas take them to the next level.
Churro cheesecake bars are rich and satisfying, so they pair beautifully with lighter accompaniments that balance the sweetness.
- A drizzle of dulce de leche or caramel sauce is the most classic pairing and adds a beautiful glossy finish
- Fresh strawberries or raspberries add brightness and a welcome tartness that cuts through the richness of the cream cheese
- A scoop of vanilla ice cream served alongside makes this a truly decadent plated dessert
- Whipped cream and a dusting of extra cinnamon for a café-style presentation
- Hot chocolate or Champurrado as a drink pairing, especially in colder months when cinnamon desserts feel most at home
- A simple Fruit Salad on the side for a refreshing contrast to the warm spices
Variations to Try
Once you’ve made the classic version, these twists are fun ways to keep the recipe feeling fresh.
- Pumpkin Churro Cheesecake Bars: Replace ¼ cup of the cream cheese with ¼ cup of pumpkin puree and add ½ teaspoon of pumpkin pie spice to the filling for a fall-flavored version.
- Chocolate Churro Cheesecake Bars: Add 2 tablespoons of cocoa powder to the cinnamon sugar topping for a rich chocolate-cinnamon top crust, and drizzle finished bars with melted dark chocolate.
- Dulce de Leche Swirl: Warm 3 tablespoons of dulce de leche until slightly pourable, then swirl it into the cream cheese filling before adding the top layer of dough for a caramel ribbon throughout.
- Nutella Churro Bars: Spread a thin layer of Nutella directly over the bottom crescent dough before pouring on the cream cheese filling for a hazelnut-chocolate twist.
- Mini Churro Cheesecake Bites: Make the full recipe but cut into very small, 1-inch squares after chilling. Serve them on a platter with toothpicks and a caramel dipping sauce for a party-friendly appetizer-style dessert.
- Sopapilla Cheesecake: The original cousin of this recipe. Simply omit the butter and cinnamon sugar topping and drizzle the baked bars with honey and a pinch of cinnamon instead of the churro topping.
For another cinnamon-spiced dessert you’ll love, check out Snickerdoodle Cookie Recipe
Storage and Reheating
Churro cheesecake bars store well and actually taste even better the next day once the flavors have had time to fully meld together.
- Refrigerator: Store bars in an airtight container or cover the pan tightly with plastic wrap. They’ll keep well in the fridge for up to 4 days. The top crust will soften slightly over time but will still taste wonderful.
- Freezer: Place individual bars on a parchment-lined baking sheet and freeze until solid (about 1 hour), then transfer to a zip-top freezer bag with parchment between layers. Freeze for up to 2 months.
- Thawing frozen bars: Move bars from the freezer to the refrigerator and let them thaw overnight. Do not thaw at room temperature, as this can cause the filling to weep.
- Reheating: These bars are best served cold or at room temperature. If you prefer a warm bar, microwave a single piece for 10 to 15 seconds only. Any longer and the cream cheese filling can separate.
- Do not leave at room temperature for more than 2 hours due to the cream cheese filling.
Another great make-ahead dessert bar: German Chocolate Cake Bars Recipe
Nutritional Facts
The following is an approximate nutritional breakdown per bar, based on a yield of 24 bars from a 9×13 inch pan.
| Nutrient | Per Serving (1 bar) |
|---|---|
| Calories | ~220 kcal |
| Total Fat | 13g |
| Saturated Fat | 7g |
| Cholesterol | 42mg |
| Sodium | 230mg |
| Total Carbohydrates | 23g |
| Dietary Fiber | 0.5g |
| Total Sugars | 14g |
| Protein | 3g |
| Calcium | 35mg |
| Iron | 0.6mg |
Nutritional values are estimates and will vary based on specific brands and ingredient amounts used.
Another crowd-pleasing dessert to explore: Basque Cheesecake Recipe
Health Benefits of Key Ingredients
While churro cheesecake is undeniably a treat, a few of its key ingredients do bring some nutritional value to the table.
Enjoy this dessert for what it is — an indulgent, joyful bake. But it’s also nice to know that a couple of the stars have something going for them beyond flavor.
- Cream cheese provides calcium, which is essential for bone health and nerve function, as well as small amounts of vitamins A and B12
- Eggs are one of the most complete protein sources available, delivering all nine essential amino acids, plus choline, which supports brain health and liver function
- Cinnamon contains a compound called cinnamaldehyde, which has been studied for its antioxidant and anti-inflammatory properties, and some research suggests it may help with blood sugar regulation
- Vanilla extract contains small amounts of antioxidants and has been studied for its potential mood-supporting properties
- Butter contributes fat-soluble vitamins including vitamins A, D, E, and K2, which support immune function, bone health, and skin health
Read Also: Pumpkin Cheesecake Recipe
Frequently Asked Questions
1. Can I use puff pastry instead of crescent roll dough?
Yes, puff pastry is a great substitute if you can’t find crescent roll dough. Roll it out to a 9×13 inch rectangle and use it the same way. Keep in mind that puff pastry will create a slightly thicker, more layered crust with a bigger puff, so you may need to add 3 to 5 extra minutes of baking time. Check for a deep golden brown color on top before pulling it from the oven.
2. Why is my cream cheese filling lumpy?
The most common reason is that the cream cheese was too cold when you started mixing. Even if it feels soft on the outside, the inside can still be cold and firm. Always set your cream cheese out for at least 1 hour at room temperature before beginning. If you’re in a hurry, cut it into small cubes and spread them on a plate for 20 minutes, which speeds up the softening process.
3. Can I make churro cheesecake bars ahead of time?
Absolutely, and they’re actually better the next day. Making them the night before a party or gathering is ideal. The filling firms up beautifully overnight, the flavors deepen, and they slice much more cleanly after a full night in the fridge. Just keep them covered tightly in the refrigerator and slice right before serving.
4. My top crust keeps tearing when I try to lay it over the filling. What should I do?
This is a very common challenge. Try unrolling the dough onto a piece of parchment paper first, pressing the seams, then flipping it upside down onto the pan using the parchment. Another option is to gently press the dough with your hands or use a lightly floured rolling pin on a flat surface to stretch it slightly before transferring. Small tears or gaps are fine — they’ll bake together and won’t affect the final result.
5. Can I double the recipe?
Yes, you can double the recipe to make two 9×13 pans at once. Keep in mind that your oven should have both pans on the same rack or you should rotate them halfway through baking for even browning. Do not try to bake the doubled recipe in one larger, deeper pan, as the extra thickness will change the baking time significantly and the crust may not cook through properly.
For a great make-ahead treat to bring to parties, check out Mini Cheesecake Recipe

Churro Cheesecake Bars
Equipment
- 9×13 inch baking pan - 23×33 cm
- Hand Mixer - or stand mixer for beating cream cheese filling smooth
- Large mixing bowl
- Small mixing bowl - for cinnamon sugar mixture
- Non-stick cooking spray - or butter for greasing the pan
- Parchment paper - optional but helpful for lifting bars out cleanly
- Rubber spatula - for spreading the filling
- Sharp knife - for slicing bars
- Pastry brush - for brushing melted butter on top (optional but recommended)
- Wire cooling rack
Ingredients
- 2 cans refrigerated crescent roll dough sheets - 8 oz/226g each, or regular crescent rolls with seams pressed together
- 16 oz cream cheese - 453g, full-fat block-style, softened to room temperature
- 1 cup granulated sugar - 200g, divided (¾ cup for filling, ¼ cup for cinnamon sugar)
- 1 large egg - room temperature
- 2 teaspoons pure vanilla extract
- 2 tablespoons ground cinnamon - divided for cinnamon sugar mixture
- 4 tablespoons unsalted butter - 57g, melted
For Serving (Optional)
- Dulce de leche - drizzle over finished bars (optional)
- Caramel sauce - drizzle over finished bars (optional)
- Fresh strawberries - for serving (optional)
- Fresh raspberries - for serving (optional)
- Whipped cream - for serving (optional)
- Vanilla ice cream - for serving (optional)
Instructions
- Preheat oven to 350°F (175°C) and position rack in the center. Grease a 9×13 inch baking pan with non-stick spray, lining with parchment paper if desired for easy removal.
- Combine ¼ cup sugar and 2 tablespoons cinnamon in a small bowl for the topping. Sprinkle 1 to 2 tablespoons evenly across the bottom of the greased pan and set the rest aside.
- Unroll first can of crescent dough, pressing seams together firmly if using perforated rolls. Lay dough evenly into the bottom of the prepared pan, pressing to edges and patching any tears.
- Beat softened cream cheese with hand mixer for 1-2 minutes until smooth. Add ¾ cup sugar, egg, and vanilla, beating another 1-2 minutes until completely creamy with no streaks.
- Pour filling over bottom crust and gently spread into an even layer with a rubber spatula, working all the way to the edges without pressing hard on the dough beneath.
- Unroll second can of crescent dough, pressing seams together. Carefully lay it directly over the filling, pressing gently to the edges and tucking under any excess dough.
- Pour melted butter evenly over the top crust and spread to edges with a spatula or pastry brush. Sprinkle remaining cinnamon sugar generously and evenly over the buttered top.
- Bake in center of oven for 30-35 minutes until top is deep golden brown and cinnamon sugar has caramelized. Slight jiggle in the center is normal; filling should not look liquid.
- Cool on a wire rack for at least 30 minutes at room temperature. Cover and refrigerate for minimum 2 hours or overnight to allow filling to set completely for clean slicing.
- Use a sharp knife to slice chilled bars into 24 pieces, wiping the knife clean between cuts for neat edges. Serve chilled or at room temperature with desired toppings.
Notes
- Room temperature cream cheese is essential: Set it out at least 1 hour before starting. Even slightly cold cream cheese will leave lumps that won’t smooth out in the filling.
- Press seams firmly: If using perforated crescent rolls, take extra time pressing every seam together tightly. Any gaps will allow filling to seep through and affect crust texture.
- Don’t skip the bottom cinnamon sugar: Sprinkling cinnamon sugar in the pan before the dough creates a crispy, caramelized crust that mimics the outside of a real churro.
- Chill before slicing: Cutting warm bars will result in messy slices. Two hours minimum in the fridge is essential for clean, defined layers.
- Storage: Store in an airtight container in the refrigerator for up to 4 days. The top crust will soften slightly but still taste wonderful.
- Freezing instructions: Freeze individual bars on a parchment-lined baking sheet until solid, then transfer to a zip-top bag with parchment between layers. Freeze for up to 2 months. Thaw overnight in the refrigerator.
- Pumpkin spice variation: Replace ¼ cup of cream cheese with pumpkin puree and add ½ teaspoon pumpkin pie spice to the filling for a fall version.
- Dulce de leche swirl: Warm 3 tablespoons of dulce de leche until pourable, then swirl into the filling before adding the top crust for a caramel ribbon throughout.
- Make ahead tip: These bars are actually better the next day. Prepare the night before, chill overnight, and slice right before serving for cleanest cuts.
- Reheating: Best served cold or at room temperature. If you prefer warm bars, microwave a single piece for 10-15 seconds only, as longer heating can separate the cream cheese filling.
Final Thoughts
This churro cheesecake recipe truly delivers everything you want in a crowd-pleasing dessert. It’s simple enough for a busy weeknight yet impressive enough to bring to a party and watch guests ask where you bought it.
The magic is in how effortlessly those two beloved flavors, cinnamon-sugar churro and cool cream cheese cheesecake, come together in one beautifully layered bar.
Give it a try this week and see for yourself. If you make it, leave a comment below and tell me how it went — and if you tweak it with a fun variation, I’d love to hear about that too!
Recommended:
- Best Cheesecake Recipe
- New York Cheesecake Recipe
- No Bake Cheesecake Recipe
- Japanese Cheesecake Recipe
- Cheesecake Ice Cream Cake Recipe
- Easy Creme Brulee Recipe
- Tres Leches Cake Recipe
- Best Carrot Cake Recipe
- Funnel Cake Bites Recipe
- Easy Tiramisu Recipe


