
If you’ve ever wanted to bake a bakery-worthy loaf at home, this Dutch oven sourdough bread recipe is exactly what you need.
Baking sourdough in a Dutch oven is the single most reliable way to achieve that dramatic, crackling crust and airy, open crumb that sourdough lovers dream about. The heavy lid traps steam during the first half of baking, mimicking a professional bread oven, so your loaf gets incredible oven spring before the crust sets.
This recipe uses just four ingredients: bread flour, water, salt, and an active sourdough starter. That’s it.
The process takes time, mostly hands-off fermentation, but none of the individual steps are difficult. With a little patience and the guidance below, you’ll be pulling a golden, shatteringly crispy boule from your oven and wondering why you ever bought bread from a store.
If you love baking with sourdough, you might also enjoy this Same Day Sourdough Bread Recipe for those days when you want fresh bread without the overnight wait.

Why You’ll Love This Dutch Oven Sourdough Bread Recipe
This recipe delivers consistent results even for first-time sourdough bakers.
The Dutch oven does the heavy lifting by creating a steam environment that gives you a beautifully blistered crust without any special equipment.
Using bread flour rather than all-purpose flour gives the dough more protein, which builds stronger gluten strands. That translates directly to better structure, better rise, and that signature chewy crumb texture sourdough is known for.
The long, slow bulk fermentation develops deep, complex flavor that you simply cannot rush. Overnight fermentation in the fridge (called cold proofing) takes this even further.
Here is why this recipe stands out:
- Only 4 ingredients required
- No stand mixer or kneading needed, just stretch-and-fold technique
- The Dutch oven creates professional steam, giving you a bakery-quality crust at home
- Long fermentation means incredible tang, chew, and depth of flavor
- Beginner-friendly with detailed step-by-step instructions
- Freezes beautifully, so you can always have fresh sourdough on hand
- Far more satisfying and nutritious than store-bought bread
Another sourdough favorite worth bookmarking: Whole Wheat Sourdough Bread Recipe
Ingredients
You only need four main ingredients for this recipe, but their quality matters. Use the freshest, most active sourdough starter possible, and opt for bread flour over all-purpose flour for the best crumb structure and chew.
- 450g (3 3/4 cups) bread flour, plus extra for dusting
- 325g (1 1/3 cups + 1 tbsp) warm water (about 75-80°F / 24-27°C)
- 100g (1/3 cup + 1 tbsp) active sourdough starter, fed and bubbly
- 9g (1 1/2 tsp) fine sea salt or kosher salt
- Rice flour, for dusting the banneton (optional but recommended)
If you’re working through a lot of starter, don’t toss the excess! Put it to use with this Sourdough Discard Bread Recipe.
Kitchen Equipment Needed
Having the right tools makes the process smoother and more enjoyable. The most important piece of equipment is a good Dutch oven; its size and fit directly affect how your bread bakes.
- Dutch oven (5-6 quart / 4.7-5.7L) with a tight-fitting lid
- Large mixing bowl
- Digital kitchen scale (strongly recommended for accuracy)
- Danish dough whisk or wooden spoon
- Banneton proofing basket (9-inch / 23cm round)
- Bench scraper
- Bread lame or sharp razor blade for scoring
- Parchment paper
- Plastic wrap or damp kitchen towel
- Oven mitts
Read Also: Sourdough Discard Focaccia Recipe
Recommended Products for This Recipe
These are products that have been chosen for their quality and performance. Each one makes a real difference in the outcome of your sourdough bread.
1. Lodge Enameled Cast Iron Dutch Oven
A heavy, well-fitting Dutch oven is the single most important tool in this recipe. The Lodge enameled cast iron version distributes heat evenly and holds steam effectively, giving you that dramatic oven spring and thick, blistered crust. The tight-fitting lid is key, and cast iron retains heat better than lighter materials.
2. Banneton Proofing Basket Set
A banneton basket keeps your shaped dough in the perfect round form during the cold proof, and the spiral pattern leaves a beautiful design on the finished loaf. Sets that include a liner cloth and a bench scraper are especially useful for beginners.
3. Bread Lame Scoring Tool
Scoring your dough just before baking controls where the bread opens up during oven spring, giving you that gorgeous ear and preventing blowouts. A quality lame with a curved blade makes this step much easier and more precise than using a kitchen knife.
4. King Arthur Bread Flour
High-protein bread flour is responsible for the strong gluten network that gives sourdough its chew and structure. King Arthur bread flour has a consistent protein content of around 12.7%, making it a favorite among home bakers for reliable results every time.
You might also enjoy: Gluten Free Sourdough Bread Recipe

Step-by-Step Instructions
1. Feed Your Starter
- Take your sourdough starter out of the refrigerator 8-12 hours before you plan to mix the dough.
- Feed it with equal parts starter, flour, and water by weight. For example: 50g starter, 50g flour, 50g water.
- Stir well, cover loosely, and leave it at room temperature (around 70-75°F / 21-24°C).
- Your starter is ready to use when it has roughly doubled in size, looks bubbly and active, and smells pleasantly tangy or yeasty, not like nail polish remover.
- To test readiness, drop a small spoonful of starter into a glass of water. If it floats, it is active and ready. If it sinks, give it more time.
2. Mix the Dough (Autolyse)
- In a large mixing bowl, combine 325g (1 1/3 cups + 1 tbsp) warm water and 100g (1/3 cup + 1 tbsp) active sourdough starter.
- Whisk them together vigorously with a fork or Danish dough whisk until the starter is fully dissolved and the mixture looks cloudy and milky.
- Add all 450g (3 3/4 cups) of bread flour to the bowl.
- Stir with your Danish dough whisk or wooden spoon until no dry flour remains and a rough, shaggy dough forms.
- At this point, the dough will look messy and feel quite sticky. Do not add extra flour.
- Cover the bowl tightly with plastic wrap or a damp kitchen towel and let it rest for 30 minutes. This resting period (autolyse) allows the flour to absorb the water fully and begins gluten development on its own.
3. Add the Salt
- After the 30-minute rest, sprinkle 9g (1 1/2 tsp) fine sea salt evenly over the surface of the dough.
- Using wet hands, squeeze and fold the salt into the dough until it is fully incorporated. This takes about 1-2 minutes of squeezing and folding.
- The dough will feel slippery at first as the salt releases some moisture, but it will come back together.
- Cover the bowl again and let the dough rest for another 30 minutes before beginning stretch and folds.
4. Stretch and Fold (Bulk Fermentation)
- This is the key technique that builds gluten strength without kneading. You will perform 4 sets of stretch and folds, spaced 30 minutes apart.
- To perform one set: wet your hands slightly to prevent sticking. Grab one side of the dough, stretch it upward as far as it will go without tearing, then fold it over the center of the dough. Rotate the bowl 90 degrees and repeat. Do this 4 times total per set, rotating the bowl each time.
- After each set, the dough should feel a little tighter and stronger.
- Cover the bowl between each set and let the dough rest for 30 minutes.
- After completing all 4 sets (which takes about 2 hours total), leave the dough covered to continue its bulk fermentation.
- Bulk fermentation is complete when the dough has grown by 50-75%, feels airy and jiggly when you shake the bowl, and you can see bubbles on the surface and sides of the bowl.
- At room temperature (around 72-75°F / 22-24°C), this typically takes 4-6 hours total from when you mixed the dough.
5. Shape the Dough
- Once bulk fermentation is complete, lightly flour a clean work surface with bread flour.
- Gently turn the dough out of the bowl onto the floured surface. Try not to deflate it too much.
- Using a bench scraper or floured hands, fold the edges of the dough toward the center, working your way around the dough. Flip it over so the seam side is down.
- Cup your hands around the dough and use the bench scraper to drag the dough toward you, building surface tension on the outer skin of the dough. Rotate as you drag to form a tight, smooth ball.
- Let it rest uncovered on the counter for 20-30 minutes. This is called the bench rest and allows the gluten to relax slightly before the final shaping.
- After the bench rest, lightly flour the top of the dough and flip it over. Stretch it gently into a circle and fold the bottom third up, the top third down, and then roll it tightly toward you. This is your final shape.
6. Cold Proof in the Fridge
- Generously dust your banneton proofing basket with rice flour. Rice flour is ideal here because it does not absorb moisture from the dough, which prevents sticking.
- Place the shaped dough seam-side up into the prepared banneton.
- Pinch the seam lightly to seal it.
- Cover loosely with plastic wrap or a clean shower cap and place it in the refrigerator.
- Cold proof for a minimum of 8 hours and up to 16-18 hours overnight. The cold slows fermentation, develops deeper flavor, and makes the dough much easier to score.
7. Preheat the Dutch Oven
- When you are ready to bake, place your Dutch oven (with its lid on) on the center rack of your oven.
- Preheat the oven to 500°F (260°C). Let the oven preheat for at least 45-60 minutes with the Dutch oven inside. A fully preheated Dutch oven is essential for the best oven spring.
- While the oven is preheating, cut a piece of parchment paper large enough to line the inside of your Dutch oven with a couple of inches of overhang on the sides. These overhangs act as handles to lower the dough safely.
8. Score and Bake
- Take the dough straight from the refrigerator. Cold dough is much firmer and holds its shape better for scoring.
- Turn the dough out of the banneton onto the center of the parchment paper, seam-side down.
- Working quickly, use your bread lame or a razor blade to make a single confident slash across the top of the dough at a 30-45 degree angle. A deeper score (about 1/2 inch / 1.2cm) gives you a more dramatic ear. You can also score a decorative pattern if you prefer.
- Carefully remove the hot Dutch oven from the oven using thick oven mitts. Remove the lid.
- Use the parchment paper handles to lower the dough gently into the Dutch oven.
- Replace the lid and put it back in the oven.
- Bake covered at 500°F (260°C) for 20 minutes. The lid traps steam from the dough itself, creating the ideal baking environment.
- After 20 minutes, carefully remove the lid and reduce the oven temperature to 450°F (230°C).
- Continue baking uncovered for an additional 20-25 minutes, until the crust is a deep golden brown. The darker the crust, the more caramelized and flavorful it will be.
9. Cool Before Slicing
- Using the parchment paper, carefully lift the bread out of the Dutch oven and transfer it to a wire cooling rack.
- This step is critical: do not cut into the bread for at least 1 hour. The interior of the bread continues to set as steam escapes during cooling. Cutting too soon results in a gummy, dense crumb.
- Ideally, wait 2 hours for the cleanest slices and the best texture.
Read Also: Sweet Sourdough Bread Recipe
Tips for Success
Small details make a big difference in sourdough baking. Keeping these tips in mind will help you troubleshoot and improve your results with every loaf.
- Use an active starter every time. If your starter doesn’t pass the float test, your bread will be dense and flat. Never rush this step.
- Weigh your ingredients. Volume measurements are inconsistent for bread baking. A digital scale is the most reliable way to ensure accuracy, especially with flour.
- Don’t add extra flour. Sourdough dough is meant to be sticky. Adding more flour to make it easier to handle will make your bread dense and dry.
- Watch the dough, not the clock. Fermentation speed depends on room temperature. In a warmer kitchen, bulk fermentation may take only 3-4 hours. In a cooler kitchen, it may take 6-8 hours.
- Preheat the Dutch oven thoroughly. At least 45-60 minutes is not excessive. A properly preheated vessel is what gives you dramatic oven spring.
- Score with confidence. A hesitant, shallow score will drag and tear the dough. Use a quick, decisive motion with a sharp blade.
- Cold proofing overnight is your friend. Baking from cold dough makes scoring easier and improves flavor significantly.
Another great way to use your starter every day: Sourdough Discard Pancakes Recipe
Serving Suggestions
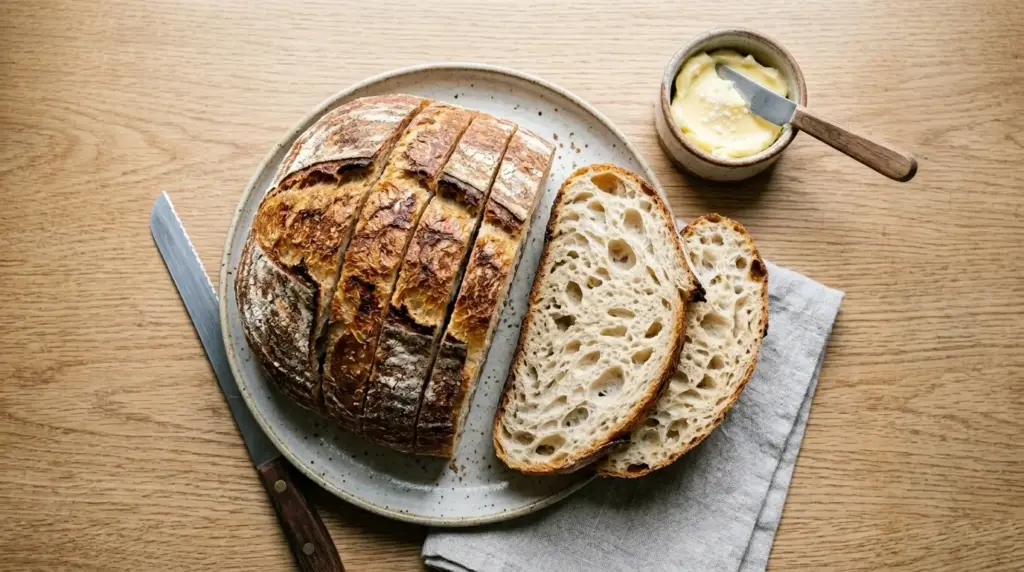
Fresh sourdough is one of the most versatile things you can have in your kitchen. A warm slice with good-quality salted butter is the classic starting point, but the options go far beyond that.
The tangy, chewy crumb makes it exceptional for both sweet and savory pairings. The thick crust holds up beautifully to hearty soups and stews, making it a natural companion for any bowl meal.
Here are some favorite ways to enjoy it:
- Sliced thick and toasted, then spread with cinnamon butter for a warming breakfast
- Served alongside a bowl of creamy chicken wild rice soup for a complete meal
- Used as the base for an elevated avocado toast with poached eggs
- Paired with olive oil and good balsamic vinegar for dipping
- Made into thick slices of French toast with a crispy exterior
- Sliced thinly and topped with whipped ricotta, honey, and fresh figs
- Grilled in a cast iron pan with butter for the best grilled cheese of your life
Read Also: Sourdough Discard French Toast Recipe
Variations to Try
Once you’ve mastered the base recipe, the Dutch oven method opens up a whole world of flavored loaves. The dough is very forgiving and welcomes additions that are folded in during the last stretch-and-fold.
Here are some popular variations that work beautifully with this recipe:
- Rosemary and sea salt: Add 2 tablespoons of fresh chopped rosemary and a sprinkle of flaky sea salt on top before scoring.
- Jalapeño cheddar: Fold in 1/2 cup of shredded sharp cheddar and 2 tablespoons of diced pickled jalapeños during the third stretch-and-fold.
- Whole wheat blend: Replace up to 30% of the bread flour with whole wheat flour for a nuttier, earthier flavor. Try the Whole Wheat Sourdough Bread Recipe for a fully whole wheat version.
- Olive and herb: Fold in 1/3 cup of roughly chopped kalamata olives and 1 teaspoon of dried thyme.
- Seeded crust: Before baking, brush the dough lightly with water and press sesame seeds, poppy seeds, or a seeded blend onto the surface.
- Gluten-free version: For those with gluten sensitivities, check out the Gluten Free Sourdough Bread Recipe for a tested alternative.
You might also enjoy: Sourdough Discard Dinner Rolls Recipe
Storage and Reheating
Proper storage keeps your sourdough tasting fresh for several days. The thick crust acts as a natural preservative, keeping the interior moist as long as you store it cut-side down or wrapped correctly.
Here is how to store and reheat your sourdough bread:
- Room temperature (1-3 days): Store in a paper bag or wrapped loosely in a clean kitchen towel. Do not store in plastic as this softens the crust and promotes mold. Place it cut-side down on a cutting board.
- Longer storage (3-5 days): Once the crust has softened slightly, you can move it to a sealed container or reusable bag.
- Freezer (up to 3 months): Slice the loaf, separate slices with small pieces of parchment, and freeze in a zip-lock bag. Pull out individual slices as needed and toast directly from frozen.
- To reheat a whole loaf: Wrap in foil and place in a 350°F (175°C) oven for 15-20 minutes. Remove the foil for the last 5 minutes to re-crisp the crust.
- To reheat individual slices: Toast in a toaster or under the broiler for 1-2 minutes per side.
Read Also: Sourdough Bagel Recipe
Nutritional Facts
These values are approximate and based on one medium slice (about 60g / 2 oz) of a 900g finished loaf.
| Nutrient | Per Slice (approx.) |
|---|---|
| Calories | 155 kcal |
| Carbohydrates | 31g |
| Protein | 5g |
| Fat | 0.5g |
| Fiber | 1.2g |
| Sodium | 290mg |
| Sugar | 0.4g |
These values will vary slightly depending on the specific flour used and the final weight of your loaf. The long fermentation process reduces the glycemic index compared to commercial yeast bread, making sourdough a more blood sugar-friendly option.
For more wholesome homemade bread options, take a look at this Einkorn Bread Recipe.
Health Benefits of Key Ingredients
Sourdough bread made from scratch with natural fermentation is genuinely different from most commercially produced bread. The process itself transforms the ingredients in meaningful ways.
Here is a closer look at the health benefits of the key ingredients:
- Sourdough starter (wild yeast and lactobacillus bacteria): The fermentation process partially breaks down phytic acid, an antinutrient found in grains, which improves the absorption of minerals like zinc, iron, and magnesium. The lactic acid bacteria also partially pre-digest gluten proteins, making sourdough easier to tolerate for many people with mild gluten sensitivity (though not safe for those with celiac disease).
- Bread flour: Higher protein content supports strong gluten development, and unlike refined white flour, bread flour retains slightly more of the wheat’s natural nutrients.
- Water: Proper hydration is essential for fermentation and dough development. It also keeps the crumb moist and open without added fats.
- Salt: In small amounts, salt regulates fermentation speed, strengthens gluten structure, and enhances flavor. This recipe uses a moderate, well-balanced amount.
- Long fermentation: Extended cold proofing lowers the glycemic index of the bread, meaning it causes a slower, more gradual rise in blood sugar compared to bread made with commercial yeast.
Another hearty, wholesome bread to try alongside this one: Fresh Milled Flour Bread Recipe
Frequently Asked Questions
1. How do I know if my sourdough starter is active enough to bake with?
Your starter should have roughly doubled in size within 4-8 hours of feeding at room temperature. It should smell pleasantly tangy and slightly yeasty, with lots of bubbles throughout. The most reliable test is the float test: drop a small spoonful of starter into a glass of water. If it floats, it is ready. If it sinks, feed it again and give it more time before baking.
2. Can I use all-purpose flour instead of bread flour?
Yes, you can substitute all-purpose flour in this recipe. The bread will still turn out well, but it will have a slightly less chewy texture and a somewhat less open crumb. This is because all-purpose flour has less protein (around 10-11%) than bread flour (around 12-13%), which means less gluten development. If all-purpose flour is what you have, it will still produce a delicious loaf.
3. Why is my sourdough bread dense?
The most common causes of a dense sourdough loaf are an underactive or underfed starter, incomplete bulk fermentation, or shaping the dough without enough surface tension. Make sure your starter passes the float test before using it. Also check that your dough has grown by at least 50% during bulk fermentation and feels airy and full of bubbles before you shape it.
4. Do I have to cold proof overnight, or can I bake the same day?
You can bake without an overnight cold proof, but the results are usually better with one. Cold proofing improves flavor dramatically, makes scoring easier, and gives the dough a tighter structure. If you need to bake the same day, let the shaped dough proof at room temperature for 1-2 hours after shaping before baking. Check out the Same Day Sourdough Bread Recipe for a version specifically designed for same-day baking.
5. My bread came out gummy inside. What went wrong?
A gummy interior is almost always caused by cutting the bread too soon. The interior of the loaf continues to set as it cools and steam escapes, and this process takes at least an hour, preferably two. Resist the urge to slice into a hot loaf. If you cut too early, the crumb will compress and become gummy. Other causes include underbaking (the internal temperature should reach 205-210°F / 96-99°C) or a too-tight scoring that prevented proper oven spring.
Read Also: Sourdough English Muffin Recipe
Final Thoughts
Making a Dutch oven sourdough bread recipe for the first time is one of the most rewarding things you can do in the kitchen.
Yes, it takes time, but almost all of that time is the dough working quietly on its own while you go about your day.
Once you taste a warm slice with that crackling crust, chewy crumb, and deep, tangy flavor, you’ll understand why so many people fall in love with sourdough baking and never look back.
Give this recipe a try and let me know how it goes in the comments below. Did your bread get a beautiful ear? Are you already planning your next flavor variation? Share your results and tag a friend who needs this recipe in their life!
Recommended:
- Sourdough Discard Bread Recipe
- Sourdough Discard Focaccia Recipe
- Sourdough Discard Breadsticks Recipe
- Sourdough Discard Dinner Rolls Recipe
- Sourdough Discard Naan Recipe
- Sourdough Discard Flatbread Recipe
- Sourdough Discard Cinnamon Rolls Recipe
- Sourdough Discard Crackers Recipe
- Sourdough Discard Pita Bread Recipe
- Sweet Sourdough Bread Recipe