If you have a jar of sourdough discard sitting in your fridge, this sourdough discard pizza dough recipe is exactly what you need. Instead of tossing it out, you can turn that tangy, unfed starter into a pizza crust with real depth of flavor and that satisfying chewy-yet-crispy texture that store-bought dough just never delivers.
This isn’t a complicated weekend project. It comes together in one bowl, uses a handful of pantry staples, and relies on instant yeast to do most of the heavy lifting so you’re not waiting days for fermentation.
The discard does two things here: it adds that subtle sourdough tang that makes every bite more interesting, and it contributes to the final texture of the crust, helping you achieve a slightly blistered, golden bottom with a tender, airy interior.
Make it thin and crispy or thick and pillowy. Either way, this dough will become your go-to for pizza night.
You might also enjoy: No Yeast Pizza Dough

Why You’ll Love This Sourdough Discard Pizza Dough Recipe
This dough is designed for real life. It doesn’t ask you to plan 24 hours ahead or babysit a slowly rising batch all day.
The combination of sourdough discard and instant yeast gives you the best of both worlds. You get that signature tang from the discard and a reliable, predictable rise from the yeast, so the dough is ready in a couple of hours rather than overnight.
It’s also incredibly versatile. Use it for classic thin-crust pizzas, press it into a sheet pan for a thick-crust version, or divide it into smaller portions for individual pizzas that the whole family can top their own way.
The flavor here genuinely stands out. Pizza dough made with sourdough discard has a complexity that plain flour-and-yeast dough simply doesn’t have, and that difference is noticeable from the very first bite.
Here’s a quick summary of what makes this recipe worth bookmarking:
- Zero waste baking that puts your sourdough discard to delicious use
- One-bowl method with minimal cleanup
- Flexible rise time that works with your schedule
- Chewy, crispy crust with a light sourdough tang
- Easy to scale for more or fewer pizzas
- Freezer-friendly so you can always have pizza dough on hand
- Works with fed or unfed discard, no specific starter activity required
Read Also: Sourdough Discard Crackers Recipe
Ingredients
This recipe uses straightforward ingredients that are likely already in your pantry. Bread flour is highly recommended over all-purpose flour here because its higher protein content builds stronger gluten, giving you that chewy, satisfying bite that great pizza crust is known for. If you only have all-purpose flour, it will still work, but the texture will be a little softer.
- 1 cup (227g) sourdough discard (fed or unfed, room temperature or cold from the fridge)
- 2 3/4 cups (330g) bread flour, plus more for dusting
- 3/4 cup (180ml) warm water (around 110°F / 43°C)
- 2 1/4 teaspoons (7g) instant yeast (one standard packet)
- 1 teaspoon (6g) fine sea salt
- 1 teaspoon (4g) granulated sugar
- 2 tablespoons (30ml) extra virgin olive oil, plus more for the bowl and pan
This dough makes enough for two 12-inch thin-crust pizzas or one generous thick-crust pizza (serves 4 to 6 people).
The same technique works beautifully for Sourdough Focaccia if you’re looking for another way to use your discard.
Kitchen Equipment Needed
You don’t need any specialty tools for this recipe. A stand mixer speeds things up considerably, but hand kneading works perfectly well too. The key piece of equipment that makes a real difference is a pizza stone or baking steel, which gives you that restaurant-style crispy bottom that a regular baking sheet struggles to replicate.
- Large mixing bowl
- Stand mixer with dough hook (optional, but helpful)
- Measuring cups and spoons
- Kitchen scale (recommended for accuracy)
- Plastic wrap or a clean kitchen towel
- Pizza stone or baking steel (highly recommended)
- Pizza peel or rimless baking sheet for transferring
- Rolling pin or your hands for shaping
Read Also: Easy Sourdough Bread Recipe
Recommended Products for This Recipe
These are products that genuinely make a difference when making homemade pizza dough. Each one is selected for performance and quality.
1. Baking Steel Pro
A baking steel conducts heat far more efficiently than a ceramic pizza stone, giving your crust an intensely crispy, pub-style bottom without any soggy center. It heats up evenly across the entire surface and doubles as a flat-top griddle for other recipes too. It’s one of the single best upgrades you can make to your pizza game.
2. King Arthur Bread Flour
Bread flour with a high protein content (around 12.7%) builds the gluten network that gives your pizza crust that satisfying chew. King Arthur is consistently milled and reliable, which means your dough comes out right every single time. The difference between bread flour and all-purpose flour in this recipe is genuinely noticeable.
3. Thermapen Instant-Read Thermometer
Getting your water temperature right (around 110°F / 43°C) is one of the most important steps in activating yeast correctly. Too hot and you’ll kill it. Too cool and the dough won’t rise properly. A reliable instant-read thermometer takes the guesswork out of it entirely.
4. Danish Dough Whisk
A Danish dough whisk makes mixing wet and dry ingredients together much easier than a regular spoon, especially with a sticky dough like this one. It cuts through the flour without getting clogged and helps you incorporate everything evenly before kneading.
5. OXO Airtight Food Storage Container (for Discard Storage)
Keeping your sourdough discard in a proper airtight container in the fridge keeps it fresh longer and makes it easy to see how much you have on hand. A clear container with a tight seal and a date-marked lid means your discard is always ready to use.
The same great dough-making technique applies to this Sourdough Sandwich Bread Recipe if you’re interested in exploring more sourdough baking.
Step-by-Step Instructions
Step 1: Bring Your Discard to Room Temperature
- Remove your sourdough discard from the refrigerator about 30 minutes before you begin.
- If you’re short on time, you can use it cold straight from the fridge, but room temperature discard incorporates more smoothly into the dough and helps the yeast activate more quickly.
- Stir any liquid that has separated on top back into the discard before measuring.
- Measure out 1 cup (227g) of discard and set it aside.
Step 2: Activate the Yeast
- Measure 3/4 cup (180ml) of warm water. Aim for around 110°F (43°C), which feels warm but not hot to the touch. A thermometer makes this exact.
- Add 1 teaspoon (4g) of granulated sugar to the warm water and stir briefly.
- Sprinkle 2 1/4 teaspoons (7g) of instant yeast over the water.
- Let it sit for 5 to 10 minutes. The mixture should become foamy and fragrant, which tells you the yeast is active and ready to work. If it doesn’t foam, your water may have been too hot (which kills yeast) or too cool (which won’t activate it). Start over with fresh yeast if this happens.
Step 3: Combine the Wet Ingredients
- In a large mixing bowl (or the bowl of a stand mixer), combine the activated yeast mixture and the 1 cup (227g) of sourdough discard.
- Add the 2 tablespoons (30ml) of extra virgin olive oil.
- Stir everything together briefly with a Danish dough whisk or wooden spoon until combined.
Step 4: Add the Dry Ingredients
- Add 2 3/4 cups (330g) of bread flour to the wet ingredients.
- Add 1 teaspoon (6g) of fine sea salt. Note that the salt goes in with the flour rather than directly on the yeast, since salt can inhibit yeast activity if they sit in direct contact before mixing.
- If using a stand mixer, attach the dough hook and mix on low speed for about 2 minutes until the flour is incorporated, then increase to medium speed.
- If mixing by hand, stir until a shaggy dough forms, then turn it out onto a lightly floured surface.
Step 5: Knead the Dough
- Stand mixer method: Knead on medium speed (speed 2 on a KitchenAid) for 7 to 10 minutes, until the dough is smooth, elastic, and pulls away cleanly from the sides of the bowl. It should pass the “windowpane test,” where a small piece stretched between your fingers becomes thin enough to see light through without tearing.
- Hand kneading method: Knead on an unfloured or lightly floured surface for 8 to 10 minutes. Use the heel of your hand to push the dough away from you, fold it back over itself, rotate a quarter turn, and repeat. The dough is ready when it’s smooth and slightly tacky but not sticky, and springs back slowly when you poke it.
- The dough should feel soft and supple, not stiff. If it feels too dry, add water one teaspoon at a time. If it’s sticking to everything, add flour one tablespoon at a time.
Step 6: First Rise
- Lightly coat a large bowl with olive oil or a neutral cooking spray.
- Shape the dough into a smooth ball and place it in the oiled bowl.
- Turn it once to coat all sides with oil. This prevents a dry skin from forming on the surface.
- Cover the bowl tightly with plastic wrap or a damp kitchen towel.
- Let the dough rise at room temperature for 1 to 1.5 hours, or until it has roughly doubled in size. In a warm kitchen (75°F / 24°C or above), this may happen closer to the 1-hour mark.
Step 7: Preheat Your Oven and Prep the Pan
- About 45 minutes to 1 hour before baking, place your pizza stone or baking steel on the middle rack of your oven.
- Preheat the oven to 500°F (260°C). The high heat is important for achieving a properly blistered, crispy crust.
- If using a sheet pan instead of a stone, drizzle it generously with olive oil and set aside.
Step 8: Divide and Shape the Dough
- Once the dough has doubled, gently punch it down to release the gas.
- Turn it out onto a lightly floured surface and divide it into two equal portions for two thin-crust 12-inch pizzas, or leave it as one piece for a thick-crust pizza.
- Shape each portion into a smooth ball by pulling the edges underneath and rotating between your palms.
- Cover the dough balls with a kitchen towel and let them rest for 15 minutes. This rest period is important: it allows the gluten to relax so the dough stretches without snapping back.
- To shape, use your fingertips to gently press each ball into a disk from the center outward, leaving a slightly thicker border for the crust.
- Either stretch the dough between your hands or use a rolling pin on a lightly floured surface to reach your desired size and thickness.
Step 9: Add Toppings and Bake
- Transfer your shaped dough to a pizza peel dusted with semolina or flour, or directly onto the oiled sheet pan.
- Add your preferred pizza sauce, cheese, and toppings. Keep toppings light so the crust bakes through properly.
- Slide the pizza onto the preheated stone or steel (or place the sheet pan in the oven).
- Bake at 500°F (260°C) for 10 to 14 minutes for thin crust, or 14 to 18 minutes for thick crust, until the edges are deep golden brown and the cheese is bubbling and beginning to spot.
- Remove from the oven, let rest for 2 minutes, then slice and serve.
This dough pairs perfectly with a good homemade Pizza Sauce for the best results.
Tips for Success
Small details make a big difference when it comes to pizza dough. These tips will help you nail it every time.
- Use a scale. Flour is notoriously inconsistent when measured by volume. A kitchen scale takes the guesswork out and ensures the same result every time.
- Don’t rush the rest period after dividing the dough. Those 15 minutes of relaxation prevent the gluten from fighting you as you stretch.
- Preheat your stone or steel fully. Placing pizza on a cold surface is the main reason for soggy crusts. Give your oven a full 45 minutes to an hour to get the stone properly hot.
- Don’t overload with toppings. A thin layer of sauce and a moderate amount of cheese lets the crust do its job and bake through evenly.
- Use room temperature discard when possible. Cold discard doesn’t blend as smoothly and can slow down yeast activity slightly.
- Semolina flour on the peel helps the pizza slide off cleanly. Cornmeal works too.
- If the dough tears during shaping, cover it and rest for 5 more minutes. Gluten needs time to relax, not force.
Another great way to use active discard is this Sourdough Pancake Recipe, which is a fan favorite for weekend mornings.
Serving Suggestions

This pizza dough is endlessly adaptable. Beyond the classic tomato-mozzarella combination, here are some ways to make it shine.
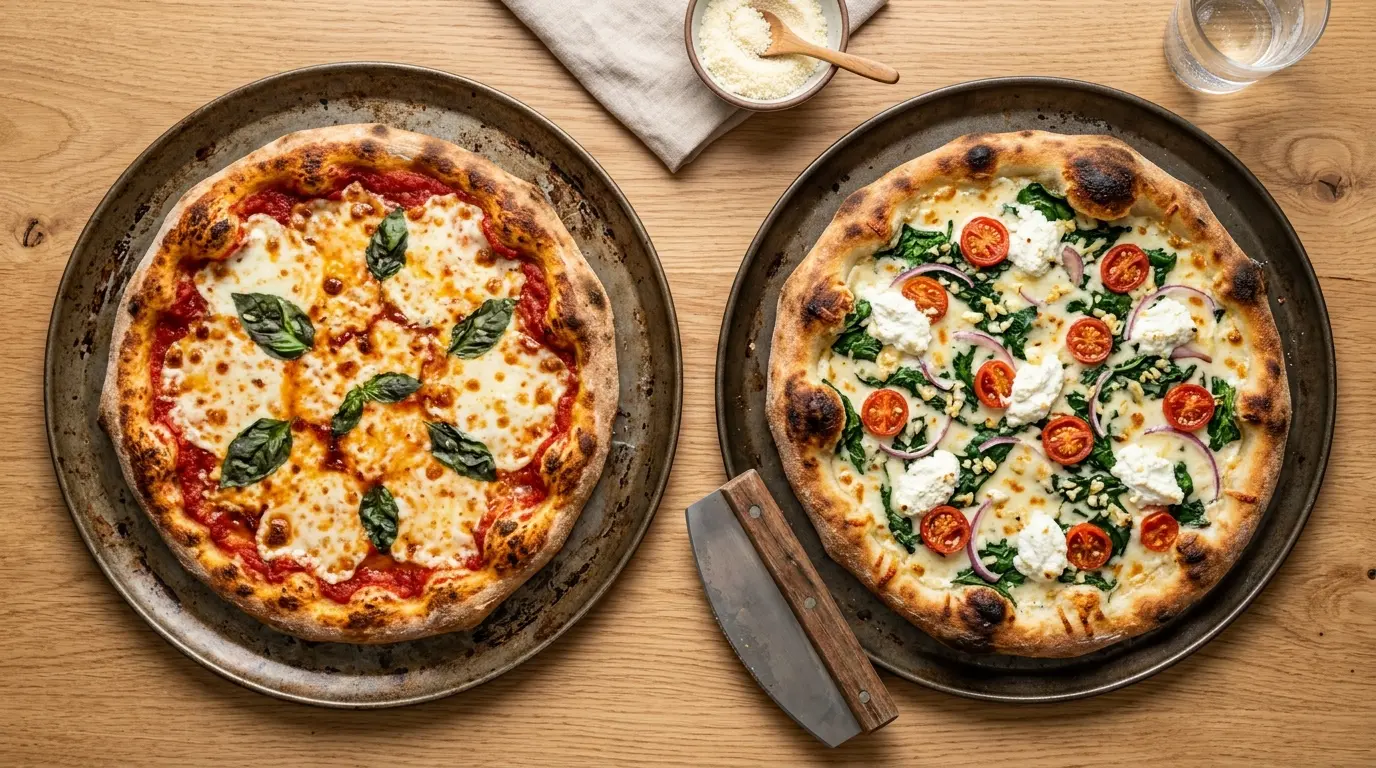
The dough’s mild tang makes it an excellent base for white pizzas (no tomato sauce) dressed with garlic oil, ricotta, and fresh herbs. It also handles bolder toppings beautifully because the flavor of the crust is interesting enough to hold its own.
Try these ideas for your next pizza night:
- Classic Margherita: San Marzano tomatoes, fresh mozzarella, and basil
- White Pizza: Garlic olive oil base, ricotta, mozzarella, spinach, and black pepper
- Hummus Pizza: A surprisingly delicious, creamy base with roasted vegetables
- Garlic Bread Style: Brush with garlic butter, top with parmesan, and skip the sauce entirely
- BBQ Chicken: Swap tomato sauce for BBQ sauce and top with shredded chicken and red onion
- Dessert Pizza: Spread with Nutella and top with sliced strawberries and a dusting of powdered sugar after baking
- Birria Pizza: Tender braised beef and melted cheese on a golden crust
Variations to Try
Once you’ve made this dough a few times, you’ll want to experiment. The base recipe is very forgiving, and small swaps can produce dramatically different results.
Here are some of the most popular variations worth trying:
- Whole wheat version: Replace up to half of the bread flour with whole wheat flour for a nuttier flavor and denser texture.
- Garlic herb dough: Add 1 teaspoon of garlic powder and 1 teaspoon of dried Italian seasoning directly to the flour before mixing.
- No-yeast version: If your discard is very active (recently fed and bubbly), you can omit the yeast entirely and rely on the natural wild yeast in the starter. Extend the rise time to 4 to 6 hours.
- Cornmeal crust: Add 2 tablespoons of fine cornmeal to the flour for a slightly crunchy, golden-textured crust.
- High-hydration dough: Increase the water to 1 cup (240ml) for a looser, wetter dough that produces an airier, more open crumb, similar to a Neapolitan-style crust. Requires more confident handling.
- Overnight cold rise: After the first rise, cover and refrigerate the dough for up to 3 days. Cold fermentation deepens the flavor considerably and makes the dough even easier to shape.
For another bread variation using your sourdough starter, this Same Day Sourdough Bread Recipe is a wonderful option.
Storage and Reheating
This dough stores well both in the fridge and freezer, making it easy to prep ahead for a quick weeknight dinner.
Here’s everything you need to know:
- Refrigerator (uncooked dough): After the first rise, punch the dough down, lightly coat it in olive oil, and store it in a zip-top bag or airtight container in the fridge for up to 3 days. Let it come to room temperature for 30 to 60 minutes before shaping.
- Freezer (uncooked dough): Divide the dough into individual portions, coat lightly with oil, and freeze in zip-top bags with the air pressed out for up to 3 months. Thaw overnight in the fridge, then bring to room temperature before use.
- Baked pizza (leftovers): Store leftover pizza in an airtight container in the refrigerator for up to 4 days.
- Reheating baked pizza: The best method is a dry skillet over medium heat for 2 to 3 minutes until the bottom is crispy and the cheese is melted. A 400°F (200°C) oven for 5 minutes also works well. The microwave is convenient but softens the crust.
- Do not refreeze dough that has already been thawed once.
Read Also: Easy Pizza Dough Recipe
Nutritional Facts
The following nutritional information is per serving, based on the full batch of dough divided into 8 slices (two 12-inch pizzas). This accounts for the dough only, without toppings.
| Nutrient | Per Serving (1 slice of dough) |
|---|---|
| Calories | 220 kcal |
| Carbohydrates | 40g |
| Protein | 7g |
| Total Fat | 4g |
| Saturated Fat | 0.5g |
| Sodium | 290mg |
| Fiber | 1.5g |
| Sugar | 1g |
Note: Nutritional values are estimates and will vary depending on the exact ingredients used.
The Sourdough Starter Recipe is a great read if you’re new to maintaining a starter and want to understand what goes into your discard before it reaches the pizza dough stage.
Health Benefits of Key Ingredients
While pizza is not typically considered a health food, this sourdough discard version has some genuine nutritional advantages over standard pizza dough.
The fermentation process involved in creating sourdough starter, even the discard used here, partially breaks down gluten and phytic acid in the flour. This can make the final baked product easier to digest for some people compared to conventional dough, and may improve the absorption of certain minerals.
Here’s a look at the key ingredients and what they contribute:
- Sourdough discard: Contains beneficial organic acids from fermentation, which lower the glycemic index of the final product compared to standard pizza dough and may support gut health over time.
- Bread flour: A good source of plant-based protein and complex carbohydrates that provide sustained energy rather than a sharp blood sugar spike.
- Olive oil: Rich in monounsaturated fats and polyphenols, olive oil has well-established links to reduced inflammation and heart health when consumed as part of a balanced diet.
- Yeast: A natural source of B vitamins including B1, B2, and B3, which play important roles in energy metabolism.
- Salt: Used in moderation here (1 teaspoon for the full batch), salt is essential for flavor and for regulating yeast activity during fermentation, contributing to proper dough development.
Read Also: Sweet Sourdough Bread Recipe
Frequently Asked Questions
1. Can I use active sourdough starter instead of discard?
Yes, you can. If your starter has been recently fed and is active and bubbly, you can use it in place of the discard at a 1:1 ratio. Because active starter has more leavening power, you may want to reduce the instant yeast to 1 teaspoon rather than the full packet, or omit it entirely and extend the rise time to 4 to 6 hours at room temperature. Active starter will give you a slightly more pronounced tang.
2. My dough is very sticky. Is that normal?
Sourdough discard adds extra moisture to the dough, so it can feel stickier than a standard pizza dough. This is normal. Resist the urge to add too much extra flour, as this will make the crust tough and dense. A very light dusting of flour on your hands and work surface is all you need. If the dough is completely unworkable, add flour one tablespoon at a time.
3. Can I make this dough without a stand mixer?
Absolutely. Hand kneading works perfectly well. It will take 8 to 10 minutes of active kneading to develop the gluten fully. The dough is ready when it’s smooth, elastic, and passes the windowpane test (a small piece stretched thin enough to see light through without tearing).
4. Why is my crust soggy in the middle?
A few things cause this. The most common culprit is a pan or stone that wasn’t preheated long enough. Make sure your pizza stone or steel has been in a 500°F oven for at least 45 minutes before you bake. Overloading the pizza with sauce or wet toppings is another common cause. Use a moderate amount of sauce and blot wet ingredients like fresh mozzarella or tomatoes before adding them.
5. Can I use this dough for calzones or stromboli?
Yes, this dough is very well-suited for both. The slightly tangy flavor from the discard works beautifully in a calzone or stromboli because the dough becomes the main flavor carrier. Shape and fill as you normally would, seal the edges tightly, brush with olive oil, and bake at 450°F (230°C) for about 20 to 25 minutes until deep golden brown.
This recipe also works well as a base for Chicken Florentine Pizza if you’re looking for a more elevated pizza night option.
Final Thoughts
Sourdough discard pizza dough is one of those recipes that genuinely earns a permanent spot in your rotation. It’s approachable enough for beginners, rewarding enough for experienced bakers, and flexible enough to fit into almost any schedule.
The next time you’re about to toss your sourdough discard, pull out this recipe instead. One batch makes enough for two pizzas, which means dinner is sorted and you’ve turned what would have been food waste into something the whole table is excited about.
Give this sourdough discard pizza dough recipe a try this week and let me know how it turned out in the comments below. I’d love to hear what toppings you went with, and if you have any questions about the process, drop them below too.
Recommended:
- Sourdough Focaccia Recipe
- Sourdough Starter Recipe
- Pizza Hut Breadstick Recipe
- Pizza Sauce Recipe
- Birria Pizza Recipe
- Chicken Florentine Pizza Recipe
- Hummus Pizza Recipe
- Sourdough Pancake Recipe
- Everything Bagel Recipe
- Sourdough Sandwich Bread Recipe