
My grandmother used to make this fudge every Christmas, and the smell of chocolate and marshmallow melting together still takes me right back to her kitchen. The Original Fantasy Fudge Recipe has been a holiday staple since it first appeared on the back of Marshmallow Fluff jars decades ago, and for good reason.
This isn’t just any fudge. It’s the fudge that made generations fall in love with homemade candy making.
What makes this recipe so special is its foolproof method and incredibly creamy texture. You don’t need a candy thermometer or years of experience.
Just a few simple ingredients and about 15 minutes of your time will reward you with the smoothest, most chocolatey fudge you’ve ever tasted. The marshmallow creme gives it that signature melt-in-your-mouth quality that’s impossible to replicate with other methods.
I’ve made this recipe countless times over the years, tweaking and perfecting it along the way. Now I’m sharing all my secrets with you so you can create the same magical treats that have made my holiday gatherings legendary.
This classic confection delivers rich chocolate flavor with a perfectly smooth texture every single time. Once you master this recipe, you’ll never buy store-bought fudge again.
Why You’ll Love This The Original Fantasy Fudge Recipe
This recipe is pure magic in a pan, and once you try it, you’ll understand why it’s been passed down through generations. The combination of chocolate chips, marshmallow creme, and butter creates a texture that’s impossibly smooth and creamy.
You’ll appreciate how quickly it comes together. Unlike traditional fudge recipes that require constant monitoring and precise temperature control, this version is remarkably forgiving.
Here’s what makes this fudge absolutely irresistible:
- Foolproof method: No candy thermometer needed, making it perfect for beginners
- Quick preparation: Ready in just 15 minutes of active cooking time
- Perfect texture: The marshmallow creme ensures smooth, creamy results every time
- Versatile flavor: Easy to customize with nuts, extracts, or different chocolate varieties
- Gift-worthy: Makes beautiful presents that everyone loves receiving
- Consistent results: Works perfectly every single time you make it
- Budget-friendly: Uses simple, affordable ingredients you can find anywhere
For a delightful contrast in textures, try serving this alongside my fudge stripe cookies for the ultimate chocolate experience.
Ingredients
This recipe calls for just a handful of pantry staples that work together to create fudge perfection. The quality of your chocolate matters here, so choose good chocolate chips for the best flavor.
Here’s everything you’ll need:
- 3 cups granulated sugar
- ¾ cup (1½ sticks) unsalted butter
- ⅔ cup evaporated milk
- 12 oz (2 cups) semi-sweet chocolate chips
- 7 oz marshmallow creme (one jar)
- 1 teaspoon vanilla extract
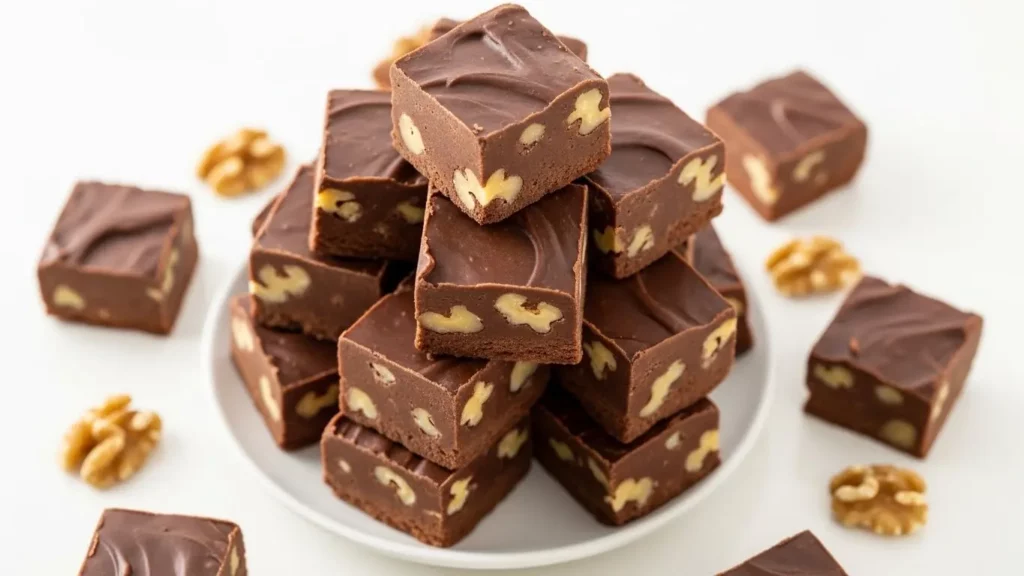
- 1 cup chopped walnuts or pecans (optional)
- Pinch of salt
Kitchen Equipment Needed
Having the right tools makes this recipe even easier to execute perfectly. A good heavy-bottom saucepan is essential for even heat distribution.
Gather these items before you start:
- Large heavy-bottom saucepan (3-4 quart capacity)
- Wooden spoon or heat-resistant spatula
- 9×13 inch baking pan
- Parchment paper or aluminum foil
- Measuring cups and spoons
- Large mixing bowl
- Sharp knife for cutting
Recommended Products for This Recipe
After making this fudge hundreds of times, I’ve found that certain products truly make a difference in the final result. These are my tried-and-true recommendations that’ll help you achieve perfect fudge every time.
1. Ghirardelli Semi-Sweet Chocolate Chips
These chocolate chips melt beautifully and have a richer, more complex flavor than standard brands. The higher cocoa content gives your fudge a deeper chocolate taste without any bitterness, and they’re consistently smooth when melted.
2. All-Clad Stainless Steel Saucepan
This pan distributes heat so evenly that you’ll never have to worry about hot spots or scorching your sugar mixture. The heavy bottom prevents burning, and the tall sides contain any splattering. I’ve had mine for over a decade, and it’s still performing like new.
3. Kraft Jet-Puffed Marshmallow Creme
The original and still the best—this is the marshmallow creme that the recipe was designed around. It has the perfect consistency and sweetness level, and it blends seamlessly into the chocolate mixture without any graininess.
4. USA Pan Bakeware Rectangular Cake Pan
This commercial-grade pan has a nonstick coating that makes removing fudge incredibly easy. The aluminized steel construction ensures even cooling, which is crucial for achieving that perfect texture throughout your fudge.
Another favorite chocolate treat of mine is this decadent hot fudge sundae that uses similar rich chocolate flavors.
Step-by-Step Instructions
Follow these detailed instructions carefully, and you’ll have perfect fudge every single time. The key is working quickly once the mixture reaches a boil, so have all your ingredients measured and ready before you start.
1. Prepare Your Pan
Getting your pan ready first ensures you can work quickly when the fudge mixture is hot and ready to pour.
- Line your 9×13 inch baking pan with parchment paper, leaving some overhang on the sides for easy removal later
- Alternatively, you can use aluminum foil sprayed lightly with cooking spray
- Make sure the lining sits flat against the bottom and corners without any wrinkles that could create marks in your fudge
- Set the prepared pan aside within easy reach of your stovetop
2. Combine Sugar, Butter, and Milk
This step creates the foundation of your fudge, so accuracy matters. The mixture needs to come together smoothly before boiling.
- Place the sugar, butter, and evaporated milk in your large heavy-bottom saucepan
- Stir the ingredients together over medium heat until the butter melts completely
- Continue stirring constantly to prevent the sugar from settling on the bottom and scorching
- Watch for the mixture to become smooth and homogeneous before increasing the heat
3. Bring to a Full Rolling Boil
This is the most critical step in the entire recipe. A full rolling boil ensures proper sugar crystallization for that perfect fudge texture.
- Increase the heat to medium-high while stirring constantly
- Bring the mixture to a full rolling boil—one that doesn’t stop bubbling even when you stir it
- Once it reaches a rolling boil, continue boiling for exactly 5 minutes while stirring constantly
- Set a timer so you don’t have to guess; those 5 minutes are crucial for the right consistency
- The mixture will be extremely hot and bubbly, so be careful not to let it splash on you
4. Remove from Heat and Add Chocolate
Working quickly at this stage prevents the mixture from cooling too much, which could affect the texture.
- Remove the saucepan from heat immediately after the 5-minute boiling time
- Add the chocolate chips and marshmallow creme to the hot mixture right away
- Add the vanilla extract and salt as well
- Let everything sit for about 30 seconds to allow the heat to start melting the chocolate
5. Stir Until Smooth
This is where the magic happens as everything transforms into silky, smooth fudge. Proper stirring technique makes all the difference.
- Begin stirring vigorously with your wooden spoon or spatula
- Continue stirring until the chocolate chips are completely melted and the mixture is perfectly smooth
- Make sure no streaks of marshmallow remain visible; everything should be uniformly combined
- This usually takes 2-3 minutes of continuous stirring
- The fudge should look glossy and have a smooth, pourable consistency
6. Add Nuts If Using
Adding nuts is completely optional, but they add wonderful texture and flavor contrast to the sweet, smooth fudge.
- If you’re using nuts, fold them in quickly but gently at this point
- Make sure they’re distributed evenly throughout the mixture
- Work fast because the fudge starts to set as it cools
7. Pour into Prepared Pan
Speed matters here because fudge begins to firm up quickly. You want an even layer for uniform pieces.
- Pour the fudge mixture into your prepared pan immediately
- Use your spatula to spread it evenly to all corners
- Tap the pan gently on the counter a few times to release any air bubbles
- Smooth the top with your spatula for a nice, even surface
8. Cool and Cut
Patience is key during this final step. Rushing the cooling process can result in fudge that’s too soft or doesn’t cut cleanly.
- Let the fudge cool at room temperature for at least 2-3 hours until completely set
- Once set, lift the fudge out of the pan using the parchment paper overhang
- Place on a cutting board and use a sharp knife to cut into 1-inch squares
- For the cleanest cuts, wipe your knife between cuts or run it under hot water and dry it
You might also enjoy: Fudge Brownie Recipe
Tips for Success
These insider tips will help you avoid common pitfalls and create fudge that turns out perfect every time. I’ve learned these lessons through years of fudge making.
Pay attention to these crucial details:
- Use a heavy-bottom pan: Thin pans create hot spots that can scorch your sugar mixture before it boils properly
- Stir constantly during boiling: Even a few seconds of neglect can cause burning on the bottom of the pan
- Don’t skip the timer: Those 5 minutes of boiling are scientifically calculated for proper sugar crystallization
- Work quickly after boiling: The mixture starts setting up as soon as you remove it from heat
- Measure marshmallow creme by weight: A 7-ounce jar is more accurate than trying to measure it by volume
- Use room temperature butter: It melts more evenly and incorporates better into the mixture
- Don’t double the recipe: Make two separate batches instead for best results
- Let it fully cool: Cutting too early will result in pieces that don’t hold their shape
Serving Suggestions
This fudge is incredibly versatile and can be served in countless delicious ways. The rich chocolate flavor pairs beautifully with many accompaniments.
Here are my favorite ways to serve this classic treat:
- Holiday cookie trays: Arrange fudge squares alongside sugar cookies and snickerdoodle cookies for a stunning dessert spread
- Gift boxes: Layer fudge pieces in decorative tins with parchment between layers
- Ice cream topping: Crumble fudge over vanilla ice cream for an indulgent sundae
- Coffee companion: Serve small squares alongside espresso or cappuccino
- Dessert boards: Include fudge on a dessert charcuterie board with toffee and other confections
- Party favors: Wrap individual squares in decorative cellophane bags tied with ribbon
For an even more indulgent chocolate experience, drizzle some hot fudge sauce over slices before serving.
Variations to Try
Once you’ve mastered the classic version, these creative variations will keep things exciting. Each one adds a unique twist while maintaining that perfect fudge texture.
Experiment with these delicious alternatives:
- Peanut butter swirl: Drop spoonfuls of peanut butter on top before cooling and swirl with a knife
- Mint chocolate: Replace vanilla extract with peppermint extract and add crushed candy canes
- Rocky road: Fold in mini marshmallows and chopped almonds
- Triple chocolate: Use a combination of dark, milk, and white chocolate chips
- Salted caramel: Drizzle with caramel sauce and sprinkle with flaky sea salt before setting
- Espresso: Add 1 tablespoon of instant espresso powder for a mocha flavor
- Orange chocolate: Add 1 teaspoon orange zest and use orange extract instead of vanilla
- Cookies and cream: Fold in crushed Oreos after the mixture is smooth
Storage and Reheating
Proper storage keeps your fudge fresh and delicious for weeks. The key is protecting it from air and moisture.
Follow these storage guidelines:
- Room temperature: Store in an airtight container at room temperature for up to 2 weeks
- Refrigerator: Keep in an airtight container for up to 1 month
- Freezer: Wrap individual pieces in plastic wrap, place in a freezer-safe container, and freeze for up to 3 months
- Separation: Layer pieces with parchment paper to prevent sticking
- Thawing: Let frozen fudge come to room temperature naturally before serving
- Avoid moisture: Never refrigerate uncovered, as condensation will make the fudge sticky
Read Also: No Bake Cookie Recipe
Nutritional Facts
This information is based on one piece of fudge cut into 48 pieces from a 9×13 inch pan. Keep in mind that these values are approximate and will vary based on exact ingredients used.
Per Piece (approximately 1 inch square):
- Calories: 130
- Total Fat: 6g
- Saturated Fat: 3.5g
- Cholesterol: 10mg
- Sodium: 25mg
- Total Carbohydrates: 19g
- Sugars: 17g
- Protein: 1g
Health Benefits of Key Ingredients
While fudge is certainly a treat to enjoy in moderation, some of its ingredients do offer nutritional benefits. Understanding these can help you appreciate what you’re eating beyond just the taste.
Here’s what you’re getting from the main components:
- Dark chocolate: Contains antioxidants called flavonoids that support heart health and may improve brain function
- Evaporated milk: Provides calcium and vitamin D for bone health, plus protein for muscle maintenance
- Walnuts (if added): Rich in omega-3 fatty acids that support brain and heart health
- Butter: Contains fat-soluble vitamins A, D, E, and K that support various bodily functions
Another delicious chocolate creation you might love is my chocolate pie recipe.
Frequently Asked Questions
1. Can I make this fudge without marshmallow creme?
You can substitute marshmallow creme with marshmallows, but the texture won’t be quite the same. Use about 16 large marshmallows or 1½ cups mini marshmallows in place of the 7-ounce jar of marshmallow creme. The fudge may be slightly less creamy but will still taste delicious.
2. Why did my fudge turn out grainy?
Grainy fudge usually results from sugar crystallization during the boiling process. This happens when you don’t stir constantly during boiling, when the mixture doesn’t reach a full rolling boil, or when you boil it for less than the required 5 minutes. Make sure to stir continuously and use a heavy-bottom pan for even heat distribution.
3. Can I use milk chocolate instead of semi-sweet chocolate chips?
Absolutely! Milk chocolate will make your fudge sweeter and milder in chocolate flavor. You might want to reduce the sugar by ¼ cup if you prefer less sweetness. Dark chocolate chips also work beautifully for a more intense chocolate experience.
4. How do I know when my mixture has reached a full rolling boil?
A full rolling boil means the mixture is bubbling vigorously across the entire surface and doesn’t stop bubbling even when you stir it. If the bubbles disappear when you stir, it hasn’t reached a full rolling boil yet. The mixture should be bubbling actively and continuously.
5. Can I cut the recipe in half?
While you technically can halve this recipe, I don’t recommend it. The smaller quantity makes it harder to maintain the proper boiling time and temperature, which can affect the final texture. If you don’t need a full batch, make the whole recipe and freeze half or share it with friends.
Read Also: Peanut Butter Pie Recipe
Final Thoughts
There’s something truly special about homemade fudge that brings people together. The Original Fantasy Fudge Recipe has been creating sweet memories in kitchens around the world for generations, and now it’s your turn to join that tradition.
This recipe proves that you don’t need fancy equipment or culinary school training to create something absolutely spectacular. With just a few simple ingredients and fifteen minutes at the stove, you can make fudge that rivals anything from an expensive candy shop.
I hope this recipe becomes a treasured part of your holiday traditions, just as it has in my family. There’s nothing quite like the joy on someone’s face when they bite into a piece of perfectly creamy, chocolatey fudge that you made with your own hands.
Give this recipe a try and let me know how it turns out! Drop a comment below sharing your results, any creative variations you tried, or photos of your beautiful fudge. I’d love to hear about your fudge-making adventures!
Recommended:
- Sweet Potato Casserole Recipe
- Dinner Rolls Recipe
- Blueberry Pie Recipe
- Tomato Pie Recipe
- Cottage Pie Recipe
- Turkey Pot Pie Recipe
- Lemon Meringue Pie Recipe
- Peach Pie Recipe
- Cherry Pie Recipe
- Banana Cream Pie Recipe


