
If you’ve been scrolling through social media lately, chances are you’ve already spotted the salmon sushi bake recipe taking over everyone’s feeds. It’s a warm, deconstructed sushi casserole that layers seasoned sushi rice with a creamy, savory salmon topping, all baked until bubbly and golden, then scooped onto crispy seaweed sheets.
Think of it as everything you love about a salmon roll, reimagined as a shareable, crowd-pleasing bake.
This dish became a massive hit in Filipino-American communities before spreading worldwide, and it’s easy to see why. It delivers sushi-bar flavor with a fraction of the effort, and it’s endlessly adaptable. Once you try it, you’ll find yourself making it on repeat for potlucks, family dinners, and weeknight cravings alike.
You might also enjoy this Salmon Skillet for another easy, delicious way to enjoy salmon any night of the week.
Why You’ll Love This Salmon Sushi Bake Recipe
This dish checks all the boxes for a recipe you’ll keep coming back to again and again.
It delivers restaurant-quality sushi flavor without any of the rolling, shaping, or slicing that usually goes into sushi making. The creamy salmon topping bakes into something rich and slightly caramelized on top, while the rice stays sticky and perfectly seasoned underneath.
It’s also incredibly easy to put together. Most of the prep work is just mixing and layering, so even beginner cooks can nail it on the first try.
Here’s why this recipe is a keeper:
- Big flavor payoff with minimal cooking skill required
- Perfect for feeding a crowd as a party dish or potluck contribution
- Customizable to suit different tastes and dietary preferences
- Uses simple, accessible ingredients that are easy to find at most grocery stores
- Leftovers reheat beautifully, making it a great make-ahead option
- Scoopable and fun to eat, making it interactive and memorable for guests
Ingredients
The salmon sushi bake relies on a short list of pantry staples and fresh ingredients that come together beautifully. Using good-quality salmon and real Japanese mayo (like Kewpie mayonnaise) makes a noticeable difference in the final flavor.
Here’s everything you’ll need:
For the Sushi Rice:
- 2 cups (400g) short-grain sushi rice
- 2 1/4 cups (530ml) water
- 3 tablespoons rice vinegar
- 1 tablespoon granulated sugar
- 1 teaspoon salt
For the Salmon Topping:
- 1 lb (450g) fresh salmon fillet (or canned cooked salmon as a shortcut)
- 4 oz (115g) cream cheese, softened
- 1/2 cup (120ml) Kewpie mayonnaise
- 2 tablespoons sriracha (adjust to taste)
- 2 tablespoons low-sodium soy sauce
- 1 tablespoon sesame oil
- 3 green onions, thinly sliced (divided: some for the mix, some for garnish)
For Serving:
- Roasted seaweed snack sheets (nori)
- 1 tablespoon furikake seasoning (Japanese rice seasoning)
- 1 ripe avocado, sliced or diced
- Extra sriracha, for drizzling
- Extra Kewpie mayo, for drizzling
- Sliced cucumber (optional)
Read Also: Baked Salmon Recipe
Kitchen Equipment Needed
You don’t need any specialized equipment to make this dish, but a few key tools will make the process smoother and more enjoyable.
Here’s what to have on hand:
- 9×13 inch baking dish
- Rice cooker or medium saucepan with lid
- Large mixing bowl
- Medium mixing bowl
- Rubber spatula or wooden spoon
- Small saucepan (for the sushi vinegar mixture)
- Shallow wooden bowl or large bowl for seasoning rice
- Sharp knife and cutting board
- Baking sheet (optional, if baking salmon before mixing)
- Aluminum foil
- Oven mitts
Read Also: Air Fryer Salmon Recipe
Recommended Products for This Recipe
These are products that genuinely make a difference in how your salmon sushi bake turns out. Each one was selected based on quality, performance, and how much it improves the final dish.
1. Kewpie Japanese Mayonnaise
Kewpie mayo is richer, creamier, and slightly tangier than regular American mayo, and it’s the secret to that authentic sushi restaurant flavor in the topping. Using a standard mayo just won’t give you the same depth of taste. It’s widely available online and well worth keeping in your pantry.
2. Furikake Japanese Rice Seasoning
Furikake is a savory Japanese seasoning blend made with sesame seeds, nori flakes, and other umami-rich ingredients. Sprinkling it over the rice layer before adding the salmon topping gives the bake a deep, nutty, authentic sushi flavor that elevates the whole dish.
3. Le Creuset Enameled Cast Iron Baking Dish
A quality baking dish ensures even heat distribution so your salmon topping broils evenly without any burnt or undercooked patches. The enameled surface makes cleanup simple even with sticky rice, and it goes beautifully from oven to table.
4. Roasted Seaweed Snack Sheets
Pre-roasted nori sheets are perfectly sized for scooping up the sushi bake and give you that satisfying crunch and ocean flavor in every bite. Look for individually wrapped snack-size sheets rather than full-size nori sheets for the easiest serving experience.
5. Premium Sushi Rice
Using authentic short-grain Japanese sushi rice is non-negotiable for the sticky, slightly chewy base that holds the bake together. Long-grain rice simply won’t give you the right texture.
For another creamy, comforting baked casserole, check out this Tuna Casserole Recipe.
Step-by-Step Instructions
Step 1: Cook the Salmon
- Preheat your oven to 400°F (200°C).
- Place your salmon fillet on a baking sheet lined with aluminum foil.
- Drizzle lightly with a small amount of sesame oil and season with a pinch of salt and pepper.
- Bake for 12 to 15 minutes, or until the salmon is cooked through and flakes easily with a fork.
- Remove from the oven and let it cool for 5 to 10 minutes before handling.
- Once cool enough to touch, use a fork to flake the salmon into small pieces, removing any pin bones or skin as you go.
- Set the flaked salmon aside in a medium mixing bowl.
Step 2: Cook and Season the Sushi Rice
- Rinse the sushi rice in cold water 3 to 4 times until the water runs mostly clear. This removes excess starch and prevents the rice from becoming too gummy.
- If using a rice cooker, add the rinsed rice and water and cook according to the manufacturer’s instructions.
- If using a stovetop, combine the rinsed rice and water in a medium saucepan. Bring to a boil over medium-high heat, then reduce to a low simmer, cover tightly, and cook for 18 minutes.
- Remove from heat and let the rice steam, covered, for an additional 10 minutes. Do not lift the lid during this time.
- While the rice cooks, combine the rice vinegar, sugar, and salt in a small saucepan over low heat. Stir until the sugar and salt are fully dissolved, then remove from heat and let it cool slightly.
- Transfer the cooked rice to a large shallow bowl.
- Pour the seasoned vinegar mixture over the rice and gently fold it in using a rubber spatula, using a slicing and turning motion rather than stirring to avoid breaking the grains.
- Fan the rice as you fold to help it cool down and absorb the vinegar mixture evenly.
Step 3: Make the Creamy Salmon Topping
- In the medium bowl with your flaked salmon, add the softened cream cheese, Kewpie mayonnaise, sriracha, soy sauce, sesame oil, and about half of the sliced green onions.
- Mix everything together thoroughly until a creamy, cohesive mixture forms. The cream cheese should be fully incorporated with no lumps.
- Taste the mixture and adjust seasoning as needed. Add more sriracha for heat, more soy sauce for saltiness, or more mayo for creaminess.
Step 4: Assemble the Bake
- Lightly grease your 9×13 inch baking dish with a small amount of neutral oil or cooking spray to prevent sticking.
- Spread the seasoned sushi rice in an even layer across the bottom of the baking dish. Use the back of a spoon or dampened hands to press it down gently and evenly.
- Sprinkle the furikake seasoning generously over the entire surface of the rice layer.
- Spoon the creamy salmon mixture over the rice, spreading it into an even layer with a rubber spatula all the way to the edges.
Step 5: Bake the Dish
- Reduce the oven temperature to 375°F (190°C).
- Place the assembled baking dish in the oven and bake for 20 minutes, or until the salmon topping is heated through and slightly set on top.
- Switch the oven to the broil setting on high.
- Broil for 3 to 5 minutes, watching closely, until the top is lightly golden and bubbling in spots. Keep a close eye during broiling since it can go from golden to burnt very quickly.
- Remove from the oven and allow to cool for 5 minutes before serving.
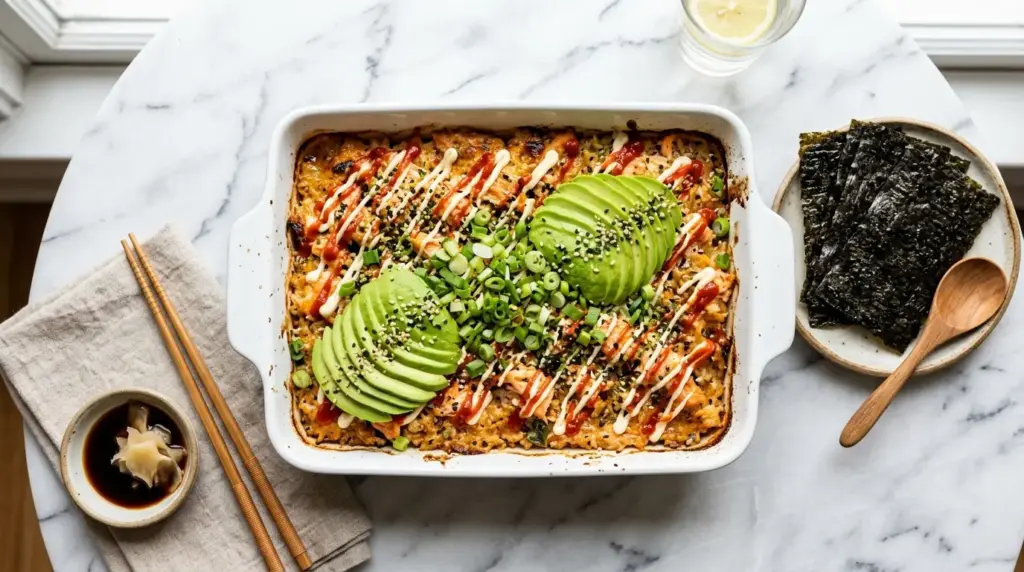
Step 6: Garnish and Serve
- Drizzle additional Kewpie mayonnaise over the top in a back-and-forth zigzag pattern.
- Add a drizzle of sriracha on top for color and extra heat if desired.
- Scatter the remaining sliced green onions over the top.
- Add sliced or diced avocado across the surface just before serving.
- Serve immediately with roasted seaweed snack sheets on the side for scooping.
This recipe shares a similar comfort-food spirit with this Salmon Chowder Recipe if you’re looking for more ways to enjoy salmon in a cozy, crowd-pleasing format.
Tips for Success
Getting the most out of this dish comes down to a few key details that make a real difference.
Keep these tips in mind for the best results:
- Don’t skip rinsing the rice. Rinsing removes excess surface starch, which prevents the rice from turning too sticky and clumping. Three to four rinses in cold water is ideal.
- Use Kewpie mayo, not regular mayo. The flavor difference is significant. Kewpie has a richer, slightly sweeter, umami-forward taste that is central to authentic sushi bake flavor.
- Soften the cream cheese fully before mixing. Cold cream cheese won’t blend smoothly into the salmon mixture and can leave lumps. Leave it out at room temperature for at least 30 minutes before starting.
- Watch the broiler closely. The topping can go from perfectly golden to burnt in under a minute. Stay by the oven during this step.
- Season the rice while it’s still warm. The warm rice absorbs the vinegar mixture much better than cold rice would.
- Dampen your hands or spoon when pressing the rice into the baking dish to prevent it from sticking.
- Let the bake rest for 5 minutes before serving so the topping firms up slightly and scooping is easier.
- Prepare the avocado last to prevent browning. Slice or dice it just before serving.
For another deliciously creamy baked comfort dish, try this Lobster Mac and Cheese Recipe.
Serving Suggestions
Salmon sushi bake is best enjoyed scooped onto roasted seaweed sheets and eaten immediately while warm. Set up a self-serve spread so everyone can build their own bites at the table.
It makes a fantastic centerpiece dish alongside simple sides that don’t compete with its bold, savory flavors.
Here are some great ways to serve it:
- Roasted seaweed snack sheets for scooping (essential)
- Sliced cucumber for a cool, refreshing crunch alongside each bite
- Edamame lightly salted as a simple starter or side
- Miso soup for a complete Japanese-inspired meal (try this Miso Soup)
- Simple green salad dressed with sesame vinaigrette
- Steamed broccoli or bok choy to balance the richness of the bake
- Pickled ginger and wasabi on the side for those who love traditional sushi accompaniments
Read Also: Fish Tacos Recipe
Variations to Try
Once you’ve made the classic version, there are so many delicious ways to mix things up.
Here are some popular variations worth exploring:
- Crab sushi bake: Swap the salmon for imitation crab meat or real lump crab meat for a sweeter, more delicate flavor.
- Spicy tuna bake: Replace the salmon with sushi-grade tuna and increase the sriracha for a spicier kick.
- Shrimp sushi bake: Use cooked, chopped shrimp instead of salmon for a slightly lighter version.
- Vegan sushi bake: Replace the salmon with seasoned mashed chickpeas or crumbled tofu, and use vegan mayo in place of Kewpie.
- Low-carb version: Swap the sushi rice for cauliflower rice seasoned the same way for a lighter, lower-carb alternative.
- Spicy miso topping: Add 1 tablespoon of white miso paste to the salmon mixture for an extra layer of deep, savory umami.
- Cream cheese-free version: Skip the cream cheese and double the mayo for a lighter topping with a slightly thinner consistency.
This dish pairs wonderfully as a companion recipe to Shrimp and Grits when you’re planning a seafood-centered dinner spread.
Storage and Reheating
Salmon sushi bake stores well, making it a great dish to prepare a day in advance or enjoy as leftovers.
Here’s how to store and reheat it properly:
- Refrigerator: Transfer leftovers to an airtight container and refrigerate for up to 3 days.
- Freezing: The assembled bake is not ideal for freezing because the rice texture changes significantly after thawing. It’s best enjoyed fresh or refrigerated.
- Reheating in the oven: Place leftovers in an oven-safe dish, cover with foil, and reheat at 350°F (175°C) for 15 to 20 minutes until warmed through.
- Reheating in the microwave: Transfer a portion to a microwave-safe bowl, cover loosely, and heat in 60-second intervals until hot.
- Store avocado separately: If you know you’ll have leftovers, keep the avocado garnish separate and add it fresh when serving.
- Re-garnish after reheating: Add a fresh drizzle of Kewpie mayo and a sprinkle of green onions after reheating to refresh the presentation.
Another great make-ahead seafood dish is this Seafood Chowder Recipe.
Nutritional Facts
The following nutritional information is estimated per serving, based on 8 servings from one 9×13 inch baking dish. Exact values will vary depending on ingredient brands and specific quantities used.
| Nutrient | Per Serving (approx.) |
|---|---|
| Calories | 420 kcal |
| Total Fat | 22g |
| Saturated Fat | 6g |
| Cholesterol | 65mg |
| Sodium | 620mg |
| Total Carbohydrates | 35g |
| Dietary Fiber | 1g |
| Total Sugars | 3g |
| Protein | 22g |
| Omega-3 Fatty Acids | ~1,200mg |
These estimates are based on using full-fat cream cheese, Kewpie mayo, and fresh salmon fillet. Using light cream cheese or light mayo will reduce the calorie and fat content per serving.
Read Also: Crab Cake Recipe
Health Benefits of Key Ingredients
Beyond being absolutely delicious, this dish brings some solid nutritional value to the table thanks to its star ingredients.
Here’s a look at what makes this recipe more than just a treat:
- Salmon is one of the richest dietary sources of omega-3 fatty acids, which support heart health, brain function, and reduce inflammation throughout the body. A single serving delivers a meaningful dose of high-quality protein as well.
- Avocado contributes heart-healthy monounsaturated fats, along with potassium, folate, and vitamins K, C, and B6. Its creamy texture also helps balance the richness of the salmon topping naturally.
- Sushi rice, while higher in carbohydrates, provides a quick source of energy and pairs well with protein-rich toppings to create a balanced and satisfying meal.
- Sesame oil contains antioxidants like sesamol and sesaminol, which have been studied for their potential anti-inflammatory properties.
- Green onions are a surprisingly good source of vitamin K and vitamin C, adding a fresh, light note that cuts through the richness of the dish.
- Nori seaweed sheets used for serving are rich in iodine, a mineral that supports healthy thyroid function, along with trace minerals and B vitamins.
For another nutrient-dense and satisfying meal idea, take a look at this Bibimbap Recipe.
Frequently Asked Questions
1. Can I use canned salmon instead of fresh salmon?
Yes, canned salmon works well as a convenient shortcut and is perfectly delicious in this recipe. Drain the canned salmon thoroughly and pick out any bones or skin before mixing it into the topping. The flavor will be slightly less rich than fresh salmon, but the overall dish will still be creamy, savory, and satisfying.
2. What can I use instead of Kewpie mayonnaise?
If Kewpie mayo isn’t available, regular full-fat mayonnaise can be used as a substitute. To get closer to Kewpie’s flavor, add a small splash of rice vinegar and a tiny pinch of sugar to the regular mayo before mixing. The flavor won’t be identical, but it works as a reasonable alternative.
3. Can I make salmon sushi bake ahead of time?
You can prepare the individual components ahead of time. Cook and season the rice, then make the salmon topping, and store each separately in the refrigerator for up to 24 hours. Assemble and bake the dish just before serving for the best results. Assembling too far in advance can cause the rice to dry out or absorb too much moisture from the topping.
4. How do I know when the salmon is fully cooked?
Fresh salmon is fully cooked when it turns from translucent to opaque throughout and flakes easily when pressed with a fork. If you have an instant-read thermometer, the internal temperature should read 125°F to 130°F (52°C to 54°C) for medium and 145°F (63°C) for fully cooked through. For this recipe, either level of doneness works since the salmon will bake again in the casserole.
5. Is this recipe gluten-free?
The main components of this recipe are naturally gluten-free, but soy sauce typically contains wheat. To make the dish fully gluten-free, substitute tamari or a certified gluten-free soy sauce in equal amounts. Also double-check that your Kewpie mayo and furikake seasoning are labeled gluten-free, as formulations can vary by brand.
For another globally inspired comfort dish that’s perfect for sharing, try this Congee Recipe.
Final Thoughts
The salmon sushi bake recipe is one of those rare dishes that feels special enough for a dinner party but easy enough to throw together on a Tuesday night.
It captures everything people love about sushi in a warm, shareable, no-fuss format that anyone can make at home. Whether you’re cooking for a crowd or just treating yourself to something a little out of the ordinary, this recipe delivers every single time.
Give it a try and don’t be surprised when it becomes your most-requested dish. If you make it, leave a comment below and let us know how it turned out, or share a photo with your sushi bake creation!
Recommended:
- Air Fryer Salmon Bites Recipe
- Old Fashioned Salmon Patties Recipe
- Salmon Croquettes Soul Food Recipe
- Air Fryer Frozen Salmon Recipe
- Air Fryer Salmon Patties Recipe
- Baked Cod Recipe
- Shrimp and Sugar Snap Peas Recipe
- Air Fryer Bacon Wrapped Shrimp Recipe
- Seafood Stew Recipe
- Classic Shrimp Scampi Recipe


