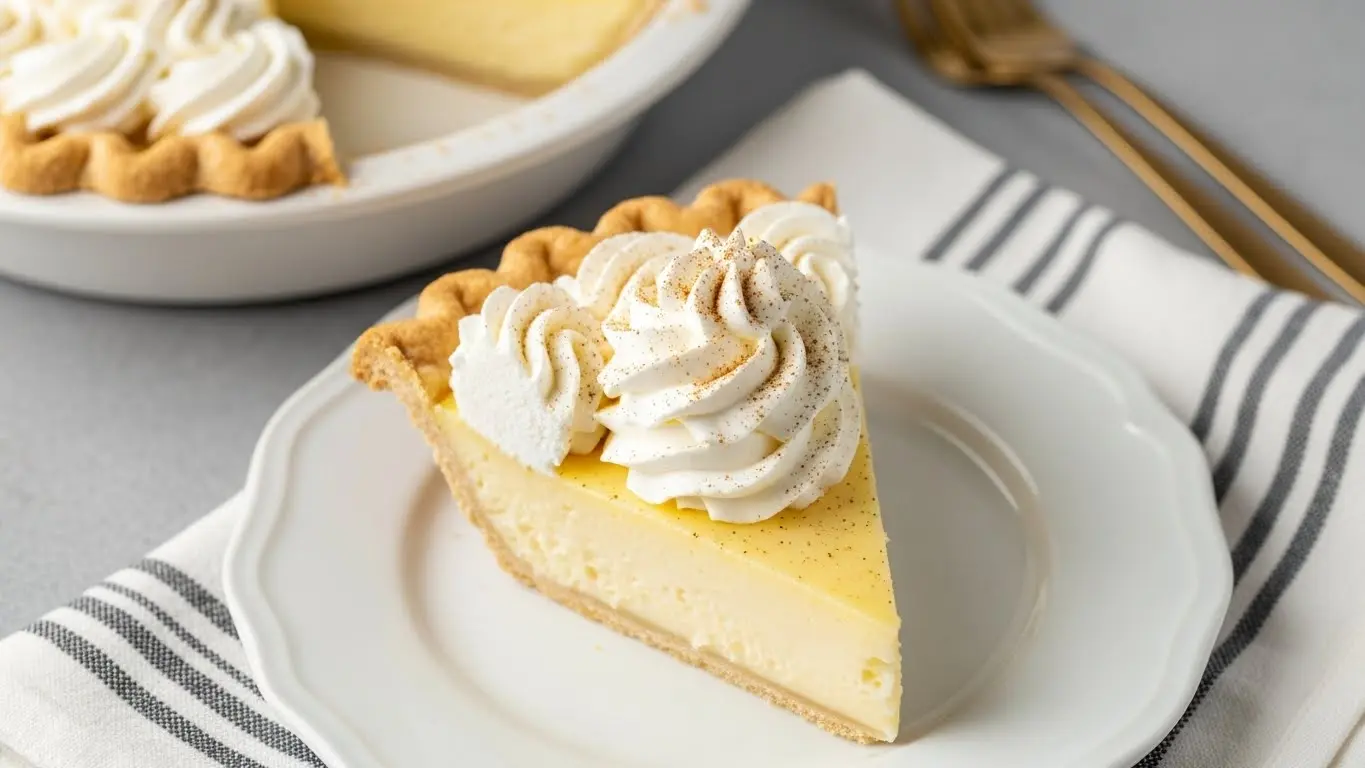
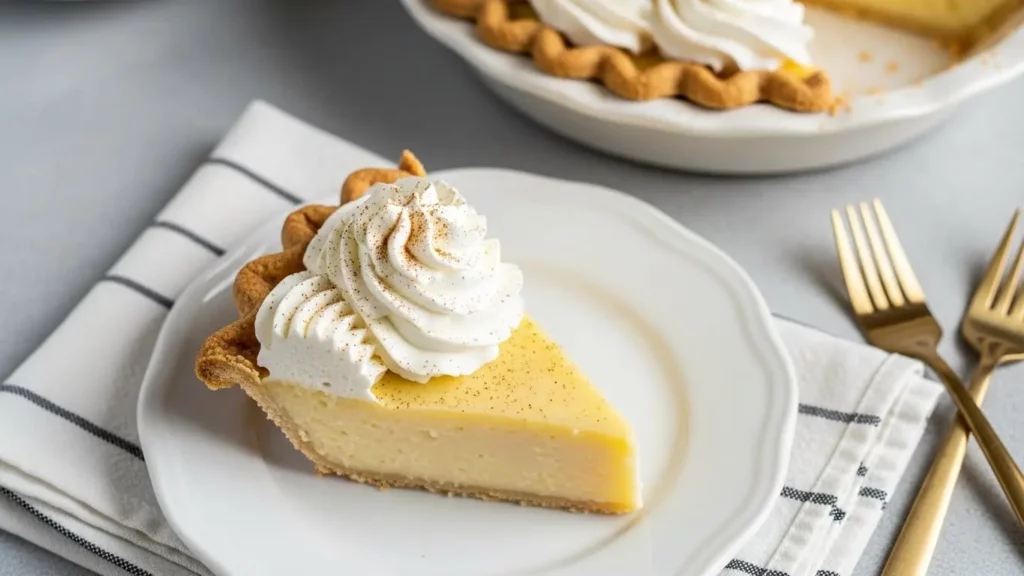
The holidays call for something special, and this eggnog pie recipe delivers all those festive flavors in one stunning dessert.
Imagine a creamy, spiced filling that tastes just like your favorite holiday drink, nestled in a buttery crust and topped with clouds of whipped cream. This pie has become my go-to dessert when I want to impress dinner guests without spending all day in the kitchen.
The best part? You don’t need to be an experienced baker to nail this recipe.
The filling comes together in minutes, and the result is a silky-smooth pie that captures everything we love about eggnog. Rich, nutmeg-spiced, with just a hint of warmth from vanilla and a touch of rum extract.
It’s become such a hit at our family gatherings that I’m always asked to bring two.
Why You’ll Love This Eggnog Pie Recipe
This dessert brings together the nostalgic flavors of eggnog with the elegant presentation of a cream pie. The texture is incredibly smooth and luxurious, almost like a cross between custard and mousse.
What really sets this recipe apart is how it balances the richness of the filling with the lightness of the whipped cream topping. The spices shine through without overwhelming your palate, and every bite melts in your mouth.
Here’s what makes this eggnog pie special:
- Quick preparation: The filling requires no baking and sets in just a few hours
- Make-ahead friendly: Perfect for busy holiday schedules since it needs to chill anyway
- Crowd-pleaser: Even people who think they don’t like eggnog fall for this pie
- Flexible flavoring: Easy to adjust the rum extract or spices to your preference
- Beautiful presentation: Looks impressive with minimal decorating effort
Ingredients
This eggnog pie comes together with simple ingredients you might already have on hand during the holiday season. I love how accessible everything is while still creating something that tastes restaurant-worthy.
- 1 pre-baked 9-inch pie crust (homemade or store-bought)
- 1 envelope (2½ teaspoons) unflavored gelatin
- ¼ cup cold water
- 4 large egg yolks
- ¾ cup granulated sugar, divided
- 2 cups whole milk
- 1 teaspoon vanilla extract
- ½ teaspoon rum extract (or 2 tablespoons dark rum)
- ½ teaspoon ground nutmeg, plus extra for garnish
- ¼ teaspoon ground cinnamon
- Pinch of salt
- 1½ cups heavy whipping cream, divided
- 2 tablespoons powdered sugar
Kitchen Equipment Needed
Having the right tools makes this recipe come together smoothly and helps you achieve that perfect creamy texture. Most of these are standard kitchen items you probably already own.
- Medium saucepan
- Whisk
- Mixing bowls (at least 2)
- Electric mixer or stand mixer
- Rubber spatula
- Measuring cups and spoons
- 9-inch pie dish
- Plastic wrap
- Fine-mesh strainer (optional but helpful)
Recommended Products for This Recipe
After making this pie dozens of times, I’ve found that certain products really do make a difference in the final result. These are my tried-and-true recommendations that’ll help you create the best eggnog pie possible.
1. Nielsen-Massey Madagascar Bourbon Pure Vanilla Extract
Quality vanilla makes such a noticeable difference in custard-based desserts like this one. This vanilla extract has a rich, complex flavor that enhances the eggnog spices beautifully without any artificial aftertaste. A little goes a long way, and it’s worth the investment for holiday baking.
2. KitchenAid 5-Speed Ultra Power Hand Mixer
Whipping cream to stiff peaks and beating egg yolks requires a reliable mixer. This hand mixer has enough power to handle thick mixtures without straining the motor, and the multiple speeds give you perfect control. I’ve had mine for years and it’s never let me down.
3. Whole Nutmeg with Microplane Grater
Freshly grated nutmeg is a complete revelation compared to pre-ground. The flavor is so much brighter and more aromatic. I keep whole nutmeg and a fine grater on hand specifically for holiday recipes, and it elevates this pie from great to extraordinary.
4. Anchor Hocking Glass Pie Dish
A good glass pie dish distributes temperature evenly and lets you see if your crust is browning properly. This one is sturdy, affordable, and the perfect size for this recipe. Plus, glass looks beautiful when you’re serving the pie at the table.
If you’re looking for another impressive holiday dessert, try my sweet potato pie recipe that pairs beautifully with this one on a dessert table.
Step-by-Step Instructions
Making this eggnog pie is easier than you might think. I’ll walk you through each step so you can create a flawless dessert that looks and tastes professional.
1. Bloom the Gelatin
- Pour the cold water into a small bowl
- Sprinkle the unflavored gelatin evenly over the surface of the water
- Let it sit undisturbed for 5 minutes until the gelatin absorbs the water and becomes thick and spongy
- This process, called blooming, ensures the gelatin dissolves smoothly without clumping
2. Prepare the Egg Mixture
- Separate your eggs, placing the yolks in a medium mixing bowl (save the whites for another recipe)
- Add ½ cup of the granulated sugar to the yolks
- Whisk vigorously for 2-3 minutes until the mixture becomes pale yellow and thick enough to leave a ribbon trail when you lift the whisk
- This step aerates the yolks and helps create a smooth, creamy filling
3. Heat the Milk
- Pour the whole milk into your medium saucepan
- Add the remaining ¼ cup sugar, nutmeg, cinnamon, and salt
- Place over medium heat, stirring occasionally with a whisk
- Heat until the milk is steaming and small bubbles form around the edges, but don’t let it boil (this should take about 5-6 minutes)
4. Temper the Eggs
- Remove the hot milk from the heat
- Very slowly drizzle about ½ cup of the hot milk into the egg yolk mixture while whisking constantly
- This gradual process warms the eggs without scrambling them
- Add another ½ cup of hot milk, still whisking continuously
- Pour the warmed egg mixture back into the saucepan with the remaining milk, whisking as you pour
5. Cook the Custard
- Return the saucepan to medium-low heat
- Cook while stirring constantly with your whisk, making sure to reach all corners of the pan
- Continue cooking for 5-7 minutes until the mixture thickens enough to coat the back of a spoon
- When you run your finger across the spoon, it should leave a clear path
- Remove from heat immediately once thickened to prevent curdling
6. Add the Gelatin and Flavorings
- Add the bloomed gelatin to the hot custard
- Whisk vigorously until the gelatin is completely dissolved (this should take about 1 minute)
- Stir in the vanilla extract and rum extract
- The mixture will be quite liquid at this point, but it will set as it chills
7. Cool the Filling
- Transfer the custard to a clean bowl
- Press a piece of plastic wrap directly onto the surface to prevent a skin from forming
- Let it cool at room temperature for 15 minutes
- Then refrigerate for 30-45 minutes, stirring every 15 minutes, until it’s cool and starting to thicken but not set
Another festive option to consider is my pumpkin bar recipe, perfect for serving alongside this pie.
8. Whip the Cream
- Pour 1 cup of the heavy whipping cream into a chilled mixing bowl
- Using your electric mixer on medium-high speed, beat the cream for 2-3 minutes
- Watch carefully as it progresses from foamy to soft peaks
- Stop when the cream holds its shape but still has a slight droop at the tip when you lift the beaters
- Don’t overbeat or you’ll end up with butter
9. Fold in the Whipped Cream
- Take your cooled (but not set) custard mixture from the refrigerator
- Add about one-third of the whipped cream to the custard
- Using a rubber spatula, gently fold it in with broad, sweeping motions from the bottom of the bowl
- Add the remaining whipped cream and continue folding until no white streaks remain
- The mixture should be light, airy, and uniform in color
10. Fill the Pie Crust
- Pour the filling into your pre-baked pie crust
- Use your spatula to spread it evenly, gently shaking the pie to level the surface
- Smooth the top with the spatula for a clean finish
- The filling should come almost to the top of the crust
11. Chill the Pie
- Cover the pie loosely with plastic wrap, being careful not to let it touch the filling
- Refrigerate for at least 4 hours, though overnight is even better
- The pie needs this time for the gelatin to fully set and the flavors to meld
- Don’t try to rush this step or the filling will be too soft to slice
12. Make the Topping
- About 30 minutes before serving, beat the remaining ½ cup of heavy cream with the powdered sugar
- Whip until stiff peaks form (the cream should stand straight up when you lift the beaters)
- Spread or pipe the whipped cream over the chilled pie
- Grate fresh nutmeg over the top for garnish
- Keep refrigerated until ready to serve
Tips for Success
These tricks have saved me from pie disasters over the years and helped me perfect this recipe. A few small adjustments can make the difference between a good pie and a showstopper.
Master the temperature: Always temper your eggs slowly to avoid scrambling. If you add hot liquid too quickly, you’ll end up with sweet scrambled eggs instead of smooth custard. Take your time with this step.
Use room temperature ingredients where possible: Eggs at room temperature incorporate more smoothly into the custard. Take them out of the fridge about 30 minutes before you start cooking.
Don’t skip the straining: If you want an ultra-smooth filling, pour the cooked custard through a fine-mesh strainer before adding the whipped cream. This catches any bits of cooked egg that might have formed.
Watch your gelatin carefully: Too much gelatin makes the pie rubbery, too little and it won’t set. Stick to the measurements in the recipe for the best texture.
Chill your mixing bowl: When whipping cream, use a cold bowl and cold beaters. This helps the cream whip up faster and hold its shape better.
Fold, don’t stir: When combining the whipped cream with the custard, use gentle folding motions. Stirring deflates the air you worked to incorporate, resulting in a denser filling.
Pre-bake your crust properly: Make sure your pie crust is completely cooled before adding the filling. A warm crust can cause the filling to melt and create a soggy bottom.
Test the custard thickness: The custard is ready when it coats the back of a spoon and holds a line when you draw your finger through it. This usually happens around 170-175°F if you’re using a thermometer.
You might also enjoy my banana cream pie recipe for another classic cream pie option.
Serving Suggestions
This eggnog pie shines on its own, but the right accompaniments can create a truly memorable dessert experience. I love playing with different pairings depending on the occasion.
A drizzle of caramel sauce adds a rich sweetness that complements the spices beautifully. You can warm it slightly and let it pool around each slice.
Perfect pairings for your eggnog pie:
- Strong hot coffee or espresso to balance the richness
- Spiced rum or bourbon for an adults-only touch
- Hot fudge sauce drizzled on the plate
- Fresh berries for a pop of color and tartness
- Candied pecans scattered over the whipped cream
- A scoop of vanilla ice cream for temperature contrast
For a complete holiday dessert spread, serve this alongside sugar cookies and gingerbread cookies.
Variations to Try
Once you’ve mastered the basic recipe, these variations let you customize the pie to your taste preferences. I’ve tried all of these and they’re each delicious in their own way.
Flavor twists to experiment with:
- Bourbon Eggnog Pie: Replace the rum extract with 2 tablespoons of good bourbon for a deeper, oakier flavor
- Chocolate Eggnog Pie: Fold in ½ cup of melted and cooled dark chocolate with the whipped cream
- Gingersnap Crust: Use crushed gingersnap cookies instead of regular pie crust for extra spice
- Coffee Eggnog Pie: Add 1 tablespoon of instant espresso powder to the milk mixture
- Maple Eggnog Pie: Replace ¼ cup of the sugar with pure maple syrup for a subtle maple flavor
- Spiced Whipped Cream: Add a pinch of cinnamon and nutmeg to your whipped cream topping
- Mini Eggnog Pies: Divide the filling among individual tart shells for single servings
Storage and Reheating
Proper storage keeps your eggnog pie fresh and delicious for days. Since this is a custard-based dessert, following these guidelines ensures food safety and maintains the best texture.
How to store your pie properly:
- Cover the pie tightly with plastic wrap or aluminum foil
- Store in the refrigerator at all times (never at room temperature)
- The pie will keep well for up to 4 days when properly refrigerated
- For best flavor and texture, consume within 3 days
- If freezing, wrap tightly in plastic wrap and then foil (freeze for up to 1 month)
- Thaw frozen pie overnight in the refrigerator, never at room temperature
- Add fresh whipped cream just before serving if the original topping has deflated
Note: This pie is meant to be served cold, so there’s no reheating needed. In fact, heating would cause the gelatin to melt and the pie to lose its structure.
For another make-ahead dessert option, check out my chocolate pie recipe.
Nutritional Facts
Here’s the approximate nutritional information per slice (based on 8 servings):
- Calories: 385
- Total Fat: 24g
- Saturated Fat: 14g
- Cholesterol: 175mg
- Sodium: 180mg
- Total Carbohydrates: 35g
- Dietary Fiber: 0.5g
- Sugars: 28g
- Protein: 6g
Note: These values are estimates and will vary based on the specific ingredients and brands you use. The crust type significantly affects the nutritional content.
Health Benefits of Key Ingredients
While this is definitely an indulgent dessert, some of the ingredients do offer nutritional benefits. Understanding what’s in your food helps you make informed choices.
The eggs in this recipe provide high-quality protein and important nutrients like choline, which supports brain health. Egg yolks are also rich in vitamins A, D, E, and K.
Nutritional highlights:
- Nutmeg: Contains antioxidants and compounds that may help reduce inflammation and improve brain function
- Cinnamon: Known for its anti-inflammatory properties and ability to help regulate blood sugar
- Milk: Excellent source of calcium, vitamin D, and protein for bone health
- Eggs: Provide complete protein and essential nutrients like vitamin B12 and selenium
- Heavy cream: Contains fat-soluble vitamins and conjugated linoleic acid (in grass-fed varieties)
Frequently Asked Questions
1. Can I make this pie without gelatin?
You can, but the texture will be much softer and more like a pudding pie. The gelatin provides structure that allows clean slices. If you prefer to avoid gelatin, you could use agar-agar as a plant-based alternative, though you’ll need to adjust the amount (typically use about 2 teaspoons of agar powder).
2. Why did my filling turn out grainy?
A grainy texture usually means the eggs were cooked too quickly or at too high a temperature, causing them to curdle slightly. Make sure you temper the eggs properly by adding the hot milk very gradually while whisking constantly. Also, keep the heat at medium-low when cooking the custard and stir continuously.
3. Can I use store-bought eggnog instead of making the custard?
While you can use prepared eggnog, the result will be quite different. Store-bought eggnog is much thinner and doesn’t have the rich, thick consistency of this custard base. If you want to try it, you’ll need to increase the gelatin to about 1½ envelopes to compensate for the thinner liquid.
4. How do I know when the custard is thick enough?
The custard is ready when it coats the back of a spoon and holds a clear line when you draw your finger through it. It should register between 170-175°F on an instant-read thermometer. Don’t let it boil or get too thick, as it will continue to thicken as it cools.
5. Can I make this pie alcohol-free?
Absolutely! Simply omit the rum extract and add an extra ½ teaspoon of vanilla extract instead. You could also add a touch of maple extract or increase the spices slightly. The pie will still be delicious and family-friendly.
Final Thoughts
This eggnog pie recipe has earned its place as a holiday staple in my kitchen, and I have a feeling it’ll become one of your favorites too. The creamy, spiced filling paired with that cloud of whipped cream creates pure dessert magic.
What I love most is how it brings people together during the holidays. There’s something special about sharing a slice of homemade pie with the people you care about. Give this recipe a try for your next gathering and watch it disappear.
I’d love to hear how your eggnog pie turns out! Drop a comment below with your thoughts, any variations you tried, or share a photo of your creation. Happy baking!
Recommended:
- Key Lime Pie Recipe
- Sweet Potato Pie Recipe
- Tomato Pie Recipe
- Lemon Meringue Pie Recipe
- Peanut Butter Pie Recipe
- Cherry Pie Recipe
- Peach Pie Recipe
- Blueberry Pie Recipe
- Boston Cream Pie Recipe
- Fudge Stripe Cookies Recipe


