If you have been on the hunt for the ultimate chocolate shortbread cookies recipe, your search ends here. These cookies hit every note you want in a shortbread: deeply chocolaty, impossibly buttery, and that signature melt-in-your-mouth crumble that keeps you reaching for just one more. Unlike regular drop cookies, shortbread relies on a high ratio of butter to flour, which is exactly what gives it that dense, rich, tender texture that no amount of baking powder can replicate.
What makes this version so reliable is the combination of Dutch-process cocoa powder and a slice-and-bake method that makes the whole process approachable, even for beginners.
The dough comes together in minutes, chills in the fridge, and then bakes into perfectly uniform rounds that look bakery-worthy every single time.
You can serve them plain, dust them with powdered sugar, or dip them in melted chocolate for a fancier finish. Any way you go, these cookies deliver.
For a classic take on the base version, you might also love the Shortbread Cookie Recipe that this chocolate variation is built on.
Why You’ll Love This Chocolate Shortbread Cookies Recipe
These cookies are a dream for anyone who loves chocolate but also appreciates the simplicity and elegance of traditional baking.
They use just a handful of pantry staples and come together in one bowl, which means less cleanup and more eating.
The dough can be made ahead of time and stored in the fridge for days, so you are always just minutes away from fresh-baked cookies.
They hold their shape beautifully during baking, which makes them perfect for gifting, holiday trays, or just keeping a stash at home all week.
Here is what makes this recipe a keeper:
- Deeply chocolaty flavor from quality cocoa powder without being overly sweet
- That classic melt-in-your-mouth shortbread texture that sets these apart from regular cookies
- Easy slice-and-bake method that requires no special skills or tools
- Elegant enough to gift but simple enough for any weeknight baking session
- Stores well at room temperature for up to a week, making them ideal for batch baking
- Easily customizable with chocolate dipping, sprinkles, or flavor additions
Another reader favorite that pairs beautifully with a cookie tin is this Whipped Shortbread Cookies Recipe.
Ingredients
The beauty of this recipe is in its simplicity. Each ingredient plays a specific and important role, so do not skip anything, and try to use the best quality you can find, especially when it comes to the butter and cocoa powder.
Here is what you will need (makes approximately 24 cookies):
- 1 cup (225 g) unsalted butter, softened to room temperature
- ¾ cup (90 g) powdered sugar (also called icing sugar), sifted
- 1 teaspoon pure vanilla extract
- ½ teaspoon fine salt
- ½ cup (50 g) Dutch-process cocoa powder, sifted
- 1¾ cups (220 g) all-purpose flour, spooned and leveled
Optional for decorating:
- 4 oz (113 g) semi-sweet chocolate chips or chopped baking chocolate for dipping or drizzling
- Sprinkles, nonpareils, or flaky sea salt for topping
You might also enjoy baking these Cranberry Shortbread Cookies alongside for a beautiful holiday cookie platter.
Kitchen Equipment Needed
You do not need anything fancy to make these cookies, but having the right tools makes the process smoother and more enjoyable.
Gather the following before you begin:
- Stand mixer or hand mixer with paddle attachment
- Large mixing bowl
- Fine mesh sieve or sifter (for cocoa powder and powdered sugar)
- Plastic wrap for chilling the dough log
- Parchment paper for lining baking sheets
- Two rimmed baking sheets
- A sharp chef’s knife for slicing the dough log
- Wire cooling rack
- Ruler (optional, but helpful for consistent cookie thickness)
- Small microwave-safe bowl (for melting chocolate, if decorating)
Read Also: Lemon Shortbread Cookies Recipe
Recommended Products for This Recipe
These are products I genuinely recommend based on their quality and how much of a difference they make in the final result.
1. Dutch-Process Cocoa Powder
Dutch-process cocoa is alkalized, which gives it a darker color and a smoother, less acidic flavor than natural cocoa. In a recipe like this where cocoa is the main flavoring agent, the quality of your cocoa is everything. Look for a brand like Cacao Barry or Valrhona for the deepest flavor.
2. KitchenAid Stand Mixer
For shortbread dough, creaming butter and sugar together properly is the most important step. A stand mixer makes this effortless and ensures you get the right light, fluffy texture without overworking the dough. It is a tool that pays for itself in years of reliable baking.
3. Silicone Baking Mat
A silicone baking mat provides even heat distribution and prevents the bottoms of your shortbread from browning too quickly. It is reusable, easy to clean, and a great alternative to parchment paper if you bake often.
4. Offset Spatula
An offset spatula is incredibly useful for transferring delicate shortbread slices to and from the baking sheet without breaking them, especially when they are still warm and slightly fragile.
You might also love this Almond Shortbread Cookies Recipe for another elegant variation to add to your baking rotation.
Step-by-Step Instructions
1. Prepare Your Ingredients
- Take the butter out of the refrigerator at least 30 to 45 minutes before you start baking. Properly softened butter should give when you press a finger into it but should not be melted or greasy. This step is critical because butter that is too cold will not cream properly, and butter that is too warm will make the dough sticky and hard to handle.
- Sift the powdered sugar through a fine mesh sieve into a small bowl. Sifting removes any lumps that could affect the smooth texture of the dough.
- Sift the Dutch-process cocoa powder into a separate small bowl and set it aside. Sifting cocoa is especially important because it tends to clump.
- Spoon the all-purpose flour into your measuring cup and level it off with a straight edge. Do not scoop directly from the bag, as this compacts the flour and can result in too much flour, which makes the cookies dry and crumbly.
2. Cream the Butter and Sugar
- Place the softened butter in the bowl of your stand mixer fitted with the paddle attachment, or in a large mixing bowl if using a hand mixer.
- Beat the butter on medium speed for about 1 to 2 minutes, until it is smooth and creamy on its own.
- Add the sifted powdered sugar and the fine salt to the butter.
- Beat on medium speed for another 2 to 3 minutes, scraping down the sides of the bowl with a rubber spatula halfway through. The mixture should look pale, light, and fluffy at this point. This step is what creates the tender texture of the finished cookie, so do not rush it.
- Add the vanilla extract and mix on low speed for about 30 seconds, just until it is incorporated.
3. Add the Cocoa Powder
- Add the sifted cocoa powder to the butter mixture.
- Mix on low speed at first to avoid a cocoa cloud, then increase to medium speed and beat for about 1 minute until the cocoa is completely and evenly incorporated.
- Scrape down the sides and bottom of the bowl with a rubber spatula to make sure no streaks of cocoa remain. The mixture should be uniformly chocolate-colored and smooth at this stage.
4. Add the Flour and Form the Dough
- Add all of the measured flour to the bowl at once.
- Mix on low speed just until the flour disappears and the dough comes together. This should take about 30 to 45 seconds. Do not overmix once the flour is added. Overmixing develops gluten, which makes the cookies tough instead of tender and crumbly.
- The dough will look slightly crumbly at first, but it will come together when you press it between your fingers. If it seems too dry to hold together, add ½ teaspoon of cold water and mix briefly.
5. Shape the Dough into a Log
- Turn the dough out onto a clean work surface or a sheet of plastic wrap.
- Using your hands, press and shape the dough into a smooth log, approximately 2 inches (5 cm) in diameter and about 10 to 12 inches (25 to 30 cm) long.
- Roll the log gently on the surface to even it out and ensure it is circular, not oval.
- Wrap the dough log tightly in the plastic wrap, twisting the ends like a candy wrapper to seal it.
- Place the wrapped log in the refrigerator and chill for at least 2 hours, or up to 48 hours. The longer it chills, the easier it will be to slice cleanly. You can also freeze the log at this point for up to 3 months.
6. Preheat the Oven and Prepare Baking Sheets
- When you are ready to bake, position an oven rack in the center of the oven.
- Preheat the oven to 325°F (165°C). If your oven runs hot, consider using 315°F (157°C) to avoid over-browning the bottoms.
- Line two baking sheets with parchment paper or silicone baking mats and set aside.
7. Slice and Arrange the Cookies
- Remove the chilled dough log from the refrigerator and unwrap it.
- Using a sharp chef’s knife, slice the log into rounds that are approximately ¼ inch (6 mm) thick. A gentle sawing motion works better than pressing straight down, which can flatten the log.
- If the log flattens slightly on one side from resting in the fridge, simply rotate it 90 degrees every few slices as you cut.
- Place the sliced rounds on the prepared baking sheets, spacing them about 1 inch (2.5 cm) apart. These cookies do not spread much, so they do not need a lot of room.
8. Bake the Cookies
- Place one baking sheet at a time on the center rack of the preheated oven.
- Bake for 14 to 17 minutes. Unlike many cookies, shortbread does not turn golden brown, so you cannot rely on color to know they are done. Instead, watch for the glossy sheen on the tops of the cookies to disappear. Once that sheen fades, the moisture has evaporated and the cookies are set.
- Remove from the oven and allow the cookies to cool completely on the baking sheet before moving them. They will be very fragile when warm and will firm up as they cool.
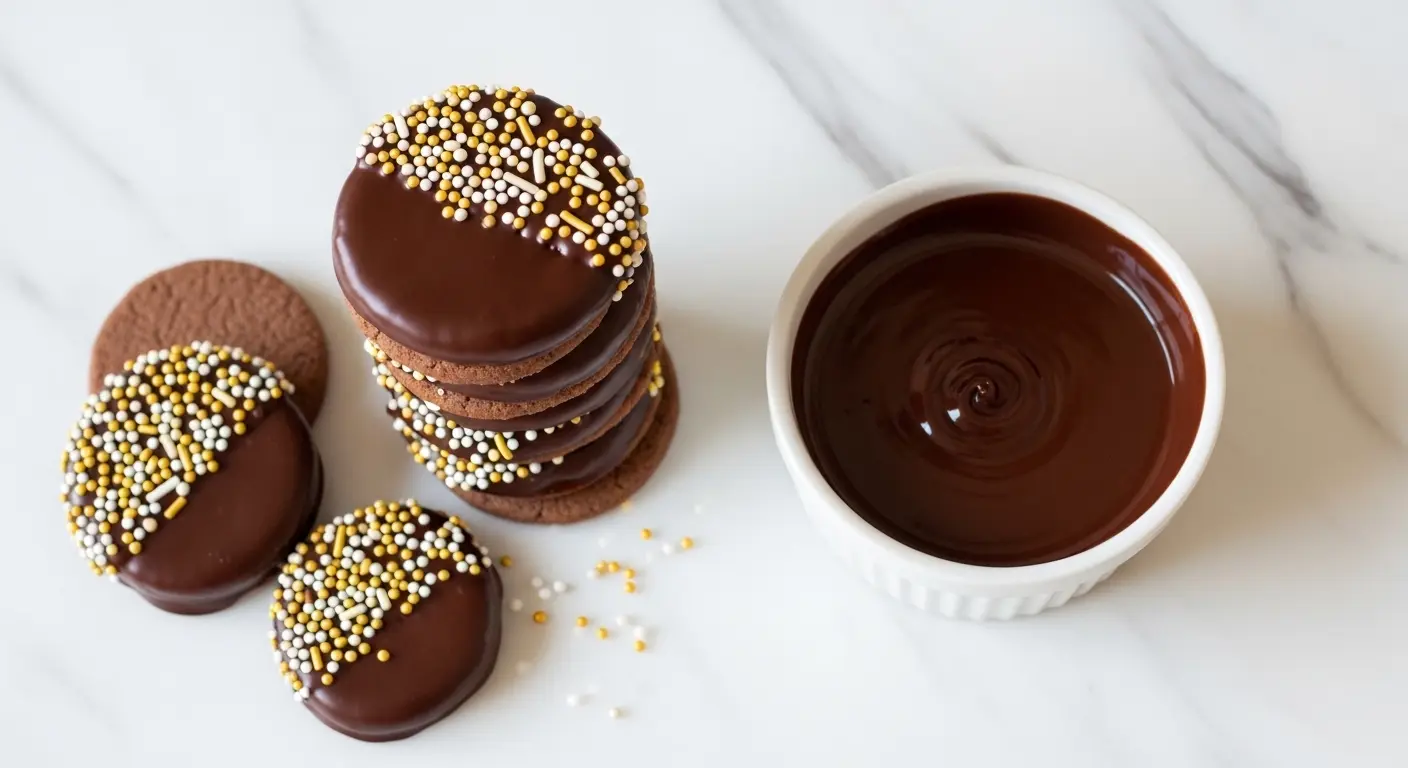
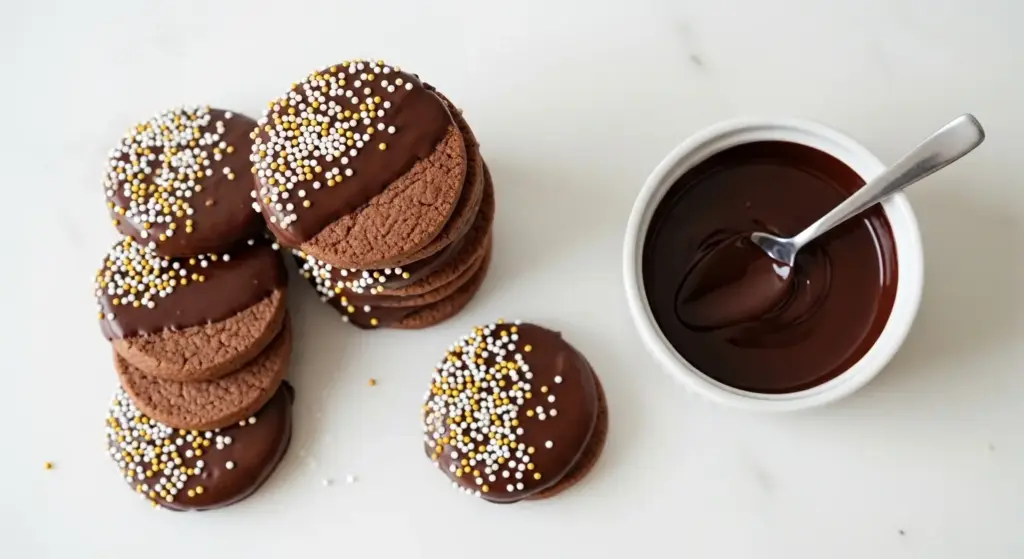
9. Decorate (Optional but Wonderful)
- If you want to dip or drizzle the cookies with chocolate, wait until they are fully cooled before decorating.
- Place the semi-sweet chocolate chips or chopped baking chocolate in a small microwave-safe bowl.
- Microwave in 20-second intervals, stirring well between each interval, until the chocolate is fully melted and smooth. Do not overheat, as this can cause the chocolate to seize.
- Dip half of each cookie into the melted chocolate, or use a spoon to drizzle chocolate over the tops in a back-and-forth motion.
- If adding sprinkles or flaky sea salt, do so immediately while the chocolate is still warm.
- Place the decorated cookies on a parchment-lined surface and let the chocolate set completely at room temperature, or speed up the process by placing them in the refrigerator for 10 to 15 minutes.
For another beginner-friendly baking treat, this Pecan Shortbread Cookies Recipe is another great recipe to add to your lineup.
Tips for Success
Getting shortbread right is mostly about respecting a few key principles. These tips will help you nail it on the first try.
Keep these pointers in mind for the best results:
- Use room-temperature butter, not cold or melted. The creaming stage requires soft butter to incorporate air properly, which creates that light, tender texture.
- Weigh your ingredients when possible, especially the flour and cocoa. Volume measurements can vary significantly based on how compacted the ingredient is.
- Do not overbake. Chocolate cookies are harder to judge visually because they do not brown in an obvious way. The disappearance of the glossy sheen on top is your most reliable cue.
- Use Dutch-process cocoa for the best flavor. Natural cocoa is more acidic and produces a slightly bitter, different flavor profile. Dutch-process gives you that rich, deep, smooth chocolate taste you want.
- Chill the dough long enough. A minimum of 2 hours in the fridge ensures clean slices and cookies that hold their round shape in the oven.
- If the dough log cracks when you slice it, let it sit at room temperature for 5 minutes before continuing to cut.
Read Also: Scottish Shortbread Cookie Recipe
Serving Suggestions
Chocolate shortbread cookies are versatile enough to fit into almost any occasion, from casual afternoon snacking to elegant holiday dessert spreads.
They pair beautifully with hot beverages, creamy desserts, and fresh fruit, making them endlessly adaptable to whatever you are serving.
Some of the best ways to enjoy these cookies:
- Serve alongside a cup of hot chocolate for a deeply indulgent treat
- Stack them in a festive cookie tin or box and give them as a holiday gift
- Pair them with vanilla ice cream or a scoop of coffee gelato for an easy dessert
- Arrange them on a dessert board alongside truffles, caramels, and berries for an impressive spread
- Crumble them over chocolate pudding for a quick and elegant parfait
- Serve them at a tea party or brunch alongside other finger sweets and scones
Variations to Try
Once you have mastered the base recipe, there are so many fun and delicious ways to customize these cookies.
Here are some popular and easy variations:
- Chocolate-Dipped Shortbread: Melt white chocolate and dip the cookies for a striking black-and-white contrast
- Espresso Shortbread: Add 1 teaspoon of instant espresso powder to the dough along with the cocoa for a mocha-flavored cookie
- Mint Chocolate Shortbread: Add ½ teaspoon of pure peppermint extract with the vanilla for a refreshing holiday spin
- Orange Chocolate Shortbread: Stir in the zest of one orange and a few drops of orange extract for a sophisticated flavor combination
- Chocolate Chunk Shortbread: Fold in ½ cup of finely chopped dark chocolate chunks before shaping the log for extra bites of chocolate
- Salted Caramel Drizzle: Drizzle the baked cookies with homemade or store-bought caramel sauce and a pinch of flaky sea salt
You might also love the flavor profile in these Raspberry Shortbread Cookies if you enjoy fruity, jammy contrasts with buttery dough.
Storage and Reheating
Chocolate shortbread stores exceptionally well, which is one of the many reasons it is such a popular choice for holiday baking and gifting.
Here is how to keep your cookies fresh:
- Room temperature: Store fully cooled cookies in an airtight container at room temperature for up to 7 days. Separate layers with parchment paper to prevent sticking.
- Refrigerator: You can refrigerate the cookies for up to 2 weeks, though the texture remains best at room temperature.
- Freezer (baked cookies): Place cooled, undecorated cookies in a zip-lock freezer bag or airtight container with parchment between layers and freeze for up to 3 months. Thaw at room temperature for about 15 to 20 minutes before serving.
- Freezer (unbaked dough log): Wrap the dough log tightly in plastic wrap, then in foil, and freeze for up to 3 months. Thaw overnight in the refrigerator before slicing and baking.
- Reheating: These cookies are best enjoyed at room temperature and do not require reheating. If you prefer a slightly warm cookie, place them on a baking sheet in a 300°F (150°C) oven for 3 to 4 minutes.
Another cookie that stores wonderfully for gifts and cookie tins is this Christmas Shortbread Cookies Recipe.
Nutritional Facts
The following nutritional information is an estimate per cookie, based on a batch of approximately 24 cookies using the standard recipe without chocolate dipping.
| Nutrient | Per Cookie (approx.) |
|---|---|
| Calories | 130 kcal |
| Total Fat | 8 g |
| Saturated Fat | 5 g |
| Cholesterol | 20 mg |
| Sodium | 50 mg |
| Total Carbohydrates | 14 g |
| Dietary Fiber | 1 g |
| Total Sugars | 5 g |
| Protein | 1.5 g |
Nutritional values are estimates only and can vary based on specific brands used and exact portion sizes.
Another reader-favorite baking treat worth trying is this Best Chocolate Chip Cookies Recipe.
Health Benefits of Key Ingredients
While chocolate shortbread is absolutely a treat and not a health food, some of its core ingredients do offer genuine nutritional value.
Understanding what is in what you bake adds an appreciation for these humble pantry staples.
Key ingredients and their benefits:
- Butter: A natural source of fat-soluble vitamins A, D, E, and K2, butter from grass-fed cows contains butyrate, a fatty acid that supports gut health and has anti-inflammatory properties
- Cocoa powder: Rich in flavonoids, particularly epicatechin, which are powerful antioxidants shown to support cardiovascular health and improve blood flow; cocoa also provides iron, magnesium, and zinc
- All-purpose flour: Provides carbohydrates for energy, as well as small amounts of protein, B vitamins like niacin and folate, and minerals including iron and selenium
- Vanilla extract: Contains small amounts of antioxidants and has been studied for its mild calming properties; pure vanilla also contributes to reducing the need for added sugar by enhancing perceived sweetness
For more baked goods that balance indulgence with wholesome ingredients, check out this Easy Granola Recipe.
Frequently Asked Questions
1. Can I use salted butter instead of unsalted butter?
Yes, you can use salted butter in this recipe. If you do, simply omit the additional fine salt called for in the recipe, otherwise the cookies may taste too salty. Many traditional shortbread recipes actually start with salted butter, and the salt can enhance the chocolate flavor. The key is to not double up by using salted butter and then also adding extra salt.
2. Do I have to chill the dough before baking?
For the slice-and-bake log method used in this recipe, chilling is not optional. The dough must be firm enough to slice cleanly without crumbling or losing its shape. A minimum of 2 hours in the refrigerator is necessary. If you are short on time, you can place the wrapped dough log in the freezer for 45 to 60 minutes as a faster alternative.
3. Why did my cookies turn out crumbly and fall apart?
The most common cause of overly crumbly shortbread is too much flour. This usually happens when flour is scooped directly from the bag, which compacts it and results in using significantly more than the recipe calls for. Always spoon flour into your measuring cup and level it off, or better yet, weigh it using a kitchen scale. Another possible cause is overbaking, which dries out the cookies and makes them fragile.
4. Can I use natural cocoa powder instead of Dutch-process?
You can substitute natural cocoa powder, but it will change the flavor and appearance of the cookies. Natural cocoa is more acidic and has a sharper, slightly bitter chocolate flavor, while Dutch-process cocoa has a smoother, deeper, and more mellow chocolate taste. The cookies made with natural cocoa will also be slightly lighter in color. If natural cocoa is all you have, it will still work, but the results will be noticeably different.
5. Can I roll and cut this dough instead of using the slice-and-bake method?
Absolutely. Roll the dough out between two sheets of parchment paper to about ¼ inch (6 mm) thickness, then use cookie cutters to cut out shapes. If you are using the roll-and-cut method, you do not need to chill the dough beforehand unless it becomes too soft to handle during rolling. If the dough sticks or tears, wrap it and chill for 20 to 30 minutes before continuing. Keep in mind that thinner cookies will bake faster, so start checking for doneness a few minutes early.
Read Also: Cherry Almond Shortbread Cookies Recipe
Final Thoughts
If you have been looking for a reliable, no-fuss cookie that delivers serious chocolate flavor with that irresistible melt-in-your-mouth shortbread texture, this chocolate shortbread cookies recipe is exactly what you need.
It is the kind of recipe that earns a permanent place in your baking rotation because it is simple enough for any skill level but impressive enough for any occasion.
Try it plain first, then experiment with the variations and decorating options. Once you taste how good homemade chocolate shortbread can be, store-bought will never quite measure up.
I would love to hear how yours turned out! Drop a comment below and let me know what variation you tried, or share a photo of your cookies. Happy baking!
Recommended:
- Cranberry Orange Shortbread Cookies Recipe
- Lavender Shortbread Cookies Recipe
- Rosemary Shortbread Cookies Recipe
- Cranberry Pistachio Shortbread Cookies Recipe
- Strawberry Shortbread Cookies Recipe
- Old Fashioned Chocolate Chip Cookie Recipe
- Chewy Chocolate Chip Cookies Recipe
- Sugar Cookies Recipe
- Snickerdoodle Cookie Recipe
- Gingerbread Cookie Recipe


