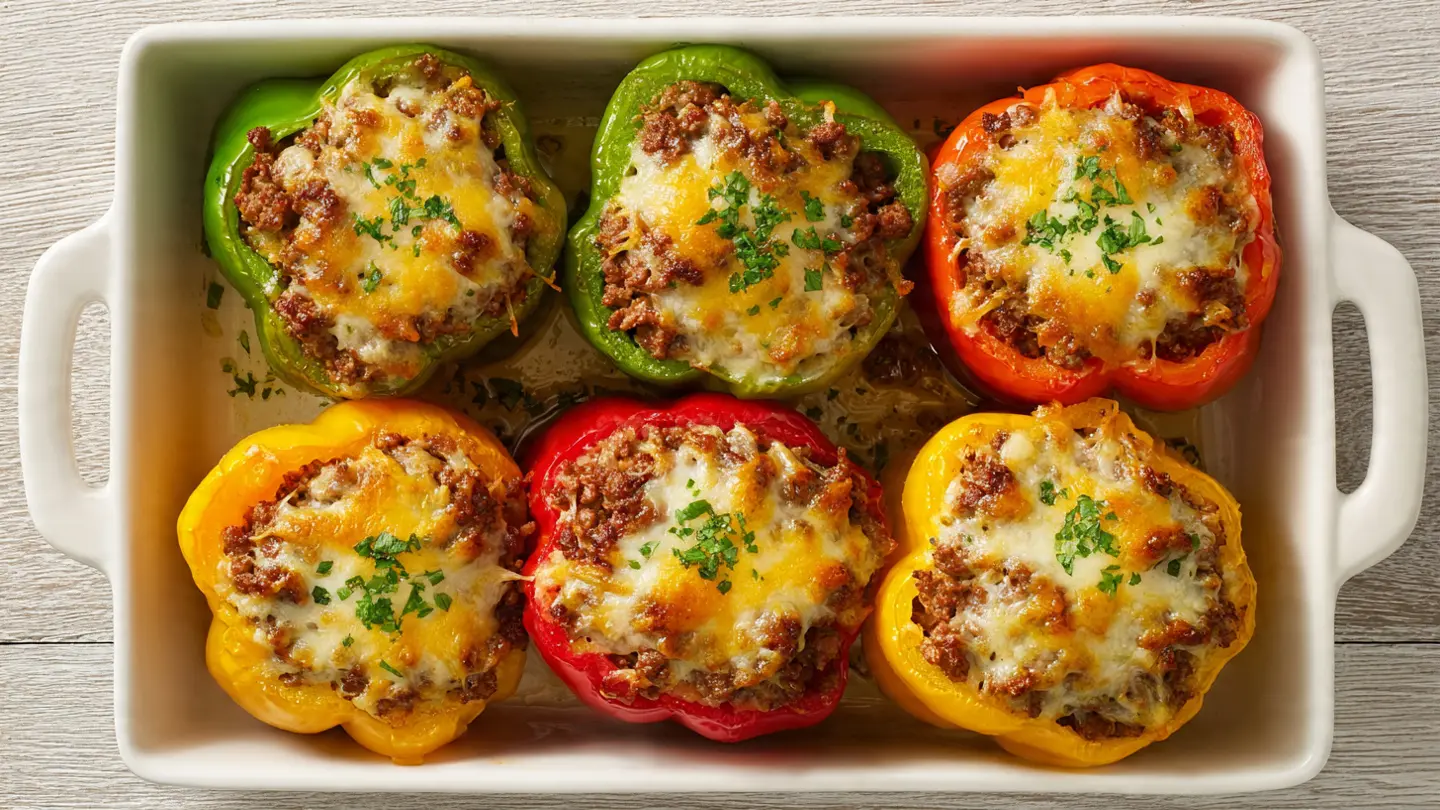
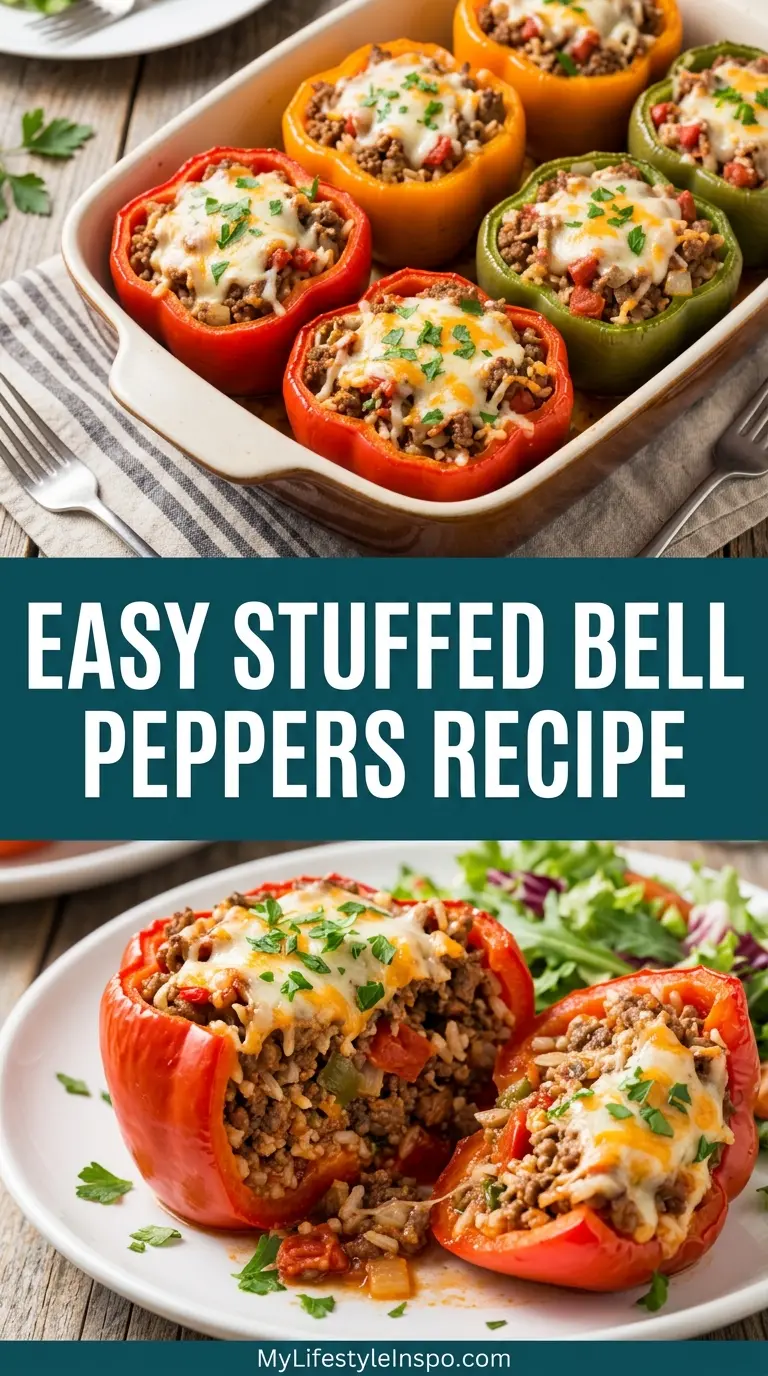
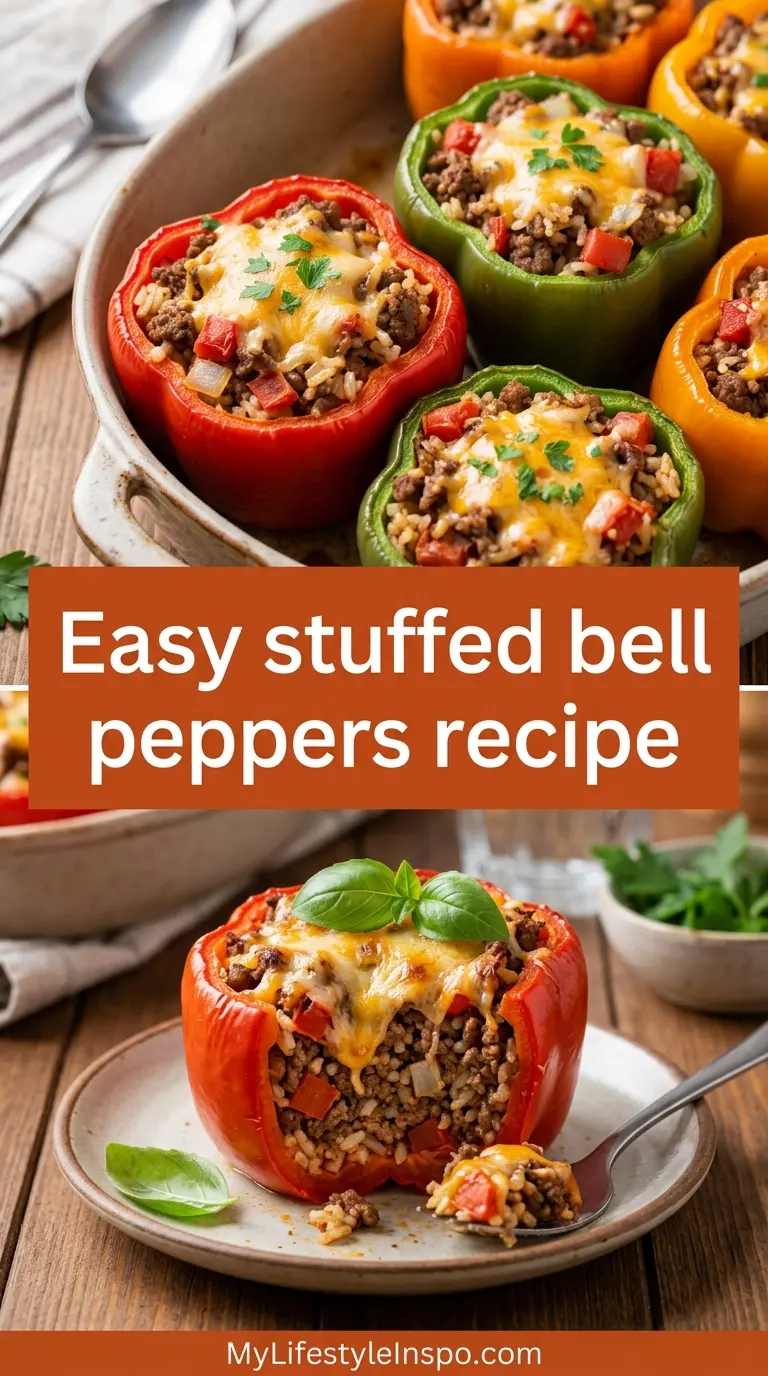
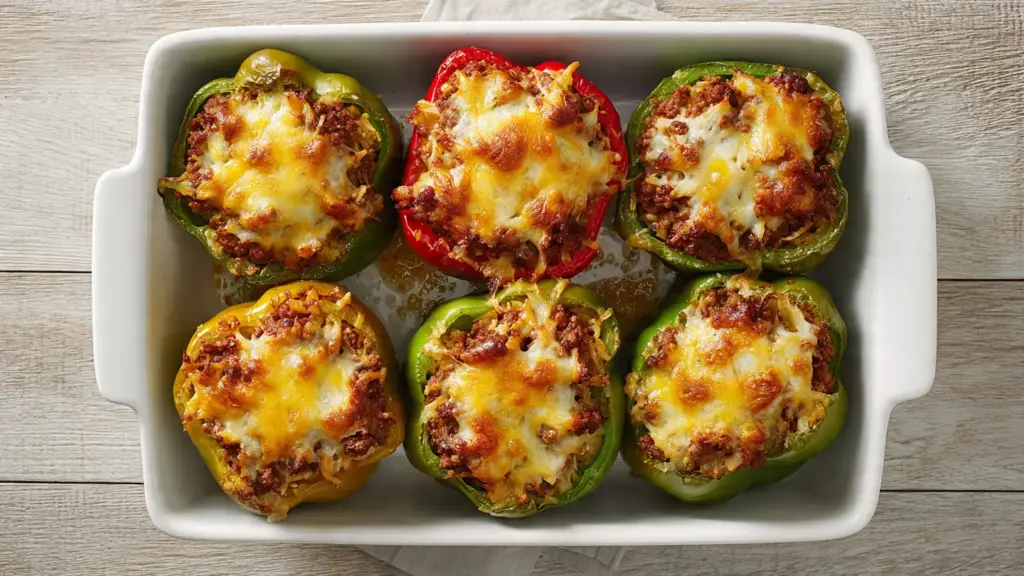
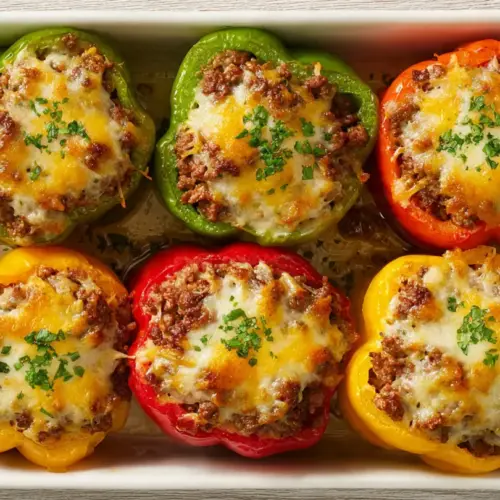
If you’re looking for a satisfying, colorful dinner that comes together with minimal fuss, this easy stuffed bell peppers recipe is exactly what you need.
Tender bell peppers loaded with a savory ground beef and rice filling, smothered in tomato sauce, and finished with melted cheese on top — it’s the kind of meal that looks impressive but is genuinely simple to pull off on a weeknight.
What makes this recipe so reliable is the combination of a well-seasoned meat filling and the peppers themselves acting as natural bowls, soaking up all the flavors as they bake.
The result is a complete, well-balanced dinner in a single dish, with virtually no extra cleanup.
If you love the flavors here, you might also enjoy the Classic Stuffed Bell Peppers Recipe for a slightly more traditional take on this classic comfort food dish.
Why You’ll Love This Easy Stuffed Bell Peppers Recipe
This dish has been a family dinner staple for generations, and there’s a very good reason for that.
It’s genuinely flexible — red, yellow, orange, or green bell peppers all work, and the filling can be adjusted based on what you have on hand.
The prep is straightforward, and the oven does most of the heavy lifting for you.
You also end up with a complete meal in one dish: protein, vegetables, and carbs all baked together so you don’t need to cook a dozen side dishes.
Here’s a quick look at why this recipe works so well:
- Crowd-pleaser from the start. The combination of seasoned ground beef, fluffy rice, and melted cheese is universally loved by kids and adults alike.
- One-pan dinner. Everything bakes together in a single baking dish, keeping cleanup to a minimum.
- Naturally portioned. Each pepper is its own serving, which makes plating easy and prevents overeating.
- Great for meal prep. Stuffed peppers reheat beautifully, making them a smart option for lunches or dinners throughout the week.
- Highly customizable. Swap the protein, change the cheese, or add vegetables to the filling — the base recipe is endlessly adaptable.
For a fun weeknight dinner with similar bold flavors, check out this Stuffed Pepper Skillet Recipe that comes together even faster on the stovetop.
Ingredients
For best results, use firm, evenly-sized bell peppers so they cook at the same rate and hold their shape throughout baking. A blend of mozzarella and cheddar gives you the best melt and flavor combination, but feel free to use what you have.
- 6 medium bell peppers (any color), tops cut off and seeds removed
- 1 lb (450 g) lean ground beef
- 1 cup (185 g) long-grain white rice, uncooked
- 2 cups (480 ml) beef broth
- 1 can (15 oz / 425 g) diced tomatoes, drained
- 1 can (15 oz / 425 g) tomato sauce, divided
- 1 small yellow onion, finely diced
- 3 cloves garlic, minced
- 1 teaspoon Italian seasoning
- 1 teaspoon garlic powder
- ½ teaspoon onion powder
- ½ teaspoon smoked paprika
- ½ teaspoon salt, plus more to taste
- ¼ teaspoon black pepper
- 1 ½ cups (170 g) shredded mozzarella cheese, divided
- ½ cup (55 g) shredded cheddar cheese
Read Also: Stuffed Pepper Soup Recipe
Kitchen Equipment Needed
Having the right tools on hand before you start makes the process much smoother. A large skillet is essential for browning the beef and building the filling, while a deep baking dish keeps the peppers upright and prevents them from tipping over during baking.
- Large skillet or sauté pan
- Medium saucepan (for cooking rice)
- 9×13 inch baking dish
- Sharp knife and cutting board
- Wooden spoon or spatula
- Large mixing bowl
- Measuring cups and spoons
- Aluminum foil
- Ladle or large spoon (for filling the peppers)
- Instant-read meat thermometer
You might also enjoy: Squash Casserole Recipe
Recommended Products for This Recipe
These are products I genuinely recommend based on quality and performance, as they make preparing this recipe easier and produce better results.
1. Pyrex Deep 9×13 Glass Baking Dish
A deep glass baking dish is ideal for stuffed peppers because the walls hold the peppers upright and the glass distributes heat evenly without any hot spots. The clear sides also let you see the sauce bubbling without lifting the foil. It’s a kitchen workhorse that will serve you well for casseroles, roasts, and baked pasta too.
2. Lodge Cast Iron Skillet
A cast iron skillet gives you an excellent sear on the ground beef, which means more fond (those browned bits) that translate directly into richer flavor in your filling. It retains heat beautifully and can go from stovetop to oven if needed. It’s built to last decades with minimal maintenance.
3. San Marzano Crushed Tomatoes
The quality of your tomato sauce matters more than you’d think in this recipe since it’s the base of the filling’s moisture and flavor. San Marzano tomatoes are naturally sweeter and less acidic than standard canned tomatoes, giving your stuffed peppers a noticeably richer sauce. They’re worth seeking out for any tomato-forward dish.
4. OXO Good Grips Stainless Steel Ladle
A good ladle makes spooning the filling into each pepper clean and precise, which keeps things neat and ensures every pepper gets an even amount of filling. The OXO version has a comfortable grip and a pour spout that prevents drips. It’s a simple upgrade that makes a real difference.
5. Microplane Zester / Box Grater
Freshly shredded cheese melts significantly better than pre-shredded cheese, which is coated with anti-caking agents that can make the melt gummy. A box grater makes quick work of both mozzarella and cheddar blocks so you get that gorgeous, stretchy cheese pull every time.
This pairs wonderfully with a warm bowl of Stuffed Pepper Soup if you want to stretch the same flavors into a cozy next-day meal.
Step-by-Step Instructions
1. Cook the Rice
- Combine 1 cup (185 g) of long-grain white rice with 2 cups (480 ml) of beef broth in a medium saucepan over medium-high heat.
- Bring to a boil, then reduce the heat to low, cover the pot with a lid, and simmer for 15 to 18 minutes, or until the rice is fully cooked and all the liquid has been absorbed.
- Remove from heat and let the rice sit, covered, for 5 minutes. This allows the steam to finish cooking the rice and makes it fluffier.
- Fluff the rice with a fork and set it aside. Using beef broth instead of water adds a savory base flavor that carries through the entire dish.
2. Prepare the Bell Peppers
- Preheat your oven to 375°F (190°C).
- Using a sharp knife, cut straight across the top of each bell pepper, about ½ inch (1.2 cm) from the stem end, to create a “lid.”
- Remove the seeds and white membrane from the inside of each pepper using your fingers or a spoon. Removing all the white pith is important because it can be bitter.
- Rinse the inside of each pepper under cold water and pat dry.
- Lightly season the inside of each pepper with a small pinch of salt and a crack of black pepper. This step seasons the pepper itself so every bite tastes well-seasoned.
- Stand the peppers upright in your 9×13 inch baking dish. If a pepper won’t stand on its own, trim a very thin slice from the bottom (without cutting through) to create a flat base.
3. Brown the Ground Beef
- Heat a large skillet over medium-high heat. No oil is needed if you’re using lean ground beef, but add a small drizzle of olive oil if using a leaner variety.
- Add the finely diced onion to the skillet and cook, stirring occasionally, for 3 to 4 minutes until softened and slightly translucent.
- Add the minced garlic and cook for 30 seconds more, stirring constantly, until fragrant. Be careful not to burn the garlic.
- Add the ground beef to the skillet, breaking it up into small crumbles with a wooden spoon or spatula as it cooks.
- Season the beef with 1 teaspoon Italian seasoning, 1 teaspoon garlic powder, ½ teaspoon onion powder, ½ teaspoon smoked paprika, ½ teaspoon salt, and ¼ teaspoon black pepper.
- Cook, stirring frequently, for 7 to 9 minutes until the beef is completely browned and no pink remains.
- If there is excess fat in the pan, carefully drain it by tilting the skillet and using a spoon to remove the liquid. Excess fat will make the filling greasy.
4. Build the Filling
- Reduce the heat under the skillet to medium-low.
- Add the drained diced tomatoes to the skillet with the cooked beef and stir to combine.
- Pour in 1 cup (240 ml) of the tomato sauce and stir well. Reserve the remaining tomato sauce for topping the peppers.
- Add the cooked rice to the skillet and stir everything together until the filling is fully combined.
- Taste the filling and adjust the seasoning with additional salt and pepper as needed.
- Remove the skillet from the heat and stir in ¾ cup (85 g) of the shredded mozzarella cheese. Adding the cheese at this stage binds the filling together and adds a creamy richness inside each pepper.
5. Fill the Peppers
- Using a large spoon or ladle, carefully fill each bell pepper with the beef and rice mixture, pressing it down gently so you can fit as much filling as possible.
- Fill each pepper right up to the top. The filling will settle slightly during baking.
- Spoon the remaining tomato sauce evenly over the top of each filled pepper, about 1 to 2 tablespoons per pepper.
6. Add the Cheese Topping
- Combine the remaining ¾ cup (85 g) of shredded mozzarella with the ½ cup (55 g) of shredded cheddar in a small bowl.
- Sprinkle the cheese mixture generously over the top of each pepper.
- The cheddar adds a slightly sharp, salty flavor while the mozzarella provides that stretchy, gooey melt everyone loves.
7. Bake the Stuffed Peppers
- Cover the baking dish tightly with aluminum foil. This traps steam and ensures the peppers cook through evenly without drying out the filling.
- Bake in the preheated oven at 375°F (190°C) for 35 minutes.
- After 35 minutes, carefully remove the foil. The peppers should be starting to soften and the filling should be bubbling.
- Return the dish to the oven, uncovered, for an additional 10 to 15 minutes, until the cheese on top is melted, golden, and slightly bubbly, and the peppers are tender when pierced with a fork.
- Total baking time is approximately 45 to 50 minutes. If you prefer a slightly softer pepper, bake for the full 50 minutes.
8. Rest and Serve
- Remove the baking dish from the oven and allow the stuffed peppers to rest for 5 minutes before serving. This resting period allows the filling to set and makes them much easier to plate without falling apart.
- Garnish with freshly chopped parsley or a sprinkle of red pepper flakes if desired, and serve immediately.
The same cheesy, well-seasoned beef and rice combination works beautifully in this Cabbage Roll Skillet Recipe if you want a quicker weeknight alternative.
Tips for Success
A few small adjustments can take your stuffed peppers from good to genuinely great. The most common issue home cooks run into is underdone rice or peppers that don’t hold their shape, and both are easy to avoid with the tips below.
- Always pre-cook your rice. Using raw rice in the filling often leads to crunchy, undercooked rice even after a full bake, because the filling doesn’t have enough moisture to fully hydrate it. Cooking it beforehand guarantees a perfectly fluffy texture every time.
- Choose peppers that can stand upright. Look for bell peppers with a flat, even bottom and roughly the same size. This ensures they cook evenly and don’t tip over in the pan, spilling the filling.
- Don’t skip draining the diced tomatoes. Excess liquid from canned tomatoes can make the filling watery and prevent the cheese from getting a good melt. Drain them well before adding to the skillet.
- Shred your own cheese. Pre-shredded cheese from a bag is coated with anti-caking agents like potato starch or cellulose, which can prevent a smooth melt. Freshly shredded cheese melts much more evenly and gives you that beautiful golden top.
- Cover tightly with foil for the first part of baking. The steam created under the foil is what softens the peppers and prevents the filling from drying out. Don’t skip this step.
- Use beef broth for cooking the rice. This one small swap adds significant depth of flavor to the filling since the rice absorbs all that savory goodness as it cooks.
Read Also: Taco Seasoning Recipe
Serving Suggestions
Stuffed bell peppers are a complete meal on their own, but a few well-chosen sides can round out the dinner beautifully.
They pair especially well with lighter, fresh accompaniments that balance out the richness of the cheesy filling without overwhelming it.
Here are some great options to serve alongside your stuffed peppers:
- Broccoli Salad — The crunchy, slightly sweet texture of a cold broccoli salad is a perfect contrast to the warm, soft filling of the peppers.
- Garlic Mashed Potatoes — A scoop of buttery mashed potatoes alongside a pepper makes this dinner feel extra hearty and satisfying.
- Roasted Broccoli — Simple, crispy roasted broccoli is an easy sheet pan side that can go into the oven right alongside the peppers.
- Creamy Mashed Potatoes — Silky mashed potatoes are a classic comfort pairing and the kids always love them.
- Crusty bread or dinner rolls — Great for scooping up any extra tomato sauce left in the baking dish.
- A simple green salad — A lightly dressed mixed greens salad cuts through the richness of the beef and cheese perfectly.
- Potato Salad — A cold, creamy potato salad makes a refreshing and filling side, especially in the summer months.
For a lighter variation on similar flavors, the Stuffed Pepper Skillet makes a wonderful companion dish when you’re cooking for a larger crowd.
Variations to Try
One of the best things about stuffed bell peppers is how easily the basic recipe can be customized to suit different tastes, dietary needs, or whatever happens to be in your fridge. Here are some popular variations that work really well:
- Mexican-inspired stuffed peppers. Season the beef with taco seasoning instead of Italian seasoning, swap the diced tomatoes for salsa or Rotel, and top with Monterey Jack cheese instead of mozzarella. Serve with sour cream and guacamole on the side.
- Turkey stuffed peppers. Replace the ground beef with ground turkey for a leaner version that’s still incredibly flavorful. You may want to add an extra drizzle of olive oil when browning since turkey is lower in fat.
- Vegetarian stuffed peppers. Skip the meat entirely and double the rice, adding black beans, corn, diced zucchini, and extra cheese to the filling. The result is hearty, satisfying, and completely meat-free.
- Italian sausage stuffed peppers. Use mild or hot Italian sausage instead of ground beef for a more robust, fennel-forward flavor profile that pairs beautifully with the tomato sauce.
- Low-carb stuffed peppers. Replace the rice with riced cauliflower to significantly reduce the carbohydrate content. The cauliflower absorbs the flavors of the filling and provides a similar texture without the starch.
- Cheesy stuffed peppers with cream cheese. Stir 2 oz of softened cream cheese into the warm filling just before stuffing the peppers for an ultra-creamy, indulgent twist.
Another great way to enjoy similar flavors is the Picadillo Recipe, which uses the same seasoned ground beef base as a filling for tortillas, rice bowls, or empanadas.
Storage and Reheating
Stuffed bell peppers store and reheat beautifully, which makes them ideal for meal prep or next-day lunches. Here’s how to keep them tasting their best:
- Store leftover stuffed peppers in the refrigerator in an airtight container for up to 4 days.
- To freeze, let the peppers cool completely, then wrap each one individually in plastic wrap and place in a zip-lock freezer bag. They will keep in the freezer for up to 3 months.
- To reheat from the refrigerator, place peppers in a baking dish, cover with foil, and warm in a 350°F (175°C) oven for 15 to 20 minutes, or until heated through.
- For a quicker option, microwave individual peppers on a microwave-safe plate, covered loosely, for 2 to 3 minutes on medium-high power.
- To reheat from frozen, thaw overnight in the refrigerator first, then reheat using the oven method above. Avoid microwaving directly from frozen as the pepper can become soggy and the filling may heat unevenly.
Storage at a glance:
- Refrigerator: up to 4 days in an airtight container
- Freezer: up to 3 months, wrapped individually
- Reheating: 350°F (175°C) oven for 15 to 20 minutes covered, or microwave 2 to 3 minutes
Read Also: Easy Lasagna Recipe
Nutritional Facts
The following nutritional information is an estimate per serving (1 stuffed pepper) based on the recipe as written using lean ground beef (90/10) and full-fat shredded cheese. Exact values will vary depending on the size of your bell peppers and specific brands used.
| Nutrient | Per Serving (1 pepper) |
|---|---|
| Calories | ~390 kcal |
| Total Fat | 14 g |
| Saturated Fat | 6 g |
| Cholesterol | 70 mg |
| Sodium | 620 mg |
| Total Carbohydrates | 38 g |
| Dietary Fiber | 4 g |
| Sugars | 8 g |
| Protein | 28 g |
| Vitamin C | ~150% DV |
| Iron | ~20% DV |
| Calcium | ~20% DV |
This recipe makes 6 servings (one stuffed pepper per person). The high Vitamin C content comes naturally from the bell peppers themselves.
Another filling and comforting dinner idea to bookmark: Corn Casserole Recipe
Health Benefits of Key Ingredients
This recipe isn’t just delicious — it’s also packed with genuinely nutritious ingredients that make it a well-rounded meal choice.
The bell peppers alone deliver an impressive nutritional punch that many people don’t fully appreciate.
Here’s a closer look at the key health benefits in this dish:
- Bell peppers are exceptionally high in Vitamin C. A single red bell pepper contains more than 150% of the daily recommended intake of Vitamin C, which supports immune function, skin health, and iron absorption. Green peppers provide slightly less, but are still an excellent source.
- Lean ground beef is a complete protein. It provides all essential amino acids along with heme iron (the most bioavailable form), zinc, and B12, all of which support energy levels, brain function, and red blood cell production.
- Garlic has well-documented anti-inflammatory properties. The allicin compound in garlic has been studied for its potential to support heart health and immune function.
- Tomatoes are rich in lycopene. Lycopene is a powerful antioxidant linked to reduced risk of certain cancers and cardiovascular protection. Cooking tomatoes (as in the sauce used here) actually increases the bioavailability of lycopene compared to eating them raw.
- Rice provides sustained energy. As a complex carbohydrate, white rice releases glucose steadily into the bloodstream, supporting consistent energy levels throughout the day.
- Cheese adds calcium and protein. The mozzarella and cheddar topping contribute meaningful amounts of calcium, which is essential for bone density and muscle function.
Read Also: Marinara Sauce Recipe
Frequently Asked Questions
1. Do I need to pre-cook the bell peppers before stuffing them?
You don’t need to, but you absolutely can if you prefer a softer pepper texture. Blanching the peppers in boiling salted water for 2 to 3 minutes before stuffing gives you a very soft, almost silky pepper after baking. If you prefer peppers with a bit more structure and a slight chew, simply stuff them raw — the 45 to 50-minute bake time in the recipe is specifically calibrated to cook raw peppers to a perfectly tender (but not mushy) result.
2. Can I use instant rice instead of regular long-grain rice?
You can, but the texture will be noticeably different. Instant rice tends to become softer and slightly mushy during baking, especially once it absorbs the moisture from the tomato sauce. If you do use instant rice, reduce the amount by about ¼ cup and keep a close eye on the filling consistency before stuffing. Regular long-grain white rice that has been properly cooked gives the filling a much better bite and texture.
3. What color bell peppers are best for this recipe?
Any color works, and it’s largely a matter of personal taste and budget. Red, orange, and yellow bell peppers are sweeter and milder, which many people prefer since their sweetness complements the savory beef filling beautifully. Green bell peppers have a slightly more bitter, vegetal flavor and are typically less expensive. A mix of colors is a great option for visual appeal and a variety of flavor notes.
4. Can I make stuffed peppers ahead of time?
Absolutely, and they actually benefit from being made ahead. You can assemble the stuffed peppers completely (filling + tomato sauce on top, cheese added last), cover tightly with plastic wrap or foil, and refrigerate for up to 24 hours before baking. When you’re ready to bake, remove the plastic wrap (replace with foil), add an extra 5 to 10 minutes to the covered baking time since they’ll be going in cold, then finish uncovered as directed.
5. Why is my filling dry after baking?
This usually happens when too much liquid was drained from the tomatoes, or not enough tomato sauce was used in both the filling and on top of the peppers. The tomato sauce on top acts as a moisture barrier during baking and keeps the filling from drying out under the foil. Make sure you’re using a full cup of sauce in the filling itself, and don’t be shy with the sauce you spoon over each pepper before adding the cheese. Covering tightly with foil for the first 35 minutes of baking also makes a significant difference in retaining moisture.
Read Also: Chicken Casserole Recipe
Easy Stuffed Bell Peppers
Equipment
- Large skillet or sauté pan
- Medium saucepan - for cooking rice
- 9×13-inch baking dish - deep dish recommended
- Sharp knife and cutting board
- Wooden spoon or spatula
- Large mixing bowl
- Measuring cups and spoons
- Aluminum foil
- Ladle or large spoon - for filling the peppers
- Instant-read meat thermometer - optional
Ingredients
- 6 medium bell peppers - any color, tops cut off and seeds removed
- 1 lb lean ground beef - 450g
- 1 cup long-grain white rice - 185g, uncooked
- 2 cups beef broth - 480ml
- 15 oz diced tomatoes - 425g, drained
- 15 oz tomato sauce - 425g, divided
- 1 small yellow onion - finely diced
- 3 cloves garlic - minced
For the Seasonings
- 1 teaspoon Italian seasoning
- 1 teaspoon garlic powder
- ½ teaspoon onion powder
- ½ teaspoon smoked paprika
- ½ teaspoon salt - plus more to taste
- ¼ teaspoon black pepper
For the Cheese Topping
- 1 ½ cups shredded mozzarella cheese - 170g, divided
- ½ cup shredded cheddar cheese - 55g
- fresh parsley - chopped, for garnish (optional)
- red pepper flakes - for garnish (optional)
Instructions
- Cook rice in beef broth according to package directions, about 15-18 minutes, then fluff and set aside.
- Preheat oven to 375°F (190°C). Cut tops off peppers, remove seeds and membranes, rinse, and pat dry.
- Brown ground beef with onion and garlic in a large skillet, breaking into crumbles, until no pink remains.
- Add Italian seasoning, garlic powder, onion powder, smoked paprika, salt, and pepper to the beef and stir to combine.
- Stir in drained diced tomatoes and 1 cup (240ml) of tomato sauce, then add cooked rice and mix well.
- Remove from heat and stir in ¾ cup (85g) of shredded mozzarella until melted and combined.
- Stuff each bell pepper with the filling, packing it firmly, and place upright in a 9×13 inch baking dish.
- Spoon remaining tomato sauce over each pepper, then top with the remaining mozzarella and cheddar cheese.
- Cover tightly with foil and bake at 375°F (190°C) for 35 minutes, then uncover and bake 10-15 minutes more until cheese is golden and bubbly.
- Rest for 5 minutes before serving. Garnish with parsley or red pepper flakes if desired.
Notes
- Make it ahead: Assemble peppers completely, cover, and refrigerate for up to 24 hours before baking. Add 5-10 minutes to covered baking time since they’ll go in cold.
- Pepper prep: Look for peppers with flat bottoms so they stand upright. Trim a thin slice from the bottom if needed to create a stable base.
- Rice tip: Using beef broth instead of water to cook the rice adds a savory base flavor that carries through the entire dish.
- Cheese trick: Shred your own cheese from a block for a smoother, gooier melt. Pre-shredded cheese contains anti-caking agents that can make the melt gummy.
- Variation – Mexican: Use taco seasoning, swap diced tomatoes for salsa, and top with Monterey Jack cheese. Serve with sour cream and guacamole.
- Variation – Low carb: Replace rice with riced cauliflower to significantly reduce carbohydrates while maintaining texture.
- Storage: Refrigerate leftovers in an airtight container for up to 4 days. Freeze individually wrapped for up to 3 months.
- Reheating: Warm in a 350°F (175°C) oven covered with foil for 15-20 minutes, or microwave individual peppers for 2-3 minutes.
- Don’t skip draining: Drain the diced tomatoes well to prevent a watery filling that prevents the cheese from melting properly.
- Foil seal: Cover tightly with foil for the first part of baking — the steam is essential for softening the peppers and keeping the filling moist.
Final Thoughts
This easy stuffed bell peppers recipe has everything going for it: simple ingredients, a forgiving technique, and a deeply satisfying result that the whole family will genuinely enjoy.
It’s the kind of dinner that feels special enough for a Sunday supper but practical enough for a busy Tuesday night.
Once you’ve made it once, you’ll find yourself coming back to it again and again, swapping in different proteins, cheeses, or seasonings to keep it fresh.
Give it a try this week and see for yourself why stuffed peppers have stood the test of time.
If you loved this recipe, share it with someone who would enjoy it or drop a comment below — I’d love to hear how it turned out in your kitchen!
Recommended:
- Classic Stuffed Bell Peppers Recipe
- Stuffed Acorn Squash Recipes
- Stuffed Shells Recipe
- Mexican Beef and Rice Skillet Recipe
- Taco Skillet Recipe
- Meatloaf Recipe
- Chicken Fajita Recipe
- Tomato Sauce Recipe
- Spaghetti Sauce Recipe
- Baked Ziti Recipe


