I’m obsessed with this basque cheesecake recipe, and I’m pretty sure you’re about to be too.
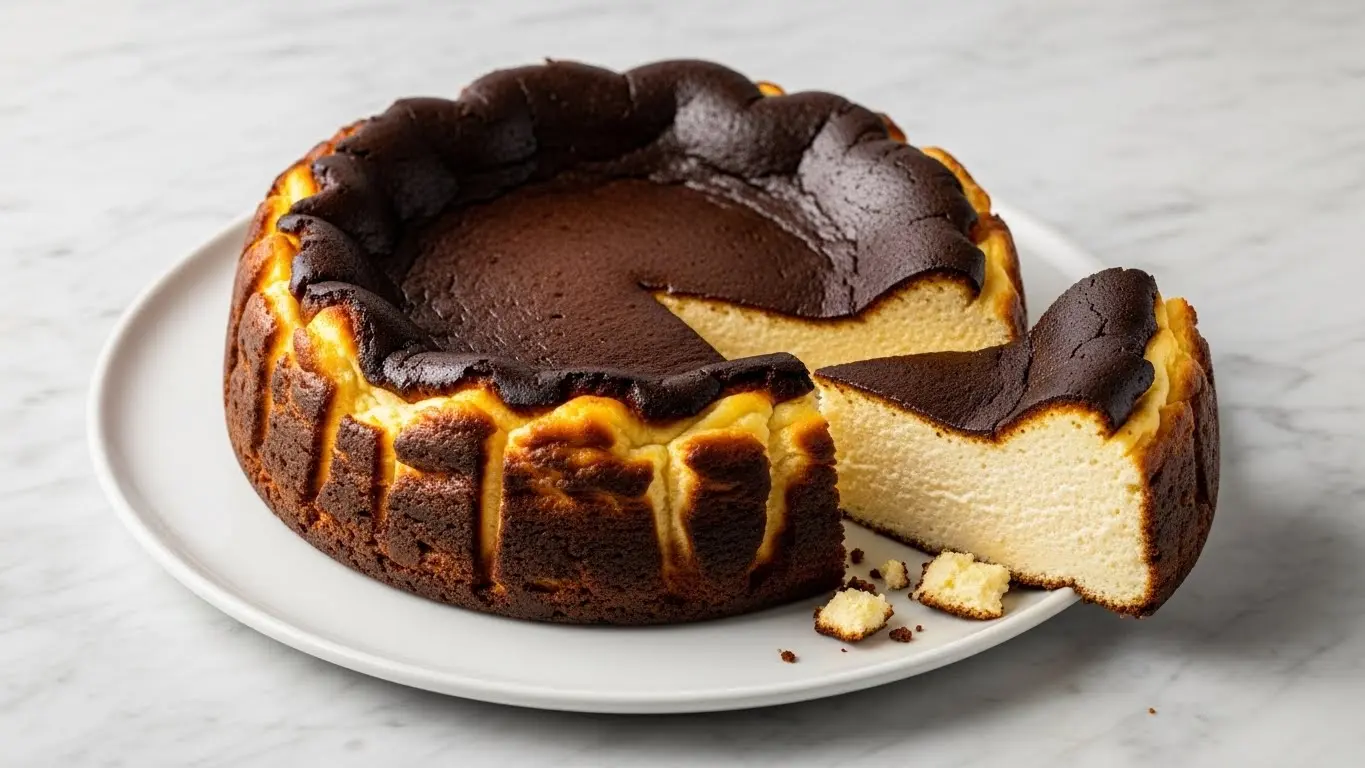
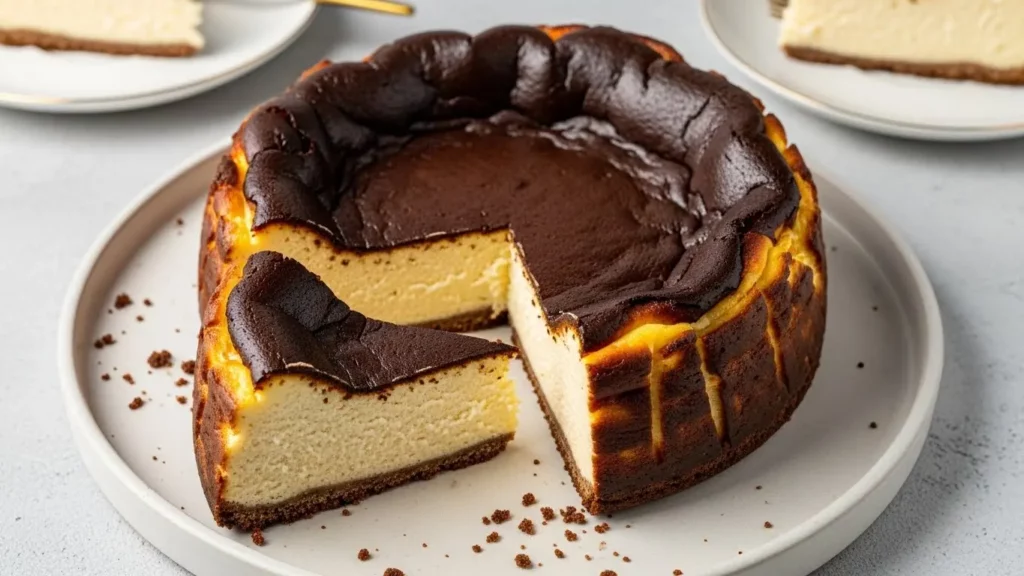
It’s unlike any other cheesecake you’ve tried. The burnt top isn’t a mistake—it’s the whole point. That deeply caramelized surface gives way to the creamiest, almost pudding-like center that jiggles when you shake the pan.
I stumbled upon Basque cheesecake at a tiny café in San Sebastián a few years ago, and I’ve been chasing that taste ever since. After countless attempts in my own kitchen, I finally nailed it. This version has all the drama of the original—that gorgeous burnt exterior, the wobbly middle, the intense cream cheese flavor—without needing a plane ticket to Spain.
The best part? It’s easier than traditional cheesecake. No water bath, no springform pan anxiety, no worrying about cracks. In fact, the more rustic it looks, the better.
Why You’ll Love This Basque Cheesecake Recipe
This basque cheesecake recipe breaks all the conventional cheesecake rules, and that’s exactly why it works. The high heat creates a spectacular contrast between the burnished exterior and the luxuriously creamy interior that you simply can’t achieve with standard baking methods.
It’s also incredibly forgiving for a cheesecake. You don’t need to stress about achieving the perfect smooth top or preventing cracks—the beauty is in its imperfection. The burnt spots add a subtle bitterness that balances the sweetness perfectly, creating complex flavors that make every bite interesting.
Here’s what makes it special:
- Minimal ingredients: Just cream cheese, sugar, eggs, cream, and flour
- No crust required: One less step and fewer dishes to wash
- Impossible to overbake: The burnt top is intentional
- No cracking issues: The jiggly center is supposed to look underdone
- Impressive presentation: Looks like it came from a fancy bakery
- Make-ahead friendly: Actually tastes better the next day
For a completely different take on cheesecake, you might enjoy my no bake cheesecake recipe.
Ingredients
The magic of Basque cheesecake lies in its simplicity. You need just six basic ingredients that work together to create something extraordinary.
Make sure your cream cheese is at room temperature—this prevents lumps and creates that silky texture we’re after.
- 2 pounds (900g) cream cheese, softened to room temperature
- 1½ cups (300g) granulated sugar
- 6 large eggs, room temperature
- 2 cups (480ml) heavy cream
- 1 teaspoon pure vanilla extract
- ⅓ cup (40g) all-purpose flour
- ½ teaspoon salt
Kitchen Equipment Needed
You don’t need fancy equipment for this basque cheesecake recipe, but having the right tools makes the process much smoother. The most important piece is a 10-inch springform pan—don’t skip the parchment paper lining as it’s essential for achieving that signature wrinkled look.
A stand mixer makes the job easier, but a hand mixer works just fine too.
- 10-inch springform pan
- Parchment paper
- Stand mixer or hand mixer
- Large mixing bowl
- Rubber spatula
- Measuring cups and spoons
- Wire cooling rack
Recommended Products for This Recipe
After making this basque cheesecake dozens of times, I’ve found a few products that genuinely make a difference in the final result. These aren’t just nice-to-haves—they actually improve the texture, flavor, and overall experience of baking this recipe.
1. Philadelphia Cream Cheese Brick
The quality of your cream cheese directly affects the final texture of your Basque cheesecake. I always use Philadelphia cream cheese in the brick form (not the tub) because it has the right fat content and consistency. Store brands can be watery or grainy, which ruins that luxurious, creamy interior we’re going for.
2. Fat Daddio’s Anodized Aluminum Springform Pan
This commercial-grade pan conducts heat evenly, which is crucial when you’re baking at such high temperatures. The anodized aluminum won’t warp in the oven, and the secure latch prevents any leaks. I’ve used cheaper springform pans that buckled under the 500°F heat, so this is one area where quality matters.
3. Nielsen-Massey Madagascar Bourbon Vanilla Extract
Since this recipe has so few ingredients, the quality of each one really shines through. This pure vanilla extract has complex, rich flavor notes that elevate the entire cheesecake. It’s more expensive than imitation vanilla, but you only need one teaspoon and the difference is noticeable.
4. If You Care Parchment Baking Paper
This unbleached parchment paper is sturdy enough to handle the high heat without burning or becoming brittle. Some cheaper parchment papers can smoke or develop an unpleasant smell at 500°F. This brand holds up beautifully and creates those gorgeous wrinkles that give Basque cheesecake its rustic charm.
Step-by-Step Instructions
Follow these detailed steps carefully, and you’ll have a stunning Basque cheesecake that rivals anything from a professional bakery. The key is not to rush—let each ingredient incorporate fully before adding the next.
1. Prepare the Pan and Oven
- Preheat your oven to 500°F (260°C) and position a rack in the middle
- Line your 10-inch springform pan with two large sheets of parchment paper in a crisscross pattern, allowing the paper to come up and over the sides by at least 2 inches
- Press the parchment into the bottom and up the sides, embracing the wrinkles—they’re part of the authentic look
- Don’t trim the excess paper hanging over the edges; it protects the cheesecake and adds to the rustic appearance
2. Beat the Cream Cheese
- Place the softened cream cheese in the bowl of your stand mixer fitted with the paddle attachment
- Beat on medium speed for 3-4 minutes until completely smooth and fluffy with no lumps visible
- Scrape down the sides and bottom of the bowl with a rubber spatula at least twice during this process
- The cream cheese should look lighter in color and have increased in volume slightly
3. Add the Sugar
- With the mixer on low speed, gradually add the sugar in a steady stream
- Increase to medium speed and beat for another 2-3 minutes until the mixture is light and creamy
- Stop the mixer and scrape down the bowl thoroughly to ensure no sugar crystals are stuck to the sides
- The mixture should be pale and fluffy at this stage
4. Incorporate the Eggs
- Add the eggs one at a time, beating on medium-low speed for about 20-30 seconds after each addition
- Make sure each egg is fully incorporated before adding the next one
- Scrape down the bowl after adding the third and sixth eggs to ensure even mixing
- Don’t overbeat once the eggs are added, as too much air can cause issues during baking
5. Add the Cream and Vanilla
- Pour in the heavy cream and vanilla extract with the mixer running on low speed
- Mix just until combined, about 30 seconds to 1 minute
- The batter will look quite thin and pourable at this point—this is exactly what you want
- Scrape down the bowl one final time to catch any unmixed cream cheese
6. Add the Flour and Salt
- Sift the flour and salt directly into the batter to prevent lumps
- Mix on the lowest speed for just 15-20 seconds until you no longer see any dry flour
- Be careful not to overmix at this stage, as it can make the cheesecake tough
- The final batter should be smooth, creamy, and have the consistency of thick pancake batter
7. Pour and Bake
- Pour the batter into your prepared springform pan, filling it all the way to about ½ inch from the top
- Gently tap the pan on the counter 2-3 times to release any large air bubbles
- Place the pan in the preheated 500°F oven on the middle rack
- Bake for 50-55 minutes until the top is deeply browned and looks almost burnt in spots
- The center should still jiggle significantly when you gently shake the pan—it will look very underdone but trust the process
8. Cool and Chill
- Remove the cheesecake from the oven and place it on a wire cooling rack
- Let it cool completely at room temperature for at least 2 hours—the center will continue to set as it cools
- Once cooled to room temperature, refrigerate for at least 6 hours or preferably overnight
- The cheesecake will sink and deflate as it cools, creating that characteristic concave top
You might also enjoy: New York Cheesecake Recipe
Tips for Success
Making a perfect Basque cheesecake is straightforward, but these tips will help you avoid common pitfalls. Pay special attention to ingredient temperature and don’t be afraid of that high oven heat.
The wobbliness in the center might make you nervous, but resist the urge to bake it longer—that custardy texture is what makes Basque cheesecake special.
- Room temperature matters: Cold cream cheese creates lumps that won’t smooth out no matter how long you mix
- Don’t skimp on the parchment: Use large sheets and let them extend well above the rim of the pan
- Embrace the burnt top: If it’s not deeply caramelized with some dark spots, it needs more time
- Trust the jiggle: The center should look almost liquid when you remove it from the oven
- Cool slowly: Rushing the cooling process can cause the cheesecake to crack or develop a strange texture
- Chill overnight: The flavors meld and the texture improves significantly after a night in the fridge
- Use full-fat ingredients: Low-fat cream cheese or half-and-half won’t give you the right texture
Read Also: Best Cheesecake Recipe
Serving Suggestions
Basque cheesecake is stunning on its own, but these accompaniments can take it to another level. The slightly bitter burnt flavor pairs beautifully with sweet or tart elements.
I love serving it simply with fresh berries and a dollop of whipped cream for an elegant dessert that doesn’t feel overdone.
This pairs beautifully with:
- Fresh strawberries, raspberries, or blueberries macerated in a bit of sugar
- A drizzle of caramel sauce or chocolate ganache
- Lightly sweetened whipped cream with a touch of vanilla
- A dusting of cocoa powder or powdered sugar for visual contrast
- Strong espresso or dark roast coffee to complement the caramelized flavors
- A scoop of vanilla ice cream for temperature contrast
- Fresh fruit tart components on the side
Variations to Try
Once you’ve mastered the classic version, these variations will keep things interesting. Each one adds a unique twist while maintaining that signature burnt top and creamy center.
I’m particularly fond of the matcha version—the earthy bitterness plays beautifully against the sweet cream cheese base.
- Chocolate Basque Cheesecake: Add ⅔ cup of cocoa powder with the flour and reduce flour to 3 tablespoons
- Matcha Basque Cheesecake: Mix 2-3 tablespoons of high-quality matcha powder with the flour before adding
- Coffee Basque Cheesecake: Dissolve 2 tablespoons of instant espresso powder in the heavy cream before mixing
- Lemon Basque Cheesecake: Add the zest of 3 lemons and 2 tablespoons of fresh lemon juice with the cream
- Dulce de Leche Swirl: Swirl ½ cup of dulce de leche through the batter before baking
- Brown Butter Version: Replace ¼ cup of the cream with brown butter for nutty depth
- Honey Lavender: Substitute ½ cup honey for some of the sugar and add 1 tablespoon culinary lavender
Another favorite: Pumpkin Cheesecake Recipe
Storage and Reheating
Proper storage keeps your Basque cheesecake fresh and delicious for days. The good news is that it actually improves with time as the flavors develop and meld together.
I find it tastes best on day two or three when the burnt notes have mellowed slightly and the texture has become even creamier.
- Refrigerator: Cover tightly with plastic wrap or store in an airtight container for up to 5 days
- Freezer: Wrap individual slices in plastic wrap, then aluminum foil, and freeze for up to 2 months
- Thawing: Transfer frozen slices to the refrigerator overnight to thaw slowly
- Serving temperature: This cheesecake is best served chilled or at cool room temperature, not warm
- No reheating needed: Basque cheesecake is meant to be enjoyed cold—reheating would ruin the texture
Nutritional Facts
Per serving (1 slice, based on 12 servings):
- Calories: 465
- Total Fat: 38g
- Saturated Fat: 23g
- Cholesterol: 215mg
- Sodium: 340mg
- Total Carbohydrates: 26g
- Sugars: 24g
- Protein: 8g
Note: Nutritional information is approximate and will vary based on specific ingredients used.
Health Benefits of Key Ingredients
While Basque cheesecake is definitely an indulgent dessert, some of its core ingredients do offer nutritional benefits. Understanding what each component brings to the table helps you appreciate this treat as an occasional pleasure rather than an everyday food.
The high-quality dairy provides essential nutrients, and the eggs contribute valuable protein and vitamins.
Key nutritional highlights:
- Cream cheese: Provides calcium for bone health and vitamin A for immune function
- Eggs: Excellent source of complete protein, choline for brain health, and vitamin D
- Heavy cream: Contains fat-soluble vitamins and conjugated linoleic acid (CLA)
- Vanilla extract: Contains small amounts of antioxidants and may have calming properties
- Calcium boost: One slice provides approximately 8% of daily calcium needs
- Protein content: The eggs and dairy deliver a decent amount of satiating protein
This works wonderfully alongside sugar cookies for a dessert spread.
Frequently Asked Questions
1. Why is my Basque cheesecake not burnt on top?
Your oven temperature might not be hot enough, or you removed it too early. The cheesecake needs the full 50-55 minutes at 500°F to develop that characteristic dark, caramelized top. Every oven is different—if yours runs cool, you might need to add 5-10 extra minutes or even bump the temperature to 525°F.
2. Is it supposed to be jiggly in the middle?
Absolutely! A proper Basque cheesecake should wobble like jello in the center when you remove it from the oven. This creates the creamy, almost custard-like texture that makes it special. It will firm up significantly as it cools and chills in the refrigerator.
3. Can I make this in a different size pan?
You can adapt the recipe, but the cooking time will change significantly. A 9-inch pan will need about 60 minutes, while an 8-inch pan might need 65-70 minutes. The cheesecake will be taller and take longer to set in the center, so watch for that deep brown top and the characteristic wobble.
4. Why did my cheesecake crack around the edges?
Some cracking is actually normal and part of the rustic charm. However, excessive cracking usually means the oven temperature was too high for your specific oven or the cheesecake cooled too quickly. Make sure to let it cool gradually at room temperature rather than transferring it directly to the fridge.
5. How do I know when it’s done baking?
Look for a deeply browned, almost burnt top with some darker spots. The edges should be puffed and set, while the center jiggles dramatically when you gently shake the pan. The center should look almost liquid—this is correct and it will set as it cools.
Final Thoughts
This basque cheesecake recipe has become my go-to dessert when I want to impress without spending hours in the kitchen. The dramatic appearance and incredible texture always spark conversation, and guests are amazed when I tell them how simple it actually is to make.
The beauty of Basque cheesecake lies in its paradoxes—it’s rustic yet elegant, simple yet sophisticated, burnt yet creamy. Once you make it, you’ll understand why it has taken the dessert world by storm. Give it a try and watch as that gorgeously burnt top and wobbling center win over everyone at your table.
I’d love to hear how your Basque cheesecake turns out! Drop a comment below with your results, or share a photo if you’re feeling proud of that burnt top.
Recommended:
- Tres Leches Cake Recipe
- Boston Cream Pie Recipe
- Pumpkin Roll Recipe
- Fruit Cocktail Cake Recipe
- Eggnog Cake Recipe
- Hot Fudge Cake Recipe
- Checkerboard Cake Recipe
- Rugelach Recipe
- Baklava Recipe
- Buckeyes Recipe


