
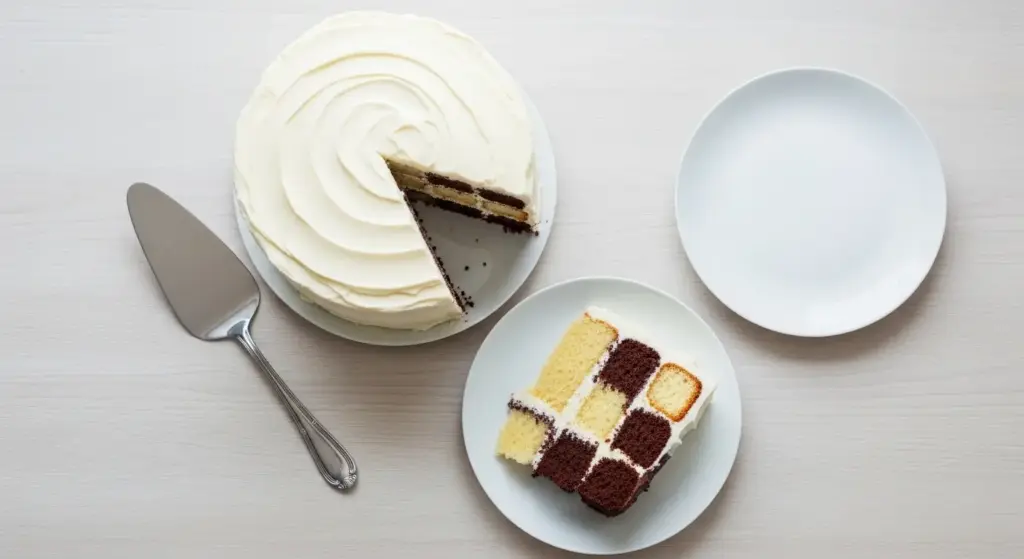
If you’ve been searching for a checkerboard cake recipe that actually delivers on both flavor and visual impact, you’ve just found it. This classic chocolate and vanilla cake is the kind of bake that stops people mid-conversation the moment you slice into it.
The secret lies in alternating rings of chocolate and vanilla sponge stacked in a clever pattern. Each slice reveals a perfect grid of contrasting squares, all held together with a smooth vanilla buttercream.
It looks impossibly complex. In reality, it’s a patient but very doable project. You don’t need a specialty checkerboard cake pan set. A couple of round cookie cutters, four cake pans, and a steady hand are all you need.
This cake is a favorite for birthdays, celebrations, and any time you want to bring something truly memorable to the table. Once you understand the method, you’ll want to make it again and again, trying new color and flavor combinations each time.
For a similarly stunning layered dessert with an impressive reveal, you might also love this Cannoli Poke Cake.
Why You’ll Love This Checkerboard Cake Recipe
This cake earns its reputation as a showstopper every single time.
It combines the two most beloved cake flavors, chocolate and vanilla, in every single slice, so there’s no need to choose.
The contrast between the dark chocolate sponge and the pale vanilla sponge creates a bold geometric pattern that looks like you spent hours at a professional bakery.
Despite how impressive it looks, the technique is surprisingly straightforward once you understand the ring-cutting and layer-swapping method.
The vanilla buttercream frosting ties everything together with a creamy, not-too-sweet finish that complements both cake flavors beautifully.
It’s ideal for birthday parties, holiday gatherings, baby showers, or any celebration where you want to make a serious impression.
The recipe is also incredibly versatile. You can swap in any two contrasting cake flavors or colors to suit the occasion.
- Visually stunning geometric interior pattern that wows every guest
- Classic chocolate and vanilla flavors that everyone loves
- No special checkerboard pan required
- Beginner-friendly once you follow the steps carefully
- Perfect for celebrations, birthdays, and special occasions
- Easily customizable with different colors or cake flavors
- Feeds a crowd generously with up to 16 slices
Ingredients
You’ll need two separate batters for this cake: one classic vanilla and one chocolate. Both use the same base, making it efficient to prep. The buttercream is a simple American-style frosting that pipes and spreads easily.
For the Vanilla Cake Batter:
- 2 cups (240g) all-purpose flour
- 1 1/2 tsp baking powder
- 1/2 tsp baking soda
- 1/2 tsp salt
- 3/4 cup (170g) unsalted butter, softened to room temperature
- 1 1/4 cups (250g) granulated sugar
- 3 large eggs, room temperature
- 2 tsp pure vanilla extract
- 3/4 cup (180ml) buttermilk, room temperature
For the Chocolate Cake Batter:
- 2 cups (240g) all-purpose flour
- 1/2 cup (50g) unsweetened cocoa powder
- 1 1/2 tsp baking powder
- 1/2 tsp baking soda
- 1/2 tsp salt
- 3/4 cup (170g) unsalted butter, softened to room temperature
- 1 1/4 cups (250g) granulated sugar
- 3 large eggs, room temperature
- 2 tsp pure vanilla extract
- 3/4 cup (180ml) buttermilk, room temperature
For the Vanilla Buttercream Frosting:
- 1 1/2 cups (340g) unsalted butter, softened to room temperature
- 5 cups (600g) powdered sugar, sifted
- 3-4 tbsp heavy cream or whole milk
- 2 tsp pure vanilla extract
- Pinch of salt
For more classic baking inspiration, check out this Classic Vanilla Cake that uses a similar base batter technique.
Kitchen Equipment Needed
Having the right tools on hand makes the assembly process significantly less stressful. The cookie cutters are the real key to creating those precise rings without a specialty pan.
- Four 9-inch (23cm) round cake pans
- Parchment paper
- Stand mixer or hand mixer
- Large mixing bowls (at least 2)
- Rubber spatula
- Whisk
- Measuring cups and spoons
- Kitchen scale (strongly recommended for even layers)
- 6-inch round cookie cutter
- 3-inch round cookie cutter
- Serrated knife for leveling cakes
- Offset spatula for frosting
- Cake turntable (optional but very helpful)
- Cooling racks
Read Also: Best Carrot Cake Recipe
Recommended Products for This Recipe
These are handpicked products based on quality and real performance in the kitchen. Each one addresses a common challenge in making this cake.
1. Fat Daddio’s 9-Inch Round Cake Pans (Set of 4)
Having four pans of exactly the same size is non-negotiable for this recipe. Fat Daddio’s are known for their even heat distribution, which helps prevent domed tops and ensures consistent layer heights. Even, flat layers make the ring-cutting step far easier and give you a cleaner checkerboard pattern.
2. Ateco Round Cookie Cutter Set
Precise ring cuts are the foundation of a perfect checkerboard pattern. The Ateco stainless steel cutter set includes graduated sizes, giving you the 3-inch and 6-inch cutters you need for 9-inch cake layers. Sharp, clean edges mean no ragged rings that would distort the pattern.
3. Wilton Angled Icing Spatula
Getting a smooth crumb coat and final frosting layer on a tall, multi-layered cake is much easier with a quality offset spatula. This Wilton angled version lets you spread frosting with control, keeping the beautiful checkerboard layers undisturbed while you work.
4. OXO Good Grips Cake Turntable
A rotating cake stand transforms the frosting process from a frustrating stretch-and-smear into a smooth, even finish. For a four-layer cake like this one, being able to spin the cake while you hold the spatula steady makes all the difference.
5. Swerve Confectioners Style Sweetener (For Low-Sugar Variation)
If you want to make a lower-sugar version of the buttercream, this powdered sweetener measures cup-for-cup like powdered sugar and blends smoothly into frosting. It’s a practical option for guests managing their sugar intake without missing out on the cake experience.
Another great celebration cake worth bookmarking: Tres Leches Cake.
Step-by-Step Instructions
Step 1: Prepare Your Pans and Preheat the Oven
- Preheat your oven to 350°F (177°C).
- Cut four circles of parchment paper to fit the bottoms of your 9-inch cake pans.
- Grease all four pans generously with butter or non-stick cooking spray, then press the parchment circles in and grease the parchment too. This double-greasing ensures your layers release cleanly every time.
- Set the pans aside while you mix your batters.
Step 2: Mix the Vanilla Cake Batter
- In a medium bowl, whisk together the 2 cups (240g) all-purpose flour, 1 1/2 tsp baking powder, 1/2 tsp baking soda, and 1/2 tsp salt. Set this dry mixture aside.
- In the bowl of your stand mixer (or using a hand mixer), beat 3/4 cup (170g) softened unsalted butter on medium-high speed for about 1 minute until creamy and pale.
- Add 1 1/4 cups (250g) granulated sugar and beat for 3-4 minutes until the mixture is very light and fluffy. Scrape down the sides of the bowl regularly.
- Add the 3 large eggs one at a time, beating well after each addition. The batter may look slightly curdled at this stage but don’t worry, it will come together.
- Add 2 tsp pure vanilla extract and mix until combined.
- Switch the mixer to low speed. Add the dry ingredients in three additions, alternating with the 3/4 cup (180ml) buttermilk in two additions. Begin and end with the dry ingredients. Mix only until just combined after each addition. Overmixing will develop gluten and make the cake tough.
- Transfer the vanilla batter to a clean bowl and set aside.
Step 3: Mix the Chocolate Cake Batter
- Clean your mixer bowl, then repeat the exact same process as Step 2 using the chocolate batter ingredients.
- When whisking your dry ingredients, combine the 2 cups (240g) all-purpose flour, 1/2 cup (50g) unsweetened cocoa powder, 1 1/2 tsp baking powder, 1/2 tsp baking soda, and 1/2 tsp salt together thoroughly. The cocoa needs to be fully distributed through the flour before you start.
- Follow the same creaming, sugar, egg, and buttermilk alternating method as above.
- Your chocolate batter should be noticeably darker and have that rich cocoa aroma when fully mixed.
Step 4: Fill the Pans in the Correct Pattern
This step determines the checkerboard. You’ll fill your four pans in two different alternating patterns.
- Pans 1 and 3 (Pattern A): Spoon or pipe vanilla batter into the outer ring of the pan, chocolate batter in the middle ring, and vanilla batter in the center circle. An easy way to do this without a specialty divider is to place your 6-inch cookie cutter in the center of the pan and fill the outer ring (between the pan edge and the cutter) with vanilla batter. Then move the 3-inch cutter to the center, fill the ring between the cutters with chocolate batter, and fill the center circle with vanilla batter. Alternatively, you can pour all the batter freely and use the cutters after baking.
- Pans 2 and 4 (Pattern B): Reverse the pattern. Use chocolate batter for the outer ring, vanilla for the middle ring, and chocolate for the center circle.
- The most reliable approach for beginners is to simply fill each pan with its batter naturally and cut the rings after baking and cooling. Divide the vanilla batter evenly between two pans and the chocolate batter evenly between two more pans.
- Use your kitchen scale to weigh each pan as you fill it. Aim for the same weight in each pan so your layers bake to the same height. Even layers are critical for clean ring cuts.
Step 5: Bake the Cake Layers
- Bake all four layers at 350°F (177°C) for 22-26 minutes. If your oven only fits two pans at once, bake in two batches.
- The cakes are done when a toothpick inserted into the center comes out clean or with just a few moist crumbs.
- Avoid opening the oven door before the 20-minute mark, as this can cause the layers to sink in the center.
- Remove from the oven and allow the cakes to cool in their pans on wire racks for 10-15 minutes.
- Run a thin knife or offset spatula around the edges to loosen each cake, then invert them onto the cooling racks. Peel off the parchment paper circles.
- Allow all four layers to cool completely to room temperature before cutting. Warm cake crumbles much more easily and will ruin the ring cuts.
Step 6: Level and Cut the Rings
- Once the cakes are fully cooled, use a long serrated knife to carefully level the tops of any domed layers. Hold the knife parallel to the counter and use a gentle sawing motion while spinning the cake for even cuts. All four layers should be approximately the same height, ideally around 1 inch (2.5cm) tall.
- Place the 6-inch round cookie cutter in the very center of one cake layer and press down firmly. If your cutter isn’t tall enough, carefully cut around the template using a sharp paring knife held vertically. Remove the outer ring.
- Now use the 3-inch round cookie cutter centered within that cut to separate the middle ring from the center circle. You should now have three separate pieces: a large outer ring, a middle ring, and a small center circle.
- Repeat this step for all four cake layers.
- Separate your pieces by flavor. Label them if needed so you don’t mix them up during assembly.
Step 7: Make the Vanilla Buttercream Frosting
- Beat 1 1/2 cups (340g) softened unsalted butter in the stand mixer on medium-high speed for 3-4 minutes until pale and very creamy.
- Add the 5 cups (600g) sifted powdered sugar one cup at a time, mixing on low speed after each addition to prevent a cloud of sugar. Scrape down the bowl regularly.
- Add 2 tsp pure vanilla extract and the pinch of salt.
- Add the heavy cream or milk 1 tablespoon at a time, mixing after each, until the frosting reaches a smooth, spreadable consistency. For a stiffer frosting (better for piping), use less cream. For a lighter, silkier texture, use a little more.
- Beat on medium-high for 2-3 minutes to make the frosting fluffy and light in color.
Step 8: Assemble the Checkerboard Layers
This is the most exciting step and the moment the pattern comes to life.
- Place your first cake layer (Pattern A: vanilla outer, chocolate middle, vanilla center) on your serving plate or cake board. Spread a thin, even layer of buttercream on top using your offset spatula.
- Add your second layer on top (Pattern B: chocolate outer, vanilla middle, chocolate center). The alternating rings are what create the checkerboard when sliced. Press gently to adhere and spread another layer of buttercream.
- Continue alternating Pattern A and Pattern B for all four layers, spreading a thin layer of buttercream between each one.
- Once all four layers are stacked, apply a thin crumb coat of buttercream all over the outside of the cake. This seals in any loose crumbs so they don’t appear in your final frosting layer. Refrigerate the crumb-coated cake for 20-30 minutes until the crumb coat is firm to the touch.
- Apply a final, generous layer of buttercream to the outside of the cake and smooth with your offset spatula or bench scraper, using the turntable to help you achieve clean, even sides.
Step 9: Chill, Slice, and Serve
- Refrigerate the finished cake for at least 30 minutes before slicing. A chilled cake cuts much more cleanly and holds the checkerboard pattern better than a room-temperature cake.
- Use a long, sharp serrated knife to slice. Wipe the blade clean with a damp cloth after each cut to keep the slices looking crisp and beautiful.
- Step back and enjoy the reactions when guests see the interior for the first time.
Read Also: Moist Chocolate Cake Recipe
Tips for Success
Getting the checkerboard pattern right is all about precision and patience. These tips address the most common stumbling points.
- Weigh your batters: A kitchen scale is your best friend here. Equal layer heights are critical. Uneven layers throw off the ring widths and make the checkerboard lopsided.
- Cool completely before cutting: This cannot be overstated. Even slightly warm cake will crumble when you try to cut the rings. Give your layers at least an hour at room temperature, or pop them in the fridge for 30 minutes to accelerate cooling.
- Room temperature ingredients: Butter, eggs, and buttermilk should all be at room temperature before mixing. Cold butter won’t cream properly and cold eggs can cause the batter to split.
- Press the cookie cutters firmly and straight down: Any angle in your cut will cause the rings to be uneven widths, disrupting the pattern. If using a paring knife, keep it perfectly vertical throughout the cut.
- Don’t skip the crumb coat: The crumb coat is what gives you that clean, professional final frosting layer. Skipping it almost always results in crumbs visible in the outer frosting.
- Chill between steps: If at any point the cake feels unstable during assembly, pop it in the fridge for 15-20 minutes to firm up before continuing.
You might also enjoy these Best Chocolate Chip Cookies for another classic crowd-pleasing bake.
Serving Suggestions
This cake is rich and satisfying, so modest slices go a long way. It pairs beautifully with simple accompaniments that complement the chocolate and vanilla flavors without competing with them.
The cake serves best at room temperature, so pull it from the fridge 30-45 minutes before slicing to let the buttercream soften and the flavors bloom.
- A scoop of classic vanilla ice cream alongside each slice enhances the vanilla notes and adds a pleasant temperature contrast
- Fresh strawberries or raspberries on the plate brighten up the richness of both the chocolate cake and the buttercream
- A drizzle of caramel sauce adds a warm, buttery depth that pairs wonderfully with the chocolate layers
- A dusting of powdered sugar or cocoa powder over the top adds a finishing bakery touch
- Serve with a cup of coffee or espresso to cut through the sweetness and highlight the chocolate flavor
- For a fun kids’ birthday spread, pair it with colorful sprinkles on the plates and a scoop of whipped cream
- A side of banana pudding makes a nostalgic and indulgent dessert table alongside this cake
Variations to Try
Once you’ve mastered the classic chocolate and vanilla version, the possibilities for this technique are genuinely endless.
- Red Velvet and Cream Cheese: Use a red velvet batter for one set of layers and a white cake batter for the other, then frost with cream cheese frosting instead of buttercream.
- Strawberry and Lemon: Tint a vanilla base batter pink with strawberry extract and natural food coloring, and flavor the other half with lemon zest and lemon extract for a bright, summery variation.
- Funfetti and Chocolate: Use the vanilla batter loaded with rainbow sprinkles (funfetti) for a festive birthday spin on the classic.
- Pumpkin and Spice: Swap one vanilla batter for a pumpkin spice batter in autumn and pair with a cinnamon cream cheese frosting.
- Matcha and Vanilla: Mix matcha powder into one set of layers for a stunning green and white pattern with a sophisticated flavor profile.
- Holiday Colors: Use gel food dye to color two vanilla batters in your chosen colors, perfect for Christmas (red and green), Halloween (orange and black), or 4th of July (red and blue).
For another fun and colorful baking project, try this Cake Pop Recipe to use up any leftover scraps.
Storage and Reheating
Proper storage keeps this cake fresh and the frosting intact between servings. Because this recipe uses a buttercream frosting, it stores particularly well in the refrigerator.
- Room temperature: The frosted cake can sit at room temperature in a cool environment (under 70°F/21°C) for up to 2 days. Cover it with a cake dome or wrap loosely with plastic wrap to prevent it from drying out.
- Refrigerator: Store covered in the fridge for up to 5 days. The buttercream will firm up significantly in the cold, so always bring slices to room temperature for 20-30 minutes before eating for the best texture and flavor.
- Freezer: Individual slices can be frozen. Wrap each slice tightly in plastic wrap and then in foil, and freeze for up to 2 months. Thaw overnight in the fridge or at room temperature for a few hours. The texture holds up remarkably well after freezing.
- Unfrosted layers: If you want to bake ahead, wrap the fully cooled, unfrosted cake layers tightly in plastic wrap and freeze for up to 3 months. Thaw in the fridge overnight before assembling.
Read Also: Easy Carrot Cake Recipe With Cake Mix
Nutritional Facts
The following values are approximate and based on 1 slice out of 16 servings from the full recipe, including buttercream frosting.
| Nutrient | Per Serving |
|---|---|
| Calories | 610 kcal |
| Total Fat | 30g |
| Saturated Fat | 18g |
| Cholesterol | 110mg |
| Sodium | 290mg |
| Total Carbohydrates | 82g |
| Dietary Fiber | 2g |
| Sugars | 60g |
| Protein | 6g |
Note: Nutritional values will vary depending on the exact brands and quantities of ingredients used. Reducing the powdered sugar in the buttercream or using a lighter frosting will lower the calorie count significantly.
For another beloved classic cake worth adding to your repertoire, explore this Boston Cream Pie.
Health Benefits of Key Ingredients
While this is certainly a celebration cake, a few of its core ingredients actually bring some genuine nutritional value to the table.
Enjoying treats made with quality whole ingredients, in reasonable portions, is always a smarter approach than reaching for ultra-processed alternatives.
- Eggs: Rich in high-quality complete protein, eggs also supply choline, which supports brain health and cognitive function. They help build the structure of both cake layers and contribute to the tender, moist crumb.
- Cocoa powder: Unsweetened cocoa is a rich source of flavanols, plant compounds associated with heart health and reduced inflammation. It also contributes iron and magnesium to each slice.
- Buttermilk: The mild acidity of buttermilk activates baking soda in the batter to help the cake rise. It also contributes a subtle tanginess, calcium, and helps keep the crumb tender and moist.
- Butter: Provides fat-soluble vitamins A, D, E, and K. Using real butter also gives the cake a richer, more complex flavor compared to shortening or margarine.
- Vanilla extract: Pure vanilla extract contains small amounts of antioxidants and contributes a complex, warm aroma that enhances the perception of sweetness without adding extra sugar.
You might also love this Fruit Tart Recipe for a dessert that leans a little lighter while still being impressive.
Frequently Asked Questions
1. Do I need a special checkerboard cake pan to make this?
No, you do not need a specialty pan. All you need are standard 9-inch round cake pans and two round cookie cutters: a 6-inch and a 3-inch. The rings are cut from the fully baked and cooled cake layers, then reassembled in alternating patterns to create the checkerboard effect. A checkerboard cake pan set with a divider ring can speed up the process, but it is absolutely not required for a beautiful result.
2. Can I use cake mix instead of making the batter from scratch?
Yes, you can use boxed cake mix for both the vanilla and chocolate batters if you want to save time. Prepare each mix according to the package directions and divide the batter between two pans each. The assembly method is exactly the same. The from-scratch version does have a more complex, homemade flavor, but a quality cake mix will still give you a delicious result.
3. Why did my rings fall apart when I tried to cut them?
The most common cause is cutting the rings before the cake has fully cooled. Even if the surface feels cool, the interior can still be warm, which makes the crumb fragile. Make sure your layers are completely at room temperature, ideally cooled for at least 1 to 2 hours after baking, or chilled in the fridge for 30 minutes. Using a very sharp, thin knife (or pressing firmly with the cookie cutter) rather than sawing will also reduce crumbling significantly.
4. How far in advance can I make this cake?
You can bake the individual cake layers up to 3 months ahead and freeze them, well-wrapped, until you are ready to assemble. The fully assembled and frosted cake keeps beautifully in the refrigerator for up to 5 days. For the best flavor and appearance, assemble and frost the cake 1 day before serving, as it gives the layers time to settle and the frosting to firm up for cleaner slices.
5. Can I make this as a smaller, two-layer cake?
Absolutely. Halve the batter recipes and bake one layer of each flavor in 9-inch pans, or use 6-inch pans for a taller but narrower cake. With a two-layer version you will only see the checkerboard pattern in half as many rows, so a four-layer cake is recommended for the most dramatic reveal. If you use 6-inch pans, adjust your cookie cutter sizes to a 4-inch and a 2-inch cutter to fit the smaller layers.
Read Also: Easy Chocolate Cake Recipe
Final Thoughts
A checkerboard cake recipe is one of those bakes that rewards you tenfold for the effort you put in. The moment you make that first slice and the crowd reacts, you’ll understand exactly why bakers keep coming back to this technique.
It teaches you skills that transfer to every other layered cake you’ll ever make: precise measuring, even baking, confident ring cuts, and smooth frosting technique.
Give this recipe a try for your next birthday, celebration, or just a Saturday afternoon project. You’ll be genuinely proud of what comes out of that oven.
Drop a comment below to let us know how it turned out, and share a photo if you’re proud of that checkerboard reveal. We’d absolutely love to see it!
Recommended:
- Classic Vanilla Cake Recipe
- Moist Chocolate Cake Recipe
- Carrot Cake With Cream Cheese Frosting
- German Chocolate Cake Bars
- Hot Fudge Cake
- Fruit Cocktail Cake
- Harvey Wallbanger Cake
- Amish Apple Cake
- Eggnog Cake
- Classic Pineapple Upside Down Cake


