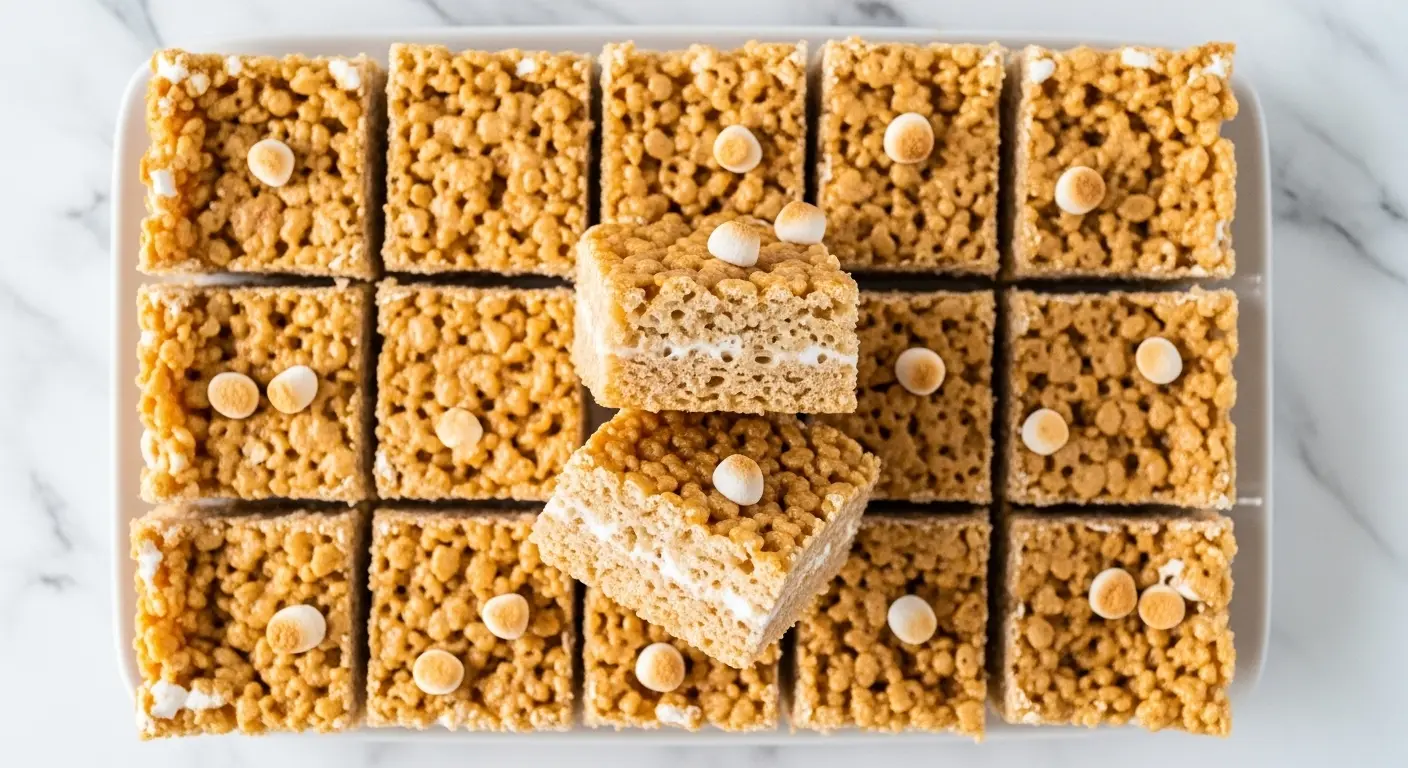
If you’ve ever made the classic version and thought “I wish these were just a little more gooey,” this rice krispie treat recipe with marshmallow fluff is exactly what you’ve been looking for.
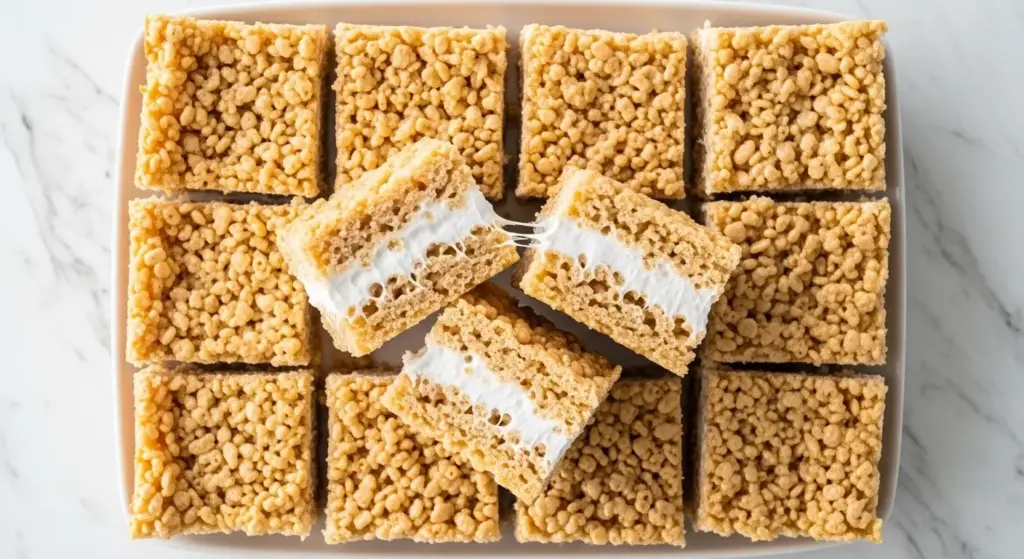
By adding marshmallow fluff (also known as marshmallow creme) alongside regular marshmallows, you get a treat that’s incredibly stretchy, extra sweet, and loaded with that iconic marshmallow pull in every single bite.
The combination might seem simple, but it makes a surprisingly big difference in the final texture.
Fluff stays soft even after the treats have cooled, which means no more hard, crumbly bars that feel stale two hours after you made them.
This recipe takes about 15 minutes from start to finish, uses just a handful of pantry ingredients, and comes out perfectly every single time.
You might also enjoy: Gooey Rice Krispie Treat Recipe
Why You’ll Love This Rice Krispie Treat Recipe with Marshmallow Fluff
This recipe has a loyal fan base for a reason, and once you try it, you’ll understand immediately why people keep coming back to it.
The marshmallow fluff is the star here. Unlike standard marshmallows, fluff incorporates into the mixture more smoothly, creating a more uniform coating on every piece of cereal.
The result is a treat that’s chewy and sticky in the best possible way, not dry or dense.
This is also one of the most beginner-friendly recipes out there. You don’t need a mixer, an oven, or any special baking skills.
If you can stir and spread, you can absolutely nail this recipe on the very first try.
It’s also endlessly customizable. The base is neutral and buttery, which means it pairs beautifully with mix-ins like chocolate chips, rainbow sprinkles, or a drizzle of peanut butter.
Here’s why this recipe is a keeper:
- Uses both marshmallows and marshmallow fluff for maximum gooeyness
- No baking required — just stovetop and pan
- Ready in about 15 minutes plus cooling time
- Easy to scale up or down depending on the occasion
- Holds up well at room temperature for several days
- Kid-friendly and crowd-pleasing every time
Read Also: Original Rice Krispie Treat Recipe
Ingredients
This recipe uses a double dose of marshmallow to achieve that extra-gooey texture everyone loves. Using both mini marshmallows and marshmallow creme gives you the best of both worlds: structure from the melted marshmallows and silkiness from the fluff.
- 6 tablespoons (85g) unsalted butter, plus more for greasing the pan
- 1 bag (10 oz / 283g) mini marshmallows, divided (reserve 1 cup / 50g for mixing in at the end)
- 1 jar (7 oz / 198g) marshmallow fluff / marshmallow creme
- 1/2 teaspoon vanilla extract
- 1/4 teaspoon fine salt
- 6 cups (168g) Rice Krispies cereal (or any puffed rice cereal)
You might also enjoy: Peanut Butter Rice Krispie Treat Recipe
Kitchen Equipment Needed
You don’t need much to pull this recipe off, but having the right tools on hand will make the process much smoother and prevent the mixture from sticking everywhere.
- Large heavy-bottomed saucepan or Dutch oven (at least 5-quart capacity)
- 9×13-inch (23x33cm) non-stick baking pan
- Silicone spatula or wooden spoon (a silicone spatula is preferred since it’s non-stick)
- Measuring cups and spoons
- Parchment paper (optional, but highly recommended for easy removal)
Read Also: Easy Rice Krispie Treat Recipe
Recommended Products for This Recipe
These are products chosen based on quality and performance, and each one genuinely makes a difference in how your treats turn out.
1. Jet-Puffed Marshmallow Creme
Jet-Puffed is the most widely available and consistently reliable marshmallow creme brand. It melts smoothly, has excellent sweetness, and blends seamlessly into the butter-marshmallow mixture without clumping. Using a good-quality fluff is what sets these treats apart from the standard version.
2. Nordic Ware 9×13 Non-Stick Baking Pan
A sturdy, high-quality baking pan with a non-stick surface makes cutting and removing your treats infinitely easier. Cheap or flimsy pans can warp and make spreading the sticky mixture difficult. Nordic Ware is a trusted brand known for even heat distribution and durable construction.
3. GIR Ultimate Silicone Spatula
Marshmallow is notoriously sticky, and a good silicone spatula will save you so much frustration. GIR’s spatulas are seamless (no crevices for sticky gunk to hide in), heat-resistant, and incredibly flexible. They’re a worthwhile investment for anyone who bakes or makes candy regularly.
4. Karo Light Corn Syrup (optional add-in)
A tablespoon of light corn syrup added to the butter-marshmallow mixture is an optional but fantastic trick for keeping treats softer longer. It interferes with crystallization and helps maintain that fresh-made chewiness for days. Karo is the classic, most trusted brand for baking.
Another favorite: Microwave Rice Krispie Treat Recipe
Step-by-Step Instructions
1. Prepare Your Pan
- Line your 9×13-inch (23x33cm) baking pan with parchment paper, leaving a few inches of overhang on each long side. This creates a “sling” that makes lifting the finished bars out of the pan very easy.
- Alternatively, lightly grease the pan with butter or cooking spray, making sure to coat the sides thoroughly.
- Set the prepared pan aside in a spot near your stovetop, since you’ll need to move quickly once the marshmallow mixture is ready.
2. Measure Out Your Cereal and Reserve Marshmallows
- Measure 6 cups (168g) of Rice Krispies cereal and add them to a very large mixing bowl. Set the bowl aside.
- From your bag of mini marshmallows, set aside 1 cup (about 50g) in a separate small bowl. These reserved marshmallows will be folded in at the very end to create those extra pockets of gooey, soft marshmallow throughout the treats.
- Having everything measured and within arm’s reach before you start cooking is crucial because the process moves fast once the butter and marshmallows hit the heat.
3. Melt the Butter
- Place your large heavy-bottomed saucepan over medium-low heat.
- Add 6 tablespoons (85g) of unsalted butter to the pan.
- Allow the butter to melt slowly, stirring occasionally. Do not rush this step by cranking up the heat. Too much heat at this stage can cause the butter to brown quickly, which will affect the flavor and color of your treats.
- Once the butter is fully melted and beginning to bubble gently at the edges, you’re ready for the next step. The key word here is gently: you don’t want a rolling boil.
4. Melt the Marshmallows and Fluff
- Add the bulk of the mini marshmallows (the entire bag minus the 1 cup you reserved) to the melted butter.
- Stir constantly with your silicone spatula, making sure to scrape the bottom and sides of the pan to prevent any marshmallow from scorching.
- Continue stirring over medium-low heat until the marshmallows are completely melted and the mixture is smooth, about 3 to 5 minutes.
- Once the marshmallows are fully melted, add the entire 7 oz (198g) jar of marshmallow fluff to the pan.
- Stir vigorously to combine the fluff with the melted marshmallow mixture until completely smooth. The fluff will make the mixture notably thicker and stickier. Keep stirring until there are no visible streaks of fluff remaining.
5. Add Vanilla and Salt
- Remove the pan from the heat entirely.
- Add 1/2 teaspoon of vanilla extract and 1/4 teaspoon of fine salt to the marshmallow mixture.
- Stir well to incorporate both. The vanilla adds warmth and rounds out the sweetness, while the salt is essential for balancing the intense sweetness of the marshmallows. Don’t skip either of these.
6. Combine with Cereal
- Working quickly (the mixture will start to firm up as it cools), pour the hot marshmallow mixture over the cereal in your large mixing bowl.
- Use your silicone spatula to fold the cereal and marshmallow mixture together, making sure every piece of cereal is coated.
- Fold gently rather than pressing or smashing. Overmixing at this stage can crush the cereal and result in dense, compact bars instead of light, airy ones.
- Once the cereal is evenly coated, add the 1 cup (50g) of reserved mini marshmallows to the bowl.
- Fold them in gently. These reserved marshmallows won’t fully melt, so they’ll stay as soft, pillowy pockets inside the finished treats.
7. Transfer to Pan and Press Into Shape
- Pour the cereal mixture into your prepared 9×13-inch (23x33cm) pan.
- Lightly butter your hands or use a piece of parchment paper to press the mixture evenly into the pan. Do not press too firmly — a gentle, even press is all you need. Pressing too hard compresses the treats and makes them dense and tough.
- Aim for an even, level surface across the entire pan. The mixture should be about 1 inch (2.5cm) thick throughout.
- If you’re adding any toppings (like sprinkles, mini chocolate chips, or flaky sea salt), now is the time to press them gently onto the surface.
8. Let Cool and Cut
- Allow the treats to cool at room temperature for at least 30 minutes before cutting. This gives the marshmallow time to set up and hold its shape when sliced.
- Once cooled, use the parchment paper sling to lift the entire slab out of the pan and onto a cutting board.
- Use a sharp knife or a bench scraper to cut the treats into squares or rectangles. For clean cuts, run your knife under warm water and wipe it dry between each cut. This prevents the blade from dragging and tearing the marshmallow.
- A standard 9×13-inch pan cut into a 4×6 grid yields 24 treats.
You might also enjoy: Single Serve Rice Krispie Treat Recipe
Tips for Success
A few key techniques make the difference between average bars and truly spectacular ones. Keep these in mind every time you make this recipe.
- Use low heat throughout. The biggest mistake people make is rushing the melting process over high heat. High heat scorches the marshmallows and butter, creating a stiff, caramelized base that makes hard, dense treats. Low and slow is the right approach every time.
- Don’t skip the salt. A quarter teaspoon might not sound like much, but salt is crucial here. It cuts through the intense sweetness and makes the flavor more complex and balanced.
- Fold, don’t smash. When combining the cereal with the marshmallow mixture, use a gentle folding motion. Pressing down hard flattens the cereal and creates a dense, compact bar.
- Butter your hands. When pressing the treats into the pan, lightly buttering your hands prevents the mixture from sticking to your fingers and helps you press more evenly.
- Add reserved marshmallows off the heat. Folding the reserved marshmallows in after the mixture has left the stove means they stay soft and pillowy, rather than melting away completely.
- Cut with a warm knife. Running your blade under warm water and wiping it clean before each cut gives you neat, even squares without any tearing.
- Press lightly into the pan. Just enough pressure to level the surface. Over-pressing = dense treats. Gentle pressure = light and chewy bars.
Read Also: Rice Krispie Treat Recipe with Large Marshmallows
Serving Suggestions
These treats are delicious on their own, but a few easy additions can turn them into a proper dessert spread.
They pair beautifully with a scoop of vanilla ice cream for a simple but satisfying dessert plate.
For a chocolate-forward pairing, serve them alongside a mug of hot chocolate for a cozy, indulgent treat combo.
Here are more ideas for serving and presenting these treats:
- Cut into fun shapes using cookie cutters for birthday parties or holiday events
- Dip the bottoms in melted chocolate and let them set on parchment paper for a chocolate-coated version
- Stack and tie with ribbon as an easy homemade gift or party favor
- Serve on a dessert board alongside no bake cookies and buckeyes for a crowd-pleasing spread
- Crumble over vanilla ice cream as a crunchy, sweet topping
- Drizzle with caramel sauce right before serving for a dressed-up presentation
Another favorite: Fruity Pebbles Rice Krispie Treat Recipe
Variations to Try
Once you’ve mastered the base recipe, the customization possibilities are almost endless. This is one of those recipes that takes really well to add-ins and flavor twists.
- Chocolate drizzle: Melt semi-sweet chocolate chips and drizzle over the cooled treats for a classic flavor pairing.
- Peanut butter swirl: Add 2 tablespoons of creamy peanut butter to the marshmallow mixture while it’s still warm and swirl gently before adding the cereal.
- Brown butter: Swap regular melted butter for brown butter to add a nutty, toasted depth of flavor that’s absolutely irresistible.
- Funfetti: Fold rainbow sprinkles into the cereal mixture right before pressing into the pan for a festive birthday-cake vibe.
- S’mores style: Mix in mini chocolate chips and crushed graham crackers for a s’mores-inspired treat.
- Salted caramel: Drizzle homemade or store-bought caramel sauce over the top and finish with a pinch of flaky sea salt.
- Vegan version: Use vegan butter and a plant-based marshmallow fluff substitute. Check out our Vegan Rice Krispie Treat Recipe for full guidance.
- Copycat Starbucks version: For a thicker, denser bar similar to the ones sold at Starbucks, see our Copycat Starbucks Rice Krispie Treat Recipe.
Read Also: Vegan Rice Krispie Treat Recipe
Storage and Reheating
These treats store really well at room temperature, which makes them ideal for making ahead. Proper storage is key to keeping them soft and chewy for days.
- Room temperature: Store in an airtight container at room temperature for up to 4 days. Place a sheet of parchment or wax paper between layers to prevent sticking.
- Refrigerator: You can refrigerate them, but cold temperatures make marshmallow firm and slightly tough. If you do refrigerate, let them come back to room temperature for 15 to 20 minutes before eating.
- Freezer: Wrap individual treats tightly in plastic wrap and store in a freezer-safe bag for up to 6 weeks. Thaw at room temperature for 30 to 45 minutes.
- To refresh: If your treats have hardened slightly, microwave individual pieces for 5 to 8 seconds. This brings back the soft, gooey texture almost instantly.
- Do not seal them while warm: Always let the treats cool completely before placing them in an airtight container. Sealing them warm traps steam and makes them soggy.
You might also enjoy: Muddy Buddy Recipe
Nutritional Facts
Based on a standard 9×13 pan cut into 24 equal squares. Values are approximate.
| Nutrient | Per Serving (1 square) |
|---|---|
| Calories | ~140 kcal |
| Total Fat | 3g |
| Saturated Fat | 2g |
| Cholesterol | 8mg |
| Sodium | 95mg |
| Total Carbohydrates | 28g |
| Sugars | 17g |
| Protein | 1g |
Note: Nutritional values will vary based on exact brands and portion sizes used.
Read Also: Monster Cookie Bars Recipe
Health Benefits of Key Ingredients
These are clearly a treat, not a health food. That said, a few of the ingredients do offer some modest nutritional value worth noting.
Here’s a quick look at what some of the key ingredients bring to the table:
- Butter provides fat-soluble vitamins like vitamin A and vitamin K2, and adds richness and satiety to each serving.
- Marshmallows and marshmallow fluff are primarily sugar and gelatin; gelatin contains amino acids like glycine, which some research suggests may support joint and gut health in small amounts.
- Rice Krispies cereal is a good source of several B vitamins including niacin, riboflavin, and folic acid, which support energy metabolism and cell function.
- Salt in small amounts helps maintain proper fluid balance and supports nerve function.
- Vanilla extract contains vanillin, a compound with mild antioxidant properties.
Another favorite: Dirt Pudding Recipe
Frequently Asked Questions
1. What is the difference between marshmallow fluff and regular marshmallows?
Marshmallow fluff (also called marshmallow creme) is a spreadable, whipped version of marshmallow that doesn’t firm up as solidly when cooled. Regular marshmallows contain gelatin and firm up significantly as they cool. Using fluff in addition to regular marshmallows creates a stretchier, gooier texture in the finished treats because the fluff never fully sets hard.
2. Why are my Rice Krispie treats hard and not chewy?
Hard treats are almost always the result of one of two things: cooking the marshmallow mixture at too high a temperature, or pressing the mixture too firmly into the pan. High heat causes the sugar in the marshmallows to caramelize and harden as it cools. Pressing too hard compresses the cereal and reduces airiness. Keep the heat low and press gently, and your treats will stay soft and chewy.
3. Can I make this recipe ahead of time?
Yes, this recipe is great for making ahead. You can make the treats up to 2 days in advance and store them in an airtight container at room temperature. For the best texture, keep them at room temperature rather than refrigerating them, as cold temperatures cause the marshmallow to firm up. If making more than 2 days ahead, freeze individual wrapped treats and thaw at room temperature for about 30 to 45 minutes before serving.
4. Can I double this recipe?
Absolutely. Simply double all the ingredients and use either two 9×13-inch (23x33cm) pans or one half-sheet pan (18×13 inches / 46x33cm). Keep in mind that a larger batch of marshmallow mixture may take slightly longer to melt and combine, so be patient and keep the heat low throughout.
5. Can I use a full bag of marshmallow fluff instead of a combination?
You can, but the texture will be different. Using only fluff (without regular marshmallows) creates a very soft, almost sticky treat that may not hold its shape as cleanly when cut. The combination of both regular marshmallows and fluff gives you the best balance of structure and gooeyness. If you prefer a softer, stickier result, you can increase the amount of fluff and reduce the regular marshmallows by an equivalent amount.
This pairs perfectly with a glass of cold milk or alongside some peanut butter cookies for a proper dessert spread.
Final Thoughts
This rice krispie treat recipe with marshmallow fluff is one of those recipes that sounds simple but genuinely delivers something special.
The double marshmallow approach creates a treat that’s gooey, stretchy, and stays soft far longer than the classic version, making it the ideal recipe for bake sales, parties, gifting, or just a Tuesday afternoon snack.
Whether you keep it classic or load it up with chocolate, sprinkles, or a peanut butter swirl, this base recipe is reliable, repeatable, and absolutely delicious every time.
Give it a try this week, and when you do, come back and leave a comment below telling us how it went! We’d love to hear your favorite mix-ins and variations too.
Recommended:
- Original Rice Krispie Treat Recipe
- Easy Rice Krispie Treat Recipe
- Peanut Butter Rice Krispie Treat Recipe
- Fruity Pebbles Rice Krispie Treat Recipe
- Gooey Rice Krispie Treat Recipe
- Microwave Rice Krispie Treat Recipe
- Single Serve Rice Krispie Treat Recipe
- Rice Krispie Treat Recipe with Large Marshmallows
- No Bake Cookie Recipe
- Cake Pop Recipe